If you want to protect your mobile phone or tablet from damage and scratches, you definitely need cover made of rubber bandsMoreover, it can be done with your own hands, and the creative process is always associated with a fun pastime. Give this task to the children, because now every first-grader has their own mobile phone, and children need to be taught to take care of things and equipment from early childhood.
We should also draw your attention to the convenience of a rubber band phone case .
The first thing to note is its resistance to abrasion; the rubber product will serve you well for many years, because it will not tear or wear out.
The product is also easy to care for, even if you spill sticky liquid on it, just rinse it in warm (but not hot) water and dry it, and it will be ready for use again.
Thanks to the rubber case, the phone will never fall out of your pocket, and its bright colors will prevent the device from getting lost on the sofa or between the pillows.
We hope that after you have woven a keychain, they are now much less likely to get lost, and you no longer waste time searching for them around the house.
It will reliably protect the device from any external damage, for example, if you carry the tablet in a bag, it will never be scratched by keys or other metal objects. And even if the phone accidentally falls out, the rubber shell will protect it from impact.
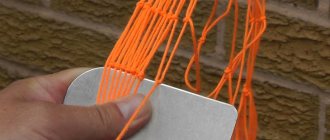
Phone case made of rubber bands
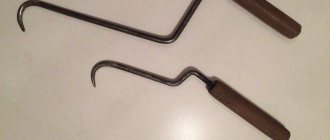
There are several options for how to weave a phone case from rubber bands : you can use a machine as for weaving various wide bracelets, or you can get by with just a crochet hook, which can also be used to make various complex products.
Some products are designed in such a way that the screen, charging and earphone output, and camera window remain open. This case can be worn without taking it off, but you can crochet a whole case.
It can easily be made to any size, so you can protect both a small mobile phone and a tablet with a large display.
One-piece cases are usually woven using crochet, but on a loom it is convenient to make a product with holes for charging and a camera. You can find a video tutorial on how to make a phone case from rubber bands to compare both options and decide which product you like better.
The cover made from rubber bands on the machine turns out bright, but you can use any colors. It will also be a wonderful gift for a man or boyfriend if made with black rubber bands. Children can make such a present for their dad on February 23rd.
While children are busy weaving from rubber bands, mothers can learn a new type of needlework for themselves - knitting an original case from beads or beads. The product is also crocheted, but this requires more skills than when working with elastic bands.
The case should fit tightly to the phone, so it should be knitted based on individual parameters. You need to measure its circumference; you can do this with an already woven chain, where the links should be slightly stretched.
Before you start weaving, you need to prepare all the materials: place the elastic bands on the work surface, pick up the hook. As you can see, we need a modest set of tools and materials for this DIY craft. But the number of rubber bands depends on the size of your electronic device.
How to make a cover from rubber bands
At the first stage of weaving, we need to make a simple chain, knit a control sample consisting of 15 links in order to use the chain to determine how many links there should be in a circle.
Now let's weave a chain: we put a ring on the hook in two turns, with the tip of the hook we hook the tip of the next elastic band and pull it through two turns, holding its second tip with our fingers. Now place both ends on the hook, hook the tip of the next one and also pull it through two loops from the hook.
Thus, you need to form a chain of 15 links, and then wrap the resulting sample around your phone or tablet. The end and beginning of the chain should be connected; if necessary, continue weaving by adding a few more links.
Don't forget, this was our control sample, and when you knit a chain that will be equal to the circumference (that is, it can wrap a phone), we will count how many links there are in the chain, determine how many rubber bands we use.
For example, if you are deciding how to make a case from rubber bands , you should know that you should weave a chain with 22-24 links. Now you need to count half of the rings - 11.
Hold the middle with your fingers or insert the hook and release the remaining links.
Now we are left with a chain with 11 rings and two loops on the hook. You can move on to the next stage of weaving.
How to weave a cover from rubber bands
At the next stage, how to weave a cover from rubber bands , we need to count the second loop from the hook: there will be a zero loop on the hook, the next one will be the first one, the next one will be the second one we need.
We thread the tool into this loop, pull one ring through, now we have four loops through which we will pull another ring. This second loop must be knitted twice (repeat all steps).
We knit each loop as if we were doing a single crochet stitch.
After we have knitted this loop three times, we can move on to the next one: we knit it once, like all the subsequent ones, except for the last one, which we will not knit for now. Finally, we have reached the last loop, which also needs to be knitted three times, so that we have a rounding on each side.
We started knitting our cover from elastic bands from the bottom. When we have completed the last loop, we can move on to the next side. Again, you need to move one loop away from the tool, insert the hook into the second loop and knit it, but only once, unlike the previous row.
When we reach the rounding, we need to knit a little differently: stretch the ring, but not only through the loop of the main fabric, but also through those two eyes that are put on the tool, and then throw it over the hook and the second “eye”.
At this step we have finished making the bottom for our little case. Now you see that on each side we have 11 loops, which will be the walls of our case, the place of rounding will be the side walls.
As you can see, in this way you can quickly make a case of any size, even for a laptop, if necessary.
This method of weaving a cover from rubber bands gives more scope for imagination, since there is no attachment to the number of pins on the machine, and the weaving can be of any size, for example, you can make a cover for a vase and a candlestick.
How to weave a cover from rubber bands
If you decide how to weave a cover from rubber bands , then be sure to make it multi-colored, combining several colors. It is desirable that the strip of each color consist of several rows.
Moving on to the next row, you should perform a “lifting loop”; to do this, you need to thread another elastic band through the loops, after which you need to start the next row; if desired, it can be a different color.
To calculate the number of rings of each color that are needed for each row, you should multiply the number of loops in the circle by two, because for each loop in the row we use two rings.
Therefore, we can make simple mathematical calculations for our case, since we have 22 loops in the circle, then for each row we need to prepare 44 rings of each color. If you have a minimum number of irises left of a certain color, it is better to count their number before starting the next row, so that you do not have to unravel the row when you do not have enough irises.
In the process of how to weave a cover from rubber bands, there is no need to make any increases in the row, since we should get a straight “bag”.
Completing the first row of the wall, we will return to the lifting loop of the previous row; it must also be knitted in a special way. We skip the instep stitch and insert the hook into the first stitch of the same color.
We pull the iris into it and into two loops on the hook. Next, there should again be a lifting loop to move to the next row, using a different color.
So we will move on, knitting them in a circle until the height of the walls becomes equal to the height of our mobile phone.
It remains to finish our product, for this we will use a “half-column”, i.e. For each loop we will use only one iris: we pull it through the loop of the row and through two loops that are draped over the hook.
The final part of the work on creating the case
How to weave a phone case from rubber bands? As a final step, you need to perform a few fairly simple steps. You need to pull the loops into each other. You will need to start performing this action approximately two circles before the end of the weaving process. Try to stretch them through each other. After this, secure them so that they do not fall down or become untied. In one place you will need to tie the elastic bands using a Loom Band. It is necessary to observe the given shade. After this, you can, without fear, begin to remove material from the posts using a hook. At the same time, you must carefully try to straighten the resulting product with your fingers.
We weave a phone case from rubber bands: photo master class
Adults and children now have mobile phones. These gadgets allow you to stay connected and therefore are incredibly popular. Every mobile phone needs a case.
It will not only protect the device from various types of mechanical damage, but also make it stylish and bright.
Today we will conduct an interesting master class especially for all mobile phone owners, in which we will tell you in detail how to weave a phone case from silicone rubber bands.
Learning how to make a cover on a machine
First, prepare all the materials and accessories necessary for needlework:
- machine without a central row;
- elastic bands of light green, dark green and bright pink;
- hook;
- scheme.
At the beginning of the master class, you need to install the machine correctly. The notches in the front rows should face to the right, and those in the back rows should face to the left. After this, sketch out the light green details diagonally. Grab the resulting crosses with a hook, 3 pieces each. and secure with a loop, as in the photo.
Fill the gap between pieces on every third column. To do this, the rubber bands are arranged in a figure eight. At the next stage of the master class, string a row of dark green elastic bands in a circle. After this, the bottom layer is dropped to the center.
Alternate dark green and light green stripes up to the 18th row. Then all actions are repeated until the 11th row. After each layer removed, a new color is added to the weave - bright pink.
This craft made from rubber bands is woven strictly according to the pattern. Finally, remove the structure from the machine.
How to make a case using a crochet hook
For those who are more comfortable working with crochet, we suggest studying another lesson with a step-by-step description of the technique. You will need:
- silicone rubber bands;
- hook.
Screw the first iris onto the hook 2 turns. Then take 1 more element and pull it through the resulting loop. Make a chain using this pattern. The size depends on the mobile model.
To find out if the chain woven from rubber bands is long enough, attach it to the device. If the ends are not connected, then you need to knit a couple more links.
In the woven chain, pass the working tool into the 2nd loop from the edge.
Please note that when counting, the loop on the hook is not taken into account! You need to pull 1 ring into this loop so that there are 4 loops on the tool. One more elastic band is inserted into them.
Actions are repeated according to this pattern. Each loop is woven with single crochets. The first loop in the row is knitted 3 times, and the rest one at a time. The last loop is also knitted three times.
When the first side of the cover is ready, proceed to the other. To do this, skip 1 loop, insert the hook into the 2nd and knit it once. The entire second side is performed according to the scheme of the first. Having reached the curve, connect both halves, as in the photo.
A bottom has formed. To make the cover bright, the next row can be woven from blue elastic bands. Before starting weaving, move all the parts on the hook through 1 more elastic band. For this row we will use a pair of elastic bands for each stitch.
To ensure that the cover is straight, no increments are made at this stage. At the end of the first color row we return to the lifting loop of the previous row. This loop is skipped and the hook is inserted into the first loop of the same color.
A new elastic band is pulled into it, as well as a pair located on the hook. After this, a lifting loop is woven and a transition to a row of a different color is made. Weaving from elastic bands according to this pattern continues until the desired length.
At the end of the master class, close the loops. To do this, make the last row with a half-column: one piece is pulled through the loop of the row, as well as a pair on the hook. The last loop is fixed with a knot. Extend the resulting “tail” on the knot using another elastic band and hide it on the wrong side. The case can be decorated with a keychain or pendant.
This weaving pattern is used not only for a mobile phone case, but also for a laptop or TV remote control.
Video: Options for weaving a mobile case
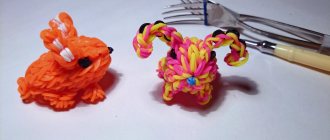
Pikachu
Pikachu weaves on a machine. Each working ring consists of a pair of rubber bands.
- Head. The head is typed from the upper central column. One loop diagonally to the right, two down and one to the left. The second side is performed symmetrically. 3 pairs of elastic bands are put on in the center. Inside the head is strengthened by two triangles.
- Eyes. They can be made from beads or black rubber bands.
- The ears are crocheted separately and connected to the head.
- Body. The transition from head to body is made with one triple loop. Next, the torso is assembled: a pair to the right diagonally for the shoulders, 3 pairs of elastic bands down, one pair to the left and down to round the torso. The left side is typed in the same way. Four pairs of elastic bands are collected down the central row.
- The tail is made of three pairs of elastic bands, is buried in a quadruple loop on the last column and is braided to the body.
- The legs (front and back) are made from five pairs of elastic bands and are closed with a triple loop on the last post.
- The front paws trail from the left row and are transferred to the figure’s shoulders.
- The hind legs trail to the body and spread to the opposite right column.
- At this stage, the body of the figure is assembled.
- Head braiding. In the process of working with the right and left edges of the head, cheeks made of red rubber bands are added. The last loop of the head is secured with a single loop.
- The figurine is carefully removed from the machine.
Idea: These figures can be used to decorate cocktail straws at themed parties.
Rubber band phone case: loom and crochet weaving
A rubber band phone case is a product every little girl dreams of. After all, you must agree that this beautiful, interesting, and most importantly, completely unique accessory will not go unnoticed among people. Before you start creating this cute accessory, it’s worth learning some of the subtleties of weaving.
Subtleties of work
The case is, of course, a magnificent thing. But how to weave a phone case from rubber bands in such a way that it fits a little princess? In fact, there is almost nothing complicated or unusual about this - any child can cope with this goal on his own, unless, of course, he is very small.
Learning how to make phone cases is not at all difficult; the most important thing here is to have the desire and skills. A couple of useful recommendations - and a delightful unusual accessory in your pocket.
Basic inventory
Remember that for such an important task as weaving, first of all, you need to stock up on great patience. After all, this will take a lot of time - the result of the work will not appear immediately. After all, weaving a product from rubber bands is a rather painstaking task. What you will need for work :
- First of all, to make it you need to decide on the pattern and weaving method.
- Then you should get those very bright elastic bands - the basis of your product. There should be a lot of them - at least 1000 pieces.
- In addition to the irises, you will need the weaving pattern itself, depicted on a piece of paper (with it it will be easier to cross out what has already been completed), and, of course, the tool itself for making a masterpiece.
- You cannot weave a cover on your fingers, so you will need to take care of purchasing a working machine or hook. Of course, you can try to weave a product for a mobile device from rubber bands on a slingshot, but this will simply be a waste of your time.
Weaving baubles from floss: patterns for beginners
Ways to weave a cover
Weaving from elastic bands, phone case. There are completely different methods of weaving rubber bands from Rainbow Looms - it all depends on the type of craft and the skills (and also age) of the manufacturer. But if you want to make a cover, then there are only two simple and interesting ways to weave :
- On the machine . This method, of course, gives a more serious range for the flight of imagination, since it makes it much more fun to change both the entire pattern and the shape. Many patterns that you can use and a large number of patterns will delight you.
- Crochet . Here, of course, there will be several times fewer options, but if you have good skill, you can make a delightful and beautiful case for your mobile device from rubber bands.
Working on the machine
Many people think about how to weave a phone case from rubber bands on a machine. With a set of materials, a machine and a little effort, you can create a unique thing. It’s not at all difficult to do such a thing on a machine. On the columns of the machine (top and bottom row) each one is placed under one figure eight.
The main goal is to ensure that the output comes out with crosses that occupy the entire perimeter of the instrument.
Stages of work:
The first lower column and the second upper one will be entwined with the first iris. The next one will catch on the second lower peg and throw itself onto the first upper one. Then everything is simple - untwisted rubber bands are put on suitable pairs of pegs in the bottom row.
A small bonus - accessories
The most standard case can always be distinguished from other similar products with the help of accessories. Various patterns are great and bright, but a product, for example, with a bright flower made of rubber bands will look much brighter. In order to make it, you won’t need much time and rubber bands. This product will use somewhere around 15 rubber bands. The weaving itself takes place using a slingshot, since the flower will be quite small.
An elastic band is screwed onto one fork horn in three rows. Then two irises are placed on both horns, and the triple elastic is removed from the bottom to the center of the double. Then the double elastic band is removed onto the opposite horn. Everything is repeated five times. Thus, on one of the fork horns there are five double elastic bands with an inner row of triple wound ones. After this, another iris is put on both horns, and all the elastic bands from the horn are removed from the center. It turned out to be an elastic band on the horns, and a flower in the middle. The end of the connecting elastic is pulled out, threaded through the other. That's it, all that remains is to straighten the petals - and the flower is ready. You can put it on the case while weaving - and you will get a wonderful accessory.
In the same way, you can decorate your future phone case made of rubber bands with a variety of stars, figures - anything you want to stand out with.
Rubber band cover: video tutorials
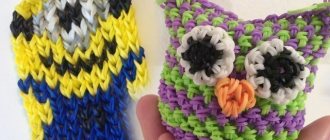
In recent years, knitting various products from multi-colored elastic bands has become very popular. Children and adults, as a rule, create cute jewelry, funny figures, keychains and the like from this inexpensive material.
However, from them you can knit not only a beautiful, but also a practical, useful thing, for example, a case from small bright elastic bands: video tutorials, photos and detailed instructions for creating such an accessory are presented in this article.
Let's look at video tutorials on how to weave covers from rubber bands with your own hands
According to most lovers of weaving from rubber bands, it is most convenient to weave covers on a special machine. However, if for some reason you don’t like this method, it seems inconvenient, or you simply don’t have this tool at hand, then the cover can be knitted without a machine.
This video shows a step-by-step master class on weaving a cover on a hook. The presented one is quite simple, despite this the resulting product looks impressive.
[media=https://www.youtube.com/watch?v=ZK8UPj4YTLk]
You can decorate not only your phone or some other gadget with a case. For example, on forks you can weave an original and bright decoration in the form of a pen or pencil case. To find out how to do this, just watch the video below.
- We also suggest you visually see the method of weaving phone cases from rubber bands on a machine in the following videos.
On the machine.
Phone cases are not only designed to decorate gadgets; first of all, they protect them from scratches and other damage. This accessory made of rubber bands copes with this task perfectly, while making your usual phone bright and eye-catching.
Happy owners of popular “Apple products” can weave a bright case for iPhone 5, 6 and 7 from rubber bands on a machine; using the same principle, you can make “clothes” for other phones. We will tell you in detail how to do this.
Let's prepare the materials needed for weaving:
- machine;
- elastic bands of two colors (about 500 pieces each);
- hook.
We only need two rows of the machine; we remove the central one. As for the color scheme, there are no strict rules in this matter. In the instructions we describe how to weave a cover in two colors, but if desired, you can make it a single color or use a larger number of colors.
Progress:
- We start by weaving the base. We take an elastic band of the first color, throw it in a figure eight on the second near column and the third far one. We throw the second one on the third near one and the second far one. In this way, we throw three more pairs of elastic bands onto the next columns. We leave two parallel columns without elastic bands (there will be a hole for charging), then we add 4 more pairs.
- Using elastic bands of the same color, we throw the next row of eights from the second near to the second far, from the third to the third, etc.
- We throw elastic bands of the second color sequentially in a circle (without twisting them in a figure of eight) - from the second closest to the third, from the third to the fourth, etc.
- We throw the elastic bands of the first color inside onto the elastic bands of the second color.
- We throw on a layer of elastic bands of the first color, as in the first row, and throw the previous row of elastic bands inward.
- We attach the next layer of elastic bands of the second color around the perimeter, remove the previous row inward.
- We throw the next row in the same way as the previous ones.
- To make a window for the screen, we do not touch the two columns on the right, we hook the bottom elastic band from the third, and throw it over the 4th column. Repeat until the third column at the end of the row.
- From the fourth column and the next four we throw all the elastic bands inward.
- We continue to string new rows, starting from the third column on the right; we do not use empty columns.
We knit 14 rows, then use empty columns, knit two more rows. - For the hole for the camera, leave two empty posts. We knit two rows.
- We throw elastic bands on the machine in cross figure eights, as well as eights on opposite sides, and throw off the elastic bands of the bottom row.
- The work is finished, the case is ready.
- Using the described principle, you can weave covers from rubber bands using a machine for other phone models, increasing or decreasing the number of rows, depending on the size of the gadget.
- If you don’t make a window for the screen, but continue to knit in the round, you will get a case - a handbag, as in the photo below.
This product looks beautiful and neat, it reliably protects the phone screen. It can be used as a case for headphones, a key holder, a pencil case and pens.
Weaving from rubber bands: crochet phone case with diagrams and video
Phone case made of rubber bands - photos, diagrams
How to make an original phone case with your own hands? Have you tried making a Rainbow Loom phone case? No? We will teach you how to make cool mobile cases from rainbow rubber bands.
Mobile phones have become so small and fragile that they can break very quickly. And to prevent this from happening, we suggest protecting your phone with an original and stylish phone case made from Rainbow Loom rubber bands.
You can make the most unusual things from colored rubber bands - bracelets, figurines, keychains, rubber band wallets and even phone cases. It's time to replace your regular silicone case with an original rubber band phone case. And we will tell you how to make such a case.
You can weave a rubber band case with an interesting pattern, with stripes, diamonds, a plain or multi-colored rubber band case for your phone.
Why do my eyes hurt after welding: what to do about it?
About the material
The inventor of this type of creativity, such as weaving from colored rubber bands, is Chong Chun Ng. His daughters loved to weave various baubles, but they weren’t very good at it. Then their father came up with a device that greatly facilitated the weaving process.
This man's technical background allowed him to bring the Rainbow Loom weaving machine to life. Initially, it was a small platform made of boards with nails driven into it. The bracelets for his daughters, woven by him on a loom, were liked by those around him.
Then Chong decided to reveal his invention to the whole world and made a patent.
The first batch of weaving kits sold very poorly. But Chong did not give up, he asked his daughters to help and film the weaving process on his machine. This is what gave a big boost to sales of his invention.
Weaving from rubber bands has taken over the whole world. People of all ages create bracelets, accessories, toys, and small souvenirs from rubber bands. Weaving clothes from this material has become a new trend.
It may not be comfortable to wear, but it arouses great interest among others.
Subtleties you need to know to weave a phone case from rubber bands
The case is, of course, a wonderful thing. But how to make a phone case from rubber bands so that it is worthy of a little princess? In fact, there is absolutely nothing incredible or difficult about this - any girl can handle this task on her own, unless, of course, she is very small.
Learning how to weave a phone case from rubber bands is not at all difficult, the main thing here is to have the desire and skill. The desire is most likely in perfect order, but problems may arise with the ability. But this can also be fixed: a few useful tips and you’ll have a chic, exclusive accessory in your pocket.
Working techniques
Rainbow Loom sets are a large number of elastic bands and special tools for weaving, collected in one box.
Crocheting rubber bands is called lumigurumi. It is usually performed in circular rows. This technique allows you to create voluminous toys and quite large things - cases for phones and tablets, clothes for dolls and people. Almost anything that can be created with a hook and thread can be made with rubber bands.
Read this: How to weave a feather from rubber bands: making a stylish bracelet and keychain
The work does not always use the standard tools included in the Rainbow Loom set. They usually work on a hook, on a slingshot and on a rainbow machine. Some needlewomen have come up with new weaving techniques using other tools:
- Comb;
- Table forks;
- Pencils;
- Fingers.
This means that you can weave beautiful crafts even without a machine.
How to make a phone case with your own hands?
Making a stylish cell phone case requires patience. Unlike small products, the result of weaving will not be noticeable immediately: you will have to spend a little time. In addition, to create a case you need
- on average about 1000 irises;
- a diagram drawn on paper (on it you can cross out the completed rows);
- device for weaving (loom, hook).
As for the last point, it is more convenient to make a phone case on a machine from which the middle row of columns is removed, and in the outer ones there remain 12 cylinders with a recess outward. For those who like to crochet lumigurumi, there are also special patterns. But forks, slingshots and fingers, unfortunately, will not be enough for such a product.
What can you use to assemble an electric generator with your own hands?
Case-bag
The simplest configuration of a phone case is a pouch case. It is a handbag in which the phone is placed horizontally or vertically.
Such a product will reliably store the device from damage and contamination. A remarkable property of a rubber cover is that it can be washed. Simply remove the cover and wash in soapy water.
And if you get tired of it, it’s easy to change the configuration or color scheme.
Thanks to the large palette of colors of elastic bands, you can make several outfits for your phone that will harmonize with your handbag or clothes.
We suggest you use detailed step-by-step instructions for making a cover in the form of a pouch on a hook.
The initial stage of making a cover is weaving a chain of rubber bands. Its length is equal to the size of the phone plus a slight increase so that it can fit comfortably inside.
This is done as follows. An elastic band twisted in a figure eight is placed on the hook. The second rubber band needs to be pulled through the first and its loops hung on the hook.
Continue threading the elastic bands until you get a chain of the appropriate length.
Knitting the bottom is done by weaving the initial chain in a circular manner. First you need to make a lifting loop, that is, just cast on another loop of the chain. Next, the hook is inserted into the third loop from the one hanging on the hook.
Pull the elastic through the loop of the starting chain and hang the ends on the hook. There will be four loops on the instrument. Pull another elastic through and drop these loops onto it. Continue braiding the initial chain on both sides.
Connect the first and last stitches with an elastic band. The bottom is already ready.
Read this: Rubber Toys for Beginners: Interesting Techniques
The rest of the weaving is done in circular rows. At the beginning of each row, a lifting loop is made; at the end, the loops are connected with an elastic band. Having achieved the appropriate size of the cover, the weaving needs to be completed.
To do this, hook the last two loops through each other and tighten with a knot. Decorate your phone case with various charms.
During the weaving process, you can use elastic bands of various colors and make original clothes for your phone.
Equipment for weaving a cover
Keep in mind that for such a serious matter as weaving, first of all you need to have a lot of patience. After all, this will take some time - the result will not appear instantly. After all, weaving a phone case from rubber bands is quite a labor-intensive task.
First of all, to create it, you need to decide on the pattern and method of weaving. Then get those very rainbow rubber bands - the basis of our case. There should be a lot of them - at least a thousand pieces.
In addition to the irises, you will need the weaving pattern itself, drawn on a sheet of paper (it will make it easier to cross out what you have already done), and, of course, the device itself to create a masterpiece.
You cannot weave such a thing on your fingers, so you will need to ensure that you have a special machine or hook. Of course, you can try to weave a phone case from rubber bands on a slingshot, but this will simply be a waste of time.
Bumper case
This type of case is a frame-shaped package for the phone. It is great for smartphones or touch devices. The screen remains open.
When making a case, you can immediately weave a hole for the camera and charger.
From this step-by-step master class you will learn how to weave such a case for a smartphone. To perform this work, a Rainbow loom machine is used. It is a plastic platform with removable pins. Each pin has a small recess designed for easy access of the hook to the loops of the weave. So, to get started, take:
- Rainbow machine;
- Multi-colored elastic bands;
- Hook.
To begin, dismantle the middle row of the machine. The notches of the remaining columns should face away from each other. The first row is performed by stretching rubber bands twisted in a figure eight over columns. You need to start from the second pin of the bottom row.
Cast a loop, twist the elastic and put it on the third pin of the top row. Repeat this operation with the top row. The machine produced the letter X. You need to make four such weaves, then skip a couple of columns to form a hole for charging, and make four more letters X.
In the second row, elastic bands are strung in figures of eight on each pair of columns of both rows. In the third row, you can change the color of the woven rubber bands. You need to throw them on each column of both rows. Crochet a pair of elastic bands of the same color from each post.
Pull the elastic bands back over each post and remove the bottom row of stitches. Repeat the weaving pattern with changing colors three times.
Read this: Wicker weaving for beginners: video tutorials of varying difficulty
To make a window, you need to remove the loops from the five central columns of the bottom row to the center. Next, the elastic bands are cast on without these rows and the lower loops are dropped.
You need to weave 15-16 rows, and then cast on loops for each free column. Start weaving full from the third column. Continue working to the desired size.
Depending on the size of your phone's camera, skip one or two columns.
The completion of the weaving is done in the same way as the beginning - type the letters X, and then connect the columns in pairs with elastic bands. Discard the bottom row. Transfer the loops from the posts of the top row of the machine to the bottom ones. Pull them through each other and drop them. The smartphone case is ready.
What is Rainbow Loom
Let's start with the history of this game. Rainbow Loom is actually the name of the machine, not the rubber bands themselves. This device was invented by Chong Chun Ng in the USA (Michigan). This Malaysian immigrant carefully watched his daughters as they weaved rubber bands into various ornaments. He decided to simplify their task and, with the support of his wife, created a special machine. Initially, it looked like a wooden board with nails driven in, and the role of a hook was played by a dental instrument. Chong found the invention extremely interesting - and he decided to introduce it to the toy market.
The inventor hired a toy company that began producing machines. Contrary to the author's expectations, the game was not very popular, and the project threatened to fail. Suddenly, Chong found a way out - he created a video channel on which his niece showed how to make various crafts using rubber bands and a machine. The videos helped attract interest from potential buyers - and the rubber business took off.