I will describe in detail the process of making the so-called rough mold using the example of a conventional doll head. The list of necessary tools and materials for making a gypsum mold for slip casting is described here>>.
So let's begin. I sculpted a certain head out of clay, from which it is necessary to obtain a working mold for casting.
To make a working form, we need a plaster model, but we only have a clay sketch. To obtain a plaster casting and bring it to a state suitable for making a working mold, a rough mold is used.
Why can’t you immediately make a working form using a clay or plasticine model?
Simply because neither clay nor plasticine can be processed as perfectly as a plaster surface. There will always be dents, bumps, and scratches. It is very difficult to achieve a smooth polished surface on clay or plasticine. And the model must be perfect, without defects, otherwise every defect will be printed on the mold and replicated in castings. And on each casting, this defect will have to be eliminated manually, which will take much more time than making a high-quality model once.
The second reason is to get the model in a hard, durable material so that if the mold wears out or gets damaged, it can be restored, and clay and plasticine are not such materials. Therefore, we need a temporary “rough” mold as an intermediate element for making the master model.
Before you begin the molding process, you should carefully review the model to determine how to most efficiently divide the mold into parts. Unlike the working form, the rough form can have a minimum of parts, even if it forms small locks. If necessary, it can then be split.
Having visually assessed the model, I decided to limit myself to making a two-piece mold, despite the minor locks (jams) that form later.
After a visual assessment, we need to clearly determine the most prominent line of our model along which the division of the form will take place. It is quite difficult to accurately determine it by eye, but there is a very simple and accurate way that clearly shows the place of division. To do this, we install the model on a sheet of glass and secure it with pieces of clay, as shown in the photo below.
After the model is firmly installed, take a square or a wide ruler and rub its end with a chemical pencil.
It is advisable to use a wooden square, it rubs better. I didn't have a wooden one, so I took a plastic ruler. Having rubbed its end, we apply it perpendicular to the base surface with the rubbed edge and draw it along the established model.
The ruler will leave a mark on the surface of the model in the most protruding place.
And so on around the entire circumference of the head. We get the exact division line.
Next you need to decide on the overall dimensions of the form. The rough mold can be quite thin, as it is not intended for slip casting. Therefore, we will try to keep the wall thickness to a minimum. And given the fact that subsequently the mold will have to be cut, the extra centimeters of thickness will only complicate the process.
Having estimated the dimensions, we begin the process of formwork formation. We cover it with clay along the protruding line. Precisely with clay, and not with plasticine, as I sometimes saw online. Why clay, I told in the previous article.
We gradually form the base of the formwork around the entire circumference.
We will have a sprue on the side of the neck, so we leave it there without any casing. After the base is ready, you need to install the formwork walls. In flat places we use pieces of glass, and in the rounded part a piece of plastic from a bottle.
All walls are thoroughly fixed with clay.
When the formwork is installed, you can begin pouring gypsum. For the rough form we use construction plaster G-5. Pour 1/3 of the volume of water into the plaster and begin pouring plaster in small portions. Until a tubercle forms above the surface of the water, which will slowly sink into the water.
Stir the gypsum thoroughly until a uniform homogeneous mass without lumps is formed. After stirring, the plaster should sit for about a minute so that bubbles float to the surface. Carefully pour the top layer with bubbles into waste. After this, the plaster is ready for use.
We begin to gradually pour plaster onto the model. The rough form should not be thick, so we do not pour out the entire volume of plaster at once, but build up the form little by little, in small portions.
The optimal thickness of the rough form should be 1-3 cm.
As soon as the gypsum has begun to harden and has set sufficiently to hold its shape without formwork, the walls of the formwork should be removed and the surface of the form should be treated with soft gypsum. The rough form may not be ideal in appearance; it is enough to just slightly align the bumps for ease of work.
As soon as the gypsum has warmed up, which means that the gypsum hardening process is in the active phase, the lower (clay) part of the formwork can be removed.
And immediately clean the joining surface of the mold.
We got two locks on the form on their own, due to the bending of the form, and we cut out the third locking one additionally.
Sweep away all the debris with a brush.
To make the second half of the mold, you must first prepare a soapy lubricant. Take any soap (not liquid soap) or soap and finely chop it into a bowl, fill it with hot water, and place it in a container with boiling water. Stir until the soap is completely dissolved.
When the soap has dissolved, add a little vegetable oil and beat until foamy.
The grease is ready.
Now you can make the other half. We place the model again on the clay platform with the finished half down and stick it on all sides to avoid plaster leaking under the mold. Before installing the side walls, generously coat the mating surface of the mold with soapy grease. While we are installing the walls and securing them, the lubricant will be drawn in by the plaster.
Remove excess grease with a brush.
Fill the second half in the same way as the first.
The plaster has begun to harden, we remove the formwork and process the surface of the mold.
It is convenient to do this with a piece of hacksaw blade, with the toothy side.
That's all. You can open it.
We extract the clay model.
As you can see in the photo, in some places the clay particles came off the model and stuck to the plaster. It's not scary, the clay is easily removed from the plaster. For a rough form, the quality turned out to be quite normal. The requirements for work uniform will be completely different.
Now the form needs to be carefully retouched, all irregularities and bumps must be cleaned, the details corrected and refined. A metal stack with rounded edges, narrow and wide, is best suited for this.
This is what the retouched rough form should look like.
And that could be the end of it. But we have locks (wedges) in the nose area on the front half of the form and just below the ears in the area of the jaw joint on the back half. If we were making castings from slip, then these minor jams would not cause us any difficulties when removing them from the mold. But since we will be casting the model from plaster, and gypsum, as is known, expands when hardening, it will be extremely difficult for us to remove the castings. It will jam tightly in the mold, and it will hardly be possible to remove it without damaging it. Therefore, our form will need to be split into 2 more parts.
To do this, we outline the split lines. They will go through the middle of each part.
And we make cuts along these lines with a hacksaw for metal, approximately ¾ of the thickness of the form.
Now the halves need to be split. This can be done by inserting a wide chisel into the cut and lightly striking the chisel, moving it along the cut. I simply inserted a metal ruler into the cut and tilted it to the side, thus breaking the shape.
As a result, instead of two halves, we now have four.
Now the mold should be dried, polished and varnished. This will be followed by the stage of casting the model from plaster and making a working mold, which differs in many respects from making a rough one and has its own difficulties and nuances. We'll look at these parts of the process in future lessons.
If you have any questions, feel free to ask them in the comments. I will try to answer as much as possible.
To be continued.
Three steps to a plaster sculpture (or finishing element)
From concept to finished product there are three stages to go through:
- make a life-size model;
- remove the injection mold from the model;
- prepare a plaster mixture and cast the desired number of copies of the product.
Let's consider these stages using the example of making a small bust (a) and an element of stucco interior decoration (b).
Application area of gypsum casting
Gypsum casting is used both at industrial enterprises for the manufacture of interior decoration parts, and in designer workshops. Craftsmen cast a very wide range of plaster
- Author's interior decor elements
- Figurines and even large statues, up to models for subsequent metal casting
- Small decorations
- Toys
- Parts for scale models of equipment
Small plaster jewelry
Plaster toys Plaster figurines
Author's interior decor elements
The scope of application is not limited to this list. Craftsmen are coming up with more and more new areas of application for gypsum casting - wherever it is necessary to create parts with complex surfaces and relief, and the requirements for strength and wear resistance are not critical.
Modeling business, we make a model of the product
The first and most difficult step to obtaining a plaster sculpture is the model.
You can make the model yourself, or select a ready-made product. For example, you decide to make 10 copies of figured friezes and stick them around the perimeter of the room, right under the ceiling. We buy one and then cast the rest using it.
If you consider that the cost of one stucco decoration can be from a thousand rubles and more, then the benefit is obvious. In this case, the original form can be slightly modified to suit your taste.
If it is not desirable or impossible to work with the original, then we will make a plaster copy of it (we will look at how exactly to do this later). Then we remove unnecessary details from the copy and (or) supplement it with plasticine parts. It is much easier to do this with a finished product than from scratch.
Making a model yourself is already more difficult. You need to have at least a minimum of spatial thinking and some sculptor skills.
In practical modeling experience, you can use plaster for the base and plasticine for making small parts. This technique is especially good for products that have large rectangular parts, for example, bas-reliefs, tiles, etc.
Tiles
Gypsum blanks are cast from inexpensive soft gypsum in the simplest rectangular formwork. When it has set, we disassemble the formwork and, having pulled out the part, we process it with a knife or simple cutters made from a hacksaw blade, or chisels. This is not difficult; cutting wet plaster is a little more difficult than cutting a piece of laundry soap.
We dry the workpiece and coat it with acrylic primer or alcohol varnish, then add plasticine parts. Without a primer, plasticine “clings” to plaster very poorly.
I recommend: How to perform dry ironing?
What is a sculpture mold
The form is a cast of the model, its “volumetric negative”. About fifteen years ago, the main material for removing molds was plaster. And even nowadays it is used quite often, especially for “one-time” fillings of simple but large products.
Gypsum molds are durable, accurately reflect the smallest details of the model and, importantly, they are inexpensive.
Alas, it is precisely the strength of the hardened plaster that sometimes leads to the fact that the form clings to the protrusions on the model and forms a kind of “castle” with it. An attempt to separate them by force results in breakage of the model or mold.
Since a more or less complex product necessarily forms locks when poured, either the model is cut into simple elements, cast separately and then glued, or the shape is filled in separate sections that do not form locks.
From practice.
At the beginning of the two thousandth, creating a form based on the model of the famous monument “Oath” (Museum of the “Young Guard”, Krasnodon), the author of these lines filled in 14 fragments.
Silicone does not have these disadvantages. It copies the details of the model no worse than plaster, and its strength is sufficient for casting dozens of copies. At the same time, the silicone is flexible enough that you don’t have to worry about it catching on the protrusion or depression of the model.
The disadvantage of silicone molds is that they are much more expensive than plaster molds.
Important!
Regular silicone mold sealant will not work. A special molding compound is required. The most popular is a two-component one consisting of a base resin and a catalyst. Moreover, the latter requires only about 1.5-2%.
Making a master model for plaster casting on an FDM printer [CASE]
Hi all! Artyom Rodin aka Articoon is in touch and in this article I will share with you the experience of one order for printing and post-processing. Since I’ve been writing quite rarely lately, the case, in my opinion, stands out for its complexity among our other works. We are talking about creating a master model from plastic using FDM technology for plaster casting.
This project was carried out in collaboration with the creative workshop of KhNUM. Printing was carried out at the RODINLABS 3D Printing Studio.
However, the first time we didn’t succeed in fulfilling our plans and we will talk about how we got out of the situation...
Our workshop received a request to make a bust of Nefertiti to decorate a private home.
The original bust is in the New Museum (Berlin), and by coincidence, there is already a freescan of the model in good quality - https://www.myminifactory.com/object/3d-print-bust-of-nefertiti-at-the-egyptian -museum-berlin-2951
For greater tactile similarity to the original, the customer decided to make the bust from plaster. And we started printing the master model...
Since the project consisted of several technological operations, we jointly looked for ways to reduce the final cost, since the budget for the project is limited.
First of all, we printed a full-size bust from PLA plastic on a 3D printer developed by Vitaly according to our order - https://foxprinters.ru/professionalnye-3d-printery/3d-printer-bigfarm-1000
Material - PLA, layer 0.25 mm, nozzle 1 mm, printing time ~ 42 hours, plastic volume ~ 1800 cm3.
The result of the first print was satisfactory for us, but not satisfactory for the workshop, since the layering, seams and artifacts from the slicer distorted the real defects of the original. In other words, it was difficult to distinguish where the original bust defect was and where the 3D printer added them. The first pancake goes into the trash in a lump.
They realized their mistake after seeing the result - the bust was printed using a shell with 0% infill and a very high speed. Not at first glance, the rigidity of the walls was not enough and at a high altitude they simply lost stability... Although in this situation the result was most influenced by haste.
At this stage, we decided to change both the equipment and the material for production. Then it was decided to print the bust from carbon-filled plastic (ForMAX), which left virtually no print marks on the model. The printer was chosen PICASO Designer XL, since the model fit the dimensions, and as the “man with green hair” says:
The printer takes a long time to print, it’s expensive, it’s awesome!)
However, you can judge the result for yourself:
The printing took more than 100 hours. Material - Formax, printer - PICASO Designer XL, Layer 0.25 mm, this time the filling was chosen to be about 10% (to be sure).
The next stage is casting.
The printed master model from ForMAX was brought to a smooth state (processing of this plastic is one of the advantages) and a mold was made based on it. Next, the Bust was already cast from plaster, preserving all the chiseled original defects.
The photo shows a casting based on the master model from ForMAX.
The final. Artists recreated the image of Nefertiti using painting:
*** Friend, if the article was interesting for you, give it a thumbs up and subscribe to me on social networks. I will be glad to any comment 
***
Sincerely yours, Artyom Rodin, RODINLABS Prototyping Laboratory.
More interesting projects - Instagram
Add to VK -
***
Preparing the silicone mixture for the mold
We measure out the components of the silicone mixture (hardener and silicone) and mix them thoroughly.
To do this, pour the main component into the container and begin to actively stir it with rotational movements, like sugar in a glass. When the mass begins to move, without stopping stirring, gradually pour in the catalyst.
It takes 1-1.5 minutes to completely mix the ingredients. You should not stir for more than 2 minutes; the mixture will begin to lose its quality.
After mixing the composition, we immediately begin pouring.
Important.
When preparing the mixture, maintain the ratio and temperature recommended in the instructions. The harder the silicone, and the faster it sets, the more hardener and the higher the temperature. And by reducing the amount of catalyst below the norm, polymerization may not be achieved.
To prevent the silicone from sticking to the model, we coat it with a release agent. The composition is sold ready-made and, if there is a lot of work, it is worth purchasing a jar. For small home crafts, paraffin, petroleum jelly and even ordinary soap are suitable for this purpose.
Making a single mold
First, let's figure out how to remove the mold from an element of stucco decor.
We place the model in a box (formwork) made of planks, securing it to the bottom with plasticine or a wire clamp. We select the dimensions of the box so that the silicone layer between the walls and the model is at least 10-15 mm. The highest part of the model should be covered with silicone for the same amount (Fig. 1). We will approximately mark this level on the wall of the box.
I recommend: How to make drainage from plastic bottles
Now let's estimate how much silicone mixture we need. Fill the model with clean sand or simple salt according to the silicone filling level. At the same time, tap and shake the box, compacting the filling. Pour the sand into a measuring container. What is the volume of sand, so much silicone will be needed.
Pour the silicone in a thin stream, trying to prevent the formation of air bubbles. We “help” him fill particularly difficult places with a thin flexible spatula.
Usually, after 5-6 hours, the impression can be carefully removed, but you should not fill it with plaster before complete polymerization occurs. As a rule, this is from 16 hours to 24 hours.
Casting using gasified models
Gasification casting, combined with technological processes such as vacuum forming, low pressure casting, etc., is one of the newest methods for producing castings. This technology solves the most important problem of foundry production - increasing the accuracy of castings to the level of investment casting at minimal production costs compared to casting using reusable models in sand-clay molds (Fig. 2 a
).
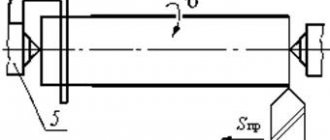
Figure 2 - Schemes of processes for producing castings : a – casting using a split reusable model; b – casting according to a one-time gasified model
A distinctive feature of casting using gasified models is that the model is removed not before the metal is poured, but during the process of filling the mold with metal, which, displacing (replacing) the “evaporating model” from the mold, occupies the free space of the mold.
The essence of casting methods using gasified models is as follows (Fig. 2 b).
One-time polystyrene foam models are made either by filling suspension granulated polystyrene into special metal molds (mass and large-scale production), or by mechanical processing of normalized polystyrene foam boards (small-scale, single production). Complex models are made in parts. The individual parts of the model and the gating system are connected into a single block by gluing or welding.
The assembled model is painted with a layer of fireproof paint and air dried. The result is a fireproof, gas-permeable shell, firmly bonded to the polystyrene foam model.
The finished model is installed in a special flask-container, filled with granular refractory filler without a binder, compacted by vibration, and covered with a metal lid with holes.
When making complex castings, after supplying the support material, the container is closed on top with plastic film and a vacuum of 0.04–0.05 MPa is created (vacuum molding).
The prepared mold is filled with liquid metal. The model is gasified and the cavity is filled with liquid metal.
After the casting has solidified and cooled, the mold-container is turned over, the filler is poured out, separated from the casting, and the casting is sent for further processing.
Model materials
Expandable polystyrene is used as a material for the manufacture of gasified models. The most common blowing agent is isopentane. When heated to 27.9
°C isopentane boils and turns into gas, and at 80-90 °C the shell softens and deforms under the influence of gas pressure. This process is called "foaming polystyrene beads." When granules are foamed in a closed volume, they are sintered into a monolithic foam mass - expanded polystyrene - exactly reproducing the shape configuration that limits its growth.
Manufacturing of gasified models
The process of obtaining models in mass and large-scale production consists of two stages: preliminary foaming in a free state of the initial polystyrene granules and final foaming of the granules in a closed cavity of the mold.
Preliminary heat treatment is necessary to obtain a gasified model with a given volumetric mass, which determines the strength of the model and the quality of the surface.
The prepared granules are poured or blown with compressed air into the working cavity of the mold, lubricated with a special lubricant (Fig. 3 a). The granules are heated using the “thermal shock” method. Superheated steam with a temperature of 125-135 °C under a pressure of 0.2-0.35 MPa is fed directly into a mold filled with polystyrene granules (internal thermal shock). Seeping between the granules, the turbulent flow of steam intensively displaces the air in the pores and uniformly heats the polymer material throughout the entire volume, which finally foams. The resulting condensate, under the action of expanding granules, is pressed against the walls of the mold and removed through special drainage holes.
Figure 3 — Molds for the manufacture of gasified models by internal (a) and external (b) thermal shocks : a – 1, 2 – lower and upper parts of the mold; 3 – injector; b – 1 – fitting for steam supply; 2 – holes for filling the mold with polystyrene foam granules; 3 – camera; 4 – steam exhaust; 5 – vents; 6 – nozzles; 7 – model made of polystyrene foam
In case of external thermal shock (Fig. 3 b), the mold is surrounded by a jacket, forming chamber 3 into which steam is supplied. Through the vents, 5 pairs enter the mold, pre-filled with polystyrene foam granules. The steam heats the granules, causing them to expand and form a model.
The technological process of manufacturing models using external thermal shock ensures their high quality. High-performance equipment has been created based on this method. This made it possible to use the gasification casting process in large-scale and mass production instead of traditional casting methods.
Production of casting molds without binder
In large-scale and mass production of castings using gasified models, bulk molding materials are used: quartz, zirconium sands, fireclay, magnesite, electrocorundum. Their use makes it possible to obtain castings with minimal costs for manufacturing and knocking out molds, and regenerating the molding material.
The molding process is carried out as follows (Fig. 4). A layer of dry sand 100...150 mm thick is poured onto the bottom of the flask container and compacted by vibration. Then a model or a block of models is placed in the flask and the flask is filled with sand while vibrating.
The flask container has holes in the walls for gas outlet. To ensure high gas permeability, it is desirable that the sand particles have an angular shape.
Molds for producing massive and complex castings are made from molding mixtures, which must have increased gas permeability and ductility. Due to the low strength of polystyrene foam models, shaking the flask to compact the mixture is unacceptable.
The most preferred are self-hardening liquid mixtures, which have the necessary strength, gas permeability and reduce the risk of model deformation during molding.
Figure 4 - Making a mold with a polystyrene foam model without a binder : 1 – ceramic riser; 2 – bowl; 3 – flask container; 4 – preliminary filling; 5 – vibrator; 6 – block of models
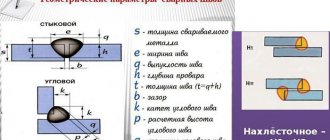
Making split molds
If to make a decorative element it is enough to fill the mold at one time, then for the bust you will need a detachable mold of two parts or, otherwise, a split mold.
You can do it in two ways:
- Immediately fill the model completely, and then cut the mold.
- Fill in two or three steps.
The first option, we think, is clear. The model is filled completely, ending up inside a solid silicone block. After the silicone has set, cut the block directly on the model, approximately in half. Then we remove the model and connect the parts of the cast along the cut, fastening with a cord or even just tape. The form is ready to be filled.
The second method is noticeably more complicated. Essentially, we remove at least two molds from the model, one on each side.
We start by marking the interface. We draw the dividing line directly on the model with a pencil or felt-tip pen, trying to ensure that it runs through the middle of the protruding elements of the product. This will make it easier to remove the finished form.
Now we have to close part of the model, leaving only the side from which we will take a cast. To do this, we use plasticine, or even better, sculpture clay.
The model is placed in a formwork box. Fill the box with clay or plasticine to the intended dividing line. As a result, we should get a continuous surface from which half of the model protrudes in bas-relief.
Some try to keep the section as flat as possible. This is not required at all. The dividing line is unlikely to be located strictly in one plane, which means that the entire boundary of the division of the form will be in relief.
Fill the model with silicone. Let's wait until it gains sufficient strength (usually from 3 to 6 hours). Now without taking off
(!) form from the model, disassemble the formwork, remove the clay (plasticine) and turn the form over with the filled side down. In front of us will be a bas-relief of the second part of the model, protruding from the silicone block.
We frame the model with formwork, lubricate the surface of both the model and the silicone “cage” with release agent. Pour in another portion of liquid silicone and wait until it sets.
I recommend: Question: How to construct a monolithic belt?
We disassemble the form and remove the model. We get two halves, in one of which the front side of the model is printed, and in the other, the back side. All that remains is to connect them, fasten them and pour the plaster.
Advice.
To ensure that the parts of the mold match exactly, press several balls, for example, from a bearing, into the dividing surface. When pouring, they form corresponding depressions and convexities on the cast, allowing the parts of the mold to be accurately aligned for pouring plaster.
Collapsible model
Any beginning should not be difficult - disinfection Once the impressions have reached the laboratory, everything that is received must be disinfected, i.e. register for determining habitual occlusion, dentures and, above all, each impression. Although everything that comes from the doctor's office should already be disinfected, dental technicians should further protect themselves by using disposable gloves and an immersion bath for disinfection, reliably eating reliably... Unfortunately, no cast can tell whether it is "dangerous/contagious" or not. Whether it is or not, it is impossible to determine with the naked eye how badly the cast is infected. And the preserved remains of blood do not in any way indicate danger as such, mainly about the quality of the office’s work - casts, by the way, are the calling card of a dental office. Manufacturers' instructions should be followed to avoid interaction of impression material with aerosol disinfectants or immersion baths.
Caution: With immersion baths, the exposure time must be respected, especially for alginates and polyester materials, since they absorb moisture and can thus swell. The standard is: 1 minute of exposure followed by 9 minutes of exposure to air.
Preparing the impression After rinsing the impression under running water to remove disinfectants, it can be carefully inspected and the accurate fit of the impression material can be checked. In case of deviations, you should immediately react and discuss further actions. This means that obstructive, unnecessary excess flowable/compressible materials (which are often seen in adjustment and two-phase impressions) should be removed with a sharp scalpel, and any minimal delamination from the trays should be fixed with cyanoacrylate adhesive. This is of great importance for a uniform dental arch, since at this stage the first sources of error are eliminated. However, in the case of a perforated tray on which the impression material has peeled off, it is necessary to carefully remove all the impression material in order to then remove all the extruded fringe. Only then is there a chance to restore the cast relatively well. Naturally, it would be better to request a completely new impression. With a strong fringe, in most cases in the area of preparation, an uneven line of the dental arch appears and there is a tendency that during trimming a curved plane with marginal grooves, etc. is formed, and due to this, a crooked-looking model. Of course, the function will be preserved, but in order to achieve an aesthetic model, detailed work must be done.
Collapsible model without aesthetic detail work.
Have you ever noticed that control models from the plaster surface look cleaner and more accurate? If yes, then here's a hint.
Clue. Before casting, it is necessary to rub the gypsum powder used into the casts and slightly moisten them. As a result, invisible residues of saliva and disinfectants will be removed along with the gypsum powder. The exposure time is approximately 1 minute.
The applied gypsum powder combines with the remains of saliva and disinfectants.
By the way, all impressions are pre-treated: polyester, silicones, alginates (necessarily due to alginic acid), hydrocolloids. When rinsing with water, all residues must be removed, otherwise inaccuracies will occur. Only after this it is possible to use an alcohol-free mesh application agent, but only for silicones! Alginates, hydrocolloids, and polyesters may additionally cause problems on the surface. Since these materials absorb water (hydrophilic), no mesh application agent is used. Fat and wax bridges (molecular chains on the surface of the silicone) are neutralized by means of a mesh application so that water is not repelled by the fats and so that fixation of the mixed plaster on the surface of the impression is achieved.
Clue. Why is the mesh applicator alcohol-free? Firstly, over time, the spray nozzles on the bottles are destroyed, secondly, the load on the respiratory tract is reduced, thirdly, and this is the main reason, the energy generated by the evaporation of alcohol leads to deformation of the very thin, unstable silicone fringe (preparation edges, interdental septa, etc.), in short, to unwanted inaccuracies.
Therefore, the author uses means for applying mesh based on surfactants, which do not have these disadvantages, but also have the advantage, because minimal residue (not puddles!) combines with the mixed plaster without causing further damage to the visible surface. Speaking of the puddles that form in impressions from mesh agents: less is often more, especially in this case it is an advantage to direct only a small spray mist into the impression or simply apply the mesh, the distance from the impression is approximately 20 cm.
The mesh is applied at the correct distance and a light spray mist is formed in the impression.
This saves material, time and money, and the result is the same; there is no need to additionally blow out puddles from the cast with compressed air. The following disadvantages arise: the product is distributed throughout the entire room where it should not be, additional noise pollution arises due to “abundant” compressed air and, above all, due to a well-conceived attempt to clean (in most cases, taking into account time pressure), as a result of The impression is directed by a “blow” of all available compressed air. Not only does this cause unnecessary noise, but there is also a risk of the impression being deformed or flattened!
Clue. If you really need to blow off the residue to make everything better, then be sure to use great care, it’s better to just shake it out.
Plaster processing
So, the cast is prepared. This is followed by mixing the plaster. If consistent quality is required, the same conditions must always be maintained. It is interesting that for investment compounds an operation is performed that is also required for gypsum. Accurate measurement of the amount of water is mandatory, this is not an exaggeration, since even 1 ml of water more or less (per 100 g) affects the quality of the gypsum, physical indicators (hardness, expansion in accordance with the manufacturer's data) cannot be maintained. And our goal is to maintain stable quality. Home scales make it easier to weigh powder as well as water, since 1 ml of water weighs 1 gram. Or calibrated measuring containers designed for water are used.
Caution: Investment liquid measuring cups should not be used to measure water as the density of this liquid does not match that of water and therefore the measurements will be inaccurate.
When filling the mixing container, the author pours gypsum powder along the side walls of the container to make it easier to control and adjust the amount. For heavily colored stones, be sure to adhere to the mixing time (approximately 1 minute) to give the color pigments sufficient time to dissolve. Gypsum powder absorbs water like a sponge.
Saturation of gypsum with liquid.
After mixing in a vacuum (follow the manufacturer's instructions), the mixed plaster is applied to the cast. The big secret of bubble-free models is revealed: concentration! On what? Very simply, the “very initial flow” of the mixed gypsum must be carefully monitored as every small cavity must be filled. If you accurately observe the plaster as it fills the cavity from the bottom to the next edge or preparation border, then no bubbles will form there.
In this case, concentration is very important.
Conclusion: when pouring, it is necessary to monitor the flow of gypsum with full concentration and confidently confirm that the pour was completed cleanly. In this case, there is no need to work with particularly small instruments (probe, etc.), small quantities of gypsum can also be applied with a plaster spatula. We use thixotropic gypsum, i.e. When vibrated, gypsum is fluid, but otherwise stable. This is a very useful property that allows you to slightly increase the height of the dental arch (about 1 cm), while the mixed plaster does not spread. Due to this property, casting on a vibrating table is further facilitated or becomes more accurate, because there is constant control over the fluidity of gypsum and the direction of spreading of gypsum. By rotating/turning the cast while vibrating on the vibrating table, it is possible to influence the direction of spreading, and if this is not required, the cast is removed from the vibrating table and the plaster in the cast “remains standing.”
Clue. There is no need to run the vibrating table in the strongest mode or press the impression onto the vibrating table with great force, as this is associated with some inconveniences: noise pollution (due to rocking tables, including accessories); when processing alginates, due to the high frequency of vibration, alginic acid appears on the surface of the impression, which leads to the formation of a powdery surface; the mixed plaster may delaminate, which is clearly visible in the color shadows. The desired quality is lost.
Attention! The height and uniformity of the extended dental arch are very important, thereby creating the foundation or better foundation for the subsequent appearance of the entire model. Of course, this should not be exaggerated, however, the following points must be fulfilled: the dental arch must be at least as wide as the outer edge of the impression tray used; the height must be at least 0.5 cm; but the most important thing is that the plaster in the posterior zone has the same plane as in the frontal zone.
The plaster should not cover the edge of the spoon; ensure a uniform height.
Of course we trim the models, but this requires the correct mass ratios to get the shape.
Trimming or shaping
After the curing time (approximately 45 minutes) the impressions are removed from the dental arch. If possible, the direction of the dies should be followed, i.e. Do not pull/or remove using a lever. If the use of leverage is absolutely necessary, the actions must be very careful. Everyone knows what can happen.
Attention! Impressions that have just been taken cannot be immediately cast as a control model, as the impression requires a minimum of 1 hour to recover its shape, as the necessary expansion of the plaster (to compensate for the shrinkage of the impression material) and removal from the mold flattens the material. Therefore, there is no point in quickly pouring the remaining plaster into the cast that was just taken from the model; the resulting control model will be larger than the original. This explains the frequent discrepancies between both models, for example in the area of proximal contact points or when fitting a bridge. Therefore, everything needs to be thought through.
What about trimming? There are several points to pay attention to: 1. In principle, the lower surface of the dental arch (and other models) should always be trimmed first, so that the dental arch can be held stably on the trimmer table and so that it does not wobble. 2. At the first stage, the coordinate plane of the plaster teeth is also fixed, and this is the occlusal plane, running as parallel as possible in both the sagittal and transversal directions.
Tip: The plane is controlled using a glass disc or table, the best tool would be an orthodontic trimmer that has a suitable device on the trimmer table that allows the dental arches/models to be made parallel to the occlusal plane. With a pronounced Spee curve, it is possible to determine only the average plane. But with some practice and dedication to detail, everything will work out without luxury equipment.
The model-specific “occlusal plane” should focus on the functional aspects of the treatment.
3. Since the final external shape is trimmed along with the future plinth, including the Splitcast plate, only enough material needs to be removed so that the dental arch fits into the plinth mold. 4. The surface treated with trimming must be absolutely level and must not tip over or rock in any way, otherwise subsequent drillings cannot be carried out in parallel (and therefore pins). 5. The author uses wet sanding with 800 grit sanding paper to smooth out the trimmed surface again! Of course, you can do without this (depending on the condition of the trimming disc, as well as the type of material; corundum, partial or full diamond coating or dry strips), however, in order to ensure a clean, precise separation, it has advantages.
Wet sanding takes little time and produces a very smooth surface.
This is followed by milling of the oral parts of the dental arch. There are two possibilities for this: - with a straight handpiece at the workplace (time-intensive with precise observance of angles and radii), - a device for milling the dental arch, a stable tabletop device with a suction device. The advantage of this method is that the angles are always correct, less dust, smooth precise work.
When grinding down unnecessary areas, do not confuse the optical width of the dental arch with the actual width! Usually the dental arch is controlled from the occlusal side, it can quickly be forgotten that the dental arch cutter has a conical shape and grinds the lower surface first. In addition, if the jaw ridge is strongly inclined on the model, this impression may be enhanced. But the capabilities of the milling device also have their limits; with strongly inclined teeth or an inclined jaw ridge, it is necessary to grind manually.
Hint: Each dental arch must be examined from below to determine the actual space available for drilling pins.
To make an aesthetic dental arch, all angles and radii must be harmonious. Any defects such as bubbles, incorrect impressions, gouges, etc. must be avoided. or they should be eliminated until the overall impression is positive (clean performance) and convincing. This is a subjective impression and should never negatively affect the functionality of the model. We operate under the motto “Aesthetics follows function.”
| Model with markings for areas that are not required. | After grinding using a dental arch grinder. |
Replication of products
Having a durable and flexible silicone mold, you can begin to replicate products.
Our crafts are unlikely to be subjected to serious stress. We use G5 or G6 gypsum for them, which can be purchased at any hardware store. But, nevertheless, before mixing it, add 6-8% PVA emulsion to the water. It will reduce the fragility of finished products, add strength to them, and also increase the “fluidity” of the gypsum mixture.
Mix plaster with water in a ratio of 55:45 or even 60x40. More information about the types of gypsum and methods for mixing it can be found in the article on the production of gypsum tiles.
Pour liquid plaster in a confident, uniform, neat stream. After the mold is filled, let the plaster harden thoroughly. For quick-setting varieties this is 20-25 minutes.
We remove the product from the mold, clean off the burrs and set it to dry. The finished sculpture can be varnished or painted.
Advice.
Although plaster does not stick to silicone, after every two or three casts, lubricate the mold with release agent, this will extend its life.
What do we get
The gypsum casting technique described in the article is intended to create many identical products.
Of course, you can cast only one, unique sculpture. Let's say you made a sculpture of your beloved girl out of plasticine and want to “translate” it into durable plaster to present to your friend.
However, it is worth remembering that for one-time, “piece” items, there are other manufacturing methods.
For example, a sculpture can be sculpted from a concrete mixture. Or cut from a gypsum block, soft natural stone. But we will talk about this in other articles. Leave your tips and comments below. Subscribe to our newsletter. Good luck to you and good luck to your family!