March 13, 2019
There comes a time in every person’s life when it is necessary to make repairs to a house or apartment. And then the question arises about remodeling the space: moving sockets, updating wiring and drilling other holes to bring the design project of the room to life.
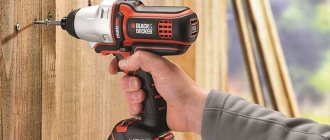
In the process of performing work, a variety of tools and drills are used. Of course, customers always prefer more powerful models. There is a large selection of tools on the market that can be used to organize work.
Selection principles
Most cases involve the use of hammer drills. This tool always has more power in reserve; it allows you to pierce even very thick walls. With this tool you can always drill into large areas. It is advisable to use it in the following situations:
- when you need to make a hole measuring up to 10 - 12 mm;
- when many holes need to be drilled. Moreover, the size of each of them is supposed to be quite large;
- when working on coatings containing foam.
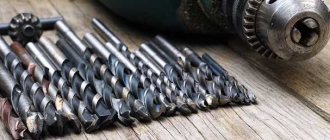
All craftsmen should know that drills can be classified according to their impact power. Some models can be used for drilling concrete, while others are designed for use with specific attachments. It is important that the alloy from which the nozzles are made is of high quality. High-quality alloys are the guarantee that the drill will not fail for a long time.
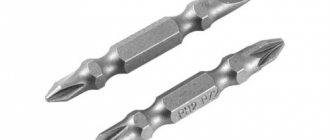
It all depends on the nozzle
Before starting repairs, it is necessary to draw up a small estimate for installation work in order to understand exactly what equipment will be needed in the process.
All drill attachments can be divided by type of work:
- for making holes;
- for corner drilling;
- drill stops;
- for grinding;
- for cutting;
- for polishing;
- mixer attachments.
And also by the type of material on which the work takes place:
- concrete;
- tile;
- tree;
- metal.
Important factors are also the length of the equipment and the alloy from which the nozzle is made.
What kind of work may require drilling:
- laying plumbing lines;
- gating walls for laying electrical cables;
- drilling socket boxes;
- small holes for wall cabinets and shelves.
How to drill concrete evenly with a drill
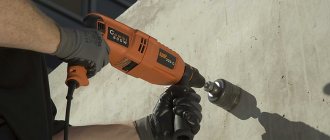
First you need to know for sure that the right nozzle has been selected. Drilling must always be done at low speeds. Typically, the tool is in use for 10 or 12 minutes. During this time, it is guaranteed that it will not overheat and accidentally break. If the tool drill accidentally remains in the thickness of the wall, you must carefully remove it. You cannot use force. Perhaps the drill will break and its fragments will remain in the thickness of the wall. If necessary, the drill can be easily detached from the attachment.
The drill must be held strictly perpendicular to the surface. If this is not observed, there is a risk of damaging the drill and sometimes leaving a dent. It is also important to ensure that drilling dust does not get into your eyes. To do this, purchase safety glasses. You can also use gloves to prevent your hands from slipping during the process. Only a person with sufficiently strong hands can drill a surface efficiently. Because the process requires significant effort.
Hole depth and width
Usually a confirmat size of 6.4*50 is used. Because the thread diameter is 6.4 mm, and the diameter of the confirmation body is 4.4 mm, then for high-quality fastening of parts, the hole diameter must be in the range of 4.5-5 mm and a depth of at least 50 mm.
If the thickness of the hole is greater than the specified one, the confirmat will not hold the parts well; if it is less, its thickness can tear the chipboard.
For drilling, use a confirmat drill with a diameter of 4.5 mm, which is equipped with an additional head for drilling an enlarged hole for the neck of the confirmat, which also makes a countersink for its head.
Of course, you can use a regular drill with a diameter of 5 mm, but for high-quality fastening in the hole you will additionally need to make space for the neck of the confirmat and its head.
In order to perfectly fasten two parts, it is necessary to mark the places of their fastenings as accurately as possible.
On the part that will be applied to the end (the one on which there will be a through hole), you need to make two measurements - along the length (usually 5-10 cm) and from the edge - exactly 8 mm (this is if the thickness of the plate is 16 mm).
On a part that lies perpendicular, mark the drilling point at the end. Here you need to maintain the same distance in length (5-10 cm from the beginning), and in width - strictly in the center (8 mm from the edge).
Markings must be done as accurately as possible, especially along the length, because If the markings are incorrect, your parts may have extra gaps or protrusions when joined.
It is better to make a through hole in the first part, attach it to the second - and immediately use a drill to mark the drilling location at the end of the second part. And then, separately, calmly drill the hole.
We make a hole at a distance of 8 mm from the edge.
The drill should ALWAYS be held strictly perpendicular to the surface.
Before making a through hole, place a piece of unnecessary chipboard under the part. This will prevent chips from appearing on the reverse side.
When the through hole is made, the part can be drilled on the fly to drill holes for the neck and head of the confirmat.
The main rule is that when drilling at the end, the drill must be strictly perpendicular to the end of the part. If you don't hold the drill straight, the drill bit may go sideways and come out, ruining the part.
When drilling, you need to pull the drill out several times so that chips do not clog in the hole.
This option is considered the most accurate and, moreover, the fastest. But in order to make a hole in two parts at the same time, you will need to fix them before drilling. To do this, you may need special clamps, clamps and other devices.
Hole Drilling Tools
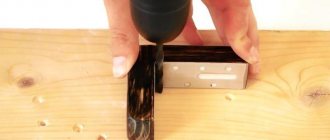
In order not to mark 8 mm from the edge each time both into the layer and at the end, you can use a special device, which, by the way, is easy to make yourself.
It is a kind of wooden template with a metal sleeve for a drill inside.
It looks like this, see photo:
And this is a more professional thing:
Watch a short video on how to accurately drill holes in chipboard for confirmations and assemble furniture parts:
Features of working with concrete pavement
First we select a drill. If the wall is made of concrete or brickwork, it is better to give preference to pobedit bits, since this tool turns the material into crumbs at the drilling site. But it is not suitable for other surfaces, for example, if you drill wooden boards with it, the fibers will tear and the hole will turn out sloppy.
When drilling a concrete surface, you need to take into account that there will be a lot of dust, so you need to prepare a vacuum cleaner to collect debris from the hole. This, of course, does not guarantee absolute cleanliness when performing work, but it allows you to reduce the amount of dirt.
Before you start drilling, you need to check whether there are any communications in that place. Damage to electrical wiring will entail the injection of additional funds into its restoration. The wall must first be ringed; for this you can use an alarm or a metal detector.
Now you can proceed directly to drilling holes in the concrete wall. First, we outline the place where the future hole will be with a construction pencil. We start drilling at low speed, this will improve the accuracy of the work. After this we increase the speed. The drill must enter the surface at one angle so that the drilling direction does not go astray and the hole is of the desired size.
If a hole is made for a dowel, it should be longer than the dowel itself so that it can be installed flush with the wall and not stick out.
Keep two sets of drills
Some pros rely on a new set of drill bits just to start drilling, then replace the old one and continue drilling.
Follow us on Pinterest for more interesting articles.
Useful short videos from Make-Self.net
How to drill into tiles with a drill
Ceramic surfaces have proven to be particularly fragile coatings. The outcome of drilling in such areas is determined by the quality of laying the tiles themselves. If the master performing the work did not make mistakes during installation work, then the drilling process should proceed without interference. Proper installation means one in which no empty zones are formed between the wall and the coating. If there are voids between the tile and the wall, the tile may burst or break off during drilling.
We start by choosing a drill. There are specialized attachments for ceramics and glass, but you can also use equipment for concrete with pobedite coating. It is important that the concrete drill is new enough, otherwise it will slide along the tiles and scratch the base, which will lead to damage to the masonry.
The process of drilling tiles should take place at low speeds to prevent chipping of the glaze coating of the decorative surface. After drilling the ceramics, change the drill; if you are using a drill for ceramics, make a hole in the wall.
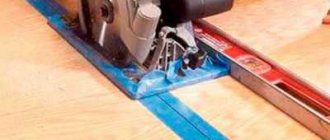
Device for drilling at right angles
Greetings to all DIY enthusiasts, today we will look at how to make a drill guide that will allow you to drill holes at right angles. The homemade product is made of plywood, and the author made the guides from steel tubes so that the weight of the nozzle would not be too large. Thanks to this device, you can also confidently drill holes of large diameters using crowns. If the project interests you, I suggest you study it in more detail!
List of materials:
— steel rods; - plywood; — threaded rods and nuts; - wood glue; - self-tapping screws; - epoxy adhesive; - two springs.
Homemade manufacturing process:
Step one. Cutting the parts
First of all, let's cut all the necessary parts. If you look at the device, you can see 3 parts that are identical in shape, they have the shape of a horseshoe. We cut out these three parts so that they are the same, they can be glued with double-sided tape and sanded all together.
After this, we immediately mark the locations for the holes and drill them at right angles on a drilling machine. These holes will be needed so that the tubes that serve as guides can be installed. Finally, don’t forget to cut out the base; you can glue one of the “horseshoes” made earlier to it with wood glue.
How to drill wood surfaces with a drill
Wood is the easiest material to drill. But there are also certain features of the technological process that must be observed so as not to spoil the surface and not to break the equipment. Speed parameters depend on the type of wood covering. Loose samples are easy to drill. The following types of wood equipment can be distinguished:
- flat or feather;
- twisted, they are also single-spiral;
- crowns, also called core drills;
- cylindrical nozzles of the Forstner type.
Select a drill. As a rule, for small holes (less than 1.2 cm), metal equipment is used; if you need a larger diameter, you will have to fork out for a specialized wood drill.
For larger holes it is necessary to use annular crowns. Forstner-type crowns are ideal for drilling blind areas.
Particular attention must be paid to drilling the timber. Despite the fact that it is very convenient to fix, its thickness often becomes a negative factor that complicates the work. If the timber is of a standard size, then, as a rule, drills up to 25 mm are used. The drilling process always takes place at low speeds.
How to drill a brick wall
Drilling brick with a drill is a simple process. An impact drill is used for work. If drilling is unstressed, the drilling process may take a long time. It is very important that the tool operates at high power. Quantitative indicators of revolutions per minute are also important. Indicators of more than 2,000 revolutions are considered the most acceptable.
Of course, to perform better work, a hammer drill is used. If it is not at hand, then use high-power drills. To drill a hole you do not need any special knowledge. The main thing is to follow a number of simple recommendations mentioned above. Sometimes you can stumble upon a burnt stone. It will be quite difficult to form a cavity in it. Such a brick is identified by the dust generated during operation. It becomes a pronounced black shade.
To create holes in burnt rocks, you need to turn on the drill at low speeds and set the impact function. You need to press very hard on the tool for the impact function to work correctly. It is also important to ensure that the drill does not overheat during operation. A severely overheated drill causes the edges of the drill to wear out quickly. For such purposes, a diamond-coated drill is most often used. This way the clutch is most effective. This leads to significant savings in physical effort and energy.
Sometimes situations arise when the hole made needs to be made of a significant diameter. For example, this could be a ventilation outlet. Such work will be very difficult to organize with ordinary tools. You will need powerful equipment and large crowns.
At what speed should you drill?
One of the important parameters when drilling is the number of revolutions per minute. The speed at which you need to drill depends on the type of material and the type of drill. There is a general rule: the harder the material and the thicker the joint, the lower the number of revolutions per minute should be. As for the specific numbers, they can be seen in the table below.
| drill diameter, mm | soft wood | solid wood | plastic (acrylic) | copper | aluminum | steel | Notes |
| 1.5-4.8 | 3000 | 3000 | 2500 | 3000 | 3000 | 3000 | When drilling metal thicker than 3 cm, lubricate the drill thoroughly with oil. |
| 6.4-9.5 | 3000 | 1500 | 2000 | 120 | 2500 | 1000 | |
| 11.1-15.9 | 1500 | 750 | 1500 | 750 | 1500 | 600 | |
| 17.4-25.4 | 750 | 500 | — | 400 | 1000 | 350 |
This table is for conventional twist drills. For specific options (Frostner drill, etc.), the drilling speeds for various materials are slightly different from those given above.
Work with large diameters
At the beginning of the work, the area where the hole should be formed is outlined. It is important to observe dimensions here. When the hole diameter is 100 mm, then the circle needs to be drawn at approximately 20 mm. This is typical for situations where the drill deviates from the working circle. Even a small shift can damage the surface if this is not taken into account from the very beginning. You need to make sure that the drill goes through the walls. Only in such a situation can you be sure that the hole will be made correctly.
Safety precautions
Compliance with these rules guarantees that the work will be successfully carried out without harm to human health. Before any work, it is important to inspect the surface. If a small element is being drilled, then most likely it will need to be secured in a special vice. For example, if we are talking about timber. Never place a work element in a poorly fixed spindle.
There should be no hanging ends on the worker's overalls. The shirt is usually tucked into the trousers. Under no circumstances should clothing be cleaned during work, as this can lead to serious consequences. Masters use protective glasses - masks to protect the skin of the face and eyes.
To prevent the tool from slipping out of your hands while working, you must wear gloves. If the drill is massive, then it is best to carry out work with rubber gloves. They not only help ensure that the instrument does not slip out of your hands, but also prevent various injuries to the skin of the hands.
Be sure to hold the tool with both hands. Do not work while standing on stairs or other poorly secured surfaces. Do not use blunt equipment, this leads to an increase in construction time. Do not insert or remove a drill using an adjustable wrench as this will damage the chuck and tool. Do not use the drill in snow or rain, even light rain, as this may cause a short circuit and electric shock.
Whatever work needs to be done with a drill, it is important to remember that the quality of the work performed directly depends on taking into account the features of drilling. The main thing is to believe in yourself and not stray from the planned work plan.
Tags:
- Home renovation
Rate the material:
What to do if, when drilling a hole in concrete, the drill gets completely stuck in the wall
Basically, the drill jams as a result of getting between a piece of crushed stone and reinforcement, especially when drilling deep. If, when starting the tool, only a characteristic buzz is heard and nothing else, then this is a clear sign of a stuck tool.
When starting work, it is important not only to know how to make a hole in the wall, but also how to remove a stuck nozzle
If the drill is equipped with a reverse function, you can try turning it on. The reverse rotation will release the drill. This method is suitable if the jam was noticed immediately, and the situation did not have time to worsen.
Otherwise, the first thing to do in such a situation is to stop the process and turn off the tool. It is useless to immediately try to remove the attachment by hand or with a drill, as the drill may break off. In this case, it will be more difficult to remove it.
The stuck bit is removed from the drill, and another drill of a smaller diameter is inserted into the tool. Carefully, without touching the nozzle, clear the space around the jammed part from the concrete. When enough space is available, the drill can be removed from the wall with your hands or long-nose pliers.
There are more unusual ways to get a stuck drill out. When a significant part of it sticks out from the wall, you can put a gas wrench on it and try to unscrew it in the opposite direction. If you cannot turn the key by hand, you can try to do it with a hammer.
Another way: drill out the fragment with a larger diameter nozzle. The hole that has already been made expands to a piece of the stuck drill. Then there are two options: use a thin drill to expand the space around the fragment or try to immediately remove the fragment with long-nose pliers.
If the place for the hole in which the nozzle is stuck is rigidly fixed by the floor plan and it is impossible to move it a few centimeters, then the nozzle or fragment must be removed, and a wooden plug (dowel) must be inserted in place of the expanded hole. Otherwise, it’s easier to leave the fragment in the wall and cut down the piece sticking out (if any). The hole formed during the removal process is sealed with a solution.