Published: 01/31/2016 Category: Tools and accessories
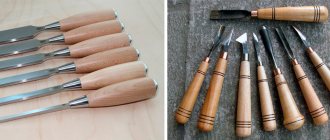
Carpenter's chisels
It would seem, what's special about a chisel? In this flat blade with a handle? But often without it it is impossible to get the job done. You can buy many different chisels, but regular chisels are, according to most craftsmen, the most versatile, affordable and easy to use. Here's what you need to know before you buy them.
Purpose
The large number of operations performed indicates versatility:
- sampling of recesses;
- chamfering;
- cleaning of grooves;
- thread;
- planing.
The purpose of the tool is indicated by the sharpening angle. With a large value, the cutting edge is stronger. For this reason, under conditions of rough work, the chisel is sharpened at an angle of 27-40 degrees. Chiselling is done with a chisel. This tool is gradually being replaced by electric machines. Its features: a narrow, thick blade, tapering towards the end. The power of the working part allows it to be used as a lever to remove chips from deep holes.
For work on a workbench, the cutting edge of chisels is sharpened more intensely. Its angle is 20-31 degrees. Considered optimal for maintaining strength while maintaining maximum sharpness.
For delicate work and removing small volumes of chips, scoring models with a razor-like blade are used. They have the greatest sharpness, allowing for delicate carvings. Hammer strikes are contraindicated. Only hand cleaning is possible. The length of the blade is 200-270 mm, the angle is sharpened to 15-22 degrees. They dull much faster than other types, especially when processing hard wood (oak, walnut, larch, maple).
What you need to know about chisels?
A forged shank is always better.
The reason for this is that the hardness of the material is more evenly distributed throughout the chisel.
It can be determined by the characteristic flow lines of the metal.
Otherwise, the problem area becomes the transition zone of the shank to the blade, where stress concentration is observed, which will eventually lead to the formation of cracks.
Design
Consists of a steel blade with a sharp blade. The wedge-shaped shank, located on the reverse side, is inserted into the wooden handle. The connection point is reinforced with a metal cap. It accepts wood fibers, maintaining the integrity of the instrument under physical pressure.
The handle is made of impact-resistant plastic or viscous wood:
- maple;
- oak;
- hornbeam;
- ash.
Plastic handles are made of two or three components. In addition to the base, there are rubber inserts for comfortable holding, and an iron or leather butt pad at the end for striking.
Expert opinion
Levin Dmitry Konstantinovich
Features of fixing the handle indicate functionality. There are chisels with a shank, as well as those equipped with a conical skirt. The strength of fixation varies. In the first case, the shank is inserted into the handle, in the second, the handle is placed in a special recess.
A tool with a skirt is better suited for impact, is less susceptible to destruction, and is durable. Tools of this type process hard wood and create deep recesses.
The presence of a shank indicates the need for more delicate handling. The main advantage is ease of production. A number of models have a long shank that extends across the entire handle and ends with a flat extension at the end. This is the most efficient design.
Universal tool
Some time ago, when working with wood, craftsmen used hand tools. Currently, there are electric chisels that are called “universal”; with their help, the range of work performed has expanded significantly, and new opportunities for creativity have appeared.
Using chisels of this type, you can remove old parquet boards or process a large workpiece in rough form. This tool is used to remove knots and other hard inclusions found in wood. A hand chisel cannot cope with such complex work.
A universal chisel has many attachments, the shape and size of which are different. For example, using small straight or semicircular bits (four millimeters) you can cut out a pattern or engraving with the master’s initials. A massive tool five centimeters wide can remove wide chips.
Material
It is made from a durable alloy. Tool steel 9ХС, ХВГ and 9ХФ is suitable. Its mechanical properties are optimal.
Material composition
According to GOST 1184-80, production is carried out from tool steel with the markings “chrome-vanadium”, CrV, drop forged. The manufacturer's mark, carried out using the electrographic method, is evidence of quality.
You should not trust such inscriptions as “Hardened steel”. As a rule, the manufacturer indicates the composition of the material, recording the designations of the elements in the labeling.
Types of work on a lathe for beginners
Depending on what item needs to be made, there are two ways to attach the workpiece. In the first case, the wooden piece is clamped horizontally between the centers of the headstock and tailstock. The second method involves installation exclusively in the headstock using a chuck or faceplate. If you are new to working with this machine, it would be logical to start with the first method.
Machining a workpiece sandwiched between centers
This method is used for processing cylindrical parts of various lengths, fixed between the centers of the headstock and tailstock. This way you can make a variety of parts: from miniature chess pieces to table legs or railing posts. Especially experienced craftsmen even manage to sharpen billiard cues.
How to properly clamp a part
The first step of the job is to find the position of the axis of the wood piece to clamp it between the driving center and the center of the tailstock.
- Using an angular center finder, draw two or three lines with a pencil from both ends of the workpiece, the intersection of which will be the center of the end.
- By hitting the marking core firmly with a hammer, make grooves and an axial depression at the ends of the workpiece.
- Place the workpiece on the drive center, move the tailstock to the opposite end and press the part with it so that the leads fit well into the grooves at the end, and then move the center of the tailstock - the product should hold on its own.
- Place the center of the tailstock against the workpiece again to secure it along the center axis. Turn the tailstock handwheel a quarter turn if the wood is soft, and a half turn if it is hard. The part must be secured so that it can be turned by hand without resistance.
Bring the tool rest as close as possible. When turning it by hand, make sure that the workpiece rotates freely and does not touch anything. The supporting plane of the tool rest should be located approximately 5 mm below the axis of rotation.
How to work
The next one is to make the block of wood cylindrical. This is done at a speed of 1,000-1,500 rpm. In this case, the chips are removed from right to left using a wide concave grooved chisel for roughing - a reyer. If the piece of wood is long, roughing is carried out in several stages; the tool rest moves towards the part as it is turned, without changing its position in height.
For turning parts, there are tools of different shapes: a grooved chisel for processing a shaped surface, a flat chisel, a hook, a semicircular cutter, a beveled chisel (jamb), etc.
Depending on the type of tool used and the stage of work, you should periodically move the tool rest closer to the workpiece. After the process is completed, when the part has already been turned, final finishing is carried out (grinding, polishing, waxing, tinting, etc.) with the tool rest removed.
Roughing
To rough turn a cylinder using a rake, set the speed to 1,000 or 1,500 rpm. The more precise the cylinder shape must be, the higher the speed must be set. Bars with a small allowance for processing can be machined in one pass along the entire length, with a large allowance - in small portions, moving from the tailstock to the spindle.
Classification
By method of use
Impact chisels
Immersion is ensured by light blows on the end part. The handles are equipped with metal rings on the back. It prevents the handle from breaking.
Hand chisels
Immersion into the tree is done by hand effort.
According to production method
- Stamped.
- Forged, having a thickened blade.
- Cutting, from less hard and dense steel.
By shape
The purpose and appearance are determined by the name:
| Name | Working part width (mm) | Handle size (mm) | Longitudinal section type | Cross-sectional shape |
| semicircular | 12 | 145X25 | smooth | ͝ |
| semicircular | 16 | 145X25 | smooth | ͝ |
| semicircular cerasic | 4 | 145X21 | smooth | ᴗ |
| eismus | 8 | 145X21 | smooth | ˅ |
| cranberry | 12 | 145X25 | spoon | ͝ |
| curved cranberry | 4 | 145X21 | spoon | ᴗ |
| cranberry-cerasic | 4 | 145X21 | spoon | ᴗ |
| semiclucarza | 12 | 145X25 | curved | ͝ |
Among classifications, national traditions can be taken as a criterion. For example, Japanese craftsmen proposed their own unique form of chisel. It is equipped with a shorter blade with a thick, long cone-shaped neck. This makes the tool comfortable, easier to hold and control while carving.
Thanks to a special recess on the back side, sharpening is more economical and faster. The combination of the shank and the conical cup makes the connection to the handle the most durable.
Thanks to two layers of the metal part (soft iron and high-strength steel), the sharpness is maintained for a long time, the blade is easily and quickly sharpened.
According to work purpose
- Plotnitsky . Allows rough processing of workpieces of different types.
- Carpentry . Used for neat, delicate work. Suitable for carving linden, spruce and poplar.
- Lathes . Cutters used for working on a lathe.
- Klukarzy . Thanks to the curved working part, they allow material to be removed from deep grooves.
- Multifunctional . Combines a nail puller and a frame lifting device. It's called "European".
- Looped . They have a special device. Used for rounding corners, preparing hinges and locks.
- Scrapers . Made from plastic. Needed for cleaning irregularities, repairing wheels, removing burrs and protrusions.
- Pocket . They have a folding blade.
- Mini chisels . Purpose: fine thread. These include rivets (miniature models with a narrow blade similar to a sharp leaf, allowing you to create a neat, high-precision design), marigolds (designed for cutting out thin elements with rounded shapes).
- Chisels . Used when knocking out unnecessary elements in the material.
- Shoals . Cutters equipped with an oblique blade for decorative work on relief. Used for sculptural carving.
- Shtiheli . They are distinguished by mushroom-shaped handles and an oblique cutter. Used for preparing grooves.
By type of longitudinal section
- Direct . The most common. The blade and blade are completely smooth.
- Curved . A special feature is the noticeable bend of the blade and blade.
- Klukarzy . They are distinguished by a sharply curved blade along the entire length. Used for punching wide pieces of wood.
- Reverse . The presence of sharpening on the other side of the blade and a notch on it allows you to create relief elements above the main surface. Such specimens are called “reverse cranberries.”
By cross section type
. The difference is the straight profile. Available in many sizes.
Flat- Angular cerasics . The cross section resembles the letter "V". Its angle is 60-90 degrees. Convenient for three-dimensional carvings, for example, images of hair.
- Radial . The cross section resembles a semicircle. Allows you to carefully and smoothly bury the tool into the wood. Used for contour carving. The working part can be sloping or flat.
- Bracketed . The smooth cutting part is equipped with sides of various sizes, placed at certain angles. Gives a narrow, even sample.
- Cerasics are round . Similar to the radius version, with a smaller thickness. Purpose – figured carving.
According to the shape of the working part
- Straight (the blade is perpendicular to the blade, used for rough processing in even stripes).
- Oblique (the beveled blade makes it easier to penetrate the wood).
Main wood carving techniques
Different carving techniques require different positions of the device in relation to the wooden plane. There are three main ways to work on wood with a chisel:
- pruning This work is carried out on the growth of fibers; The tool is positioned with the unsharpened side of the blade facing up, and you need to hold the handle with one hand and the blade with the other so that your thumb is pointed at the handle. If you hold the chisel in this position, the master can easily set precise forces to obtain the most even and smooth surface possible
- side cutting or selecting grooves. Flat chisels are used to obtain rectangular grooves. The sharp edge can be beveled or straight. Most often, such a chisel is sharpened only on one side. Options with a semicircular sharp edge (in the form of a quarter or semicircle) of the canvas are used to create grooves in a circular manner
- perpendicular cutting. In this type of work, the chisel must be held by the handle with one hand, and the blade should be held with the thumb and forefinger of the other hand. In this way, you can thinly cut wood chips once. Note that this method is the most labor-intensive.
Wood carving chisels are not designed to cut large amounts of wood at one time. Their task is to remove excess wood gradually, adhering to pre-defined lines.
You can use a mallet or hammer during the cutting process. These additional tools will be needed if you need to quickly make a recess or hole. At the same time, complex patterns require a lot of work and are cut out slowly.
Prices
The cost of different products does not vary much. On average, it is 300-700 rubles per unit. Depends on the material, manufacturing method and manufacturer. The author of the article enjoys using Belarusian chisels made by hand forging and hardening. Their retail price does not exceed 300 Russian rubles.
Expert opinion
Levin Dmitry Konstantinovich
There are models costing more than one and a half thousand. Brand has a significant impact on pricing. In addition, it is more profitable to buy individual copies than to purchase an expensive set.
Sharpening quality control
It remains to check the quality of sharpening. Valery Prostyankin makes test cuts on a pear board across the grain.
The cut mark should be perfectly smooth and shiny. This is a sign that the instrument is sharpened well! If, during the test, burrs and nicks appear, the wood begins to crumble. watch the MK videos, re-read this article again and work on your mistakes.
Friends, once again I want to draw your attention to the fact that a sharp tool is the key to success in wood carving. Do not try to cut with chisels sharpened according to the principle “this will do.” It’s not for nothing that in specialized carving schools students are not allowed near wood until they learn how to sharpen a tool well!
In conclusion, I can only express my deep gratitude to Valery Alekseevich Prostyankin for the wonderful master class. The author of the videos selflessly shared his personal experience in this matter. Perhaps his recommendations will be useful to you too.
Features of choice
When choosing a tool, you should consider the following criteria:
. It must be hardened, clean, smooth, and have the appropriate thickness.
Blade quality- Features of the handle . Wood is the best option, providing ease of holding in the hand. Plastic ones must have rubber inserts. The blade should fit snugly into the handle.
- Price . Often a cheap product does not meet most requirements. Sometimes it is beneficial to purchase a separate blade and make the handle yourself.
- Options . The optimal length is considered to be 100-150 mm.
- Proposed work . Die-cut models are suitable for high-precision carving; stamped chisels can be used with thrust washers.
- Each type has its own area of use . Often, to create any kind of relief you need at least 10 different tools.
The best shank is forged. It has an optimally distributed hardness and is distinguished by characteristic stains on the surface.
Common patterns
The most common type is considered to be “bench” chisels. They are universal, used by all masters. Just a few types allow you to do almost any job.
Their blades are 150-170 mm long. Blade width – 3-50 mm. The sharpening angle is 20-31 degrees. The parameters allow for fine pruning and chiselling of the tree. The presence of chamfers on the edges of the blade allows you to work in hard-to-reach places.
What kind of chisel do you use?
ManualPunch
Another popular type is stripping chisels. Features - shortened blade, small handle, chamfers, sharpening angle - 25-30 degrees. Allows you to create miniature transitions and replace the cutter. Used for inserting locks and cleaning hinge recesses. An indispensable tool for repair work.
Interesting fact! Many pocket tools have evolved from common carpenter's chisels. Their reduction occurred as a result of frequent sharpening and adjustments.
Famous manufacturers
Reputable companies:
- Bahco;
- FIT;
- Hardax;
- Hart;
- Narex;
- Sandwik;
- SANTOOL;
- Stanley;
- TOPEX;
- Truper;
- Unipro;
- VIRA;
- Irwin;
- COBALT;
- Sturm;
- Anchor.
Mistakes and how to avoid them
It takes a lot of time to master carving. And it goes not only to learning how to work with a tool, but also to coping with the consequences of failures and mistakes that are made due to inexperience.
Professionals advise paying attention to these “little things” that can ruin the final result:
- Only well-dried wood should be used.
- You should not hastily delve into the surface of the workpiece; all movements should be made smoothly and with minimal pressure on the tool.
- It is necessary to take into account the specifics of different types of wood, having studied it additionally, with different types of wood and you need to work differently.
- You can’t start working without a sketch; a beginner should give up improvising.
- You can’t grab onto everything at once and try to complete complex tasks; you need to gradually move from the simplest tasks to more complex ones.
