How to make a groove in a beam using a router, a hand-held circular saw and a chainsaw
Sometimes when carrying out work there is a need to make a groove in a beam, for example, when installing internal partitions or when installing door and window blocks in openings, this is necessary for a better connection of elements and improving the appearance of the structure. Also, sometimes there is a situation when a beam with grooves needs to be joined with a conventional option, in this case a longitudinal recess is needed, we will also consider this in this review.
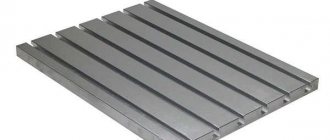
In the photo: cutting a groove in a timber requires precision; any errors or miscalculations are unacceptable
Seam using an electric planer: purpose and application
Quarter or other name for seam. This is a selection in the form of a step along the edge of a board or block. It is designed to allow you to create overlays for workpieces. This simplifies the process and also eliminates the need to make tongue-and-groove joints in parts that are burned. The board is peeled, used mainly for the manufacture of floors or panel structures.
First, the workpiece is placed on a carpentry machine and secured as tightly as possible with clamps. Fasteners should be on the opposite side of the processing area.
Tool that can be used
Let's consider what devices can help you when carrying out work:
| Fraser | There can be two options here - either a full-fledged machine that can perform any work, or a manual milling machine, with which you can quickly perform some operations right at the construction site. |
The first solution is used by professionals, since the price of the machine is high; the second type of tool is also suitable for home use
Specialists use special machines for longitudinal profiling of timber
Features of the work
Since independent work on cutting longitudinal grooves is impractical (it is much easier to purchase a tongue-and-groove beam, this will save you a lot of time and effort), we will look at how to make slots for partitions, frames, etc. There are several options, choose the one that is more convenient for you.
Tenon-groove-tenon timber is one of the most popular and sought after options among developers
Using a hand router
This tool is very suitable for DIY work for the following reasons:
A correctly selected cutter will help you easily achieve the desired result.
Before selecting a groove in the timber, move the stop to the required distance
Hand-held circular saws
Very mobile equipment that can be used for cutting elements of small thickness; it is also often used for the purposes discussed in our article, this is due to the following factors:
Mobility is the main advantage of this option
Advice! This saw is very convenient for making grooves in window and door openings, where there is little space and it is difficult to position yourself with a chainsaw or router.
Working with a chainsaw
This type of tool is available at all sites where structures made of wooden beams are erected, so it can be used for our purposes.
Let's look at how to cut a groove in a beam with this tool:
It is important to cut the timber to the required depth
Cutting a tenon with a router
If you have a lot of tenons to cut (or if you just like working with machines), a table router is the ideal tool. If the large size of the workpiece does not allow it to be placed on the milling table, it is better to press it with clamps to the workbench and process it while holding the router in your hands. Set the fence to the length of the tenon and the router to the desired height, then, holding the workpiece firmly against the fence, remove the excess wood in several passes. When the end of the tenon rests against the stop, turn the workpiece over and repeat the procedure on the other side. If you stop before the cutter reaches the shoulder line, trim the tenon with a chisel.
Cutting a tenon with a router
How to make a rectangular or oval groove in a log? Cut out grooves and bowls.
The construction of a wooden house or bathhouse is gaining more and more popularity every day, and often home craftsmen decide to build a building from timber with their own hands. In addition to creating a working design, you should know the technology of laying logs. For high-quality and competent assembly, you should study all possible connection methods. Therefore, in this article we will tell you how to make a groove in a beam and connect it correctly.
How to cut timber?
When folding a log house, its connection may be needed in two cases:
Each of the above connection methods has several types of grooves for fastening.
What does drying out lead to?
A typical case: you made a shed at your dacha to store household equipment and for other needs. They did it for themselves, so they pulled together the boards from which the walls were made, carefully, without the slightest crack. Two or three months pass; the boards dry out and the entire wall glows with cracks. In winter, snow blows through them; in summer, the wind blows dust inside the barn.
To prevent this from happening, you need to use quarter boards for wall cladding. A wall covered with such boards will never have through gaps. With their quarters, neighboring boards overlap each other and when they dry out, through cracks no longer appear.
Unfortunately, lumber is very rarely sold with a quarter finished. Therefore, an amateur craftsman should know the ways in which boards can be modified if necessary.
What types of beam corner ties are there?
To efficiently connect a wooden frame at the corners, you can use a tie with or without residual ends. In the first case, the connected beams will have leading ends; this option is good because it provides better piping and protection of the corners from precipitation. But with this connection method there is an increased consumption of material. In the second case, laying the timber is much more economical, and the corners are smooth. Examples of the above connections are shown in the photo below.
Sawing method
If we consider this connection option as with the remainder, we can distinguish the following types of grooves:
Although the “oblo” is simple, there are three types of its grooves:
Examples of such connections are shown in the photo. Let's look at each of them separately.
How to choose a groove in a log - stages of the work process
Grooves are required for more dense and reliable joining of logs to each other. If you purchase rounded elements, they are usually ready for assembly, but sometimes you need to make a groove yourself, this process is not very simple, so it’s worth talking about it in more detail so that you can understand some of the nuances better.
It is important to carry out the work correctly, as the elements can very easily be damaged.
In the photo: you can make a longitudinal groove with your own hands using special tools
What does drying out lead to?
A typical case: you made a shed at your dacha to store household equipment and for other needs. They did it for themselves, so they pulled together the boards from which the walls were made, carefully, without the slightest crack. Two or three months pass; the boards dry out and the entire wall glows with cracks. In winter, snow blows through them; in summer, the wind blows dust inside the barn.
To prevent this from happening, you need to use quarter boards for wall cladding. A wall covered with such boards will never have through gaps. With their quarters, neighboring boards overlap each other and when they dry out, through cracks no longer appear.
Unfortunately, lumber is very rarely sold with a quarter finished. Therefore, an amateur craftsman should know the ways in which boards can be modified if necessary.
We connect the beams using the “oblo” method at the corners
When making a corner connection of a log house using the bowl method, there are three possible methods:
Of the above methods, the last one is the most used and simple. Technologically, making a groove is similar to a “groove”, but in addition, a laying groove is selected along the length of the beam. During the installation of logs, the laying cutout is filled with insulating material, and this procedure is repeated during the installation of each subsequent log house.
Important! For reliable and high-quality fastening, in addition to the groove, the logs are attached to dowels. They are round dowels that are driven into drilled holes in the logs being joined.
When laying using the oval ridge method, in addition to the main and laying grooves, an oval protrusion is left in the bowl, and a cut of the same shape is left in the lying log. Thanks to this protrusion and cutout, reliable fixation of the log house is ensured.
The fat tail laying is the most complex of the three listed, because the groove made in the log has an unusual shape (most often it is rectangular) and is located across the log, and in the next log the cutout has a longitudinal cut of the same shape. Although making a selection in this way is very problematic, such a connection is very strong. When building and installing it yourself, you will have to acquire not only a chainsaw, but a router and an electric jigsaw.
Considering other installation methods, it should be noted that they are all very similar to each other. For example, “Oblo” and “Okhlop” have a difference in the location of the cut; in the latter, the groove is cut from the bottom of the log.
If we consider the “ohryap” method, then the groove in the beam is cut longitudinally and transversely, that is, there is a double cut in the bowl, and at the same time it is made in both logs.
What does drying out lead to?
A typical case: you made a shed at your dacha to store household equipment and for other needs.
They did it for themselves, so they pulled together the boards from which the walls were made, carefully, without the slightest crack. Two or three months pass; the boards dry out and the entire wall glows with cracks. In winter, snow blows through them; in summer, the wind blows dust inside the barn. To prevent this from happening, you need to use quarter boards for wall cladding. A wall covered with such boards will never have through gaps. With their quarters, neighboring boards overlap each other and when they dry out, through cracks no longer appear.
Unfortunately, lumber is very rarely sold with a quarter finished. Therefore, an amateur craftsman should know the ways in which boards can be modified if necessary.
Warm corner for a log house
In modern low-rise housing construction, timber material is confidently replacing rounded logs. The use of wooden beams makes it possible to complicate the design of houses and expand the possibilities for introducing new architectural and design solutions. Bay windows, attics, verandas and balconies appeared in houses.
The shape of the timber building material made it possible to introduce the technology of closed tongue-and-groove fastening into house construction, called the “warm corner”. The method and technology of connecting timber into a warm corner is similar to fastening it into a paw. Unlike laying in the paw, this method has a number of advantages. Advantages of cutting in a warm corner:
The method of closed corner connection of beams is quite complex; when building with your own hands, the operation requires the performers to have qualifications and skills in handling the tool.
The “warm corner” technology is widely used in the industrial production of turnkey prefabricated wooden houses. The profile of the lock is cut out with a high-precision machine method, the frame of an industrial house is easy to assemble with your own hands, the assembly of parts from timber into a warm corner is available to mass developers.
Types of castle
The corner connection into a warm corner ensures fastening of the original design: a blind groove cut into the body of the beam and a tenon form a lock that is maximally isolated from the external environment. The area of such a connection is minimized; there are no through gaps in the structure. The groove is located vertically and is cut down to the entire thickness of the timber. The unit reliably fixes the building structure in a horizontal plane and provides resistance to multidirectional loads; types of fastening differ in size and shape of the profile:
Pairing into a straight tenon is the simplest; cutting and laying such a tenon is easier, but this design requires additional reinforcement with a dowel. The technology of cutting, installation and dovetail laying is more complex and requires professional skills. A common disadvantage of all studded fasteners is the possibility of delamination or cracking of the stud; such a defect cannot be corrected and the workpiece is rejected.
The keyed connection is used to connect high-quality profiled laminated veneer lumber in industrial housing construction. Rectangular and trapezoidal hardwood keys are used. The dimensions of the keyed fastening are minimized, the design is distinguished by the strength and tightness of the connection, fastening to the key does not require the use of insulation.
Material selection
At the preparatory stage, it is necessary to choose a standard size; most often, a warm corner is built from 100x150 timber. The choice of the size of the tenon and the shape of the lock depends on the density of the wood; for soft pine, the width of the fastening is half a tree, for denser larch - a third or a quarter. The length of the tenon should not exceed half the width of the workpiece; for a beam width of 150 mm, this is 60-70 mm.
Laying timber flush
The basis for connecting beams flush is the folding method, but the protruding sections of the logs are removed from the end. And to increase the reliability of fixation, “presecs” are used; they are made in the form of protruding spikes that are attached to the edge of the frame.
When the connection has a regular groove with a “presec”, the stacked logs will be blown through at the place of laying.
Important! To prevent such defects, the cut in the timber is made in the form of a “dovetail”.
By using inclined tenons for connection, a tighter clamping of the timber is created, and as a result, thermal insulation increases.
Important! When a log house is mounted using dowels, dowels or fat tails, then before selecting a groove in the timber, you need to ensure there is a sufficient gap between the groove-tenon connection so that during shrinkage of the material the wood can move sufficiently.
Types of groove boards
Many users have no idea how to choose a groove in a board, believing that the store will offer them only one option for connection and material.
This is far from true; there you will be greeted by a large assortment:
- Symmetrical groove. This is the simplest type. In it, the lengths of the upper and lower shelves are the same, and they protrude at the same distance.
- Asymmetrical groove. Here the upper shelves are longer than the lower ones.
- Block house, used mainly for finishing walls and ceilings. The planks often imitate the relief of timber and have a semicircular or shaped profile on the front side.
- Euro lining, like block house, is often supplied with a relief pattern.
- Decking boards, made of wood and polymer, also have tongues and grooves that simplify installation.
Note! If you plan to mount walls that are not level, have protrusions and dents without a groove board, do not expect good quality from the result. The cladding will not lie flat, height differences and cracks are inevitable.
Making a rectangular groove
Before marking the width and depth of the groove, the log should be secured by laying it on pads.
Using a compass on the thinner end of the log, you need to find the center and draw the radius, the same should be done on the thicker end of the log.
Using a cord and a square, vertical and horizontal diameters are drawn at both ends of the log. After this, mark the width and depth of the future groove. Typically, the width is chosen equal to 1/6 of the diameter of the circle, and the depth is ¼ of the diameter.
After the necessary markings have been made on the ends of the log, use a cord and notches to mark the boundaries of the groove on the surface of the log and begin chopping the wood.
Driving screws
You have a choice of mild steel, stainless steel, brass or aluminum screws with straight or Phillips slots and countersunk or pan heads. Semicircular heads stand out clearly on the surface of the wood, countersunk heads are either flush with the surface, or edged with brass washers, or hidden by wooden plugs. The screws are screwed in with a hand screwdriver, a drill with an appropriate attachment, or a screwdriver.
Driving screws with a drill or screwdriver
When using a drill, install the locking mechanism so that the screw is screwed in to the required depth. If the wood is soft, the installation hole can be made with an awl; if it is hard, drill it with a drill of a smaller diameter.
The installation hole can be made with an awl
To be able to hide the screws under the wooden plugs, you will have to drill a hole for the plug with a countersink drill and a corresponding cutter for the plug. Don't use steel screws on oak - they react with the wood and moisture and cause stains. Instead, choose plated steel, brass, or stainless steel screws.
How to connect timber longitudinally?
When building a house from timber, it often happens that the length of the material is not enough, because a standard log is 6 meters long. But often the size of the house is much larger, so the beams have to be connected to each other.
To connect two beams, you can use several methods:
When fixing a log house using the longitudinal tenon method, an internal groove is sawn on one log, and an external groove on the other, which fits tightly into the first, after which both parts are secured with an iron bracket or cotter pin.
If the half-log fastening method was chosen, then each edge of the beam is sawed in half and placed end-to-end, after which it is fixed with a bracket or dowel.
Important! The use of this method of fastening is very rare due to the low efficiency of fixation.
The third method of fixation is the most reliable; to implement it, a groove and tenon in the form of a “dovetail” are sawn through the edges of the beams.
conclusions
All work on the construction of a wooden house should be carried out only by professionals, but if you are confident in your abilities, you can assemble a timber building with your own hands. Then you should study in detail the technology for creating and fastening grooves, and also watch the video “how to cut a groove in a beam.” But the main key to success is self-confidence.
A hand router is a universal mechanical tool in the home workshop. To use it correctly, you need to get basic lessons in working with a wood router. There are many Chinese-made milling cutters on the market, they are all of the same design and differ only in engine power. Experts recommend purchasing a more powerful tool, since the list of work performed will expand significantly. The craftsman will be able to cut out a pattern, make a quarter cut, cut tenons and perform other operations related to the manufacture of furniture.
Types of cutters
For processing wood, board and composite materials based on it: chipboard, OSB, MDF, plywood and others, two types of cutters are used:
A Forstner drill allows you to make through and blind holes in wood materials. There are plenty of them on the market, but with standardized sizes: from 10 to 35 or more mm in 5 mm increments. What if we need a hole with a diameter of 17 or 22 mm?
Take a bolt with a head a couple of millimeters in diameter larger than the drilling diameter. A pair of symmetrical slots are made in it, which will become the cutting edges.
The bolt is placed in the drill (its standard chuck accepts bolts with a diameter of up to 13 mm), and it is clamped in a vice. The electric motor power button is clamped and fixed. Using a grinder, the edges of the bolt are cut to the diameter of the hole. Additionally, the operation will reduce vibration.
The end part is slightly removed, but so as to form a point in the center. It is better to leave the needle a larger size, and then modify it with a burr or a needle file.
They are formed, brought to perfection and sharpened at an angle of 35-40° - the harder the wood, the blunter the angle - the cutting edges of the tool. Afterwards they can be finished with a whetstone to give them ideal geometry and sharpness.
After completion of the work, the homemade cutter is tested at low speeds in a drill or drilling machine. It is strictly prohibited to install such equipment on a high-speed milling cutter:
Expert opinion
Strebizh Viktor Fedorovich, leading construction foreman
Then the second board is placed on the workbench, and the first one is placed on it, in order to install and secure the metal template in the desired position, the protrusion on the edge of the template must fit exactly into one of the middle grooves of the first board. If you want to clarify something, please contact me!
Features of the work
Since independent work on cutting longitudinal grooves is impractical (it is much easier to purchase a tongue-and-groove beam, this will save you a lot of time and effort), we will look at how to make slots for partitions, frames, etc. There are several options, choose the one that is more convenient for you.
Tenon-groove-tenon timber is one of the most popular and sought after options among developers
This tool is very suitable for DIY work for the following reasons:
A correctly selected cutter will help you easily achieve the desired result.
We suggest you familiarize yourself with How to cut a hole in slate for a pipe? Before selecting a groove in the timber, move the stop to the required distance
Very mobile equipment that can be used for cutting elements of small thickness; it is also often used for the purposes discussed in our article, this is due to the following factors:
Mobility is the main advantage of this option
Advice! This saw is very convenient for making grooves in window and door openings, where there is little space and it is difficult to position yourself with a chainsaw or router.
Working with a chainsaw
This type of tool is available at all sites where structures made of wooden beams are erected. therefore it can be used for our purposes as well.
Let's look at how to cut a groove in a beam with this tool:
It is important to cut the timber to the required depth
Manual milling machines have a high spindle rotation speed, so when working with them, a certain amount of care and attention is required. Compliance with basic safety rules that must be followed when working with any power tool will help you avoid injury.
When working, do not neglect protective equipment - eye glasses, a respirator and gloves, since very fine wood dust is generated during the work.
Drilling holes
Use a drill press and Forstner bits to drill large holes accurately and accurately. Mark the center of the hole, attach the corresponding drill bit and set the depth stop. Then press the workpiece with clamps to the workbench (this will take some time, but it will be completely worth it).
Drilling holes
To drill holes for screws and installation holes for nails, you should use a drill, and it is more convenient to use a cordless drill. If you need to screw in a lot of screws, install the screwdriver included with this tool into the drill chuck.
Driving screws with a drill
Creativity without limits
Milling equipment is indispensable when processing wood. With its help, you can turn a wooden blank into an elegant decorative product. This equipment is most often used by professionals, but experienced amateurs can also master it. Using mechanisms is not an easy task , so before you start working with them, you need to ensure your comfort and safety. Organization of the workplace is very important. The home craftsman must remember that during work there is a possibility of damage not only to the cutter or mechanical device, but also to health.
Woodworking is not only about working at the machine , but also about preparing the workplace and planning the sequence of work performed. Before you start milling, you need to select the appropriate type of cutter for a specific task, taking into account its shape and size. You should select the speed of the machine and the cutting depth and do not forget that the material being processed must be securely attached to the table.
Depending on the specific type of milling device, the rules for their use are different in many aspects. Today, vertical milling machines in which the spindles are located above the work table are widely used. They have proven themselves to be excellent in operations such as wood milling, processing the edges of shelves and round tabletops, making a groove, and joining wooden parts. When processing round structures, an indispensable addition is a special compass with a support plate, which ensures precision processing.
When working with a router, you need to learn how to move it calmly and smoothly. The key is to move the material being processed correctly and safely. This should not be done too slowly, as burn marks may appear on the wood, which can lead to damage to the material.
Marking of the second part
Tenon joint elements.
After this, we move on to marking the second part of the connection. To do this, you need to take the two parts that are supposed to be connected and attach them tightly to each other. In this case, you need to ensure that it matches the lines of the cuts. When the parts are perfectly attached to each other, it is recommended to clamp them in a vice so that they do not move.
Now that the parts are properly fastened, you need to apply marks with a pencil on the second part that has not yet been marked, and then make the initial cuts with a file. These will not be solid lines, but just thin marks, similar to scratches. But it is still necessary to do them, since it will be easier to work later. Only when making marks, try to do it in such a way as to achieve perfect evenness and avoid bending.
Related article: Technology of interior finishing with gypsum bricks
After this, it is necessary to release the parts and move them further relative to each other. It is important to take this into account. If you move the parts just a little by the width of the file, the connection will turn out to be quite rigid. And if you make the shifts a little more, it will be freer.
However, it cannot be said that any of the options is bad. It all depends on the nature and size of the parts being connected. And also on the specific type of wood used. If you use plywood, then you can make shifts only along the width of the cut, since in any case it will not be subject to severe deformation.
Tool that can be used
There can be two options here - either a full-fledged machine that can perform any work, or a manual milling machine, with which you can quickly perform some operations right at the construction site.
The first solution is used by professionals, since the price of the machine is high; the second type of tool is also suitable for home use
In common parlance it is called a parquet or a manual circular saw, this is a very convenient device with which you can make vertical cuts of a certain depth, the groove is then selected with a chisel and a hammer, the equipment is multi-purpose, so it is available to many home craftsmen
Chainsaw or electric saw
Suitable for making grooves for internal partitions, it can be used to quickly make a cut to the desired depth, after which modification is necessary using a chisel and hammer.
It’s important to be good at handling a chainsaw, since without a certain skill you won’t be able to make an even cut.
Hammer and chisel
Previously, all work with wood was performed with the help of these devices, but nowadays they are used as auxiliary elements, since manual labor is very slow and labor-intensive. But if the amount of work is small and there are no power tools at hand, then you can get by with these simple tools
Specialists use special machines for longitudinal profiling of timber
Rallying in a quarter
Rallying in a quarter
gives a tighter connection than butt jointing. Longitudinal side cuts (quarters) are made in the boards to be joined using a hand router, electric planer or circular saw. The depth and width of the quarter should be equal to half the thickness of the board. This type of connection leaves no cracks or gaps. Quarter bonding is useful for cladding external and internal surfaces. For example, to hide unevenness or defects in walls, insulation and flooring.
1. For an example of cutting a quarter with a circular saw, take 3 identical boards (photo 1).
2. At the beginning of work, mark 1/4 of their width on the boards on both sides. Prepare the circular saw. To do this, adjust the reach of the saw blade so that the cutting depth is equal to half the thickness of the board (photo 2).
3. For the required distance (half the thickness of the board) of the cut from the edge of the board, we adjust the parallel stop of the saw (photo 3).
4. We secure the workpiece on the work table with clamps and make a longitudinal cut with a circular saw (photo 4).
5. After this, we make longitudinal cuts on the back sides of the board (photo 5).
6. Again, secure the workpiece with clamps on the work table (photo 6.1) and make transverse cuts equal to half the thickness of the board (photo 6.2-6.4).
7. In this way we make 2 more blanks (photo 7).
8. Place the workpiece on 2 perpendicular boards (photo 8).
9. We nail the prepared blanks to their base (photo 9.1, 9.2).
10. When nailing the next workpiece, press it tightly against the previous one and fix it with nails using a hammer (photo 10).
11. The quarter joint is ready (photo 11).
Processing of wooden parts
The first thing you need to learn is to correctly set the milling depth. To do this, you need to set the zero point. It is impossible to set it rigidly, because it changes every time the cutter is changed. The zero point is the position of the tool when the end of the cutter touches the material and is fixed with a special device called a clamp.
It is necessary to pay attention to the fact that each router has a different position when fixed. To control the depth of immersion of the cutting tool into the body of the material, a stop pin with a coarse adjustment scale is used.
When milling with an end mill, the counterforce from the cutting force moves the router to the side. To prevent this from happening, you need to use a rip fence. The milling process is as follows. Place the cutter along the marking line and secure the position of the stop with a special screw. Set the milling depth and turn on the machine. If the rip fence is installed on the left side, you need to pull the router towards you, when on the right side - away from you.
In order to select a quarter on a beam, you need to set the cutting edge of the cutter at the very edge, fix it, set the depth of the quarter, turn on the router and pull it towards you (if the stop is on the left edge of the beam). Milling the surface of narrow bars has its own peculiarity. The problem is that it is very difficult to hold the router on the narrow side of the workpiece. If it wobbles during operation, the groove will be inaccurate.
To avoid this problem, the block must be clamped with a clamp, and a block of exactly the same size must be placed in parallel. Then the milling machine will acquire two points of support and will not wobble.
Working with a hand router can replace working with a planing machine. To do this, you will need several accessories for the milling mechanism. It looks like this: attach a milling mechanism to two equal-sized slats and use it as a planer, where a large-diameter milling cutter is installed instead of a shaft.
Curved cuts
A curved cut can be made with an electric hacksaw, jigsaw or band saw. The hacksaw is good for large radius cuts and thick wood, when the cutting line goes away from the edges.
Curved cut
Hacksaws are equipped with rotating bases that change the cutting angle, and depending on the type and thickness of the material, different saw blades should be used. For curved cuts of small radius and with wood thickness less than 50 mm, use a jigsaw or jigsaw.
Jigsaw machine
Install the new file and tighten it until it rings when you click it with your finger. If you need to cut an opening, you can do two things: either start cutting from the edge, or, if you do not need to touch the edge, first drill a hole in the part to be removed, then release one end of the file, pass it through the hole made and clamp and tighten again.
This saw makes it easy to make cuts at any angle. Place the cutting blade on the frame at the required angle (90, 45, 36, 22.5 or 15°) and fix it. Set the depth gauge to the desired mark. Place the workpiece on the saw table, press it against the fence, and then make the cut using smooth back and forth movements.
Useful DIY crafts
In order to make something useful, for example, a box, it is not necessary to have a whole arsenal of complex equipment and expensive tools. You can get by with a minimum of tools and mechanisms . To perform carpentry work you will need:
You can use absolutely anything as a material - for example, scraps of parquet boards, pieces of plywood and waste chipboards, but always at right angles. To simplify the work, you need to make a simple milling table. To process workpieces, you will need a large-diameter straight groove cutter. The process looks something like this. On a makeshift table, plan the ends of parquet board scraps. Mark the sides of the box and use a jigsaw to remove all excess.
The resulting blanks must be processed with a thicknesser to maintain the size of all sidewalls. If you don't have a surface planer, you can use a milling table. To do this, set the stop to the size of the workpiece and move the part between the stop and the rotating cutter towards you. The next operation to calibrate the sidewalls in length is performed with a jigsaw.
You can connect the sidewalls together with a mustache. To do this, you need to mill the ends of the sidewalls with a conical cutter with an angle of 90 degrees. This can be done using a router. Thus, the ends of the sidewalls have the same bevels of 45 degrees. Next you need to make grooves in the sides for the bottom. For this, an end mill with a diameter of 6 millimeters is used, equal to the thickness of the plywood. The parts are connected using glue. The product looks neat and beautiful both outside and inside. What else can you do with a hand-held wood router? Anything: for example, a shelf for things, drawers for storing vegetables or tools, kitchen furniture.
Toolbox
In order to make a tool box, it is necessary to strengthen the carpentry joint of the sides by inserting additional tenons. The operation is called cutting tenons with a hand router. It is very difficult to do it manually, so you need to make a simple device - a milling table . The principle of its manufacture is simple:
A device for cutting tenons in a board works as follows. Mark the place to be milled and, pressing the board against the stop bar, move the carriage, directing it towards the cutting tool. The resulting finger joint between the parts will be strong and reliable.
How to make a panel
One of the most commonly performed carpentry operations is making paneling. It is performed with a special cutter. To perform the work efficiently, it is necessary to make a simple device for the tabletop of the milling device. To do this, you will need thick-layer plywood measuring 500 x 300 x 10 millimeters. To exit the cutter, a hole with a diameter of 100 millimeters is cut. The parallel stop is attached to the table with clamps. The cutter is set taking into account the distance from the table surface to the sharp edge of the cutting tool of one millimeter. All sides of the workpiece are processed sequentially. The thickness of the panel is adjusted by lifting the cutter.
Making a box begins with preparing the material
When making boxes, take the time to prepare the material, and this will certainly pay off when assembling the connections later. This is the sequence that leads to success.
Step 1: Level one face of the board using a planer, then make the other face smooth and parallel using a planer and give the board the required thickness.
Step 2: While pressing one face of the board against the planer fence, align one edge of each board at a right angle. File the opposite edge, making the board 3mm wider than the final height of the box, and mark this edge by drawing a solid line along it with a pencil.
Step 3. Pressing the sharpened edge against the cross-cut fence, cut the board into blanks for the walls of the box. Attach a stopper-limiter to the stop plate so that the workpieces have the same length.
When preparing material for your project, be sure to do the same with a few scraps that will be needed to check settings and make test joints.
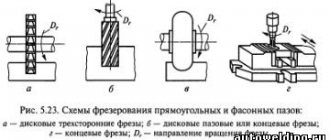
Choosing an electric milling machine
A groove is a recess limited by planes or shaped surfaces. This element can be of various shapes - rectangular, triangular, trapezoidal, T-shaped and shaped. There are also through, closed and semi-closed grooves.
1. Straight. The most common type that can be used to perform a wide variety of jobs. This type of equipment creates an even rectangular groove in the wood.
2. Fillet. They form a semicircular groove and can be used to create grooves in products.
3. V-shaped. Create a groove with 45 degree angles. They are used primarily for cutting out ornaments or letters on parts. They can be used to make drawings on a wooden surface.
4. Spiked (“swallowtail”). Designed for the manufacture of hidden and open tenon joints. They are widely used in furniture production.
A ledge is a recess bounded by two mutually perpendicular areas. To manufacture this element, end, disk or end mills can be used. The principle of operation here is similar to the selection of grooves.
For mortises and tenons under similar circumstances: only half the normal width. This is explained by the characteristics that compounds of this type have.
The tongue-and-groove joint should end up with some clearance. It is necessary so that later you can conveniently use the adhesive composition.
The solution to the problem depends on where the grooves are located and what size they are. Here are some recommendations for home craftsmen:
The main thing is to get rid of wood waste in a timely manner after completing each stage. Then the instrument will definitely not suffer from overheating. When doing the work, it is easiest to use a template cut out of plywood. They pass through it with the cutter itself, with the bearing installed.
Routers are also used to make a variety of signs, signs, low-profile designs, and carving patterns on flat wood materials. When free-routing, Y-slot cutters are often used because even hardwoods feed easily under their pointed tips.
Standard 6 letters are best made using a template or stencil. Areas with dense texture will deflect the cutter. To avoid unexpected movement of the cutter from the required direction, hold the cutter by the base, lightly touching the surface of the product with your hands.
1. Taper cutters. Grind the angle of the workpiece at 45 degrees.
2. Moulding cutters. Their main purpose is to round edges; they form a quarter-circle profile. Edge processing with this type of cutter allows you to give products beautiful smooth outlines. The range of molding cutters is quite extensive, the radius of the circle varies from 3.2 to 16 mm.
3. Quarter cutters. They not only round the corner, but also form small grooves above and below the roundness. As a rule, this type is used in the manufacture of window frames.
4. Profile (decorative) cutters. The profiles are cut at the edge, forming a smooth curved surface. They are used primarily to create decorative elements.
5. Fillet cutters. Used to create an internal quarter groove in wood.
They have become widespread in the manufacture of decorative edges of products, including furniture.
In order to mill at home, it is recommended to choose a universal tool, which is an electric router with an interchangeable base - plunge and edge, thanks to which it performs any type of woodwork, depending on the selected type of cutter. It is better if it has speed control, work with a cutter with a diameter of at least 8 mm, the optimal power should be 800-1300 W.
Using factory or homemade templates, copiers and other devices, you can cut out quite complex patterns, even circles, circles and bends.
Using an ellipsograph (a rod with a center), you can move the router around in a circle to mill circular grooves or chamfer disc-shaped workpieces. The ellipsograph is usually installed in one of the clamps of the guide ruler. The medium ellipsograph is well suited for small items, such as cutting boards for cutting bread or cheese.
For larger projects (such as finishing the edge of a round table), secure the router with screws or bolts to one end of a strip of plywood, cut a hole in it for the router, and drive a nail into the other end to act as a centerpiece. To prevent the center from leaving holes on the surface of the product, glue a small piece of plywood using double-sided adhesive tape (tape), then mark the center on this pad.
Working from a template is a quick and easy way to make identical elements, and if the quality of the template itself is high enough, excellent results are guaranteed every time. In order to accurately repeat the shape of the template, manufacturers of milling machines produce guide bushings for them.
We suggest you familiarize yourself with Which timber to use for floor joists
It is simply a ring with a cylindrical edge along its inner radius. It is mounted on the base plate of the router coaxially with the cutter, which passes through the hole in this sleeve. The edge slides along the edge of the template, exactly repeating its profile. When making a template, it is necessary to take into account the difference between the diameters of the side and the cutter itself.
Make templates from stable sheet material such as plywood, chipboard or medium-density fiberboard. The template can be attached to the product using either nails or double-sided tape.
Working with a manual wood router helps to carry out the following carpentry operations:
Depending on the type of work performed with a manual wood router, video lessons of which can be viewed at the end of the article, you will need the following equipment:
With the help of such a tool, a novice craftsman can bring old furniture back to life and carry out small carpentry and decorative work with wood around the house.
To make this tenon joint, we will need the router itself and the work table. To facilitate the process, you can make an additional device such as a conductor.
The procedure is as follows:
Tenoning templates come in a variety of configurations. They serve to facilitate the work of cutting joints such as tongue and groove, as well as to speed up the work. With their help, you can make frames, box joints, and cut out various joints for furniture. The size of the groove, as well as the evenness of its edges, will depend on the shape of the template tooth.
To make a tenon cutter with your own hands, you will need guides, with the help of which you will mill the tenons. They should be mounted on two opposite sides of the housing in a checkerboard pattern, located equidistantly. If these conditions are met, they will fit together perfectly.
Drill saw
Neither a hand saw nor an electric hacksaw will help if you need to cut a small hole in the workpiece - less than 10 cm in diameter. A jigsaw may also be useless if the workpiece is large. In this case, the most suitable tool is a drill saw. With its tip it bites into the wood like a drill and thus makes a “starting” hole for further cutting. Externally, the saw is similar to a round file with the difference that its shaft is surrounded by a spiral around the cutting edge.
Drill saws are available with interchangeable attachments of various diameters, designed for processing both soft and hard wood, as well as a variety of materials made from it.
The working body of a drill saw is a metal rod with a cutting tip, like a gimlet, and a cutting edge that goes around the rod in a spiral.
This is what the narrowest of hand saws looks like. Thanks to the fastening unit, the blades in the hacksaw can be changed depending on the nature of the material being processed.
Drill attachment
One of the most popular and convenient options for cutting a hole is a special attachment for a drill. It is made in the form of a crown comb and has a rounded shape. With this attachment, cutting holes occurs quickly, and they turn out quite smooth.
drill bit for holes
Nozzles come in different diameters, which allows you to cut a hole of the required diameter. If you have already prepared a hole, we can advise you to try your hand at options trading.
Drill
You can also cut a large hole using a drill. To do this, it is necessary to pre-mark the outline of the hole to be drilled. Next, use a small drill to drill through holes along the contour prepared in advance. Next, using a jigsaw or a very sharp knife, we cut off the holes, thereby connecting the holes. After which you can smooth the circle using sandpaper of various grain sizes.
Chisel
You can also cut the required hole using a chisel. It is enough to remove the wood layer by layer along the contour. This option is the least suitable for interior decoration. The hole must be smooth, which cannot be achieved by using improvised and unsuitable materials for the job. The best option would be to use a drill bit. The hole is even and has smooth edges.
Thus, to summarize, it becomes clear that you need to choose a tool for cutting a hole based on your goals. If you need a high-quality cut, then you cannot do without a special tool.