Material cutting methods
As with any metal, methods for cutting cast iron are divided into thermal and mechanical. The choice of a specific tool depends on the design features. The following is equipment that saws (or cuts) cast iron:
- pipe cutter;
- angle grinder;
- chisel;
- hacksaw for metal;
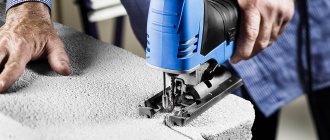
- jigsaw
- plasma installation;
- gas cutters.
Now it’s worth evaluating cutting using the mentioned tools with objects made of cast iron.
Useful tips
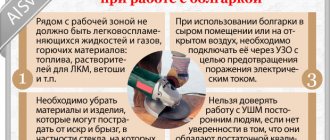
When starting to cut cast iron, it is worth remembering useful recommendations to make your work easier and safer.
- When cutting large cast iron, make sure there are supports. This will prevent the cut part from falling and biting the tool.
- Don't neglect your partner's help. Its involvement will make it possible to organize additional lighting, speed up the selection of tools, and reduce the risk of accidents.
- When purchasing canvases, circles and other consumables, give preference to certified products.
- Before starting work, clean the work area and make sure that there are no foreign objects under your feet that could cause a fall or restriction of movement.
Regardless of the chosen method of cutting cast iron, it is worth using personal protective equipment. With their help, it will be possible to protect the organs of vision, hearing and skin.
Pipe cutter
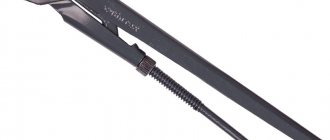
This is a special device for cutting pipes from different materials. There are manual (mechanical) and electric tools. Both types are suitable for diameters 15-360 mm.
First, a carbide disk is mounted on the device. The removable element has a number of advantages over classic abrasive ones. For example, the cutting speed is increased by 4 times, there is no sparking and no need to add any substances to the cutting zone. Diamond coating is applied on top of the cutting edge, which extends the service life of the products. Examples of pipe cutters for cast iron pipes are portable Exact Pipecut products for diameters less than 360 mm.
Alas, it is rare that a home pipeline can be easily cut with a pipe cutter. It may be difficult for a tool to access it, or the cutting area may be bent so that it cannot be grasped by the device. Therefore, it is worth considering other options.
Selection of electrodes
The first thing you will need to carry out welding work on heating pipes or other structures is electrodes. Not only the reliability of the resulting welds and the tightness of the system, but also the process of performing the work will depend on the quality of this consumable material.
An electrode is understood as a thin steel rod with a special coating, which allows for a stable arc during the electric welding of pipes, and is involved in the formation of the weld, and also prevents oxidation of the metal.
Depending on the type of core, there are the following electrodes:
- With a non-melting center. The material for such products is graphite, electrical coal or tungsten.
- With a melting center. In this case, the core is a wire, the thickness of which depends on the type of welding work.
As for the outer shell, the many electrodes that are found on the market should be divided into several groups.
So, the coverage could be:
Before starting work, we recommend that you consult with your familiar welders about the type of electrodes they prefer to use. In each specific case, these will be different brands, because a large variety of brands may be available for sale, and different from city to city.
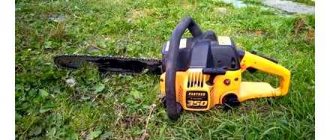
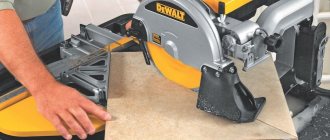
Angle grinder
Working with an angle grinder is quick and convenient, but not without its drawbacks. For example, it only cuts in a straight line. An attempt to make a curved cut will result in the disc being “bitten”, breaking, and possible injury to the user. Therefore, the machine is used for straight cutting. Another disadvantage is the fire hazard of the method (abrasive disc + metal = sparking). Before work, you will have to wear goggles, protection for your face and hands.
Cutting with a circle is more efficient than with a jigsaw, which is why users often choose a noisy grinder. When buying a cutting wheel, prefer products with a bakelite bond, because they are much stronger than their ceramic counterparts.
Answers from experts
Make cuts and break them with a sledgehammer. It should turn out better than mine - I just smashed it with a sledgehammer, but it’s a bit heavy and very noisy.))
And I'm thinking about how to take mine out. But it turns out she’s Bulgarian
Give it a try. You can, in principle, also try to make holes with it and break it into pieces with a sledgehammer
my father took out a cast-iron bathtub with his friend... from the 5th floor, without an elevator, they took several smoke breaks))) and most importantly... they took it to the trash, and when they went back... throw away all the trash (literally in 5-10 minutes), then there was no bath anymore))) ) in 5 minutes. the bathtub was taken away by unknown people... to an unknown direction))))
Is it worth the hassle - two hits with a sledgehammer (but in certain places) and it broke into three pieces
Sometimes people use a grinder to cut out a piece of a bathtub to install a washing machine. The only thing you need to think about is the place of the cut so as not to be tortured or killed by the grinder itself. A very dangerous tool when working in an awkward position. It may be enough to saw through half the depth of the edge of the bathtub, and then beat it off with a sledgehammer.
Cut it with a grinder and hit the cut with a sledgehammer. It will only break apart on its way.
They drill holes in them and break them with a sledgehammer, and then take them out.
Cast iron is very easy to drill and cut with a grinder. True, the dust from this is very black and difficult to wash off. When sawing, do not neglect protective measures against both dust and chipped enamel.
Alexander Kudryavtsev OLD. OTVET:
Found the problem... call a couple of homeless people and they will carry it out. And they will drag you to the metal collection point... Utya-Putya writes correctly, I had this happen... The bathtub was instantly dragged away from the trash heap...
What kind of homeless people tell the janitor that for 90 kg of ferrous metal it weighs exactly that much... he will carry it out himself. . In the dark she will pull out 1000 Russian ones... When I was throwing everything away... they came to me from home and asked if I needed to take anything out..
A kilogram of cast iron costs 3 rubles. So think about it, maybe it’s more economical to drag it to the collection point yourself?
If it’s just too hard to bear, catch the janitor in the yard and offer him a bath. They happily pick them up and sell them for scrap.
Arm yourself with a sledgehammer weighing 2 - 3 kg, strike a few times - no dust, no bath... No need for a grinder. Tried it several times...
real, but you'll get tired.
Working with a chisel and hammer
This pair of products will help separate cast iron in hard-to-reach places. Dismantling work begins with pipes remote from the riser in places where a grinder or hacksaw cannot be inserted. Since cast iron is a brittle material, it is easily destroyed after point dynamic loads.
A good impact tool has a rubber or polymer attachment to slightly soften the impact. This is necessary so that pieces of cast iron do not fly around, get into the riser and create a blockage.
The chisel and hammer work great with Soviet-era cast iron, that is, combined with sulfur, aluminum and cement. As you move towards the riser, there is usually more free space for work, so further cast iron can be cut with a more efficient device. As with the grinder, when working with a chisel, it is recommended to cover areas of the body into which cast iron splinters may fly off.
The productivity of work is extremely low, but sometimes you can’t do without them.
Tapping into a cast iron pipe
During the operation of a dacha or country house, sometimes it becomes necessary to make a tap from the water supply or an additional drain into the sewer for the washing machine.
This issue is resolved using the “inset” method. How to insert into a cast iron pipe?
In most cases, it is possible to use a ready-made tee, the diameter of which is slightly larger. You should cut off the part of the pipe where the pipe is missing.
The pipe usually has to be cut lengthwise, a hole drilled and a pipe welded to the remaining part.
The flange is attached to the pipe along the entire perimeter by welding. It is quite difficult to do this without special skills. In this case, you can use sealant and clamps, which will allow you to make an insert into almost any pipe in the house.
Situations often arise in everyday life when you have to work in extreme conditions. One of the most difficult jobs is drilling cast iron, because... it belongs to abrasive materials. There can be many reasons: from remodeling the bathtub to personal technical ideas.
Plasma cutting
The method relates more to production than to household use, so it will not be discussed in detail. If the goal is minimal material consumption, speed of operation, and noiselessness, there is no better equipment for cutting cast iron. The plasma will make cuts in workpieces with a thickness of more than 200 mm, and the sawn material will hardly have to be processed at the end of the work.
The method is used by large metallurgy and industrial enterprises where there is a need for cutting and transporting cast iron scrap. Plasma installations are indispensable for large-scale work.
Security measures
When working with welding equipment, you must follow the safety rules:
- Do not work with faulty devices.
- When working with welding equipment, stand on a rubber mat.
- If there are cracks or pores in the workpiece, do not secure it above you.
- The welding process is harmful to health. The welder needs to use a special mask, gloves and protective clothing.
Do not touch the seam you have just made.
It is more difficult to connect parts made of cast iron using welding equipment than those made of other materials. For this reason, it is necessary to know the technology of creating seams and to use suitable equipment and consumables.
Gas cutting
There are two methods of gas cutting of cast iron:
In the first case, the workpiece is exposed to a thin jet of flame supplied under high pressure. The combustion product is usually a mixture of oxygen with kerosene or diesel fuel. By the way, it is an effective method for eliminating man-made accidents.
The second method resembles the oxygen gas method, only the cutting element is a thin tube made of hardened steel. Its tip is heated to almost 1500 degrees (welding/soldering iron/lamp), then oxygen is supplied through it, ignited at the outlet and heated to 2000 degrees. The resulting burning mixture easily copes with thick cast iron.
Both methods are good, but there are disadvantages - it is important to have experience working with gas equipment. Responsible and precise cutting is performed only by a professional. The second drawback is the release of gas that is harmful to health during operation of the cutter.
The method is suitable for working outdoors or in the garage. For example, the need to remove a cast iron lock from a swing gate. The cutter works quietly, you won't disturb anyone.
Possible problems
Dismantling of the old pipeline must be carried out to the maximum possible extent, since it is better to cut off a cast-iron pipe to the point where it passes into the socket. Then joining a new plastic pipeline and a cast iron pipe will take less time and effort. Don’t think twice about how to cut a cast iron pipe; use a grinder.
Read also: How to check a car battery with a tester
How to cut a cast iron pipe if you don’t have an angle grinder? Take a hacksaw and get to work, but this will naturally increase the duration of dismantling operations.
Cutting a cast iron pipe with a grinder
If dismantling attempts are unsuccessful, do not be upset: stores sell adapter couplings specifically designed for connecting cast iron and polymer pipes.
Sometimes it can be difficult to cut plastic pipes. Try to saw it halfway around the circumference, and then apply slight pressure or perform a slight rotation - the pipe will burst.
Before connecting cast iron and polymer pipes, it is necessary to clean the former from sulfur, using the same heating. After removing the sulfur, the pipes are allowed to cool, usually for several hours. At the final stage, the installation of a new sewer network is carried out. It is best to purchase pipes made from modern materials: plastic or metal-plastic.
As you know, cast iron is a brittle metal, however, cast iron pipes can be cut in several ways. These are the ones that will be discussed in this article.
Cast iron pipes can be cut using a regular hacksaw and chisel. This work is done in this way. First you need to mark a cutting line on the surface of the pipe. After this, you need to place a wooden board under the cut site and make a notch several millimeters deep along the entire length of the line. After the notch line is closed, the pipe should be moved to the edge of the board so that the notch hangs over the board. Now you need to insert the chisel blade into the cut and make a sharp blow with a hammer. The end of the cast iron pipe will then fall off smoothly.
In addition, there are special pipe cutters for cutting cast iron pipes. The first step is to install the cutter on the pipe cutter. It is a metal disk with diamond coating on the cutting edge. After this, use the handle to press the pipe tightly. Only after this can you start making cuts. Perhaps the best pipe cutters for cast iron pipes are Exact Pipecut brand pipe cutters.
You can also cut a cast iron pipe using a grinder. There is no need to write much about this simple method, since every man already knows how to use this tool. The only thing you need to keep in mind is that to cut cast iron pipes you need to use a Bakelite-based cutting disc. Ceramic bonded discs are not suitable for cast iron pipes.
In addition, there are two methods of gas cutting of cast iron pipes. This is gas-oxygen and oxygen-lance cutting.
The essence of the first method is to expose the pipe to a very thin jet of flame under high pressure. The combustion product here can be a mixture of kerosene with oxygen or a mixture of diesel fuel with oxygen. This method is used in construction, production, and also in the elimination of man-made accidents.
The operating principle of oxygen lance cutting is as follows. A thin tube made of hardened steel is used as a cutting tool. The end of this tube is heated to a temperature of 1350 degrees. This is done using the same gas welding machine or blowtorch. Then oxygen is supplied through this tube, which ignites and reaches a temperature of two thousand degrees at the outlet. It is the oxygen flame that cuts the pipe.
Types of units
If you are planning to make a repair and are choosing a device, then the following information will definitely interest you.
There are quite a few types of cutters. They all have different devices and characteristics.
Let's study the most popular of them:
- The oxygen apparatus is an ejector unit in which the burning jet is formed by oxygen supplied under pressure. The oxygen autogen is considered one of the most budget-friendly devices and is quite suitable for DIY cutting;
- A kerosene cutter, as the name suggests, operates using kerosene vapor. As a rule, it is used when cutting carbon steel no more than 20 cm thick. It is almost never used for cutting with your own hands, since it has a complex structure and is used mainly in industrial work (the characteristics of the burner allow it to be used in the coal or mining industry, underground , while it is undesirable to use a propane or acetylene cutter there);
- A propane machine is used when cutting products that contain non-ferrous and ferrous metals of different compositions (most often, a propane autogen is used when cutting cast iron - batteries or pipes). Professionals pay attention to the safety and reliability that a propane device provides compared to the use of other units. Therefore, it is propane autogen that is most often used when doing DIY work. In addition, if you use the propane method of metal cutting, you can be sure that efficiency and productivity are guaranteed;
- An acetylene gas torch is used to process parts and sheets that are thick. All such burners have separate valves, with the help of which you can set a higher speed and power of gas supply during operation. There are even portable cutters that require an acetylene mixture to cut metal. Since acetylene allows the flame to reach the highest temperature, despite the compact size of the device, it can cut even very thick metal. This portable cutter is extremely convenient for DIY use and is therefore in great demand.
But still, universal ejector devices are the most popular. Universal autogens can cut metal in any direction and at any angle.
At the same time, they are extremely easy to use and are lightweight. One of the latest developments by manufacturers is a gas cutter with piezo ignition.
It is extremely convenient for do-it-yourself use, since such a device is turned on with one press of a button.
But such an autogen is quite expensive, so if you need a device for a short period of time and for a small volume of metal cutting, then purchasing such a torch will be inappropriate and wasteful. It is much better to buy a mini cutter.
Drilling cast iron pipe
When drilling gray cast iron, as a rule, there is no need to use coolants and lubricants.
What does it mean to drill? Drilling is the process of creating holes in solid metal using a cutting tool - a drill. And now about how to drill a cast iron pipe.
Many people face this problem and don’t know how to solve it. Gray cast iron can generally be drilled easily and does not require the use of coolant or lubricant.
But pipes are different, and in some cases more force is required. To do this, you should choose a metal drill with an angle of approximately 116-118 degrees, and when there are no special tools, you should drill with the smallest size drill, then use drills with a larger diameter, gradually increasing it.
- When the drill burns, you can lubricate it with water. In order to drill through cast iron, a hand drill is also suitable, the speed of which gradually increases. Directly when drilling, the speed should be small, as well as the pressure on the drill.
- In domestic conditions, it is recommended to use drills with pobedite bits; such drills should be used at low speeds, the force should be kept vertical and the cutting bit should be cooled frequently; overheating and blackening should not be allowed;
- In industrial conditions, if it is necessary to drill a cast iron pipe, machines with working tools that have working surfaces with appropriate sharpening are usually used.
Of course, they are equipped with a supply of coolants that ensure the desired operating temperature. In addition to the question of how to drill through cast iron, you need to think about the safety of this work. The array of processed material may contain voids and other defects.
This is often related to the amount of carbon in the cast iron and other components. These defects lead to the release of large amounts of dust and fine chips. In this regard, there are general safety rules:
- equipping the work area with a ventilated hood;
- use of a respirator or cotton-gauze bandage;
- use of safety glasses with closed sides;
- work in overalls, gloves and headgear.
It is also important to remember: before drilling a pipe, you need to make sure that there is no pressure in it and the liquid that it transports!
Mini cutter
A mini-cutter is a type of portable autogen for metal work, but with an even smaller size.
Essentially, a mini-cutter is a lighter that has a gas cutter nozzle, which is located on top of the device.
At the same time, the characteristics of the device are quite good: the mini-autogen has a good flame pressure and a sufficient size of the gas tank, which allows you to work with it even in windy weather.
But there is one nuance here: prolonged burning can greatly heat the upper part of the mini cutter, and parts made of plastic can melt, and in most cases it is not possible to repair or replace them.
The mini-burner has the same operating principle as a standard size unit.
But due to the fact that the volume of the gas cylinder is small, it must be refilled periodically (you can use a regular collet cylinder).
One of the disadvantages of a mini-burner can also be noted that the length of the exiting flame is insignificant, so working with some types of metal is extremely inconvenient.
Mostly, such mini-devices are used by jewelers or craftsmen who repair air conditioners and refrigerators, as they are very convenient for working with small objects with your own hands.
In everyday life, a mini-burner is used to light a fireplace in a private home or country house.
Stud welding method
The fusion zone is the most vulnerable joint due to peeling of the weld metal. To relieve it during cooling and shrinkage, steel pins (wraps) are used.
When the workpiece thickness is 6 mm, the edges of the crack are cut at an angle of 45º.
The studs are screwed tightly into the prepared threaded holes in a checkerboard pattern. The protruding part of the wrap is welded along the contour. Then it is welded with the entire mass of the seam by applying annealing beads.
When load is applied to a joint, most of it is transferred to the metal with the studs rather than to the weld, making it more durable.
Burner structure
The structure of the burner itself is very simple. It includes a tip for supplying a jet of fire and a barrel through which gas is supplied.
To attach the barrel to the cutter body, use a regular union nut.
The barrel itself consists of an ejector, inlets with nipples (through which gas hoses are connected to the autogen), nozzles, a mixing chamber and two valves.
Despite the different characteristics of the device models and differences in their performance, weight and dimensions, they all have the same operating principle.
First, gases are supplied through hoses (main fuel and oxygen), which are connected to a small chamber.
The gases are mixed in the chamber, after which they come out under pressure through the release device (mouthpiece).
In this case, you can control the flow rate of the mixture, and regulate the combustion intensity and temperature. Regulation is provided by two valves (one for each gas).
A stream of fire coming out of the burner and hitting the metal begins to quickly heat it up. As a result, the metal becomes soft, begins to melt and can be easily cut.
Welding of thick-walled samples with alloy additives
To weld cast iron and steel, when their structure contains alloyed additives or the samples being joined have a sufficiently large cross-section, the following points must be taken into account.
- The parts are not preheated.
- The connection of two different metals is carried out using small rollers up to 2.5 mm long.
- The second roller is formed after the first one has completely cooled.
The tightness of the seam joint depends precisely on the two extreme points. When using this welding technique, there is no need to talk about the tightness of the connection between steel and cast iron, since each subsequent bead is placed on the previous bead, which is completely cold. In this case, the resulting seam will be quite fragile.
Using the cutter
Before you start using the machine for metal, the device must be prepared.
First, we check whether the gas hoses are connected correctly (the oxygen supply hose is connected to a fitting with a right-hand thread, and the hose for supplying flammable gas to a fitting with a left-hand thread).
Secondly, we tighten all connections and check how tight they are to avoid leakage of the mixture during work.
It is advisable to lubricate the rubber valve seals using a special lubricant or glycerin. Only after this can you light the cutter and start cutting metal.
The sequence is extremely simple:
- first open the valve with oxygen, then the valve with gas;
- ignite the flammable mixture coming out of the release device;
- we adjust the flame jet to the required size and intensity using valves;
- heat the metal until the heating area becomes straw-colored;
- open the valve with cutting oxygen and cut the material;
- Having completed the cutting, first close the gas valve, then the oxygen valve;
- If the tip gets very hot, you can immerse it in cold water.
When working, you should be extremely careful and avoid mistakes.
If you do the cutting yourself, be sure to wear special gloves and a protective mask.
Clothes should be made from natural materials; it is advisable not to wear synthetics or flammable materials when working with fire.
Shoes should be comfortable so that you can move easily and quickly in them if an unexpected situation arises.
Metal cutting should only be done on a specially prepared, grease-free surface.
If oxygen comes into contact with even a small amount of oil, the rate of explosion is extremely high.
Therefore, under no circumstances should you touch the cylinder with oily hands! Smoking while working indoors is also strictly prohibited!
Do not panic if during work your gas supply hose falls off or breaks (since the gas comes under pressure, this sometimes happens).
Those who encounter this for the first time are in most cases frightened by the loud sound that occurs at this moment.
In this case, you should turn off the propane first and then the oxygen as quickly as possible.
After use, the gas cutter should be stored in a specially designated place to prevent the ingress of oil and grease.
The gearboxes are stored separately, and the cutter and welding torch can be placed together.
Detailed instructions for drilling cast iron
Tools and materials required for work:
- ruler;
- marker;
- wooden block;
- Bulgarian;
- kerosene solution.
Before drilling a hole in cast iron, you need to clearly define your goals and objectives in advance, because... you need to see the final result accurately. When drilling holes in a bathtub without prior experience, mistakes are made. The three most common are hole slipping, enamel chipping, and even drill bits breaking.
Before you start doing anything, you need to make sure that there really is cast iron in front of you. The easiest way is to try to lift the product. If it does not rise due to the enormous mass, then no error has occurred. Otherwise it's just plain steel.
The most important aspect that should not be forgotten throughout the work is the lack of haste. Even if it’s really necessary and deadlines are pressing, you need to drill cast iron at cruising speed, because... The material is not only very hard, but also very fragile, which is why you can inadvertently say goodbye to a cast iron product.
Now you can begin the preparatory work. At the very beginning of preparation, you need to set all the necessary marks on the surface using a black or red thick marker. The points are placed small so that during work the drill does not accidentally move away from the selected positions.
The drill must be made of carbide steel, and its sharpening must be impeccable. The drill should be for metal with an angle of 116-118 degrees, so as not to scratch the surface, but rather to dig into it. If this point is not taken into account, then with a very high probability the enamel will not be cut off in a careful circle, but will crack, creating cracks around itself.
If you want to play it safe, you can use a wooden block. A hole is made in it that is 2 mm larger than the drill used, so that no difficulties arise during professional activities. This block should be, if possible, 2-2.5 cm thick so that the drill does not move even if the hand shakes. When working, the block will be applied to the surface in such a way that a pre-marked point can be seen in the center. It will need to be pressed with 1 hand while the entire work process is organized with the other.
Often, beginners forget or deliberately ignore drill cooling, which is why the work process is much slower and the drill itself wears out faster. In order to avoid this, you need to use a kerosene solution. Its consumption is small enough to make the drills more expensive.
There is another way not to harm the enamel and at the same time do everything with the utmost quality - use a grinder. Instead of the usual cutting disc, you need to string a grinding disc, which will safely clear the patch of enamel, and only then carry out the steps described above. This approach not only minimizes risks, but also significantly speeds up the process. Usually an additional 2 mm to the diameter is tacked, because in this case, the result will be without flaw.
The most important primary products of ferrous metallurgy, cast iron, are widely used in a variety of areas of world industry. They serve as raw materials for steel production and are used in mechanical engineering. Having been known for more than three thousand years, this metal today reflects the level of industrial development of the countries that produce it.
Throughout history, cast iron production has developed and improved. And today the use of this metal in some types of industry cannot be replaced, which is why cutting and drilling cast iron is so important. Due to the high carbon content, different methods and special tools are used for cutting.
As a rule, in domestic conditions we can recommend the use of drills with Pobedit tips (for example, VK8
). Such a drill for cast iron should be used at low speeds, maintaining the vertical force applied and frequently cooling the cutting attachment, preventing it from overheating and blackening.