Beton-House.com
Website about concrete: construction, characteristics, design. We combine the experience of professionals and private craftsmen in one place
Concrete casting technology is suitable for making small figurines as well as massive objects such as flower bowls, shells, etc.
Concrete is a building material known to mankind for a very long time. So long ago that today there are heated debates about the natural origin of the building material of the Egyptian pyramids, since recent studies show the presence inside the “megaliths” of traces of sheep wool and other foreign inclusions, which by definition cannot be in real stone.
Unfortunately, this has nothing to do with the topic of our article, although it is very interesting - our goal is to find out how the production of molds for casting concrete takes place, as well as the process of pouring concrete objects.
Gypsum casting process
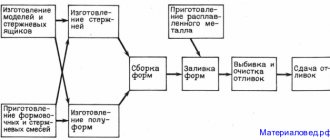
The gypsum casting process consists of several stages. Casting into plaster molds itself takes minutes; much more time is spent on preparatory and final operations. Preparatory ones include:
- Making a product model.
- Design and production of a mold, or flask.
- Preparation of materials for casting and lubrication of the mold.
Gypsum casting process
Check that all necessary materials, equipment and tools are at hand, washed and cleaned from the last time. When casting, minutes count.
Immediately before casting into plaster, the molding box should be lubricated and the casting solution should be mixed. The raster should be poured into the hole in a thin stream, making sure to allow the air to escape. After pouring, the mold must be rotated and shaken slightly to achieve maximum adherence of the solution to the small details of the relief.
The final steps are no less important. They also determine the quality of the product. These include
- Drying (at natural temperature or on a radiator). Drying too quickly can cause the casting to crack.
- Disassembling the form. If it does not come away from the product well, you can lightly tap it with a wooden or rubber mallet.
- Removing sprues and reworking parts of the finished product.
- Cleaning the flask (if one or more castings are planned).
Casting in plaster molds is slightly different from casting in silicone molds. Silicone does not require lubrication, it is elastic and it is easier to remove the casting from it, and it also gives more opportunities for working out details.
Molding polymers
The universal material is obtained by dissolving crushed quartz with nitric acid. When mixed with one of the catalysts, it somewhat resembles rubber. The substance is non-toxic, resistant to alkalis and acids. When finished, it is elastic, impact-resistant, water-resistant and has an unlimited service life. Products made from it are very easy to care for and easy to store.
According to their intended purpose, two-component compounds, consisting of a paste and a hardener, are divided into pouring, coating, and silicone for making molds. With your own hands, you can make from these mixtures not only blanks for souvenir soap, but also strong templates for pouring paving slabs, obtaining decorative stones and gypsum stucco.
To give the substance a solid state, before use it is mixed with a tin or platinum catalyst, which is included in the kit. Some qualities of elastic rubber depend on the type of hardener:
- transparency or dullness;
- tear or tear strength;
- dimensional retention and heat resistance;
- hardness;
- final hardening time;
- durability and circulation resistance.
For example, mixtures with tin catalysts are used in industry and construction. To produce artificial stone or strong plastic products, you need the most durable materials. Food grade silicone for making molds into which chocolate and caramel are poured is produced on the basis of platinum hardeners. The softness and elasticity of these compounds is more suitable for “sweet” production and baking.
Necessary equipment and materials
Casting gypsum products does not require highly professional equipment. The process is quite accessible in an amateur home workshop.
Important: preparation, the casting process itself and final operations are associated with the appearance of a large amount of dust. High-quality ventilation and cleaning of the premises must be ensured. You should not do this in residential areas or in houses where allergy sufferers live. In addition, a mixture of air and dust in a certain concentration is explosive. Avoid using open flames in the workshop.
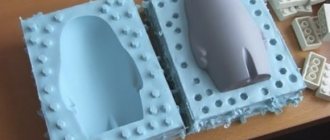
Gypsum casting molds
The main equipment is a casting mold. To make it, you must first prepare a model of the product. Plasticine, polymer clay, and any plastic material are suitable for this. If a copy is made, then the original itself is the model. It is imperative to mark on the model the line where the halves of the future form meet.
It is important to choose the right material for the flask. If you are preparing a small mold for casting a pendant or parts of a scale model of equipment, hard cardboard will do. For casting large castings, it is better to take multilayer plywood - it will not be crushed by a large mass of gypsum.
Rigid cardboard flask for plaster casting
You will also need:
- Container for mixing gypsum with water.
- A glass with a spout for pouring plaster.
- Elastic bands for tightening parts of the form.
- Lubrication brushes.
- Drill for drilling holes.
- Spatulas and knives.
- Cardboard and tape.
The best plaster for casting should be chosen. Construction alabaster can be used, in extreme cases, it is better to sift it through a 0.2 mm sieve, make sure that it has reached a “fluffy” consistency and does not contain lumps or foreign inclusions.
Lubricating plaster casting molds
You can purchase ready-made lubricant for the mold, or you can make it yourself from grated baby soap, water and sunflower oil.
Where is homemade polymer used?
Despite the variety of compounds on sale, some craftsmen prefer to do everything themselves. This is usually justified by saving money and being creative.
Making silicone for molds with your own hands is possible in several ways. It should be clarified that the resulting substance differs in characteristics from industrial mixtures. And these differences are not always positive. If branded liquid silicone for making molds is used to create large and small products, then homemade rubber is made only for home creativity.
Making molds for casting from gypsum
The most used materials are plaster itself and silicone.
Gypsum forms are traditional and familiar to many generations of craftsmen. They are more demanding in terms of craftsmanship in manufacturing. In recent decades, they have been increasingly replaced by silicone molds.
Molds made of silicone are distinguished by high accuracy, the ability to work out small details, and ease of production and removal from the casting. The original composition is somewhat more expensive, but this is compensated by increased manufacturability and durability.
When designing and manufacturing a mold, it is important to pay attention to:
- Careful attention to detail.
- Method of connecting mold halves and their subsequent disassembly
- Method of fixing the halves relative to each other
- Location of casting holes. It should allow the liquid plaster to penetrate into all corners of the mold and completely fill it.
- The configuration of the flask should allow air bubbles to escape freely.
To fix the parts of the flask relative to each other, rubber bands are usually used. Rubber bands for money are suitable for small products; for larger ones they are cut from bicycle or car inner tubes.
Video description
The video shows how you can make a figurine from plaster by pouring the mixture into a silicone mold:
The described choice has one significant drawback. The production of garden figures from polystone is impossible without the use of synthetic pigments and polyester resins. They contain styrene, a dangerous chemical compound. Therefore, those who choose such technology for the production of garden figurines will need to be more careful about the organization of the labor process. For its implementation, only those premises that are located five hundred meters from residential buildings are suitable; good ventilation must be installed inside, workers must wear respirators and other protective equipment.
Polystone figures with a lot of small details Source vsegdasvami.ru
Important ! There are no local raw materials on the domestic market. It has to be imported from abroad, so the cost of polystone figurines is very high.
Concrete garden figurines are also in good demand among buyers. They are manufactured using components that are quite affordable. These are sand, cement, pigments and plasticizers. All dry ingredients are mixed into the solution using water, and the solution is poured into special molds. After hardening, the result is very durable products that can last in the garden for decades. They have one significant drawback - heavy weight. It will be difficult to move the figurine from place to place if desired. Often, special equipment must be used to transport and install such sculptures.
Concrete watchdog figurine Source compras.sharemedoc.com
Manufacturing of gypsum molds for casting
Casting in plaster molds requires a certain skill, good planning and precise coordination of the master's actions. How to make a casting mold from plaster?
First, a flask is built around the model of the future product - a box made of cardboard covered with tape, or hard plastic. The gaps between the base and the walls are coated with plasticine. The model is coated with lubricant and placed inside the flask at equal distances from the bottom and walls. Pieces of plastic and cardboard are used as supports. Sometimes they simply hang the model by strings.
Gypsum is diluted to the consistency of sour cream
Gypsum is diluted to the consistency of sour cream and applied with a brush to complex relief elements of the model - corners, depressions, etc. Everything is ready for casting. Then the model is poured to the line where the flask halves meet and the plaster is left to thicken.
Plaster casting mold
After thickening, check how well the model separates from the lower half, lubricate it and the model, and fill the upper half of the mold. After the upper half has thickened, holes are drilled in the corners for pins that will secure the halves during casting. After this, the upper half is removed and the model is removed. The flask is ready for casting. If you are a beginner, plan on ample time to gain experience and develop skills. Casting in plaster may not work the first time.
How to cast aluminum
Characteristics of aluminum.
Aluminum is one of the most common metals.
It is silver-white in color and lends itself quite well to casting and machining. Due to its characteristics, aluminum is equipped with high thermal and electrical conductivity, and also has corrosion resistance.
Technical aluminum has a melting point of 658 degrees, high-purity aluminum has a melting point of 660, and the boiling point of aluminum is 2500 degrees.
For aluminum casting, home heating devices are unlikely to be useful and will provide the required temperature. It is necessary to melt aluminum by heating it to a temperature of over 660 degrees.
Aluminum casting: choosing a heat source
The following can be used as a heat source for aluminum melting:
- A very effective method is achieved using a self-made crucible muffle furnace. A crucible (a necessary tool for melting aluminum) is installed on the working surface of this furnace, and raw materials are added to it. Using a muffle furnace you can cast aluminum very easily.
- Do-it-yourself muffle furnace for melting aluminum, here!
- To obtain the melting temperature of aluminum, the combustion temperature of liquefied or natural gas is sufficient; in this case, the process can be performed in a homemade furnace.
- With a small volume of melting, you can use the heat obtained by burning gas in a household gas stove.
- The required temperature will be provided by gas cutters or acetylene generators, if available in the household.
Aluminum preparation
Despite the fact that the melting process will be performed at home, it must be handled responsibly. The metal must first be cleaned of dirt and crushed into small pieces. In this case, the melting process will go faster.
The choice is made on softer aluminum, as a purer material with fewer impurities. During melting, slag is removed from the liquid surface of the metal.
Application area of gypsum casting
Gypsum casting is used both at industrial enterprises for the manufacture of interior decoration parts, and in designer workshops. Craftsmen cast a very wide range of plaster
- Author's interior decor elements
- Figurines and even large statues, up to models for subsequent metal casting
- Small decorations
- Toys
- Parts for scale models of equipment
Small plaster jewelry
Plaster toys Plaster figurines
Author's interior decor elements
The scope of application is not limited to this list. Craftsmen are coming up with more and more new areas of application for gypsum casting - wherever it is necessary to create parts with complex surfaces and relief, and the requirements for strength and wear resistance are not critical.
Generalization on the topic
The business described is a wide field for activity. It can bring good profits if it is constantly developed. This must be done by involving professional artists and sculptors. The cost of exclusive works is much higher than products made according to standard sketches. Garden decorations that glow in the dark can interest buyers. And if you open a multidisciplinary company and add to the staff employees involved in landscape design, providing services for the care of the created landscaping, profits will only increase.
Ratings 0
Details of recipe No. 1
The bottom of the prepared cardboard or wood tray is evenly covered with the resulting mixture. Then the souvenir is dipped into homemade silicone and quickly placed in this box. The stuck figure is immediately poured with hot mixture, filling the tray to the brim.
Liquid silicone for making molds, obtained in this simple way, hardens in a few minutes, almost before our eyes. After the mass has completely cooled, the resulting block is removed from the box, a cut is made on the bottom side and the souvenir is carefully removed.
The resulting shaped cavity can only be filled with epoxy resin. Making silicone for molds with your own hands using this recipe has several disadvantages:
- the finished master product absorbs water, so it cannot be used to produce plaster castings;
- the mass melts when you try to fill it with a hot substance, so it is not suitable for creating designer soap.
- After several uses, the inner surface of the mold deteriorates, loses its gloss and quality.
The ability to repeatedly remelt used dies is considered a plus.
Recipe No. 2: details
- Sprinkle a little talcum powder or starch on the surface of the table (to prevent it from sticking).
- A bunch of sealant is squeezed out of the tube into the center of the sprinkle.
- Add starch on top and mix everything.
- The resulting “dough” should contain so much starch that it does not stick to your hands or to the table.
- A thick cake is made from the mass, corresponding to the size of the future souvenir.
- Quickly and carefully, with force, press the selected sample into this workpiece.
- The silicone for making molds is left to dry for a day.
- After removing the figure, the template cavity is lubricated with talcum powder using a brush and tightly filled with plastic clay.
- This base can be placed in the oven to dry along with the filler; it is not afraid of high temperatures.
Recipe No. 2: preparation
Making silicone for molds with your own hands requires some effort. Craftsmen who work with plastic clay make templates and molds in this way to bring their ideas to life. So, you will need one of the types of high-temperature resistant construction sealant and ordinary food starch or talc. It is advisable to work with rubber gloves. Since the sealant sets within 10 minutes, it is necessary to place in advance next to the object from which the cast will be prepared: a shell, a figurine flat on one side, something else. The mold will be solid, with a concave depression, so it is suitable for the production of only one-sided souvenirs.
Read also: How to properly install a cutter on a lathe