An edge router is a tool that may not find much use in some shops, but it is a unique and surprisingly versatile tool. They're lightweight, surprisingly powerful, and small enough to go where larger routers simply won't fit.
Here are 10 types of work where an edge router can come in handy.
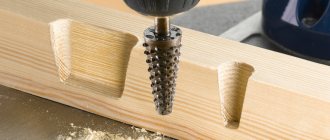
Inlay
Cutting thin, flush inlays requires shallow cuts and precision, making a router the ideal tool for the job. Inlaying requires shallow digging into the wood to seat the pieces flush with the surface. You can do the job with other routers, but an edge router is best suited for this task. Its small size and much lighter weight are an advantage over other models, as they provide better accuracy when inserting inlay elements.
What types of cutters are there for metal?
Metal cutters for a hand router, which can be purchased in specialized stores, perform many functions.
Metal cutter
If we consider the possible options for the technological purpose of cutters, we can determine the most extensive classification:
- Face - used for the purpose of forming planes, sequential processing of edges
- Disc wheels are necessary for processing corner grooves, as well as inclined surfaces
- Quarter carbons are needed to form a rounded edge.
- End with sharpening at an angle of 90°
- Single-angle for forming dovetail grooves
- Three-way discs are used in rotors for electric motors
- Splined disks facilitating the formation of splines and various slots
- End, forming an open groove
- For grooves adapted for segment keys
- Double-angle symmetrical are used to form prismatic grooves
- Milling cutter
- Angular ones are needed for chamfering and forming flat edges
- Cylindrical
- Semicircular disc
- Double-sided disc
- For high-quality formation of T-slots
- Keyed end
- Semicircular convex for making radius grooves
- Cut-off
Metal cutters are also classified:
- By placement of cutting teeth
- According to the technology of sharpening cutting parts
- Towards
- By type of tool design
- According to the method of fixing the cutting teeth
- According to the material from which the cutting elements are made
Therefore, it will be a little difficult to list all the options for classifying cutters for metal for maximum detail. A metal cutter is considered a special tool for processing iron workpieces, the functional features of which are based on translational and rotational movements.
The cutter itself is considered the original body, which is given rotation, interacting with the surface of the object during its processing.
The selection of a cutter for metal must be carried out taking into account certain secondary features. When choosing a device, a lot of attention should be paid to the technology and quality of sharpening the cutter. The nature of the cut will be determined by the sharpness of the main operating elements of the tool.
The material from which a special cutting edge is created is also of great importance. Special carbide cutters, characterized by a very high incandescent temperature, are in great demand these days. The durability of these tools has been proven by many years of use and positive feedback from craftsmen. Milling cutters made from carbide materials can be used in the processing of the most durable workpieces.
Straight edges start in the shop
When purchasing lumber, select the best boards possible, paying particular attention to the grain pattern and how it will look on the finished product. You can purchase unplaned material, either having two planed faces or planed on both faces and on both edges. The latter option, being more expensive, often solves the problem of obtaining a straight edge. However, even such boards can warp. Warped boards, although difficult to work with, can also be a good material. A flat board with curved edges (photo on the right) can easily be processed to straight edges by following the decision diagram.
The router moves to the side during operation. This should be taken into account
During milling, the router pulls slightly to the side. Why? The fact is that the cutter always rotates clockwise. During cutting, its cutting edges exert an impact on the material. And he, in turn, exerts resistance and pushes the cutter along with the router in the opposite direction.
This nuance should be taken into account when working with a router. This is especially important to take into account when working with a rip fence. Because the router will either pull towards the edge of the part or move away from it. It depends on the direction of movement of the tool.
There is never enough physical strength to hold the router and give it the correct direction of movement. This is why you should use a rip fence to make straight cuts.
Or maybe a cordless router is better for you? Read it!
To plan or not depends on your machines
After the boards have acclimatized in the workshop, you can choose one of two options. Either first level one face on a planer and thicknesser the other to make them flat, and then proceed to straighten the edges, or straighten the edges, leaving the faces untreated. We recommend the first option, since some methods of preparing the material work better when the faces of the boards are cleanly planed.
However, the choice may be dictated by the capabilities of the available machines. For example, you cannot process a 200 mm wide board on a planer with a maximum planing width of 150 mm. And by sharpening both sides of the board in a thickness planer, you will not make them flat, but only parallel to each other. In this case, make one of the edges of the board straight by first sawing it evenly on a saw to the required width, level one face using a planer, and then plan the board to the desired thickness in a planer. If the required width of the workpiece is greater than the length of the knives of your planer and jointer, then simply saw it lengthwise into two or three sections, sharpen them and process them with a thickness planer, aligning the edges. After the plots become straight and rectangular in cross-section, connect them again into a shield, gluing them with edges.
Planer and jointer: the main machine for straightening edges
If you work with unplaned lumber, you really need a good planer. This is the best tool for getting a straight, clean edge that is exactly at right angles to the face (photo below), as well as for cleaning and leveling the face of the board. Although models with a planing width of 150mm work well, consider purchasing a machine with a planing width of up to 200mm. In addition to allowing you to process wider boards, this machine also features longer front and rear tables to provide better support for long workpieces.
A relatively straight board can be planed to a straight and perpendicular edge in just one or two passes.
We do not recommend using auxiliary receiving and feeding stands with the machine, as a board with uneven or curved edges may tip the stand, causing damage to the board by the blades of the machine.
You're lucky: there's no warping
If the selected board falls into this category, you can consider that the deal is in the bag. Regardless of the length of the board, you can quickly get a straight edge using a planer and jointer . If you don't have one, use a circular saw to file down the rough edges of the board.
A straight edge on this type of board can also be achieved using a router. If the face of the board is not planed, use a guide board that has a smooth face and a straight edge, attaching it to the top of the workpiece, as shown in the photo below. Use a guide cutter with a top bearing. Install the guide board with a slight indentation from the edge of the workpiece - this distance corresponds to the volume of material that will be removed during processing. If necessary, make two passes.
When using this method, press the straightest edge of the board against the rip fence to avoid kickback. Having filed the opposite rough edge of the board (photo on the left), move the longitudinal fence, turn the board over so that its new edge faces the fence, then file the second rough edge (photo on the right).
If the sides of the board are planed, fix the guide (it can be a flat board or a homemade or purchased tire) on the workpiece so that when moving along it, the router removes a layer no more than 1.5 mm thick in one pass (photo below) Make as many passes as required to obtain a straight edge.
With the router sole on the guide board, guide the cutter bearing along its edge. Remove no more than 1.5 mm of material in one pass. Use a cutter with an upward or downward helix, or a straight cutter whose blades are longer than the thickness of the workpiece.
Grind a small chamfer on the edge of the face facing the cutter - this will prevent the workpiece from getting stuck when it is fed.
A straight edge can be made on a router table, but it requires a little more advanced setup. First, clamp a straight or spiral cutter into the collet of a router fixed to the table and set the cutter overhang to be slightly larger than the thickness of the workpiece. Adjust the front of the rip fence so that no more than 1.5 mm of material is removed in one pass. Place the back of the rip fence flush with the cutter blades. If the rip fence does not have separate front and back parts, use a clamp or double-sided tape to attach a piece of laminate plastic to the back half of the fence with a thickness corresponding to the layer of material being removed (photo on the right).
Typical case: slight bend
Most boards in this category warp when they swell or shrink, adapting to environmental humidity. Plan the future straight edge in such a way as to obtain an effective textured pattern on the front surfaces of the product. Boards belonging to this category are processed differently depending on their length.
Boards less than 0.3 m long are processed quickly
For short boards, use the simplest options: a planer, circular saw or band saw. Planers are usually faster, even if it takes multiple passes to get a straight edge. The same technique is used when sawing on machines: the board is sawn longitudinally, while its concave edge moves along the parallel stop. The edges obtained in this way, being straight, have sawing marks that can be quickly removed in one pass on the planer. A router table will produce the same quality as a planer, but it will take more time to set up.
Choose the right tools for straight edges
The tools and techniques used to straighten edges vary depending on the degree of curve and length of the board. Use this decision tree to select the best tools and techniques for use in each situation. Additional options are described in the article.
Boards 0.3-0/9 m long: many possibilities
With boards of this length (the thickness and width of the board can be any) you have the largest number of options to choose from. On a planer, such boards can be processed in two ways. The first is a conventional planing of a concave edge, removing a small amount of material each pass until the edge is straight. The second option involves preliminary planing in several passes, first one edge of the board and then the other, as shown in the figure above. This is repeated until the bend disappears almost completely, after which the entire edge of the board is planed. A band saw and circular saw will also do the job, but with one major addition.
To ensure that the concave edge of the board contacts the rip fence when cutting boards longer than 30 cm, add a long trim as shown in the photo below left. The length of the overlay is equal to twice the length of the workpiece, increased by 300 mm. Center the pad relative to the saw blade and secure it to the longitudinal stop of the machine using clamps or double-sided fabric-based tape.
The auxiliary stop ensures the linear movement of the workpiece, thanks to which the sawn edge will be straight.
How does a milling cutter work?
Metal milling cutter
The scope of application of this type of metal processing tools is the formation of recesses of a specific shape, or surface processing of an iron workpiece.
To be able to perform the above functions, individual design characteristics of such cutters are provided.
Today we can consider several main types of cutters for metal, determined by the nature of their purpose.
To equip a hand router with the necessary cutter, special finger models are used.
The design characteristics of these devices visually resemble drills and consist of a main and tail working parts. The main distinguishing feature is the method of movement of the part, as well as the tool. The metal processing part will always rotate, and the iron workpiece will be placed under the cutter.
Using finger-type components, the following types of processing of metal workpieces can be performed:
- Edge grinding is carried out to enable fastening of various workpieces to each other. In this way, a knot can be created using the tenon/groove principle.
- Preparing the part for installation of fittings.
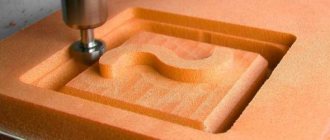
- The surface of flat workpieces can be processed in such a way that they are given a certain volumetric shape. In most examples, products with complex configurations are processed in this way.
Experienced craftsmen who practice processing metal products using special tools can name many different methods for using finger cutters. However, in order to choose the right cutter, it is advisable to familiarize yourself with the currently available classification of these devices.
Worst case: significant bending
Before processing such a board, first determine how best to dispose of it. By removing the bend from a 3 m long board, you will waste a lot of wood, as the photo below shows. If you really need a long board, try to choose a board with less curvature. If you absolutely need to get long workpieces from heavily curved boards, you have three options: cut them lengthwise with a circular saw, use a sled for a circular saw, or use a band saw with an extended fence - provided that the length of the workpieces does not exceed 0.9 m. Processing on a bandsaw, longer boards will only create additional complications.
Make an anti-splinter guide for sawing and milling
You can make two guides (1.2 m and 2.4 m long) to use with workpieces of different lengths. These guides, designed to work with a specific circular saw and router, can be made from a single sheet of plywood 13 mm thick. (We recommend using plywood with both sides sanded.) Here's how to do it.
- Using a chalk cord, mark a line along the entire sheet of plywood at a distance of 280 mm from the edge. Cut the sheet along this line with a circular saw.
- Make the remaining cuts along the guide, using the factory edge of the cut strip as this. From the remaining part of the sheet, cut two strips 51mm wide, two strips 203mm wide and one strip 280mm wide.
- Saw the plywood strips to the length shown in the picture above, and then assemble the guides. Carefully remove any exposed adhesive.
- When the glue has dried, secure the guides to the workbench, leaving an overhang necessary for further trimming. Using a circular saw with the blade you normally use, make a cut along the wide edge of the fence, running the saw along the fence as shown below. Do the same from the other edge of the guide, but using a router. In the future, when milling along the guide, use a cutter of the same diameter as for the initial trim.
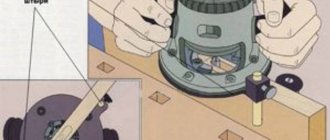
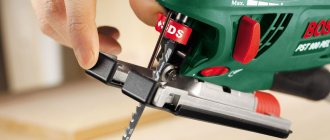
How to set up a router to work with cutters of different diameters
If we are talking about a thin cutter, then you should use the fine-tuning head, which we wrote about above.
If you use cutters with a large diameter of more than 10 mm, you can use a turret stop. How is this done? Let's look at this with a specific example. Let's say the diameter of the cutter used is 16 mm, and the final milling depth should be 14 mm. The following operations are performed:
- We set the milling cutter to the zero mark.
- Lower the pin until it touches the turret stop.
- We set some integer value.
- If there is a slight play above the stop, then you should tighten it a little using the fine adjustment screw and fix it.
- Unlock the coarse adjustment scale and raise it by 14 mm.
Thus, the gap between the pin and the turret stop increases by the 14 mm we need. And if we lower the router, the cutter will protrude beyond its base by 14 mm.
It is quite clear that it is impossible to mill such a large amount in one pass. Therefore, you should take advantage of the turret stop, which allows you to adjust the immersion depth in 3 mm increments. There are steps on the stop that make it possible to gradually, pass by pass, set an increasingly greater depth of immersion. Additional precision can be achieved by using a fine adjustment screw.
ATTENTION!!!
If you want to learn more about woodworking tools and the crafts you can make with them, be sure to check out this link.