Machine Applications
A sharpening machine is a device with which you can sharpen cutting tools: cutters for wood, for metal. The range of sharpening machines varies from large industrial models to versions that can be used in home workshops. The machine can be used for sharpening cutters for wood or metal.
The machine is often used in established industrial production, when there are many cutters available and they are often used. If only burrs have formed on the cutting edge due to incorrect processing modes, then the problem can be corrected using a whetstone or file.
How to assemble correctly
The quality and speed of tillage depend on the correct installation of cutting elements. Before assembling the motor-cultivator cutters, you must carefully inspect the included elements. On them we will see the stamped letters L and R. This means “left” and “right”. To avoid confusion, let's divide them into 2 identical groups. The hubs on which the knives are mounted can be based on a round pipe or a hexagon. It depends on what shaft the cultivator has.
On one side there is a small protrusion with a hole for a cotter pin and a seat for the first link of knives. Let's take one of the semi-axes. It will be located on the left, in the direction of travel. We assemble the first link, starting from the gearbox. We position the cutting edges so that they circle counterclockwise. Alternately place the right and left knives. If there are 4 elements, 2 knives lie below, 2 - on top of them. Where there is a hole for a cotter pin on the axle shaft, the knife in front of the hole should lie higher. Otherwise, there will be difficulties with installing and removing cotter pins.
We screw the element so that the base plate is between it and the gearbox. Otherwise, the knife may catch on the gear housing. When the first link is ready, assemble the second.
We look at any of the screwed knives, on the next plate we find a position so that the new knife looks in the same direction, but is shifted a few degrees counterclockwise.
Classification
Conventionally, the following classification can be made:
- The universal machine is suitable for sharpening not only cutters, but also other cutting tools.
- A specialized machine is used to process only one type of tool, for example, cutters.
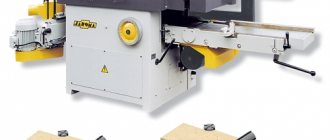
The universal machine is equipped with normal and special devices that are used to secure and install the tool, additional measuring mechanisms that allow you to maintain the sharpening angle of the cutters.
Universal sharpening machine with accessories for sharpening cutters
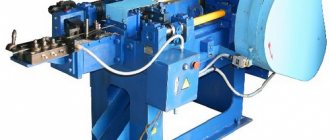
Specialized sharpening machine for sharpening end and cylindrical cutters
Specifications
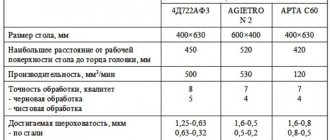
When choosing machines for sharpening cutters, you should pay special attention to the technical characteristics. The main indicators include:
- Operating voltage. Many models operate on a standard 220 Volt network. Options with a higher power rating operate at 380 Volts.
- Power consumption is also an important indicator. It can vary in the range from 200 to 5,000 watts.
- Spindle rotation speed without load. This figure can vary from 900 to 3,000 rpm.
- The accuracy with which cutters can be sharpened. The accuracy indicator often depends on the design features of the model.
- Abrasive feed rate.
- Feed type: mechanical and electric. Some models have an electric drive, others mechanical. The electric version significantly makes the design more expensive, while the mechanical version requires certain skills from the master.
- Range of sharpening angle. The angle can be called the most important indicator. The cutting edge is formed by two planes located at a certain angle.
- The presence of special water baths that allow you to cool the abrasive material while the machine is operating. An increase in the temperature of the abrasive material can lead to significant heating of the cutting edge, causing it to change its performance.
- Availability of ventilation. During sharpening, the metal layer is removed from the cutters, and the abrasive material also flies off. This moment determines whether the workplace is clogged, and the ventilation system will help keep the equipment clean.
- Noise indicator during operation. The drive and motor make noise when running. High noise levels make work much more difficult.
- Availability of a protective casing. During sharpening, abrasive chips and metal fly off, which can get into your eyes. It is the protective casing that protects the craftsman from chips and abrasive crumbs.
According to the layout, machines for sharpening cutters are also available in floor-mounted versions. The traditional drive involves the use of an electric motor and a V-belt drive.
Sharpening cutters: for metal, wood with your own hands, types, application
Sharpening of different shapes of cutters is carried out using specialized equipment. This is a circular cutting tool, although its configuration can vary. The grooves and teeth located around the circumference come in different sizes, and when they rotate, the material is processed.
Types of cutters
There are several types of cutting tools. These include: cylindrical, end, disk, end and groove.
By type of purpose:
- angular;
- shaped;
- keyed;
- to provide T-type grooves.
On the surface:
- plastic;
- tree;
- metal;
- glass;
- others.
Sharpening is difficult, since the length of the cutting base is large. Therefore, specialized tools are used.
And in some cases, grinding is carried out manually, but the worker performing this work must have experience.
An employee who does not have the skills may allow defects and defects to appear on the teeth: cracks, burrs or cavities, due to which the tool will need to be ground again, and this will lead to a reduction in size.
Milling cutter material
The following materials are used for the manufacture of technological equipment:
- hard alloys;
- high-speed steel;
- metal alloys of increased hardness;
- metal ceramics;
- diamonds.
For direct cutting of metal, the edges of the cutting tool are made of:
- cardan wire;
- diamonds;
- hard alloy compounds;
- ceramic coating.
The difference in technological equipment is determined by its appearance.
Cutter tooth geometry
Productivity depends on proper sharpening of the teeth. Work surface configurations are used to solve even the most complex problems.
The design of a spiral cutter is carried out with a large and small inclination of the teeth at a given angle. The purpose of this type of tool is to carry out roughing and finishing operations, including variable steps.
The rake angle is the angle formed between the flat end and the flute edge of a standard cutter.
Angle value:
- small no more than 35;
- large 35 and above.
An excellent option for initial and finishing machining is the tooth angle of 38. Rectangular tools have the maximum value.
A tool with a variable pitch is in demand; the pitch of the spiral is measured along the length.
Application area
There are various types of tools to perform technological operations. Which cutter to use in this or that case, for this you need to take into account what material needs to be processed.
Common types include:
- Disk. Elements for cutting material are located on one or both sides at the same time. Used for cutting grooves, sampling, trimming and chamfering.
- End Designed for turning stepped and flat bases.
- Cylindrical. Available with helical and straight teeth.
- Angular. Used for cutting chip flutes in technological equipment.
- End. They are used for making ledges, contour recesses and grooves.
- Shaped. Designed for processing shaped surfaces.
- Worm-shaped. Processing is carried out using the rolling method - touching the workpiece with a tool at one point.
Wood cutters
The following tools are used for processing wooden structures:
- End. Outwardly they resemble a drill, but the conical part is missing.
- Edges. Used for cutting edges and various recess configurations. Tools for manual milling are structurally equipped with a bearing to regulate the depth of processing.
- Grooved. Used for cutting grooves.
- Copying. Arrangement of the milling head in the form of an arc.
Cutters for plastic
When processing plastic products, the following tools are used:
- End For processing large bases.
- Shaped. Used for cutting complex profiles.
- End. Used to produce pockets or grooves.
- For engraving. With its help, you can apply patterns or logos to the base.
Glass cutters
Diamond cutters are used to prepare glass products. Designed for creating edges and contours using manual or automatic equipment.
Methods for sharpening cutters
Sharpening cutters is difficult, since it is necessary to process curved and long surfaces. It is also necessary to ensure that the abrasive moves with precision along the edge.
Using the machine
The sharpening technology is carried out in stages:
- Fastening the cutter in a given position.
- Bring the surface to be treated to the abrasive wheel until there is no sparking.
- Removing a metal layer with a thickness of 25 to 50 microns.
- Sharpen each tooth separately. The work begins by positioning it in the groove formed by the tooth, and the needle should touch the surface of the instrument.
- Turn on the sharpening machine and, sequentially retracting the cutter, perform the operation.
To perform the work efficiently, each edge of the cutting base should be sharpened equally, that is, the movements should be uniform.
Using sharpening wheels
The choice of wheels depends on the material from which the tools are made. What kind of circles are there:
- Normal electrocorundum and white electrocorundum. Provides optimal sharpening of tools for metal or wood.
- Elborovye. Using wheels of this material you can sharpen high-speed steel products.
- Green and diamond silicon carbide are used for sharpening carbide products
Varieties
Cutters come in a variety of types - end, end, disk, slotted, cylindrical, groove. And these are not all varieties. They are also divided according to their purpose and are angular, shaped, keyed, for T-shaped grooves. Another division is based on the type of surface being processed:
- for metal;
- on wood;
- on plastic;
- on glass;
- and others.
Sharpening a cutter for metal is difficult due to the large length of the cutting surface. Such work is only possible with the use of special tools.
In some cases, you have to grind by hand, but this requires a lot of experience. Otherwise, all previous work will go down the drain. The grooves (teeth) will show nicks, gouges, chips and cracks.
The part will have to be ground again, which invariably reduces its size.
The peculiarity of sharpening is to ensure the movement of the emery along the edge. To preserve the profile of the structure, backed teeth are sharpened along the front base, and sharp or non-standard teeth are sharpened strictly along the rear base.
End mills
Sharpening an end mill is simple and can be done with a regular thin diamond stone.
In this case, the block must remain motionless (it is placed on the edge of the table or secured in a special way for working with deep grooves). The sharpening process is carried out directly by the cutter.
End mills are used for processing grooves, pockets, windows (grooves with access to only one machined surface).
Sharpening of cutters in Moscow can be done here. The price for the work is from 150 to 300 rubles, depending on the complexity of the cutter. For more details, contact us by phone +7. We guarantee our clients high quality and a guarantee for all work performed.
Machine for sharpening cutters for metal
Nikolay Chernak spoke about a homemade machine that he uses to sharpen end mills for metal. Acquisition history. One Sunday I stopped by a flea market and noticed that a man was selling an interesting machine.
As soon as the buyer showed interest, a man immediately came up and said that he also wanted to buy a machine and had been bargaining since the morning. He needs this machine to make wobblers for fishing. He wants to make a copier out of it.
Nikolay took this homemade machine for a while to review it.
Machine Features
Let's look at the capabilities of this machine and what it is intended for. Has length adjustment according to the cutter. That is, you can clamp long cutters. There are many holes and a groove for setting the required length. Emphasis.
One part is missing parts. Judging by the fact that there is a thread cut here, there must be chucks for clamping other cutters. There are not enough collets. There are 16 holes on the outside of the cartridge.
There should also be a pin here, insert it tightly and divide by a multiple. Movement by hand, a little tight.
Judging by the collet, if you find other sizes, you can install a fairly thick cutter in diameter.
The drive is carried out by two stepper motors. There is a reverse. Along the Y axis, automatic movement of the entire carriage.
That is, you can move it manually or with an electric motor. Electronics, 3 boards. She was faulty. The owner has renovated it. There is still no clear synchronization of the two motors. There is a stepper motor for feeding along the Y axis. It sets the carriage into automatic motion. By installing the stops, you can set the automatic feed to the left or right.
Design Features
Despite the fact that there are quite a few models of machines, their design is somewhat similar. Features of the typical design include:
- The main part of the body is represented by an electric motor.
- If it is necessary to change the rotation speed, a V-belt drive can be included in the design.
- An abrasive wheel is fixed to the shaft.
- The stand is necessary to secure the tool being processed.
- There is a block with a button to turn the equipment on or off, as well as elements for adjusting operating modes.
Other elements may also be present.
Advantages of use
Many people decide whether it is worth spending money and purchasing special sharpening machines. Their use can be defined as follows:
- The process is significantly accelerated: the high speed of rotation of the circle speeds up the process of removing the required layer of metal.
- A more accurate result can be achieved. The sharpening angles have clear limits; without the use of machines it is almost impossible to maintain them.
- The quality of the work performed is much higher.
- Even an untrained master can do the job, since the work is almost completely automated.
The machines are used in workshops for medium and large-scale production. Only in this case is their purchase justified.
Disadvantages of use
You can also highlight some disadvantages of the application:
- The electric drive consumes quite a lot of energy. With constant use, the cost of paying for electricity will be very high.
- The cost of the machines is very high. At the same time, we note that the price depends both on the main performance indicators and on which company is the manufacturer.
- It is necessary to carry out constant maintenance of the equipment to keep it in proper condition.
- You need to find a place to install the equipment and equip it correctly. Some models require rigid mounting.
Similar disadvantages can be identified when considering sharpening machines.
In conclusion, we note that there are quite a few types of cutters, each with certain qualities that are worth considering. That is why you should purchase not a specialized, but a universal version of the sharpening machine.
Homemade sharpening machine for metal cutters - Moy-Instrument.Ru - Review of tools and equipment
› Article tools
Loading... Best products from AliExpress HERE ⬇
Details 01/13/2017 11:03 Aleshkin 6804
A homemade device for sharpening cutters and other cutting tools.
During the operation of our machines, the need for such a device arose.
You can sharpen a drill by hand, but what about cutters, where there are not two, but four, or more edges only at the bottom, and you need a less precise geometry, and the size is small.
So I decided to make such a device.
It's a simple back and forth feed mechanism, plus tilt and swivel.
It will be installed simply next to the sandpaper.
The materials available were aluminum, some steel, and sandpaper.
I will now show you how this was done in photographs.
Let's start with the device that must hold the cutter or drill, that is, the spindle, to install the tool.
To do this, I have such a part in it, Morse taper number two (KM2), this is what I need.
After all, my machines also have KM2 everywhere, and you can use their equipment, and mortises and drills with such a cone can be installed directly into the spindle.
I removed everything unnecessary from this mandrel.
The result is a small spindle that can rotate around its axis.
I'll do a little modification, drill a hole for a cleaning rod, which will secure the tool from suddenly falling out of the spindle.
Now the spindle will be able to accept any tool with KM2, both with a presser foot and with M10 threads, a drill or collet chuck, cutters with KM2 and all kinds of mandrels for disk cutters.
Now the housing for this spindle.
All that remains is to make a locking ring for the spindle and a handle.
Handle for rotation around the spindle axis.
This is what the first assembled part for my device looks like.
Fitting equipment, drill chuck.
Now you can work on the movement mechanism, it will be like a small cross table, similar to that of a milling machine only with rotation around its axis.
I am sawing a blank for the table.
Milling future movement axes.
Preparing a table for installing a spindle.
The workpiece is ready for dovetail milling.
I'm milling a dovetail.
I drill, cut the threads and add an axial movement nut.
I try on the guide for the table; the screw for it will be an ordinary pin.
The propeller supports are made from two small pieces of aluminum.
General view of the finished axle with fitting of the collet chuck.
The general appearance of the device is already emerging, but this is just a project.
I had some free time and I spent it in the workshop, working on the ears or hinges, for the tilt and the turntable with the axis.
So that the loops or ears were the same, I connected them immediately into one piece.
And then I drilled and bored holes for the axle.
I cut off a little excess aluminum and drilled it, then cut a thread for the hinge adjustment screws.
The second axis of movement in the trailer is no different from the first, only there is no feed screw and the table is slightly wider.
A turntable in the shape of an ordinary pancake.
This simple cylinder will serve as my tilt axis.
I tried everything on the table, all that remains is to drill and assemble this unit.
Drilled and assembled.
I assemble two axes into one whole device.
Again we drill and tap the threads for the screws.
I cut out a corner and put a pin on it to read the cutter strip when sharpening.
This is what the entire device looks like assembled.
Over the weekend at the dacha I couldn’t resist and carried out the first tests, tried to level and then sharpen the end of the cutter.
To do this, I secured my homemade device on the table with self-tapping screws, near the sandpaper.
Here is a video report on the experiment.
All that remains is to finalize the sharpening of the cutter strips and make a stop that limits the cutter from falling to the front, and finally, a table for this device.
For those who are interested in this topic, below is a link to the continuation.
Machine for sharpening cutters for metal: review of models, self-assembly
Devices for sharpening the end cutting elements of a milling-canter machine are divided according to the nature of the work and are divided into two types - universal and special.
Let's look at each of these options below.
1 Machines for sharpening cutters for metal - review of factory models
Sharpening cutters for working on metal and wood is done with your own hands using universal worm gear devices.
In addition, the cutting elements of the milling-canter machine can be sharpened using special devices.
