DIY electric spark machine
To change the shape and size of a metal workpiece, you can use the electrical discharge processing method. It has been used for many years in various industries, characterized by high accuracy but low productivity.
To apply this processing method, you should use a special electric spark machine, which you can purchase or make yourself. The homemade version can be used in everyday life in small-scale production. The cost of making it yourself will be lower than purchasing an industrial version.
Therefore, let’s take a closer look at how you can make the electric spark machine in question with your own hands, what you need for this and in what cases it can be used.
Homemade electric spark machine
The principle of the considered processing method
A special feature of processing with an electric spark unit is that the evaporation of metal occurs due to the effect of a certain charge on the surface of the workpiece. An example of such an effect is the short circuit of a capacitor on a metal plate - a hole of a certain size is formed.
EDM creates a high temperature that simply evaporates the metal from the surface. It is worth noting that a machine from this group has already been used over the past 50 years in various industries. The main condition for using such an electric spark machine is that the workpiece must be made of a certain metal.
In this case, it is not the degree of machinability that is taken into account, but the electrically conductive properties.
The EDM machine has a spark generator that acts as a capacitor. For processing, a large capacity storage element should be used. The processing principle is to store energy over a long period of time and then release it over a short period of time. The laser device also works on this principle: reducing the time period of energy release leads to an increase in current density, which means the temperature increases significantly.
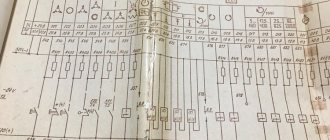
Electrical circuit of an electric spark installation
The operating principle of the generator, which is installed on an electrical discharge machine, is as follows:
- the diode bridge rectifies industrial current with a voltage of 220 or 380 Volts;
- the installed lamp limits the short circuit current and protects the diode bridge;
- the higher the load indicator, the faster the charging of the electric spark machine;
- after charging is complete, the lamp will go out;
- Having charged the installed storage device, you can bring the electrode to the workpiece;
- after the circuit is opened, the capacitor begins to charge again;
- The charging time of the installed storage element depends on its capacity. Typically, the time period is from 0.5 to 1 second;
- at the moment of discharge the current reaches several thousand amperes;
- the wire from the capacitor to the electrode should have a large cross-section, about 10 square millimeters. In this case, the wire must be made exclusively of copper.
The generation frequency when the electrode is supplied to an electric spark machine is 1 Hz.
Design of an electric spark machine
There are schemes that are quite difficult to implement. The scheme in question can be implemented with your own hands. Parts for the installed generator are not in short supply; they can be purchased at a specialized store. Capacitors are also widespread, as is the diode bridge. At the same time, when creating a homemade electric spark machine, the following points should be taken into account:
- on the capacitor the indicated voltage should not be less than 320 Volts;
- the number of energy storage devices and their capacity are selected taking into account that the total capacity should be 1000 μF. All capacitors must be connected in parallel. It is worth considering that the power of a homemade version increases if it is necessary to obtain a stronger spark strike;
- The lamp is installed in a porcelain socket. The lamp should be protected from falling; a circuit breaker with a current strength of 2 to 6 Amperes is installed;
- the machine is used to turn on the circuit;
- electrodes must have strong clamps;
- a screw clamp is used for the negative wire;
- The positive wire has a clamp with a copper electrode and a tripod for direction.
How to make an electrical erosion machine for your home workshop with your own hands?
Some home craftsmen have the idea of making an electrical erosion machine with their own hands for their own workshop. The desire is explained by the fact that sometimes it is necessary to process parts with high hardness. Annealing to reduce strength is not allowed. Deformation of the part is possible and the requirements for the quality of the processed surface or other characteristics will be violated.
As a result of spark erosion, through holes are burned or markings are applied. It is possible to process a surface of complex shape specified by the electrode.
Basic elements of the electrical spark equipment circuit
The diagram is represented by the following elements:
- electrode;
- a clamp screw used to secure the positive wire and electrode;
- guide bushing;
- body made of fluoroplastic;
- hole used to supply oil;
- tripod.
The body, which is used to connect all the elements, is machined from fluoroplastic. A grounding pin is used as a bushing, in which a threaded hole is machined along the axis for attaching the electrode. All structural elements are mounted on a tripod, which is made with the ability to change height. A hole is also created through which oil is supplied.
Often cutting is carried out using a device that is powered by a starter with a coil connected to a voltage of 220V. The starter rod can have a stroke of 10 millimeters. The starter winding is connected in parallel with the lamp. That is why the lamp is lit when the capacitors are charging, and after this process is completed, it goes out. After the rod has been lowered, a spark charge occurs.
Electroerosive machines operate on the principle of applying electric charges to the work surface of a part located in an electrically conductive environment.
Due to this, electrical erosion occurs in a given direction, which makes it possible to obtain a specific shape or size of the part.
Features of a homemade device
Before you start making a homemade EDM machine, you need to understand its structure. The main structural elements include:
Table for securing the workpiece.- Bath.
- Actuator (electrode, terminal block for connecting the wire, bushing, guide, dielectric housing, tripod).
- Generator.
- Carriage.
- Easel base.
- Handwheel for tool feeding.
- Bracket.
- Vibrating plate.
- Rod guide.
- Stand.
- Equipment.
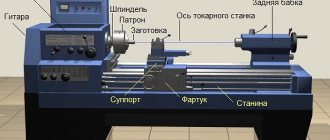
Drive of the main movement in the machine
A linear drive is a design with non-contact force transmission, a direct drive without any kinematic chain for converting energy into motion and rotational motion into linear motion, without backlash, dead zone and uneven feeds. All that happens during each movement is:
Command impulse => Interaction energy of magnetic fields => Linear motion
In linear drives there is no multi-stage conversion of energy into movement, which causes backlash and uneven feeds. Linear drives of an electric spark machine are capable of adjusting the gap 500 times per second with a feed resolution of 0.1 microns. It turns out that the optimal gap is at almost any moment. And as a result, we get optimal modes, consistently maximum removal, high processing speed and surface quality.
How to improve the machine?
The simplest machine made is a working model. Its purpose is to create holes in hardened parts.
In the future, you need to consider the option with a vertical electrode arrangement. Then you can install a bath underneath it. The process will occur without possible malfunctions associated with the presence of sludge that cannot be removed from the working area.
It is also necessary to consider additional mechanisms for smooth tool feeding. It may be necessary to carry out not only axial movement, but also movement of the electrode in the horizontal plane in order to carry out three-dimensional surface treatment.
Any simple machine gives ideas on how to further improve it and create a more convenient unit. The main thing is to take the first step and try to make the first sample.
Video: homemade electric spark machine.
Electric spark processing of material.
Electric spark machining involves using the phenomenon of electrolytic erosion and transferring the tool metal to the build-up surface of the part when spark discharges pass between them.
In electrical installations (switches, contactors, switches), sparks are formed at the moments of closing and opening the electrical circuit, which gradually destroy the surface of the contacts. This phenomenon is called electrical erosion. Particularly severe erosion is observed in DC circuits. This is explained by the fact that air ionization occurs between the energized electrodes, thereby creating a narrow channel that conducts current. An electron avalanche (in the form of a spark), breaking through the air gap, transfers a significant amount of electricity in a very short period of time from the cathode to the anode. In this case, a small part of the anode surface is heated to a very high temperature (10,000°C...15,000°C), which leads to melting and even evaporation of the metal, which is ejected from the spark gap in the form of liquid drops.
Let's consider electric spark processing (Fig. 1). The workpiece is the anode in the electrical circuit, and the tool is the cathode. To prevent metal droplets from growing on the tool and changing its shape, the processing process is carried out in a liquid medium (oil, kerosene) that does not conduct electric current. The tool is fixed in a slider that makes vertical movements up and down using a solenoid regulator. An electrical circuit consists of direct current sources, a resistance that regulates voltage and current, and a capacitor that prevents the spark from turning into an electric arc. When the electrode is lowered so much that a small gap is formed between it and the product, an electric spark jumps and erosion of the product occurs. The electrode is then raised slightly and the processing cycle, lasting a fraction of a second, is repeated.
Rice. 1. Scheme of electric spark processing (firmware) 1 - solenoid; 2 - current source; 3 - resistance; 4 - capacitor; 5 - detail; 6 — liquid medium (oil, kerosene); 7—tool; 8 - slider
Rice. 2. Installation diagram for electrospark metal growth 1—switch; 2 - transformer; 3— rectifier; 4— capacitor; 5—vibrator; 6 - workpiece
The electrode is made of soft brass or copper-graphite mass, which can easily be given any shape and size. This method can be used to process both soft and hard metals (hardened steels, hard alloys, etc.).
Technological indicators of electric spark processing of metals depend on the applied processing mode. Thus, when flashing in hard mode (voltage 150...200 V, short circuit current 10...60 A and capacitor capacity 400...600 μV), you can get clean surfaces of classes I and II, and a metal volume of 150...300 mm3/min; when flashing in soft mode (voltage 25...40 V, current 0.1...1 A and capacitor capacity up to 10 μF), it is possible to achieve surface cleanliness corresponding to classes VI and VII, however, metal removal in this case will be less than 20 mm3/min .
Electric spark machining of metals is used for piercing holes of various shapes and sizes, removing remnants of broken tools and fasteners from products, surface hardening and building up a metal layer with minor wear.
Electric spark growth (Fig. 69) allows you to apply coatings from any metals and alloys, regardless of their hardness. This, as well as the low temperature of the part during processing, creates favorable conditions for building up a layer of metal on worn, hardened surfaces. Electrospark build-up restores the journals of the axles of road wheels, seats for bearings on shafts, bearing cups, journals for bearings on axles and other similar surfaces of parts in fixed and transitional fits.
When the electrode (anode), fixed in the vibrator clamps, comes into contact with the surface of the part (cathode), a spark discharge is formed, which transfers the metal from the anode to the cathode. Metal transfer occurs in the air and, unlike installations for piercing work, does not require the use of working fluids and baths.
The wear resistance and fatigue strength of machine parts strengthened by the electric spark method largely depends on the modes used and the strengthening material.
For electrospark growth of metal on parts, UPR-ZM and EFI-25 installations are used.
DIY electric spark pencil
This method will require an alternating current source with a voltage of 18-20 V, preferably adjustable, and an electrode holder - an electric spark pencil.
A transformer with a power of about 200 W can be used as a current source. One of the terminals of the secondary winding of the transformer is connected using an alligator clip to the workpiece or part on which the inscription needs to be applied. The other terminal is connected to an electrode clamped in an electric spark pencil. Connections are made with an insulated stranded wire with a cross-section of at least 1.5 mm2, ensuring operation with currents of more than 10 A. The connection diagram is shown in Fig. 1.
Fig. 1 Connection diagram of an electric spark pencil to a 220 volt network
An electric spark pencil is a simple clamp for an electrode, the basis of which can be used as a regular collet pencil (Fig. 2). However, due to the high degree of heating during engraving, its plastic body must be replaced with another made of heat-resistant insulating material, for example, PCB or ebonite. The wire coming from the transformer is passed through a hole in the housing and soldered to the collet.
Rice. 2 Electric spark pencil based on a regular collet pencil
The electrode can be a pointed metal rod with a diameter of 02-3 mm, preferably made of a refractory metal, for example, tungsten. But you can use rods from other materials, say, from less scarce graphite. The engraving end of the rod is a cone with an apex angle of about 30°.
When the transformer is connected to the network according to the diagram above, voltage appears on the electrode. Touching the end of the electrode to a metal surface causes a spark discharge to appear, which, melting the metal surface, leaves a noticeable mark on it.
Experience shows that the highest quality inscriptions are obtained at an operating voltage for a tungsten electrode - 8-10 V, for a graphite electrode - 16-18 V. Before applying an inscription, the metal surface must be cleaned of dirt and degreased. Inscriptions and drawings are applied with separate points and tangential movements.
'If desired, an electromagnetic breaker can be introduced into the electrical circuit of the “electric spark pencil”, connected in series to the circuit it breaks, and the pencil can be equipped with a solenoid (in the core of which the collet is fixed) and a spring that returns the collet with the electrode to its original state after opening the circuit. This will somewhat simplify the engraving process, but will complicate the design of the electric pencil.
When operating the described device, it is necessary to observe electrical safety measures, especially when using LATR as a voltage source. To protect your eyes, you must always use safety glasses. Do not allow the transformer to overheat, take breaks during operation.
S. IVANOV, Kursk
Schematic diagram, design of the ignition transformer
Here is a selection of materials:
P
practice of electronic circuit design. The art of device design. Element base. Typical schemes. Examples of finished devices. Detailed descriptions. Online payment. Opportunity for authors
Capacitor C1
- 1 µF 600 V, non-polar.
To increase the spark power, you can increase its capacity, but for all my undertakings this rating was enough. Resistor R1
- 5 kOhm 2 W.
Sometimes it has to be selected for a specific thyristor. The thyristor may not open at all, then its rating must be reduced, or it may open at too low voltage (short spark), then its rating must be increased. But usually the indicated denomination is fine. Resistor R2
- 50 Ohm 1 W.
Diode VD1
- any, current 1A, voltage from 700V (reverse DC voltage).
I'm using 1N5407. Thyristor VS1
- voltage from 600V current from 1A. The choice is huge. I use KU202N or KU202M.
The isolation transformer (Tr1) is used for the sole purpose of galvanic isolation of the circuit from the 220V network to ensure safety and eliminate the supply of mains voltage to various metal parts of the burner, boiler and other devices with which the unit will work. This transformer additionally allows the use of a wide variety of ignition coils, from motorcycle (6 volt) to 24-volt, from classic (with energy storage) to switched transistor ignition units. To use the desired coil, you simply need to select the number of turns of the secondary winding. For the classic coil, a transformer is used, wound on a 20 x 20 mm transformer iron core with 0.5 mm wire, each winding is 250 turns. Three layers of transformer paper must be laid between the windings, and in general, when manufacturing a transformer, ensure reliable insulation of one winding and its terminals from the other winding and its terminals.
The essence and characteristics of the method
Electroerosion is a change in the shape and structure of the surface of a part when exposed to an electric discharge. One of the electrodes is a tool, the other is a part made of conductive materials. When they come together, an electric discharge is formed. Discharges are produced pulsed, using a pulse generator. The work is carried out in a liquid dielectric medium, which increases the discharge force. Various mineral oils and kerosene are used as dielectrics. As a result of the discharge, an electric arc is formed. You can choose different materials for electrodes:
- tungsten;
- coal;
- copper;
- brass.
The current heats the electrode, evaporation of the dielectric occurs and the formation of a gas bubble. When exposed to a high-power discharge, the temperature in the gas bubble rises to thousands of degrees, the electrodes melt and metal is released.
Electrical discharge machining is used in the following processes:
- Abrasive grinding. It consists of destroying a metal workpiece using abrasive processing and electrical erosion.
- Electroerosive chemical grinding is the use of electric spark erosion and anodic dissolution in an electrolyte environment.
- The anodic-mechanical method of electrical processing is characterized by complex electrochemical and mechanical methods of action, in which the workpiece material is dissolved, and the resulting oxide film is removed mechanically.
- Piercing is a method of making holes in solid materials using the electrical discharge method.
- Electroerosive hardening makes it possible to improve the strength characteristics of the workpiece surface.
- Volume copying allows you to copy the shape of the electrode-tool.
- Electrical discharge cutting of metal allows you to obtain high precision.
Electrical processing is carried out with direct and reverse polarity.
Electric spark processing of metals
In electric spark machining, the part is the anode and the tool is the cathode. With this polarity, the electrode-tool is severely destroyed. To prevent destruction, a short negative pulse is applied to it with a duration of no more than 0.001 seconds. The method is mainly used for finishing. It allows you to pierce holes, clean surfaces and grind parts made of materials of increased hardness.
Electropulse treatment
When using electric pulses, reverse polarity is used. The part is the cathode. When an arc discharge is formed, the part is processed by an ion flow directed towards the part. This provides good metal removal performance, but significantly less accuracy. This method is used for rough processing of workpieces.
Electroerosive cutting is used when it is necessary to produce complex parts from high-strength alloys. Cutting machines are used when mass production of products with high precision is required.
Main structural element
The EDM machine has a spark generator that acts as a capacitor. For processing, a large capacity storage element should be used. The processing principle is to store energy over a long period of time and then release it over a short period of time. The laser device also works on this principle: reducing the time period of energy release leads to an increase in current density, which means the temperature increases significantly.
Electrical circuit of an electric spark installation
The operating principle of the generator, which is installed on an electrical discharge machine, is as follows:
- the diode bridge rectifies industrial current with a voltage of 220 or 380 Volts;
- the installed lamp limits the short circuit current and protects the diode bridge;
- the higher the load indicator, the faster the charging of the electric spark machine;
- after charging is complete, the lamp will go out;
- Having charged the installed storage device, you can bring the electrode to the workpiece;
- after the circuit is opened, the capacitor begins to charge again;
- The charging time of the installed storage element depends on its capacity. Typically, the time period is from 0.5 to 1 second;
- at the moment of discharge the current reaches several thousand amperes;
- the wire from the capacitor to the electrode should have a large cross-section, about 10 square millimeters. In this case, the wire must be made exclusively of copper.
The generation frequency when the electrode is supplied to an electric spark machine is 1 Hz.
Brief description of a homemade installation
Electrode 1 is installed in housing 2. Its reciprocating movement is carried out by an electromagnet from coil 7. Terminal 3 is connected to the guide sleeve (positive potential is applied).
The part to be processed is mounted on the work table 4. There is terminal 5 on the table; the negative conductor is connected to it. Lubricant is supplied through tube 6 into the housing.
By turning on the converter, operating voltage will be obtained on the current-carrying wires. Additionally, voltage is applied to the induction coil 7. It creates vibration of the electrode 1, directing its movement to the right and left. Electrode 1 touches the workpiece. A current of 7000...9000 A appears in the contact zone.
Each time the tool moves towards the part, a small amount of metal is burned off. Within 10...12 minutes of operation of the electrical erosive machine, a through hole will be obtained in the part. A hole is obtained in the drill shank. It is quite difficult to drill such a hole using the usual method.
Development of a horizontal electrical discharge machine
The installation diagram includes the main components and parts:
- 1 – electrode;
- 2 – screw for fixing the electrode in the guide sleeve;
- 3 – terminal for fixing the positive wire from the voltage converter;
- 4 – guide sleeve;
- 5 – fluoroplastic body;
- 6 – hole for lubricant supply;
- 7 – bed.
The unit is small in size and can be placed on a table. In the housing 5, the guide sleeve 4 can move in both directions. To drive it you need a special mechanism or device.
Electrode 1 is attached to sleeve 4, the positive wire is also connected using terminal 3. All that remains is to assemble the proposed circuit into a real installation at home. It uses the simplest equipment.
§2 Electrical erosion
The principle of electrical discharge machining of metals is based on the evaporation of metal by a spark discharge. If you have seen a short circuit of a capacitor on a metal plate, then remember that a hole remains at the discharge site. The metal in this place evaporates from the high temperature of the spark discharge. Electrical discharge machines have been used in industry for processing high-strength alloys for more than 50 years.
§5 Implementation of the machine
Parts for a spark generator are not in short supply; they can be bought at a specialized store or taken from the nearest trash heap. You will find capacitors in any discarded TV or monitor or in a computer power supply. You will also find a diode bridge there. The voltage indicated on the capacitor must be at least 320 V. The capacitance of the capacitor can be any, the sum of all capacitances of the capacitors must be at least 1000 μF (all capacitors are connected in parallel). The larger the capacity, the more powerful the blow. All this must be assembled in a durable insulating housing. As I already said, for installation you need to use thick copper wires (6..10mm2), which should go from the capacitors to the electrodes. The wires from the capacitors to the diode bridges and to the lamp can be 0.5 mm2. Install the lamp in a porcelain socket and firmly secure it to the stand so that the lamp does not fall and break; it is advisable to install a 2..6 A circuit breaker here. With its help, you can turn on the circuit. For the electrodes you need to make reliable clamps. For the negative wire, a large alligator clip or screw clamp. On the positive wire you need to make a clamp for the copper electrode and a tripod with a guide for the electrode.
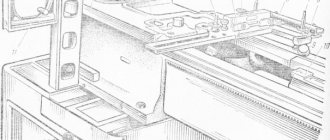
Fig.2 Machine structure
- Description:
- electrode;
- electrode clamp screw;
- positive wire clamp screw;
- guide bushing;
- fluoroplastic body;
- oil supply hole;
- tripod;
Body 6 is machined from fluoroplastic. The grounding pin of a 3-phase Euro socket is used as a guide sleeve 4 for electrode 1. It was drilled along the axis to install an electrode into it, and two threaded holes were made to secure the electrode and wire. As the electrode evaporates, it is moved forward by loosening screw 2. The entire structure is mounted on a reliable tripod, which allows you to change the height. A tube with oil is inserted into hole 6. Guide sleeve 4 supplies oil along the electrode like a syringe.
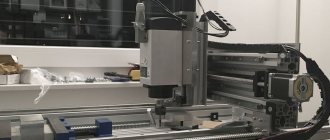
Fig.3 Photo of the machine
To drive the electrode, a domestic starter with a 220V coil was used, the rod of which has a stroke of 10 mm (it determines the maximum depth of the hole). The starter winding is connected in parallel with lamp H1, so while the capacitors are charging (the lamp is on), the starter rod is retracted. After charging the capacitors, the lamp goes out because the current in the system stops flowing and the rod is released. When the rod is released, it touches the part, a spark discharge occurs, lamp H1 lights up and the rod retracts again. The cycle repeats again, with a frequency of approximately 1 Hz. If you need to increase the frequency, then you need to increase the power of lamp H1. A file is used as a detail in the photo.
Fig.4 Photos of a drill with a hole made by this machine.
High voltage generator from a transistor liner
Hello, dear friends! Today I suggest you assemble a high-voltage generator using just one transistor from a TVS-110PTs15 line transformer with an UN9/57-13 voltage multiplier from an old color TV. The circuit is quite simple, built on the principle of blocking a generator and contains a small number of parts.
Circuit of a high voltage generator from a liner on one transistor
To assemble the generator, you will need one KT819G transistor, or an imported analog TIP41C, but it is best to use MJE13009, since this transistor can withstand current up to 12 A and, accordingly, will heat up less. Personally, I used MJE13009 in my generator. Be sure to coat the transistor with thermal paste and install it on a radiator, preferably with a fan.
You will also need two 5-watt resistors. At 100 ohms and 240 ohms, the resistors in my generator got very hot and I decided to glue a small radiator with “poxy-pol”. The most important part of the generator is the TVS-110PTs15 line transformer; it is possible to use TVS-90LTs5 and other similar ones from old color, black-and-white and even tube TVs.
Linear transformer TVS-110PTs15
A couple of additional windings need to be wound on the magnetic core of the transformer. Coil L1 contains 10 turns, wound with wire with a diameter of 1 millimeter. We wind coil L2 with 1.5 millimeter wire, 4 turns in total. Both coils should be wound in the same direction. The secondary high-voltage winding remains unchanged.
Line transformer TVS-110PTs15 with two additional windings
The voltage multiplier UN9/27-13 or similar also needs minor modification. It is necessary to remove two unused terminals on it, marked in the picture with red arrows, then isolate these places with “poxy-pol”. It’s not necessary to do this, but if you accidentally touch these conclusions during the experiment... Your hair will stand on end and it won’t seem like much, of course it won’t kill you with an electric shock, there are very few amperes there, but it can burn you. A 470 ohm resistor is installed between the line transformer and the multiplier.
Voltage multiplier UN9/27-13
The arrester is made of two wires with a diameter of 1 millimeter. The distance between the electrodes is selected individually. To power the generator, it is best to use a power source from 12 to 30 volts with a current of at least 2A.
High voltage generator. Arrester
After power is applied, a powerful arc appears at the spark gap. How to measure the voltage at the output of a multiplier without a kilovolt meter? It is generally accepted that 1 millimeter of arc is 1 kilovolt, the length of the arc is 15 millimeters, which means the voltage at the spark gap is approximately 15 kilovolts.
I would like to say a few words about safety precautions. A high voltage of several tens of kilovolts is supplied to the spark gap from the multiplier, so do not touch the spark gap with your hands to avoid electric shock; even after turning off the power, high voltage remains in the multiplier capacitors. Of course, it won’t kill you with an electric shock, because there are not enough amperes, but it will hurt and possibly leave burns on the skin.
Friends, I wish you good luck and good mood! See you in new articles!
I recommend watching a video about how a high voltage generator works.
Royal icing for cakes
If you prefer to decorate your Easter cakes with white frosting, you can also use royal icing for this purpose. This glaze will not drip down the cake, and you can also make patterns and inscriptions from it.
Ingredients:
- Egg white
- Powdered sugar (glass)
- A pinch of flour
- Vanilla (pinch)
Preparation:
Grind the sifted powdered sugar with the protein, and at the end of cooking add flour and vanillin. Coat the top of the cake with icing and draw flowers, stars, monograms, etc.
Note:
For painting, it is better to use colored glaze. And instead of flour, you can add starch (potato or corn). To prepare colored glaze, you can use regular food coloring (liquid, dry or gel). Or you can take natural ones: beet juice, saffron, cocoa powder.
As you can see, royal icing is such a simple recipe that it is suitable for the very first steps in the artistic design of any confectionery product. It is not for nothing that it is also called drawing paste. Unlike meringue, this glaze is devoid of pomp and airiness, it is plastic and dries quickly. So try, do, draw, create!
To change the shape and size of a metal workpiece, you can use the electrical discharge processing method. It has been used for many years in various industries, characterized by high accuracy but low productivity. To apply this processing method, you should use a special electric spark machine, which you can purchase or make yourself. The homemade version can be used in everyday life in small-scale production. The cost of making it yourself will be lower than purchasing an industrial version. Therefore, let’s take a closer look at how you can make the electric spark machine in question with your own hands, what you need for this and in what cases it can be used.
Machine feed drives
Only recently has the production of electric spark machines begun, namely with completely new linear motors. In this release, work was done and corrected on speed control and acceleration, uniform movement, reverse, ease of maintenance, etc.
The linear motor in this release of machine tools has a motor containing only a few elements: an electromagnetic stator and a flat rotor, which contain only a gap of air between them. There is also another important element and this is an optical measuring ruler with high resolution (0.1 microns). Without this measuring device, the control system will not be able to recognize the coordinates.
But we will also take a closer look at the stator and rotor. Both are designed as flat, easily removable blocks. But the stator is attached to the frame or column of the machine, and the rotor is attached to the working element.
The design of the rotor is completely simple. It consists of rectangular strong permanent magnets. And the magnets are on a thin plate made of special high-strength ceramics, the coefficient of thermal expansion of which is half that of granite.
Many problems of the linear drive were solved, as they began to use ceramics simultaneously with the cooling system. Accordingly, problems with temperature factors, structural rigidity, the presence of strong magnetic fields, etc. “went away.”
DIY electric spark machine
To change the shape and size of a metal workpiece, you can use the electrical discharge processing method. It has been used for many years in various industries, characterized by high accuracy but low productivity.
To apply this processing method, you should use a special electric spark machine, which you can purchase or make yourself. The homemade version can be used in everyday life in small-scale production. The cost of making it yourself will be lower than purchasing an industrial version.
Therefore, let’s take a closer look at how you can make the electric spark machine in question with your own hands, what you need for this and in what cases it can be used.
Homemade electric spark machine
The principle of the considered processing method
A special feature of processing with an electric spark unit is that the evaporation of metal occurs due to the effect of a certain charge on the surface of the workpiece. An example of such an effect is the short circuit of a capacitor on a metal plate - a hole of a certain size is formed.
EDM creates a high temperature that simply evaporates the metal from the surface. It is worth noting that a machine from this group has already been used over the past 50 years in various industries. The main condition for using such an electric spark machine is that the workpiece must be made of a certain metal.
In this case, it is not the degree of machinability that is taken into account, but the electrically conductive properties.
The EDM machine has a spark generator that acts as a capacitor. For processing, a large capacity storage element should be used. The processing principle is to store energy over a long period of time and then release it over a short period of time. The laser device also works on this principle: reducing the time period of energy release leads to an increase in current density, which means the temperature increases significantly.
Electrical circuit of an electric spark installation
The operating principle of the generator, which is installed on an electrical discharge machine, is as follows:
- the diode bridge rectifies industrial current with a voltage of 220 or 380 Volts;
- the installed lamp limits the short circuit current and protects the diode bridge;
- the higher the load indicator, the faster the charging of the electric spark machine;
- after charging is complete, the lamp will go out;
- Having charged the installed storage device, you can bring the electrode to the workpiece;
- after the circuit is opened, the capacitor begins to charge again;
- The charging time of the installed storage element depends on its capacity. Typically, the time period is from 0.5 to 1 second;
- at the moment of discharge the current reaches several thousand amperes;
- the wire from the capacitor to the electrode should have a large cross-section, about 10 square millimeters. In this case, the wire must be made exclusively of copper.
The generation frequency when the electrode is supplied to an electric spark machine is 1 Hz.
Design of an electric spark machine
There are schemes that are quite difficult to implement. The scheme in question can be implemented with your own hands. Parts for the installed generator are not in short supply; they can be purchased at a specialized store. Capacitors are also widespread, as is the diode bridge. At the same time, when creating a homemade electric spark machine, the following points should be taken into account:
- on the capacitor the indicated voltage should not be less than 320 Volts;
- the number of energy storage devices and their capacity are selected taking into account that the total capacity should be 1000 μF. All capacitors must be connected in parallel. It is worth considering that the power of a homemade version increases if it is necessary to obtain a stronger spark strike;
- The lamp is installed in a porcelain socket. The lamp should be protected from falling; a circuit breaker with a current strength of 2 to 6 Amperes is installed;
- the machine is used to turn on the circuit;
- electrodes must have strong clamps;
- a screw clamp is used for the negative wire;
- The positive wire has a clamp with a copper electrode and a tripod for direction.
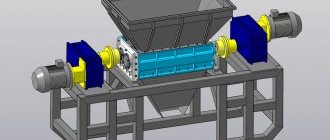
Electroerosive machine: types, schemes for producing an electric discharge, do-it-yourself equipment
To produce elements with a complex profile from difficult-to-cut metals, an electrical discharge machine is used.
Its work is based on the impact of electric current discharges, which create a high temperature in the processing zone, causing the metal to evaporate. This effect is called electrical erosion.
The industry has been using machines operating on this principle for more than 50 years.
Types of equipment and processing methods
The operation of an electroerosive machine can be described as follows : take a charged capacitor and bring it with electrodes to a metal plate.
During a short circuit, the capacitor discharges. A bright flash is accompanied by the release of energy (high temperature).
At the point of closure, a depression is formed due to the evaporation of a certain amount of metal from high temperature.
Various types of generating electrical discharges are implemented on technological equipment . Among the main schemes are:
- electric spark;
- electrical contact;
- electric pulse;
- anodic-mechanical.
By implementing one of the schemes in practice, machine tools are manufactured . Based on the principle of electrical erosion, the following machines were produced in different modifications:
- cut-out;
- wire;
- stitched.
To obtain precise dimensions and automate the process, the equipment is equipped with computer numerical control (CNC).
An electric spark machine works using a spark generator. A generator is an energy storage device that produces an electrical impulse. For constant supply of pulses, a capacitor bank is organized.
To organize an electrical circuit, the cathode is connected to the actuator, and the anode is connected to the workpiece.
A constant distance between the electrode and the workpiece guarantees uniformity of the process.
When the electrode is lowered vertically onto the part, the metal is pierced and a hole is formed, the shape of which is determined by the shape of the electrode. This is how an EDM piercing machine works.
A wire EDM machine is used to produce parts from hard-alloy and difficult-to-machine parts. A thin wire acts as an electrode.
When metal evaporates, oxides with a high melting point are formed on the surface of the workpiece. To protect against them, the process is carried out in a liquid medium or oil.
During sparking, the liquid begins to burn, taking oxygen and other gases from the working area.
Machines of this type are sometimes the only possible way to manufacture a structural element. But buying EDM equipment for infrequent jobs is costly. Therefore, if the need arises, you can make an electrical erosion machine with your own hands.
Features of a homemade device
Before you start making a homemade EDM machine, you need to understand its structure. The main structural elements include:
- Table for securing the workpiece.
- Bath.
- Actuator (electrode, terminal block for connecting the wire, bushing, guide, dielectric housing, tripod).
- Generator.
- Carriage.
- Easel base.
- Handwheel for tool feeding.
- Bracket.
- Vibrating plate.
- Rod guide.
- Stand.
- Equipment.
Manufacturing a spark generator
To make a spark generator, parts can be found everywhere (in old TVs, power supply monitors, etc.). The principle of its operation is as follows :
- The diode bridge converts alternating current into direct current. The home network voltage is 220 V (380 V can also be used).
- The incandescent lamp included in the circuit is designed to limit the current during a short circuit. Thus, it protects the diode bridge from breakdown. It also signals that the capacitor is charging. The lamp must be of the appropriate voltage and power of at least 120 W.
- The capacitor must be rated for the supplied voltage. The most optimal voltage would be 400 V. The capacitance of the capacitor should be at least 1000 µF. To burn on a home machine, 20,000 uF is enough.
- After the capacitor is fully charged, the lamp goes out. Then it is discharged through the electrode. The chain breaks.
- The charging cycle repeats. Its speed directly depends on the capacitance of the capacitor. At minimum values, charging takes a little less than one second.
- To protect against overload, the design is equipped with a 2-6 A circuit breaker.
Safety precautions when working
Since organized do-it-yourself electrical erosion is associated with the possibility of electric shock, safety precautions must be approached with all responsibility.
The workpiece must not be grounded. Otherwise, an emergency will occur - a short circuit in the supply network.
Capacitors rated at 400 V can be lethal with only 1000 µF of capacitance.
Connecting devices eliminates contact with the housing. To connect the capacitor to the electrode, a copper wire with a cross section of 6-10 square meters is required. mm. Large volumes of oil used to prevent oxide formation may ignite and cause a fire.
Cutting and stitching machine
Contrary to preconceived notions about the complexity and impracticability of such a task, this is not the case. This is a completely feasible task for the average person, although everything is not so simple. The simplest type of machine is a cutting machine, designed for processing parts made of alloyed, refractory and other durable metals.
Electroerosive cutting machine
The electrical circuit contains: a power source, a diode bridge, a light bulb and a set of capacitors connected in a parallel circuit. The electrode and the workpiece are connected to the output. Let us note once again that this is a schematic diagram for a figurative concept of the principle of operation of the device. In practice, the diagram is supplemented with various elements that allow you to adjust the piercing machine to the required parameters.
General requirements for the electrical circuit of a cutting machine:
- Consider the required power of the machine when choosing a transformer;
- The voltage across the capacitor must be greater than 320 V;
- The total capacitance of the capacitors must be at least 1000 μF;
- The cable running from the circuit to the contacts must only be copper and have a cross-section of at least 10 mm;
One example of a working diagram:
As you can immediately see, the scheme differs significantly from the fundamental one, but at the same time it is not something supernatural. All the details of the electrical circuit can be found in specialized stores or simply in old electronic devices that have long been collecting dust somewhere in the garage. An excellent solution is to use CNC to control the machine, but this method of control costs a lot, and connecting it to a homemade machine requires certain skills and knowledge.
Technical specifications for the design of a homemade machine
To make a homemade electrical discharge machine, you need to make a number of devices that will help automate the production process.
- A frame is needed; the mechanism for moving the electrode will be placed on it.
- You will need a mechanism that allows you to periodically bring and remove the electrode to the material being processed.
- To burn holes of different shapes you need to have a set of electrodes. Experts recommend using molybdenum wire.
- For different types of main tools, you will need to change the device power and amperage. Under different operating modes, the electrical circuit diagram must allow regulation of the discharge value on the electrode. It is necessary to provide for a change in the voltage ripple frequency.
- To cool the part (hardened steel cannot be overheated; tempering occurs with a decrease in hardness), coolant must be supplied to the work area. More often, ordinary water or salt solutions are used. The water simultaneously washes away sludge (destroyed metal particles).
Main structural element
The EDM machine has a spark generator that acts as a capacitor. For processing, a large capacity storage element should be used. The processing principle is to store energy over a long period of time and then release it over a short period of time. The laser device also works on this principle: reducing the time period of energy release leads to an increase in current density, which means the temperature increases significantly.
Electrical circuit of an electric spark installation
The operating principle of the generator, which is installed on an electrical discharge machine, is as follows:
- the diode bridge rectifies industrial current with a voltage of 220 or 380 Volts;
- the installed lamp limits the short circuit current and protects the diode bridge;
- the higher the load indicator, the faster the charging of the electric spark machine;
- after charging is complete, the lamp will go out;
- Having charged the installed storage device, you can bring the electrode to the workpiece;
- after the circuit is opened, the capacitor begins to charge again;
- The charging time of the installed storage element depends on its capacity. Typically, the time period is from 0.5 to 1 second;
- at the moment of discharge the current reaches several thousand amperes;
- the wire from the capacitor to the electrode should have a large cross-section, about 10 square millimeters. In this case, the wire must be made exclusively of copper.
The generation frequency when the electrode is supplied to an electric spark machine is 1 Hz.
Main features of electrical erosion
The operating principle of an erosion installation for metal parts is based on the removal of the smallest particles of the material being processed by a spark discharge. As a result of a single exposure, a small hole remains at the point of contact. The more powerful the spark, the wider and deeper the depression is formed.
Spark generator circuit:
The electrical circuit of the device provides for the use of:
- diode bridge, it rectifies the supplied alternating voltage from the 220 V network;
- a 100 W H₁ incandescent lamp represents a resistive load;
- capacitors C₁, C₂, C₃ accumulate energy to produce a one-time spark discharge.
When the circuit is connected to the network, the H₁ lamp lights up, and an electric charge accumulates on the capacitors C₁,..., C₃. When the capacitors are fully charged, the flow of electric current through the circuit stops. The H₁ lamp goes out, which serves as a signal for the possibility of a spark.
The electrode is applied to the part. There remains a gap through which breakdown occurs. A small hole is burned into the metal.
Similar actions happen many times. With each subsequent action, the electrode penetrates deeper into the metal, tearing out particles at a greater depth.
The above circuit requires about 0.5...0.7 s of time to fully charge the capacitors. The current value in the charge circuit is approximately 0.42...0.47 A. When contact is made in the discharge zone, the current increases to 7000...9000 A. At such a high value, 0.010...0.012 g of metal (steel) evaporates.
Technological indicators
An electric spark installation, depending on the operating mode, can ensure the accuracy of the result within a wide range. If high performance is required with relatively low requirements for surface condition (class I and II), then currents of 10-60 A are used at voltages up to 220V. In this case, electric spark erosion can remove metal from the cutting or drilling zone in a volume of up to 300 mm3/min. With higher accuracy class values - VI and VII, productivity decreases to 20-30 mm3/min, but lower currents are required, no more than 1 A at voltages up to 40 V.
A feature of the use of electric spark installations can be considered the ability to strengthen parts of various configurations. A thin layer of a stronger alloy or metal is applied to the surface of the workpiece without heating the base to a greater depth. This allows you to preserve the metal structure of the base product and significantly change the properties of its surface. In some cases, base viscosity and high surface hardness are required, or vice versa. Only an electric spark machine can solve this problem.