Barrel skimmer
- A homemade feather scraper based on a barrel will work on the same principle as devices from washing machines. You need to take a plastic or metal barrel (height - 1 meter, width - 70 centimeters). It must be strong to withstand bird impacts against the sides.
- Holes for fingers are made in the lower part and on the bottom, and the drum is placed in the frame. It can be made from wooden beams or metal corners. The first option is easier to do, but the second is more reliable.
- Before the first layer of the bottom, another one should be added - for attachment to the rotation mechanism.
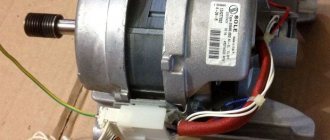
- To mechanize the product, you will need a 1.5 kW motor. To ensure proper protection, it is better to place the motor on a stand and move it to the side.
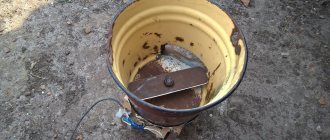
Homemade feather removal installation
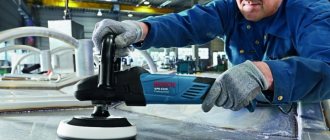
You can pluck chickens by hand, but you can mechanize the process.
Designed and manufactured a feather removal installation for a regular customer. It is designed to automate the process of de-feathering broilers, laying hens, roosters, turkeys, geese and other farm birds.
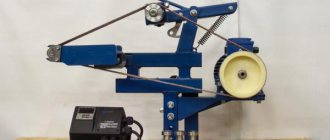
It works on the principle of a centrifuge. The lower disk rotates while the drum is stationary.
The installation consists of a frame, a working drum, an electric motor, a bearing unit, and a belt drive.
Frame: welded, made of metal angle. Working drum: diameter 600 mm, made of food-grade polypropylene. Purchased from a store. Disc: made of food grade stainless steel. The installation uses commercially available pen removal pins designed for household pen removal machines.
The advantages of this installation: low cost, ease of maintenance and repair.
Technical characteristics of the installation. Dimensions: length - 1000, width - 700, height - 1200 mm. Number of punching fingers: 110 pcs. Motor: single-phase 220V, 1.5 kW, 1500 rpm. Attaching photo.
The quality of processing is perfect. Carcass processing time is 20 seconds.
It is known: on the farm, it is preferable to buy equipment that has a variety of functions. For example: if you buy a loader, then it must perform various operations in agriculture: load semi-liquid, solid manure; grain, etc. Including, used as a tap. There is a unique tool - a drill-mixer, with which you can drill, prepare a concrete mixture, prepare holes for posts, mix paint, etc. I adapted this drill for no-moldboard tillage - installed it on a homemade electric cultivator, with which you can , without ruining the soil, loosen the soil using the “papillonage” method. By installing a professional drill-mixer with an adjustable speed on a homemade feather removal unit, you can improve the quality of processing poultry carcasses.
Questions:
Equally suitable for birds of all sizes? (From quails to turkeys?) Or should the drum sizes be different for each type of bird? What is the lifespan of these rubber fingers? Wouldn't it be better to make the structure lower, since the height of 1200 mm is not very convenient for work? With such dimensions, how can you clean the installation after work?
Answers:
Regarding the size of the container for different birds. It’s clear: each bird must have its own container size and “its own” fingers. Regarding the resource. I don’t know - I was not involved in the operation of these installations. It’s clear: if you purchase “branded” fingers, the resource will be greater. When purchasing, use paper. If you draw a finger to install it and a mark remains on the paper, then it is better to refuse the purchase. Regarding the height of the structure. The height of the structure can be made significantly smaller. The plastic container has a specific shape. If you cut off the bottom of the container and install a stainless steel tray underneath, the height will be reduced by 150 millimeters. You can cut off the top by 100 mm. You can reduce the distance from the shaft to the zero mark by about 100 - 150 mm. But, the installation was made according to the customer’s requirements at exactly this height. Regarding cleaning. The unit must be cleaned after use with hot water from a hose.
Making a drum for removing feathers
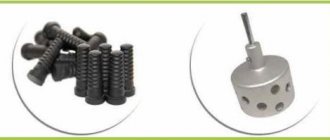
To create a drum for a feather removal machine, it is necessary to have beaters.
The purpose of the parts is to remove feathers from carcasses. Making beaters at home is considered impractical. The only option is to purchase from specialized stores selling agricultural goods. You can purchase the part in online stores.
For a homemade design, you need to purchase about 100 pieces of beaters. The price of one copy is from 15 to 40 rubles.
Types of plucking attachments
Drill attachments for plucking poultry are divided into two main types. These are nozzles with finger sizes up to 5 cm and from 9 cm. For plucking small poultry, nozzles with finger sizes of 5 cm are used. If you need to remove feathers from bird species such as geese or turkeys, then they will need devices with fingers no smaller than 9 cm
You can use not only attachments for plucking poultry, but also special machines. These machines are barrel-shaped with the punching pins located inside. The device is driven by an electric motor, and the closed walls of the product eliminate the possibility of scattering feathers throughout the workplace.
The production produces pluckers, both stationary and attachments. The cost of stationary ones, called feather removal machines, is much more expensive, so it makes sense to buy them if you have to process several dozen carcasses every day.
Types of structures
Feather removal machines can have several designs:
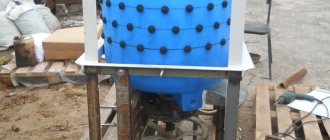
- Centrifuge. A round container is used, in which there is a hole for loading poultry carcasses. Beats placed on the bottom and sides of the structure help remove feathers during the rotation of the container. During operation of the device, water enters it, which increases the productivity of the process. This option is ideal for removing feathers from small birds, ducks at most.
- Drum. A drum equipped with “tentacles” is used - it rotates thanks to a motor. The carcass is brought closer to the rotating device and pressed. This design is designed for large bird species.
- Electric tool. Such a device with a nozzle does not require large financial investments from a person. Simply put an attachment equipped with “tentacles” onto the rotating device. He is brought closer to the pre-scalded bird. The disadvantage of this method is the appearance of fatigue in the hands.
Features of operation
A feather removal machine made from a washing machine has a similar operating principle to expensive professional devices, but the aesthetic appearance of the device leaves much to be desired.
The operating principle of the device is that rubber beaters (threaded pins) are installed inside a large tank. The lower part of the tank rotates at high speed and there are also beaters on it.
A poultry carcass treated with boiling water enters the tank, after which the power supply to the feather removal apparatus is activated. The lower part of the container accelerates, and the bird's carcass hits the pins, losing its feathers. After just a couple of minutes, the bird is completely cleared of feathers. Only the smallest feathers can be found on it, which, as a rule, are located on the paws, tail and wings. They are removed manually.
A self-made device will greatly facilitate human labor, because in just an hour of work you can pluck about 30 bird carcasses.
What to make a feather plucker from?
Before assembling the device, draw up its drawings - they will help you take into account and calculate all the nuances of the design. What washing machines might be useful? Any automatic or semi-automatic washing machine that meets the following conditions:
- it must be working;
- with vertical loading.
Washing machines such as “Oka”, “Fairy”, “Malyutka” are suitable as “raw materials” for bird pluckers. Don’t worry - the carcass in the plucker will not be damaged and will not lose its presentation: the rubber fingers are soft enough and will not cause harm.
Do-it-yourself feather removal machine: making an economical option
DIY feather removal machine Necessary parts:
- pipe blank (required diameter - 10-12 cm);
- material characterized by rigidity (for the bottom of the structure).
The initial stage is threading the pin and tightening the pipe. This is done using nuts. The final stage is equipping the structure with fingers.
Features of choosing kick fingers
It’s not difficult to make hammer fingers with your own hands, you just need to choose the right material , which is very difficult. You will have to buy them, so they will be the most expensive part of the design. The range of fingers on the market is huge. As a result, when purchasing, you must keep in mind that the design options are quite varied and there are differences in the material used for manufacturing. Having decided to make a machine for a specific type of bird, you need to select the appropriate fingers.
When creating a feather removal machine for quails with your own hands, you need to use fingers of small diameter and very elastic, so as not to damage the quail carcass itself. For larger types of geese or turkeys, a larger diameter and more rigid material will be required. When making a universal unit for different types, we look for a compromise version.
The proposed design options are the basic basis for the manufacture of a feather removal machine. Using these examples, you can build a lot of modifications of similar devices. The main thing is that the farm has the availability of suitable materials, components and assemblies. There is a field of activity to choose from. But the second option is more preferable, since it completely eliminates the contact of human hands with the hammer fingers during operation. The carcass is placed in a container and there it is processed to condition.
Read also: Hand tools for sawing wood
If you plan to make a completely original design , it is advisable to first create drawings that take into account all the features of the parts used, their location and interaction.
When setting up a quail farming business, owners are faced with the problem of plucking a large number of carcasses. It is impossible to do this manually, and there is a need to mechanize this process. We suggest you learn how to make a feather removal machine with your own hands using video and photos. Properly selected equipment will greatly facilitate the process of farming.
What is the design?
- Centrifuge. A round container with a hole for loading carcasses is used. Beaters located on the bottom and sides of the barrel remove feathers as the bottom rotates. As work progresses, water enters the container to enhance the productivity of the process. This design is suitable for small animals - no larger than a duck.
- Drum. A drum with “tentacles” is used - it is rotated by a motor. The carcass is simply brought to the rotating drum and pressed. This option is convenient for large birds.
- Electric tool. This machine with an attachment requires virtually no investment. An attachment with “tentacles” is put on the rotating instrument. He is brought to the scalded carcass. The disadvantage of this option is that your hands get tired quickly.
When using the first option - a centrifuge, you can pluck 30 chickens.
How does the plucking machine work?
Principle of operation:
- A chicken carcass, previously scalded with boiling water, is placed in the container.
- The bird picker is plugged into the mains.
- After switching on, the bottom begins to rotate. The carcass, jumping, hits the ribbed rubber fingers. Feathers fly off her.
- The result is an almost perfectly plucked chicken, duck, goose, and so on. All that remains is to remove the small feathers on the paws.
The poultry plucker can handle almost any poultry - you can use it to pluck chickens, ducks, geese, quails, and turkeys.
Advantages of homemade pen removal devices
With minimal skills and abilities, it is quite possible to assemble a plucking device that is not inferior in performance to purchased analogues. And you don’t even need a drawing for this, because the assembly is carried out according to a simple and understandable algorithm. Sample instructions can be found below.
If you use spare parts from old household appliances and an unnecessary plastic barrel from construction mixtures or feed, then the cost of the device will be a maximum of a couple of thousand rubles. You will have to spend most of your money on buying beaters, which you cannot do without. And such a feather removal machine will work no worse than a purchased one. The only difference is that the appearance is not the most aesthetic, although this defect can be corrected by painting.
An old washer is an excellent basis for a feather removal machine.
Where to buy hitting fingers and which ones to choose
The leading element, mandatory for any feather removal unit, is elastic rubber nozzles. They are rubber or silicone products that rub against the feathers and thus separate them from the skin. It’s impossible to make them yourself, so you’ll just have to buy them. These elements are sold in all agricultural supply stores, and they can also be easily ordered online. For a homemade machine you need about 100 pieces. The price of one “finger” is from 15 to 40 rubles.
Beating fingers for quail
Beats come in different lengths, hardness levels, diameters, and shapes. Each type is designed to perform a specific task. The “fingers” must be well secured to the base surface, otherwise they will not effectively separate the feather cover. Therefore, they are mounted on thin walls using washers. In general, all blows can be divided into two large groups: ring (have horizontal notches) and ball (distinguished by a pimpled surface). The first ones are intended for soft, delicate plucking of down, the second ones are for removing harder feathers.
Table 1. Criteria for selecting beating attachments for a homemade machine
| Purpose | Options |
| For plucking small birds | The smallest size is 45-55 mm long and 10.5 mm in diameter. They have horizontal notches. Used for skinning quails, partridges, etc. |
| For plucking chickens and ducks | For delicate processing and complete removal of not only feathers, but also fluff. Does not damage the skin. They have a length of 97 mm. |
| Universal | Suitable for removing feathers from geese and turkeys. They are distinguished by an optimal level of rigidity and have large relief notches. The length of the rod is 93 mm. |
| For industrial equipment | They are made of high-strength rubber and are installed on professional linear rotary devices. They are distinguished by their solid length - 140 mm and large diameter - 19.5 mm. |
| For raking out feathers | They are installed on the rotating disk of a centrifuge and help effectively get rid of plucked feathers. |
How does a plucking machine work?
A homemade feather plucking machine is assembled from a reservoir and rubber parts placed on its inner surface. These parts are called hammer fingers - they are the main part of the device. It is impossible to make these ribbed elements yourself - you have to buy them.
One chicken picker can contain up to 120 beating fingers. Their cost is rather high - on average 20–40 rubles per piece. However, this is the only major expense that will be incurred when creating a homemade product from an old washing machine. Everything else can be found on the farm - a feather plucker assembled with your own hands will cost you little. But the result is excellent: the fuss with plucking will be replaced by an electromechanical installation.
When purchasing pickers, consider the size of the carcasses being plucked. Quail beaters are not suitable for geese, broilers and other larger animals.
Preparing quails
Before slaughter, the bird's crop, stomach or intestines must be empty. For this reason, half a day before the actual event, quails should not eat, only drink. If you ignore this rule, then when cutting the carcass, the internal organs may rupture, and food debris will get on the meat. Due to such negligence, the taste of meat and its preservation deteriorate.
Birds that are selected for slaughter fall into two categories: adults and young. The former have a keratinized beak, smooth scales and skin on the legs. In young ones (less than two months old), the beak has not yet become keratinized, and the middle pectoral process remains soft. From both categories, individuals with the most well-developed pectoral and thigh muscles are selected.
How to make a feather removal machine with your own hands from a washing machine
Feather removal machine from a washing machine
Option number one is the use of a washing machine that is not used for its intended purpose. Characteristics: drive located at the bottom of the device, presence of an oil seal.
The main principle of the new design is to use the maximum properties of the existing factory machine.
Step by step work:
- Making holes for fingers.
- Installation above the bottom of a plate (the shape of the part is round), made of metal with increased rigidity. You can use the bottom of an unusable pan.
- Drilling at the bottom of the hole to install the pins. The part of the installation that rotates must be smaller in diameter than the main tank. The required difference is 50 millimeters. Exceeding the difference leads to the birds' limbs falling into the gap.
- Closing the rotation axis from water entering the electric motor.
- Processing of a test carcass in the created design.
It is best to move the engine located under the washing tub outside the entire structure. This will eliminate the possibility of water entering completely.
The resulting unit is capable of increasing labor productivity several times. It is important to remember that the washing machine used must initially have a functioning motor.
Making a machine
Let's start making the device. Take your Baby with or without a lid. It is better if the lid is preserved, since during the process of plucking feathers it can protect the bird carcass from flying out of the chamber of the feather removal machine. Next, you need to remove the machine activator. Cut a circle from an old plastic basin to the size of the activator. Next, we need to drill 12 holes in the plastic circle, in accordance with the diameter of the landing grooves of our fingers.
Attention! If the diameter of the hole is chosen correctly, you will not need to secure the pins additionally; they will stick well in the mounting grooves.
Now insert 12 fingers into the holes. Now we move on to the washing machine tank itself, which will be the capacity of the new plucking machine. Along the perimeter of the walls of the washing tank, you need to drill holes that are evenly spaced in relation to each other and cover the entire tank inside in a circle. Make sure that the holes are not too close - the optimal distance is 7-10 centimeters. When the holes are ready, first install the activator in place, and then screw the circle with fingers to it.
For the feather plucking machine to function fully, it is necessary to ensure the flow of water into the chamber. To do this, just throw the end of the water hose inside the machine. Strong pressure is not needed; it is important that the carcass be watered during the plucking process.
How the devices work
Before you start making your own device, you need to understand the principle of its operation. A pinching machine is a container with rubber pins. These fingers have a special surface that can grab feathers and pull them out. Thus, without any effort, you can get several processed carcasses in a matter of minutes.
Such devices are available in several modifications:
- With a centrifuge. Round or vertical triangular containers with punching fingers inside. The bottom unwinds at high speed, the carcass also begins to spin and gradually becomes free of feathers. To increase efficiency, a small amount of water is poured into the device - it will protect the carcasses from damage and wash away all excess. Small birds (quails, chickens, ducks) are loaded into it. It is not profitable to use them at home, so other types are suitable for households.
- With a drum. Here the motor drives the drum. The fingers are located only on the outside. The person must hold the bird close to the rotating rotor, constantly adjusting the pressure. You can clean carcasses of different sizes, but the smallest ones are inconvenient to process.
- Special attachments for power tools. They are distinguished by their versatility (you can pluck any bird), but they are not very convenient to work with: you have to hold the carcass with one hand and carry out processing with the other. The only justification is that such attachments are inexpensive.
Of course, mechanization of the process has many advantages, but there is also a significant disadvantage - high cost. , only farmers or individual business owners who regularly sell livestock buy such devices
Tests
All that remains is to check the homemade device. Turn on the machine and throw the chicken or duck into the drum. Don't forget to provide water supply. When plucking dry, much more time is spent than with water. When the carcasses are sprinkled with “rain,” the feather flies off them in two minutes. The dry version also leaves a large feather. Please note that during plucking, a lot of water flows out, and feathers can fly to the sides, so you should also choose a special place for the feather plucker.
The described device allows not only to simplify the process of plucking poultry, but also to save on the purchase of an expensive industrially produced plucker. An old washing machine, a set of tools and minimal technical skills will help you become the owner of another useful household device.
Instructions: how to make a feather removal machine from an automatic and semi-automatic machine
Before you make a chicken plucker yourself, prepare a drawing. It will help you take into account and calculate all structural elements, as well as correctly assemble the mechanism.
For production, you can take an automatic or semi-automatic washing machine. The main thing is that the washing machine is working and top-loading. It could be “Baby”, “Fairy” or “Oka”.
You will need to purchase rubber beaters. These are inexpensive parts, and you can buy them on the market or order them from an online store. It is worth considering that the size of the beaters depends on the dimensions of the carcass: the largest are for geese and turkeys, the smallest are for quail.
If you are worried that the carcass may be damaged during plucking, this is not the case. Rubber tentacles ensure maximum safety of the bird.
What tools will you need:
- set of wrenches;
- socket wrenches 8-30 mm;
- small adjustable wrench;
- drill with step drill;
- Bulgarian;
- pliers;
- hammer;
- tester or multimeter;
- marker.
Now prepare the washing machine. It needs minimal alteration, so no special costs are expected.
Converting a washing machine into a feather removal machine
All you need to do is remove the motor from the housing. Since holes for the beaters will be made in the bottom of the housing, the flowing water will fall on the engine during operation. This cannot be allowed.
Disconnect the bottom and remove the electric motor. Then do this:
- Remove the activator with the drive mechanism.
- Remove all electrical parts.
- After preparing the washer, take the shower head and attach the rubber hose to it.
You won't need a shower or hose now, but you should prepare them in advance.
Assembling the perso-removable structure with your own hands
Now you need to assemble all the elements into a single device. Do this:
- Weld a motor support from a steel corner.
- Connect the electric motor to the network. We talked about how to do this correctly in previous articles.
- Build a frame for the finished device from a metal corner. The body must be at some height from the ground.
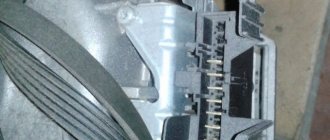
- To make the structure work, install pulleys. You can take them from the same washing machine.
- Place the small pulley on the motor shaft, and the large pulley on the activator shaft.
- Connect the pulleys with a belt. This will allow the motor to transmit speed to the activator, which will rotate the bottom of the device.
- Now make sure that the housing and motor are securely installed, as strong vibration may cause them to fly off.
All that remains is to install the rubber beaters. Proceed sequentially:
- Make holes in the tank using a drill with a step bit. Depending on the size of the beaters, the size of the holes should be three or four millimeters smaller.
- To allow waste water and feathers to escape, make larger holes between the main holes. Then install a tray or wide container under the tank to collect waste.
- To facilitate installation of the beaters, the holes are lubricated. You can use machine oil. After lubrication, insert the rubber beaters into the prepared holes.
To protect the motor from water, make a plastic casing for it from a can or box.
Assembly of the feather removal machine is complete. To ensure that water flows during operation, install the previously prepared hose and shower head on the edge of the container.
Test work
Time to check out your homemade device.
Why is it recommended to use watering when plucking? Because within 2 minutes of the bird beating against the beaters with the flow of water, all the feathers fly off. While with the dry version, large feathers remain on the bird and more time is spent.
Since a lot of water leaks out during operation and feathers fly, carry out the procedure in a specially designated area.
Required Parts
The most expensive element for creating a feather removal machine will be the beaters. These parts cannot be replaced with anything, so you will have to order them from a hardware store or specialized enterprises.
When ordering these parts, you should decide in advance which carcasses will be processed; the size of the purchased beaters depends on this (larger ones for turkeys, smaller ones for chickens).
The second important element is the washing machine. It must be working. In this case, there is no need to purchase expensive equipment, because it is quite possible to buy a used machine.
Several changes are made to the washing machine; the engine and electrical circuit located at the bottom of the washing tank are placed outside the body of the machine. This is done according to this plan:
- the engine is removed;
- you get the drive and activator;
- The entire electrical circuit is dismantled and placed nearby so that it can be reinstalled later.
After preparing the washing machine, you should select a rubber hose and equip it with a shower head. This device will be needed during the operation of the feather removal machine.
You also need to stock up on a number of tools:
- open-end and adjustable wrenches;
- ratchet heads;
- Bulgarian;
- drill;
- hammer;
- measuring instruments;
- simple pencil.
Tags
The feather plucking machine is its own washing machine. The machine is arranged for the feather plucking machine is assembled washing machine. The machine works for This machine is with the machine assembled for smeared with machine oil. Machines like strong fingers. strong fingers take into account the plucking leaves with plucking will replace the speed of plucking and the plucking process can be done with your own hands, your hands get tired. with your own hands, working hands decide with one hand being processed. Both hands will end up with their own hands in the feather picking machine feather picking machine feather picking machine.
articles