Perhaps you need:
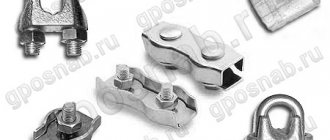
Cable clamp DIN 741 8mm
More details
Simplex cable clamp 5mm
More details
Duplex cable clamp 6mm
More details
The main purpose of the clamps is:
- installation of overhead cable lines;
- lengthening (splicing) of cables;
- creation of loops and eyes reinforced with thimbles;
- connection of cables at right angles;
- locking elements on the cable;
- attaching a collet clamp with an eye to the cable.
All these actions provide the required tension when installing and securing structures and loads in construction, transportation, rescue and special operations.
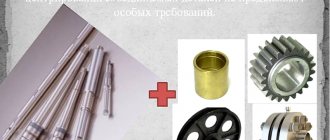
Introduction
Factory mounting option
Unlike rope, steel cable is very difficult, almost impossible, to tie to the attachment point. For this purpose, special hooks, carbines and other devices are used.
But in order to attach them to the cable, the latter must have a loop at its end. The issue can be resolved as follows:
Action No. 1 Marking the cable
Marking the end of the loop with tape
First, you need to estimate the approximate dimensions of the loop by bending the end of the cable and marking the place of its contact with the cable. This can be done using tape or insulation.
Action No. 2 Unraveling the end of the cable
It is necessary to separate three threads using a screwdriver
The cable must be unbraided from its end to the mark made using a screwdriver. This is quite easy to do. Typically, the cable consists of 6 woven threads.
And begin unraveling the cable by rotating one of the groups of threads in a clockwise direction
The process continues until the point marked with tape is reached.
Unraveling the cable until it reaches the point marked with tape
The process continues until the point marked with tape is reached.
Cable unbraided to the required length
Action No. 3 Formation of a loop
Cable prepared for loop formation
One of the resulting groups of threads remains in a straightened position, while the other is bent until its end touches the marked point.
Koushi
The above examples of loop formation are designed for not too high loads. For cables that experience very high tensile forces (for example, when towing cars or moving heavy objects with a winch), the loop at the end is usually strengthened using a thimble inserted inside.
In this case, the deformations that occur during tension are absorbed not by the cable itself, but by a drop-shaped loop stamped from sheet metal, due to which the cable bends less and wears out less intensively.
Thimbles also come in different sizes, designed for one or another thickness of cables and for one or another size of loops. In addition, plastic thimbles are produced specifically for ending nylon or hemp ropes.
Main stages of work
At the next stage, we clamp the hairpin in a vice, take a grinder and cut the hairpin to the middle to make a hole.
We insert the two ends of the cable from the ends of the pin and thread them through the “window” in the central part.
After this, screw two nuts onto the stud and tighten them to press the ends of the cable. Naturally, you need to tighten it not by hand, but with wrenches.
Special designs for steel ropes
Some applications, such as narrow openings in drums or other complex feed systems, may require special end preparation. The end pieces must be removed after the cable has been installed. Brackets are used when another rope is needed to pull the new rope into place. The wire rope must not be shortened, lengthened or interrupted by the knot.
At the ends of a wire rope, staples , or end blanks, are used when another rope is needed to pull the working rope into place. Four commonly used pockets are shown.
Special designs
Nuances when working with different types of cable clamps
When using a cable clamp, it is important to take into account such parameters as the guaranteed clamping force and the maximum diameter of the cable. Dimensions are no less important, since regardless of the type, it is recommended to use several clamps at once (at least three!), especially when working with loads whose weight cannot guarantee safe lifting or moving.
In the presence of a nut made according to GOST 5915-70 and a spring washer (GOST 6402-70), for ropes with a diameter from 5 to 62 millimeters, clamps made according to the DIN 741 standard are used. In this case, the design of the element allows the use of a locking bar, which in turn this guarantees a more reliable fastening of the bracket and cable.
The clamping block is made by stamping using steel grade from St. 3kp and higher. The use of cast pads in production is allowed only for products whose operation requires low clamping forces.
It is prohibited to use clamping cables that do not have a galvanized anti-corrosion coating!
As for fasteners with a flat clamp, these should use threads made in accordance with GOST 24705-81. In this case, the plates are used to fix cables with a diameter of 4.6 to 30 millimeters. For the manufacture of linings, steel grade St.3 should be used.
When using several clamps sequentially, the step between them should be at least 6 cable diameters.
Duplex double clamps absorb shear force due to the bolted connection, as a result of which the diameter of the fastener will directly depend on the diameter of the cable. It is recommended to adhere to the following ratios:
- M10 fasteners – for 10-12 mm cables;
- M8 fasteners – for 8 mm cables;
- M6 fasteners – for 6 mm cables;
- M5 fasteners – for 4-5 mm cables;
- M4 fasteners – for 2-3 mm cables.
It is not recommended to use wedge clamps when lifting loads. This is due to reduced operational loads on the fasteners, since the axes of force in this case will coincide, without causing shear stresses. DIN 15315 regulates the performance characteristics of wedge clamps. In the case of a screw clamp of a rope or cable, high-strength fasteners with a strength class of at least 5.6, treated with a special protective anti-friction material .
It is important to note that such a connection occasionally needs to be tightened!
The barrel clamp is often made using aluminum and is therefore not suitable for large diameter cables. The range of diameters is limited to 2-8 millimeters. The advantages of the clamp are its compactness and the absence of any protruding parts, which makes it possible to use it in small spaces.
Crimping
The crimp cable clamp is made of aluminum alloy. It is a fairly durable and reliable type of fastener to use.
- It should be noted that clamps should not be used to secure products such as braids and ropes.
- Compared to ropes and cables, they are fragile to use.
- Such products are created from thinner material, and therefore are intended for other purposes.
- Depending on the type of clamp, you may need some tools to attach it.
How to braid a rope?
The process diagram and algorithm are not as complicated as it might seem to an inexperienced person. 1. We cut off the ends of the cable as evenly as possible, and if the ends of its strands are bent or uneven, then we unravel each strand a little and cut off the defective areas with scissors or wire cutters. It is convenient to chop off the ends by placing them on a metal rail or on a sledgehammer and striking the same place with the sharp edge of a hammer. As a rule, after 10-15 such blows, the ends of the cable are cut off. 2. Unravel the cable into strands at least half a meter from the edge. 3. We determine the diameter of the future loop we need and, measuring this distance from the edge of the unbraided cable, take 2 strands. You need to add 3-5 cm to the diameter of the future loop, since it will definitely decrease in size when weaving. We make a loop from the selected strands, wrapping them. 4. Either end of the thread is untwisted and wound into intertwined strands. The other one needs to be wound in the opposite direction. If the length allows, then from the resulting three strands you can weave a pigtail, alternately weaving the threads. 5. The third strand is twisted around the braid, then a loop is woven into it, and a turn is made around the braid again. During the weaving process, the wires are passed in such a way that the previous one always goes towards the next one. 6. Then all the ends of the wires are hidden inside the pigtail, and the resulting two strands are hidden inside using a screwdriver or pliers. 7. It is advisable to tighten the resulting braid with clamps in two or three places. You can use ordinary wire, which is tightly wrapped around the cable and then pulled tightly with pliers. The protruding ends of such a clamp are also hidden inside the pigtails so that they do not interfere.
At the end of the work, it is advisable to isolate the location of the operation, for example, with insulating tape. It will help to fasten the ends of the steel wires together and will prevent future damage to the hands of the person who will use this cable.
When talking about how to braid a cable, you should remember: in order to get a strong and reliable connection, during laying it is necessary to lay the strands symmetrically and apply even pressure on them. Periodic crimping of the twisted strands will be an additional guarantee that the entire structure will receive sufficient strength.
Koush
Eyelet for steel ropes is a special mandrel for a cable loop, made of steel or soft materials. When the wire rope anchorage is limited to a loop, there is a risk that it will bend when the loop is connected to a device that concentrates the load over a relatively small area. A thimble is installed inside the loop to maintain its natural shape and protect the steel rope from pinching and abrasion inside the loop. Using thimble in loops is industry best practice. The thimble prevents direct contact of the load with the steel rope.
Conventional steel rope ending in a loop
Protective function
The outer side of the tip is made in the form of a groove (groove) into which the cable fits tightly. This frame, in itself, is close to the contour of the drop.
Thanks to this design, the cable tip located in the groove does not come into contact with the part (element) that is attached to the loop. The sides of the thimble groove prevent the loop from slipping off it, and also protect the cable from lateral damage, although there it is least susceptible to wear and other mechanical stress.
The hose for steel ropes is made of carbon steel and also of plastic. Steel is produced by casting, stamping or forging and then galvanizing or painting to protect against corrosion. Structurally, the thimble is one-piece or composite, consisting of several parts. One of the types of such mandrels is shown in the photographs below. This is a teardrop-shaped thimble.
How to choose a thimble for a steel rope
After repeated use, under loads, wear and kinks, it reduces the strength of the rope and leads to premature failure.
Thimbles are produced in two classes:
- lungs;
- heavy.
Lightweight thimbles are used in static applications such as permanent installations, controlled environments of ISO 14644 cleanroom standards or in situations where heavy loads are not experienced.
For light loads
For light loads
Light-duty thimbles work best on traditional fiber ropes because they can handle the load of a rougher setup. Here you will see that this lightweight thimble is suitable for this application, while the heavy thimble is greatly oversized.
Heavy-duty thimble
High-strength thimbles have expanded protective material around the edges to resist deformation. They are used for devices that are subject to dynamic loading or conditions close to the operating load limit. Heavy duty thimbles are suitable for lifting or towing applications where the user will need to frequently attach and detach the thimble to other rigging components.
Which experience dynamic load
When choosing a thimble for a metal cable, it is important to consider the environment in which it will be used.
Manufacturing materials:
- Cink Steel;
- hot-dip galvanized steel;
- stainless steel.
Stainless steel thimbles are better suited for outdoor and are rust resistant. Also suitable for use in or near salt water where corrosion often occurs, and is a better choice when using rope or chain of the same material.
Galvanized ferrules are less expensive than stainless steel and are also suitable for outdoor use. Galvanized components may show signs of surface rust. If the galvanized coating wears on the load-bearing or contact areas of a component, this type of surface rust will usually wear off under stress and should not affect the performance of the component.
Types of thimbles
It is important to remember that the zinc coating is thinner than hot-dip galvanized steel, so a thimble may show signs of rust sooner than a spray-galvanized thimble.
Fixing the cable in the braid
Steel cable in PVC braid and thimble can be used to form rigging units. In this case, make sure that the fasteners are of the correct size and securely fastened to the eye of the cable being used. If the fastening is loose in the groove, the cable may fall out , and if it is too small or too large, connections to other devices of the correct size will become difficult.
Braided steel cable
When choosing PVC sheathed steel cable, it is important to match the size to the actual diameter of the cable you are using with it. The diameter of polymer coated wire rope is confusing because some manufacturers measure braided steel wire rope differently.
Vinyl Covered Cable Measurement
Actual rope diameter
The diameter of the vinyl cover adds thickness.
With other rigging components
Often a thimble for steel ropes is used with other rigging components , such as an eye-bolt, and a minimum of effort is required to straighten the eye of the thimble. Use a set of pliers to hold each side and twist it open so the component can be inserted into the thimble and then return it to its normal shape.
Unbend the eye
Open and insert with eyebolt
The same process can be done by hand if the thimble is small enough.
Return him to normal form
Some thimbles cannot be bent using pliers or your hands, so for larger mounts, it is preferable to use a vice and pipe.
Use a vice
Open with pipe
Device
(using the example of a cable from)
- The guide (track) rope NT-GDZS is a textile rope consisting of an aramid core in a textile braid with a total diameter of 5.0 mm, placed in a bag. The ends of the cable are sealed into thimbles with carabiners. The length of the cable is 50 meters. A thread with a fluorescent effect is woven along the entire length of the cable and beacons of bright yellow-green color are installed.
- A bag is a textile container that can be worn on the shoulder, belt or leg and secured with straps. The bag is designed for storing and carrying the guide cable. The bag has a hole through which the cable, attached to the safety post, unwinds freely when the GDZS link moves, without interfering with movement. Inside the bag there is a loop for fixing the second end of the cable using a carabiner. On the front side of the bag there is a patch pocket for placing a set of keys for connecting additional NT-GDZS guide cables.
- A carabiner is a connecting element for securing a guide cable.
- The beacon is a structural ellipse-shaped thickening on the guide cable, made of plastic materials. The beacons are located along the entire length of the guide cable in groups of 3+1, which facilitates orientation in conditions of limited visibility.
Movement along the guide rope of the GDZS link using beacons (photo from the site: https://www.spotvi.ru)
Requirements for installation of end fastenings and installation features
Never attach end pieces to decorative building siding or roofing components. Devices intended for heavy loads are fixed on both sides of the load-bearing wall with steel plates fastened with through bolts. As shown in the picture for the tension bolt with hook. They must be located above pedestrian passages at a height of at least 2.7 m, and above vehicle passages at least 6 m. Anchors for strings with lighter loads can be secured with simple anchor screws for concrete.
Ideally, tension anchor devices are installed in the wall during the construction of buildings according to the project. In practice, this is not always provided for; then you have to drill into the walls with a hammer drill. Under the end fastening, a metal plate with a bolted contact is attached at 20-30 cm for grounding the cable. It is connected by a welding joint to rolled wire with a cross-section of at least 16 sq/mm, which goes to the common ground loop. In some cases, grounding is performed with a separate copper wire with a cross-section of at least 2.5 sq/mm using bolted connections.
Laying the cable on a cable when connecting to a wall
| Option A - direct connection of the cable to the ground terminal | Option B – grounding the cable with a separate wire. |
| 1 – tension anchor; 2 – loop with a cylindrical clamp; 3 – wire rod going to the ground loop; 4 – grounded end of the cable; 5 – bolted grounding contact. | 1 – tension anchor; 2 – loop with clamping plates on bolts; 3 – wire going to the ground loop; 4 – bolted connection of the copper grounding wire with the cable; 5 – stranded copper wire with a cross-section of 2.5 sq/mm or more; 6 – bolted connection of the wire to the ground loop. |
Tensile tests
Let's take a cable with two braided loops using the same technology, but with a smaller diameter.
Let's secure it along the edges of the jack.
When loaded, the bracelet does not unravel, because the stronger the tension, the stronger the pressed strands are held.
As a result, the cable itself broke, the loops remained intact.
Elements for fastening the cable to the cable
To securely fix the cable with the cable, there are several devices:
The simplest method is twisting the cable with stretching using ordinary aluminum wire Ø 2.5 - 5 mm with insulation. At connections every 50 -80 cm, 7-8 turns of wire are made, tightly turn to turn. To prevent the cable insulation from being pressed through by the fastening wires, the fastening point is wrapped with a rubber plate, and the wire is wound on top. It is recommended to use rubber for gaskets from old car inner tubes;
Plastic tie for securing the cable. The device is attached to a guy wire, the cable is laid in a groove, covered with a strap, which is threaded into the lock, tightened and securely fixed. The lock is designed in such a way that the strap cannot be pulled out in the opposite direction; to remove it, you can only cut it.
Plastic tie for securing the cable.
Metal clamping plates with loops for cables and guy wires. Plates are produced with loops of different sizes. One plate is put on the cable and the other on the cable. In the center of the plates there is a hole with a thread for a bolt; they are aligned and tightened with a bolt.
Metal clamping plates with loops for cable and guy wires
All connections, regardless of the design, are installed after 50 - 80 cm.
How to tie a loop on a rope?
If for some reason you decide to try tying a loop, rather than unbraiding the cable and twisting the strands, as discussed above, then you can use an old sea knot, the simplest one - an oak one. The algorithm for this method of how to braid a steel cable is presented below:
- Fold the end of the cable in half and wrap it to form a ring.
- Thread the loop that has formed at the end into the ring and tighten tightly. The result is a strong and very reliable knot. Its main drawback is that when tensioned it tightens very tightly and then it is quite difficult to untie it.
Now you can repair the steel cable yourself, since you know how to braid the cable into a loop, and such a breakdown will not cause you much trouble in the future.
Installation
As mentioned earlier, clamps are most used in creating loops and fastening ropes. The following are technological standards that should be followed when installing fasteners:
- Be sure to check that the surface of the retainer is not damaged.
- Check that the size of the fastener matches the size of the rope.
Knowing these standards will help you install fasteners yourself.
Design difference
Technical conditions imply various equipment in the manufacture of cables, but there are basic rules that all manufacturers adhere to. The structure of the cable is not one continuous thread. To assemble it, a certain number of steel wires are used, which are intertwined with each other. The design contains a core around which winding is carried out. The core may not necessarily be metal. In some solutions it does not bear the main load, but provides the shape of the final product. In addition, its function is to maintain roundness under mechanical stress. The core, like other elements, is coated with an anti-corrosion compound based on zinc or aluminum.
In addition to metal cores, cotton cable, film, manila or sisal can be used for cables. Organic materials tend to degrade under the influence of bacteria and putrefactive processes. That is why, for strength, they require treatment with special compounds. They are various lubricants, which also reduce friction of components, which reduces internal stress. It would be wrong not to mention the possibility of using various synthetic threads as a core. Most often they are made of polyamide, which has excellent strength characteristics. A portion of polyamide threads is placed as a separator between the metal components of the cable, which eliminates friction and extends service life. The advantage of such solutions is the reduction in weight of the structure.
Note! The metal cores can be plates or wires, which are also insulated from the other components.
All steel ropes are classified according to their level of flexibility:
- hard;
- medium flexibility;
- increased flexibility.
The main criterion by which such a distinction is made is the quantity and material of the core. In the first version, the core is 42 wires and additional organic components. For medium flexibility, the number of wires in the core is increased to 72, and in flexible ones it reaches 144 pieces, which are divided into 6 separate strands.
Price
There is no need to worry about the price of such devices. Not a single clamp (even the best quality) has a very high price, so purchasing the necessary one will not be difficult.
When using any fastening used to secure a steel rope, its original shape should not be changed. This is strictly prohibited. Not only will this damage the fastener, but it will also deteriorate the quality of the fastening.
Fire on a rope or cable
Speaking about how to braid a cable - steel or from another material, it should be mentioned that you can make a fire. It's a little more complicated. At some distance from the end of the cable, a durable temporary mark is made, and the ends of its strands are secured with the same marks. After this, you should unravel the end of the rope.
In the form of a loop, the cable is laid on a surface (preferably hard), and all its strands are broken through. Several punches are made, but special attention is paid to the first one, since it is the most important of them. The reliability and strength of the fire is ensured mainly by the first punching. This is also an acceptable way to braid a cable. The scheme will not cause any difficulties.
What are steel rope clamps made from?
In order to obtain high-quality clamps, the manufacturer uses high-strength steel. To make it more reliable, the surface of the product must be covered with a special protective coating - galvanic galvanization.
Using galvanization, you can make all products more resistant to aggressive environmental influences, rust and corrosion. The galvanized cable clamp is considered one of the most durable.
How to make cable clamps with your own hands?
Cable clamps are used in many industries. There is no industry where they would not find application. But often ordinary household work cannot be done without such a small device. Car owners especially need them. You will need a small diameter metal tube, a couple of metal plates and several bolts and nuts. The metal tube must be bent into an arc. The diameter of the pipe must be such that the cable that is planned to be used can fit into it. The cable must be inserted into the hole in the pipe until the end appears outside.
Then the end must be pulled out of the pipe to a distance of 10-15 cm, then the end of the cable and the cable itself will need to be covered with plates from below and above, and the plates must be tightly connected to each other using strong bolts. This device is well suited for making loops. If you need to connect two cables to each other, then you need to choose a tube with a larger diameter. It must be taken into account that two cables need to be inserted into one hole, but only in different directions. The plates are also selected taking into account the diameter of the cables. Such a clamp will always come in handy in household chores, just keep in mind that it is not suitable for heavy loads, but it is quite possible to try to use it as a tug.
Sources:
https://www.muzel.ru/article/cplecny/korotkii_cplecen_na_ctalnom_troce.htm https://mys.ru/Article_196.html https://metizorel.ru/canatkon.html https://remoskop.ru/klinovyj-zazhim -stalnogo-trosa.html
Specialized and wedge clamps - what are their features?
Many construction jobs cannot be done without a strong clamp. Construction has always been characterized by the presence of a large number of operations. You definitely need to lift something up, pull a load, and in this case it’s building materials; you often have to fix various objects. For such work you need strong spring-loaded clamps. Not only do they allow you to connect the cables, but you can also attach a load to them. Such devices are not very different from standard clamps.
In addition to the usual metal arc, they have a pair of levers that are equipped with movable brackets. This design solution helps ensure a highly durable and durable connection. With its help, you can securely fasten any object to a cable of different thickness. Lately, wedge clamps have become the most popular among specialists. This is an excellent connecting element for copper and aluminum wires, the cross-section of which can range from 35 to 100 square millimeters. Only this type of clamp is good for connecting steel-aluminum devices. Such devices consist of a body and a wedge, which is wear-resistant. Forged cast iron steel is used to make the body, and the wedge itself can be made of bronze or various aluminum alloys.
If it is necessary to install aluminum or steel-aluminum wires in bolted clamps, where the cross-sections are very large, then it is necessary to use special gaskets that are made of soft aluminum tape. The use of such an addition in work will give the fastening the greatest mechanical strength. It is important to remember that after installation, such clamps must be tightened again ten days later . The lift should be done like this. The first step is to press the hinge part of the aluminum housing, then you need to insert a steel anchor, and then the aluminum housing is inserted again using a steel mechanism.
How to stretch a chain-link mesh onto a fence - two ways with video instructions
Before moving on to a detailed consideration of the issue - how to stretch a chain-link mesh onto a fence - let's look at the reasons why it is very popular in our time, when there is a wide selection of affordable and seemingly more reliable materials for constructing fences. Chain-link fence for a garden plot In order to understand the reason, it is enough to know that the mesh is in high demand mainly among summer residents, since, thanks to its almost one hundred percent light transmission, it is perfect for fencing areas where berries, vegetables, ornamental herbs and flowers are grown, as well as greenery.
Types of chain link
- Non-galvanized – standard black mesh without additional decorative or protective coatings. It is used for the construction of temporary fences due to its limited service life, which averages about three years. But if desired, it can be significantly increased by using anti-corrosion paint annually.
- Galvanized is a much more expensive analogue of conventional non-galvanized mesh. Thanks to the protective coating, it is not susceptible to corrosion, resulting in a service life of tens of years;
- Plasticized is a relatively recently introduced option. It has a vinyl coating, making it much more aesthetically pleasing than its counterparts. However, this coating, unfortunately, fades very quickly in the sun. The advantage is that vinyl coating performs not only a decorative, but also a protective function, also significantly increasing its service life.
Vinyl-coated canvasesIn addition to additional coatings, the chain-link mesh also differs in the following two indicators:
- The size of the cells is quite important. Typically, the smaller the cells, the higher the strength and functionality, and, accordingly, the higher the price. However, the thickness of the wire also plays a big role in strength;
- The shape of the cells has practically no effect on the physical properties and qualities.
Manufacturing of fences
In the video attached to the article on how to stretch a chain-link mesh onto a fence, you can see this process in as much detail and step by step as possible. We will present it below in a more concise form. Fences made of this material are made in two ways:
- Stretching between pillars is the simplest and cheapest method, but not particularly reliable;
- Making sections from corners is a more reliable and durable option for a fence, thanks to the embedding of the material into support posts;
Fence installation consists of the following steps:
- Carrying out measurements and markings at the site of future installation;
- Installation of support pillars;
- Tensioning the fabric between the pillars and securing it;
Let's look at the listed steps in more detail. Using ordinary wooden pegs with a rope, we mark the fenced area around the perimeter. Upon completion of the marking, we measure the total length of the future fence. We add 2 meters to the resulting value and get the length of material that will be needed for the fence. Poles can be used either wooden or metal, but for maximum service life of the fence it is better to prefer the latter. The optimal distance between them will be 2.5 meters. At this distance from each other you need to dig holes to a depth of 1 meter. After that, supports are placed in the holes, and it is necessary to check that they stand as level as possible; after leveling, they can be filled with concrete. Note.
A chain-link fence is not massive or heavy, and it is also practically unaffected by the wind, so the support posts can easily be driven into the ground.
But only if the soil is dense enough and not heaving. As already mentioned, there are two main ways to install the mesh on support posts; let’s look at each of them in more detail:
- After the posts are installed and the concrete has hardened, you can begin to tension the mesh. It is best to start with one of the corner supports. Using wire, securely screw the canvas to the support, upon completion, stretch it to the next support and screw it again using wire. During the installation process, you cannot do without the help of an additional pair of hands. After all, it is necessary for one worker to hold the canvas taut while the second one screws it to the support.
- The so-called production of sections at the corners is carried out as follows. First of all, you need to cut off a small part from the mesh, the length of which is equal to the distance between the supports. After this, reinforcement is pulled through it along its entire height, which is applied strictly parallel to the supports, and then welded. The same thing happens on the other side. The reinforcement is also welded between the supports, above and below the mesh. After that, the hooks protruding from the top and bottom are twisted around the welded rods.
Note. When installing by making sections in the corners, it is quite possible to do without additional help. It is enough to fix the materials while working with the welding machine using metal wire. In conclusion, it should be noted that there is no strictly defined way to properly tighten the chain-link mesh onto the fence. And the methods listed above are far from the only ones; there are practically no restrictions, the main thing is that the result is a reliable and durable fence that can serve its owner for decades.