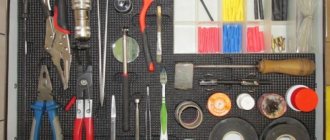
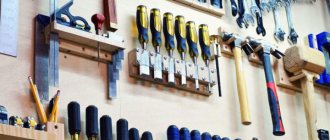
A real owner should have order not only on the site, but also in the workshop! Check out these 12 easy ways to store important items in a small space.
As a rule, few of us can boast of a large, spacious garage or utility room, where a walk-behind tractor, a tool cabinet, or even a woodworking machine can easily be stored. There is always a catastrophic lack of space, so you have to resort to little tricks. We offer a few more ideas for your piggy bank.
Preparing the shelf space
It’s easy to make a tool shelf with your own hands. First, it is worth determining the location of its future placement so that access to it is free. The size of the shelf also matters and depends on the volume of tools planned to be stored on it.
Designate a space on the wall for a shelf. Make the necessary sketch or drawing on paper, then take the necessary measurements with a tape measure and mark the mounting locations for the hanging shelf on the wall.
It is desirable that the wall surface is free of defects and distortions. If there are still irregularities, then the wall needs to be plastered. In addition, this will protect the room from condensation and increase the thermal insulation properties.
When arranging a shelf with your own hands, you should remember that it must be quite reliable in terms of strength, because it will store tools made mainly of metal.
If the shelf is fixed in only two places at the edges, then the maximum weight it can support is no more than 15 kg. Therefore, for greater stability and strength, it is better to use brackets.
The problem and why such a stand is needed
Specialists in various fields often need to drill something in their work.
To do this, they have the necessary tools, in particular, a drill and a set of drills for drilling holes of different diameters.
At the same time, tools and drills lie in bulk.
Such storage is very inconvenient, so various organizers have been invented for carrying and storing drills and tools.
These organizers help you quickly find the required element (drill) of a certain diameter, and thanks to them, drills are stored safely and will not break or get lost.
If your tools and drills are lying in bulk, then you will need to check the entire box in order to find it.
If you have an organizer for drills, then each drill will have its own place and you can easily find a drill of the diameter you need from the set.
How to make wall shelves for tools
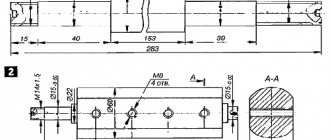
To make shelf parts you will need a drawing with the required dimensions, which can be selected on the relevant websites. Or you can use your talents exclusively. The height of the shelf should not be higher than the height of the owners. At best, the shelf should be perfectly visible.
The materials you will need are high-quality wooden boards without damage or defects, no more than 3 cm thick and about 20 cm wide, which need to be sanded to make the surface smooth.
Make eyelets along the edges of the board to fix the shelf on the surface of the wall, in which 2 holes of a certain diameter are pre-drilled with a hammer drill and plastic dowels are inserted.
To ensure that the eyelet is securely fixed and the hanging tool shelf is sufficiently stable, a fastening washer is used. The product is ready.
How to handle the organizer
Like any other thing, this device needs proper handling and care. The first will help extend the life of the organizer, the second will help prevent or correct possible breakdowns.
The list of such actions includes:
- Checking the structure for cracks or other mechanical damage;
- Depending on the type of material chosen, its surface must be subjected to special treatment from time to time to prevent rapid wear;
- It is strongly recommended to calculate the load-carrying capacity and capacity of the structure in advance, so as not to overload it in the future, thereby leading to breakdown;
- If the organizer or shelf is portable, it must be handled with care;
Depending on the material, the fixture should not be placed in areas with an unsuitable environment. For example, hang wooden shelves in rooms with high humidity, etc.
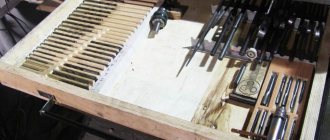
Making a simple homemade organizer for drills
There are factory-made and home-made samples of organizers for drills.
Factory-made products may not suit you for various aspects or reasons, so you can independently modify them to suit your needs.
For example, add special plastic inserts to secure the tool in the compartment/groove of the organizer. Also, instead of plastic inserts, you can use a piece of a strip of soft rubber or several layers of electrical tape.
Accuracy in this process is not very important, because if you miss by a fraction of a millimeter, then it’s okay, because rubber, like electrical tape, tends to shrink under load.
And now, how to make an organizer for drills for a workshop or garage with your own hands.
To make a stand for drills, you will need a piece of board, timber, or chipboard.
The dimensions of your material should be selected based on the number of drills that the stand will need to accommodate and the following parameters of the slots for the drills:
- The depth of each groove is approximately 2.5 centimeters
- The distance between the grooves is at least 1 centimeter
These parameters are not strict, so they can be changed if it is more convenient for the user.
After selecting the material, holes are drilled in it that will serve as nests for drills.
The holes can be located in one/two/several rows or in a checkerboard pattern.
Next, under each socket, for convenience, you should mark the size of the tool.
Doing this on a wooden surface will not be problematic.
Afterwards, metal corners are installed to the rear edges of the stand using self-tapping screws, which are screwed into pre-drilled holes.
Source ad-cd.net
Finally, the stand is installed on the wall.
If desired, an additional shelf can be added to this design, which will increase the number of transportable elements and make the design “two-story.”
And if you add handles and a lid to the design, you can get a portable wooden organizer for drills.
Source ytimg.com
I recommend the following video, in which the author makes a homemade stand for drills and explains the process in detail:
As a result…
Homemade supplies for drills are ready. This simple design made from scrap boards, lumber, chipboard or other wood material helps organize the drilling process by ensuring quick search, access and efficient use of drills. Similar organizers for drills are stationary and portable. Making them is not particularly difficult, you can verify this by making an organizer according to the instructions above.
Question
Write in the comments what you think - plastic organizers are more convenient than wooden ones
Types of shelves
By type of design
- Hanging Organizers: These are easiest to make from wood. They look like lockers;
- Shelving: the relevance of this device is determined by the need to save as much space as possible in the room. As a rule, the rack is installed along the wall. It can be divided into cells, or it can be made in the form of a continuous shelf;
- A box with compartments: it is divided into several sections, which, depending on the complexity of the design, can be removed. It is convenient because it is easy to transport and does not take up much space.
By type of fastening
- Wall-mounted: no matter what material they are made of, they can be attached to the wall, to pre-prepared places. The disadvantage of such fastening is that such a shelf will be difficult to move, and in addition, you will have to drill into the wall in a new place;
- Mobile: they can be moved due to the fact that the structure is supported on wheels. Disadvantage: ineffective for rooms with uneven floors;
- Ceiling-mounted: as the name suggests, the structure is attached to the ceiling. Its main feature is that it takes up very little space;
- Stationary: such shelves are attached to the floor, and with small dimensions they can be moved.
Materials and tools used
To make shelves for tools in the garage, you will need the following materials: a frame made of metal or wooden boards, self-tapping screws, nails, dowels, washers, steel corners. And also tools: a hacksaw, a pencil, paper, a screwdriver, a chisel, a device for grinding surfaces, sandpaper and others.
Shelves are a necessary item for organizing storage space for tools and other items in any home. Not to mention the owners of cars and motorcycles, for whom such a corner is simply vital.
How to properly store drill bits
And now a little about the nuances of storing drills.
The first nuance is that drills should be stored based on their purpose (for drilling wood, for drilling metal).
Secondly, the drills should be arranged according to their diameter - from the smallest to the largest or vice versa, whichever is more convenient for you.
Third, each drill in its groove must have a reliable fixation, regardless of whether the organizer is portable or stationary; it is also necessary to exclude the possibility of the drill elements touching each other.
And the last, fourth point is ease of use. The drills should be located in an area where you can easily reach them and out of the way of other samples.
Source katlavan.ru
Advantages of tool shelves
Speaking about the obvious advantages of using shelves, one cannot fail to mention the following:
- All work supplies are always in one place: a man will not have to run around looking for a hammer, pliers or a jar of screws in different parts of the room, because everything will always be at hand.
- The man himself decides what and where to place it, so instead of chaotic throwing, he will know exactly where this or that tool is.
- Compact and space-saving. Today, the market offers countless models of organizers of this kind, which in turn helps you choose an option that will accommodate your existing arsenal and at the same time will not take up much space in the pantry.
- Such an organizer will be convenient to transport from one place to another.
This is a device that can be made independently - this does not require special skills or tools.