A hammer is a percussion instrument, without which no apartment renovation, no furniture installation, no fence construction can be done.
There are universal hammers, and there are special ones.
In numerous construction works, the need for different tools arises.
However, a simple, even primitive impact tool – a hammer – remains in demand.
Driving nails and dowels, straightening sheet metal, removing nails, cleaning surfaces of dried mortar - all this is done with a simple device.
Hammer
Despite its apparent simplicity, this tool is still the most effective option for converting kinetic energy into mechanical work.
In fact, the process of hammering a nail is not so simple; it is a series of transformations to transfer energy from the hammer to the fastener, and from the fastener to the solid body.
The efficiency of the process is estimated at 70–97%, which is an unattainable value for most modern machines.
Both the quality of the work and the amount of effort that a person expends on the work depend on the effectiveness of the hammer.
Thus, the most energy is lost during tool recoil.
For a steel hammer this value is 30%, for a titanium hammer – 5%.
Accordingly, the latter option provides greater operational efficiency.
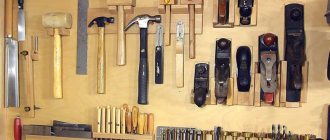
There are dozens of types of tools - highly specialized, “for all occasions”, semi-professional.
But, despite the different types, the hammer has one design.
In art[edit | edit code]
Stephen King's novel Rita Hayworth and the Shawshank Redemption mentions a geological hammer, with which one of the main characters managed, over the course of many years, to quietly make a hole in the wall of a prison cell and escape to freedom. The story was adapted into the film "The Shawshank Redemption" in 1994.
A hammer is an indispensable tool on the farm. The ideal option would be if the set contains a set of several of its varieties at once, which will greatly facilitate the implementation of many highly specialized works. But to solve many everyday problems, the most ordinary tool is quite enough - it is called a plumbing tool.
Device and characteristics
The tool consists of 2 main parts - the head and the handle.
The elements are connected as firmly as possible.
When an impact occurs, all the force is transferred to the head, and if it slips off the handle, it flies off a couple of tens of meters.
Therefore, it is prohibited to use a tool with a loose head or a cracked handle.
The head is made up of several parts:
• toe – the back side of almost all hammers is wedge-shaped.
In this case, the impact force is transferred to a small area.
Wedge blows are used to split hard materials during minting.
In some cases, the toe has an unconventional, rounded shape or is made in the form of a “dovetail”;
• striker – striking part.
It has a flat shape, a relatively large area, high strength and can withstand a large number of impacts.
The cross-section of the striker is square, rectangular or round;
• insertion – a hole for a handle, round or oval.
The landing increases from the center upward - this prevents slipping.
Some instruments have a metal collar around the end;
• cheek – the flat, non-working part of the hammer.
Material
The head is made from hard steel by injection molding, forging, and milling.
A product made of black steel is protected from corrosion by a layer of zinc or polymer paint.
Models made of titanium or copper do not need protection, just like hammers made of wood.
The steel head is hardened by electroinduction and strengthened.
The amount of hardening varies.
Thus, the toe is hardened to 36-42 units on the Rockwell scale, the landing - only to 24-30, the maximum hardness is given to the striker - up to 52 units.
The handle is most often made of hardwood - oak, beech, hornbeam.
However, models with plastic, rubberized or even steel handles are also offered - a welding hammer.
Dimensions and weight
These parameters are determined by the type of work performed.
Sizes include:
• handle length – determined by the weight of the tool.
The average length is 250–325 mm.
The length of the handle of heavy hammers is 380–450 mm, small ones – 200–260 mm;
• striker length – in light hammers it reaches 85–90 mm, in medium hammers – 115 mm, in heavy hammers – up to 135 mm;
• cross-section of the striker – is also determined by the mass.
In light hammers it is 15 * 15 mm, in medium ones - 25 * 25 mm, in large ones - 33 * 33 mm.
The weight of the tool varies widely: products for tool work weigh from 200 to 300 g, for metalwork – 400–500 g.
When repairing, heavy models are needed - 600–800 g.
Products weighing from 1 to 16 kg are called sledgehammers, and are used for breaking walls.
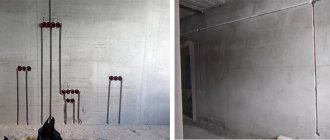
Entrenching hammer
This is the largest type of hammer used in modern industry. The hammer head weighs from 2.5 to 10 kg. These massive tools are used for breaking various materials, as well as for driving in reinforcement, various pins and stakes. They are usually produced with a wooden handle, but relatively recently products with handles made of durable plastic began to appear on sale.
Here we have listed not all types of hammers that are used by specialists in various professions. There are many more varieties of this instrument, but they are so rare that knowledge of their features is unlikely to be of benefit to an ordinary person. When choosing a hammer, you should always remember that only by using the tool for its intended purpose can you be sure that the work will be done efficiently and, most importantly, without injury.
Articles about products Updated: 12/01/2020 16:02:20
Types of hammers and their purpose
A construction hammer can be either universal or “qualified”.
According to the purpose of the instrument, the following types are distinguished.
Locksmith - classic option
The firing pin is flat or slightly rounded, the back side of the head is wedge-shaped.
The handle is wooden, sometimes rubberized.
Products are classified by weight: models weighing 330–500 g are suitable for household use, heavy professional models weigh up to 2 kg.
Carpentry
This type is distinguished by a smaller cross-section of the striker with a comparable head weight - from 100 to 800 g.
The firing pin is only flat, the back side is wedge-shaped or made in the form of a nail puller.
The hammer is used for work where not so much impact force is needed, but high accuracy.
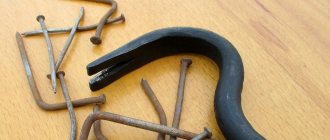
Plotnitsky
The back of the head of this model is always made in the form of a “dovetail” - a nail puller.
The firing pin is flat or grooved, the weight of the head varies from 300 to 800 g.
The nail puller is made with different angles of inclination - from 0 to 120 degrees.
Carpenter's hammers are used when assembling and dismantling wooden structures.
On some models, the striker is magnetized and holds the nail in the desired position.
Bushhammer
Here the impact part is flat with a very small cross-section, the rear part is made in the form of a pointed or flat pick.
The pick is used for chopping and breaking stone and brick.
The head is hardened by the induction method, and its hardness is not inferior to a forge hammer, since very high strength is required to fit stone or porcelain stoneware.
The handle is marked in the form of a ruler: this makes the mason’s work easier.
The tiler's hammer weighs only 75 g, since working with such a fragile material requires precision, not strength.
The firing pin, accordingly, has a small cross-section, and the wedge is made in the form of a narrow pick.
Kiyanka
This type of hammer is made of wood, polymers, and cast rubber.
It is used for leveling and shaping tin and sheet metal products.
The striking part is flat, rectangular; a carpenter's mallet has a cylindrical or barrel-shaped head.
The metalwork version has a wedge-shaped back part.
To adjust tiles or level a car fender, plastic or rubber pads are placed on the firing pin.
Sledgehammer
This is the heaviest hammer, weighing up to 16 kg.
Used for breaking walls, driving pipes into the ground, dismantling structures and other power work.
The head is of a standard shape, while the conical insert does not allow it to slip off.
Unlike professional ones, homemade hammers do not differ in the variety of shapes.
However, this is not the most important drawback: the strength and hardness of the striking part of the instrument is achieved through hardening and hardening, and such a procedure is impossible to do at home.
Recommendations for selection
When the need for a purchase arises, the master, as a rule, understands what type and amount of work will need to be performed using the tool. Therefore, you need to determine which hammer you should purchase based on these parameters.
- Determine the type. To do this, we evaluate the frequency of performing specific tasks. For example, will you need to re-roof or lay tiles in the near future? Perhaps the listed process is a professional activity. In this case, it is necessary to purchase a tile or roofing hammer. However, most often it is enough to purchase plumbing tools.
- We calculate the weight. When choosing a hammer, it is important to take this parameter into account. For large-sized products, you will need to use fairly large nails, which, in turn, will require greater impact force and striker area. To save the physical cost of hammering, you should choose a heavier hammer with a long handle. For example, a hammer is ideal as a tool for this type of work.
- Choose the shape and size. Even certain subtypes of hammers have different functional devices that need to be considered from the point of view of necessity. For example, a tool with a nail puller nose will cost more than one with a regular wedge-shaped head. You should determine the feasibility of overpayment yourself.
- Additional equipment. Modern tools have a number of advantages. For example, more contoured handles allow you to better hold the hammer and spend less effort on this process. And additional rubber pads protect against accidental slipping. As a result, productivity will increase due to more hammer blows being made. Therefore, if there is a choice between a more modern and classic option, you need to choose the more advanced version.
Thus, it becomes clear that in order to choose the right hammer, you need to decide on its functional purpose. The type of work and its volume should be thought out in advance, because its weight, shape and additional equipment will depend on this. Only with the help of such a sequence is it possible to accurately select a tool for solving certain technical problems.
What you need to know about hammers
To select the model that suits your needs, the following factors are evaluated.
Purpose - the type of impact part is determined by the work for which it is intended.
Accordingly, if a tool is required for chipping stone plaster, then a mason’s hammer is purchased.
If wooden structures are dismantled and assembled, then choose a model with a nail puller.
The material of the handle – or rather, its quality.
The wooden handle is smooth, without cracks or knots.
Plastic or fiberglass are also purchased only without cracks.
The rubber coating on a high-quality handle is uniform.
An all-metal handle is acceptable as long as it has appropriate bulges or coatings.
Otherwise, the hammer slips out and vibrates noticeably.
Place of attachment - the head should sit on the handle without the slightest play, as tightly as possible and in no case move.
It is recommended to check the strength of the fastening when purchasing.
Weight – a hammer for household needs weighs 350–450 g.
To repair walls and ceilings, purchase a product weighing 600–800 g.
How to use a hammer
The most popular type of work is driving nails or dowels into a hard surface.
It's easy to do.
1. The nail is placed perpendicular to the surface or at an angle, if required.
2. The hammer transfers force perfectly, so you don’t need to swing too hard to hammer a nail.
It is better to make the first blow a test one, only slightly deepening the fasteners.
3. You need to apply force if the surface is hard.
The swing is short and precise.
4. If necessary, perform several blows before the nail reaches the desired position.
Basic Rules
Despite the obvious simplicity of the process, some rules are followed so that driving nails does not result in injury.
Before use, you should check the tool: the connection between the head and the handle is strong, there are no cracks.
You should hold it at the base of the handle, not the middle.
In this case, the swing can be made shorter and the force transmitted greater.
The nail is driven in at the center of the striker, not at the edge.
Otherwise, the head will easily slide off the fastener head.
The force is applied not with the palm and hand, but with the whole arm - from the shoulder through the elbow.
Otherwise, the hand will quickly get tired, and the work will have to be interrupted.
You need to work only on a hard surface.
Soft ones - carpet, rug, absorb some of the energy, and the effort is wasted.
It is recommended to protect your eyes and ears, since when driving nails and chipping the material, fragments fly in all directions, which can cause eye injuries.
If the nail is very small - a wallpaper nail, for example, and it is difficult to hold it with your fingers, they pierce a piece of cardboard with it and hold not the nail, but the cardboard.
This makes it easier to avoid injury.
When working with sheets of metal or tin, place a thick layer of plywood or wood underneath it.
It partially absorbs impacts and prevents material displacement.
Subtleties of use
Unfortunately, “Soviet” labor lessons are a thing of the past and in rare schools boys are taught how to use construction tools. It is not surprising that many people start work incorrectly, which often causes injuries. To get started, remember the following rules:
- when carrying out any work, use only a specialized hammer; for example, you should not buy a tool weighing 900 g for upholstery; models weighing 200 g are not suitable for making tables and chairs;
- It is strictly forbidden to use the tool if the striker is unsteady - when swung, it can fly off and seriously harm others;
- You should not use a hammer if it has cracks, deformations or chips.
Now let's look at the basic rules of work.
- You need to pull the hammer correctly. When driving nails, increased precision is required, so it is better to keep the tool as close to the striker as possible. If a strong blow is important to you, then, on the contrary, grab it by the very end of the handle.
- If you intend to hammer a nail, then hold it between the thumb and index finger of your left hand. The nail is grabbed close to the head, at the very top. If you take it by the lower part, it will begin to dangle from one side to the other and the hammer will most likely begin to jump off - in such a situation, injuries to the limbs are possible.
- If you are working with very small nails, you may hit your fingers. To prevent this from happening, use a little trick - just take a small piece of very thick cardboard and place it on a nail - this way you will hold it not with your fingers, but with paper. Once the nail is in the base, removing the paper will not be difficult.
- Some hardwoods are too dense, so it makes sense to pre-drill a narrow pilot hole. In this case, splitting of the wood is prevented, and the work itself goes much faster.
- In order to safely store the hammer, it is better to make a small hole at the bottom and hang the tool on a special nail, always with the striking part facing down. This will not only save time searching for tools, but will also protect surrounding objects from damage if the hammer falls off the shelf.
For a review of the Brigadier locksmith hammer, watch the video below.
How to make a hammer with your own hands
The selection of products in stores is huge.
However, not every master is ready to part with an old, tried-and-true hammer if its handle is dry or damaged.
It's easy to fix this situation.
The handle is made from hardwood - hornbeam, oak, birch.
You should not use wood that is easily splintered, like pine or spruce, as such a handle will quickly become unusable.
1. The dimensions of the product are marked on the board - oval cross-section, length 250-350 mm, and turned on a machine.
One end of the handle is slightly thinner than the other.
The product is thoroughly sanded.
2. You can plan a handle from a birch branch to the desired thickness.
It is dried in a shady, ventilated place, otherwise the handle dries out over time and the head slips off it.
3. Do not dry the product on batteries or a heater, as this will cause the wood to crack.
4. The thin end of the handle is inserted into the hole on the head with sufficient force - with interference.
If the handle is too big, it is processed with a rasp and sanded again.
5. Hold the handle vertically and hit it hard against a hard wall several times.
In this case, the head is inserted deeper, after which it is fixed with a wedge, which can be glued for reliability.