The three main reasons that lead to the need to repair a screwdriver yourself are:
- If the battery is faulty or not charged.
- The power button does not function.
- The motor shields are worn out or the armature is burnt out.
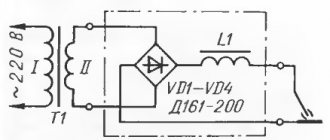
Schematic diagram of a screwdriver.
Any screwdriver has the following basic elements in its design:
- Engine.
- Reverse.
- Gearbox.
- Speed regulator.
- Speed controller transistor, which is connected to the radiator.
Causes of screwdriver malfunctions
Device repair most often has to be done due to the occurrence of various malfunctions, which are typical for cheap devices and expensive ones. Among them are:
When a screwdriver breaks down, the battery accounts for the majority of the problems.
- Defective battery.
- Broken power button.
- Burnt anchor.
- The presence of whistles and various creaks during operation.
- Reinforced tapping of the chuck.
- Inability to regulate screwdriver speed.
- The screwdriver reverse does not switch.
- The machine's motor does not stop rotating after the screwdriver is turned off.
- The device turns on for a split second and then jams.
Let's consider the features of eliminating each of the listed malfunctions.
History of the device
A screwdriver is a power tool. Its main purpose, as the name suggests, is to tighten or unscrew a fastener. After the electric drill was invented in 1868, the development of power tools became widespread. Founding companies DeWalt, Bosch, Black & Decker, Makita and Hitachi developed the industry by creating new devices.
The introduction of the Phillips head screw in 1934 created a demand for electric tools to tighten them. It was especially in demand in mechanical engineering. The first device of this kind was called a wrench. With the advent of batteries, the device gained mobility, and the name screwdriver came into use. Its mass production began in the early 80s .
Modern devices are constantly improving, but to a greater extent this relates to the method of autonomy and control. The design of the device remains unchanged.
Troubleshooting a screwdriver
In order to make sure that the screwdriver battery is broken, you need to check it with a multimeter.
The battery should first be checked before it can be replaced. The battery should be checked by routinely measuring the voltage level using a multimeter at the terminals of the device. You can also check using any other tester. In this case, the output voltage of the batteries should match in operating condition if they are charged. The values 12V, 18V, etc. indicated on the battery cases must be strictly observed. If this condition is not met, the device should be replaced.
Possible malfunctions of the screwdriver charger lead to the need to disassemble it and then check it using a tester that has already been used. Each battery included in the battery must be subjected to a similar test. After identifying the faulty elements, you should buy special elements of the same type with a similar capacity in the store in order to install them in place of the previous ones, replacing the old ones with new ones.
When repairing the power button, you must have special skills and relevant knowledge in the field of electronics. Disassembly of the device should be carried out with extreme care and caution. Otherwise, opening the device may result in certain types of parts easily falling out of the screwdriver.
It is best to first make a sketch of the order of arrangement of different springs, contacts and screws.
Once you have verified that the cause of the breakdown is the battery, you will need to disassemble it.
When the device case is opened, the device must be checked for the presence of darkened contacts. If they are present, they must be cleaned using sandpaper.
When the switch has already been repaired, it is possible that the device will not regulate the speed if its trigger is pressed smoothly. However, the functions of the device are not lost when the trigger is pulled completely. In this case, the malfunction itself is associated with the adjustment circuit. In this case, the switch is completely replaced.
If the device does not have reverse, then it is replaced with a reverse switch, but you can also try to repair it. For this purpose, repairing the reverse is similar to repairing a switch button. The switch cover is carefully lifted. Then the contacts are checked, cleaned and assembled.
If burnt or deformed contacts are found under the cover, the reverse must be replaced. In the button version, when the reverse is assembled in its body, that is, inside it, the button changes completely.
What problems in the operation of the device can be detected when checking the armature of an angle grinder with a tester?
If you have sufficient knowledge to properly disassemble a power tool, then in some cases you will be able to diagnose the cause of the device failure yourself. Checking the angle grinder's armature with an interturn short circuit tester will allow you to determine further actions regarding the detection of malfunctions or repair of equipment. If the part is not damaged but the tool still does not work, contact qualified service personnel for assistance. Did checking the angle grinder's armature with a tester allow you to accurately detect the cause of equipment failure? If you have the necessary tools, you can repair equipment yourself in the following cases:
- If the winding is damaged in the upper visible layers, you can try to solder it. This anchor will last for some time. After sealing, it must be checked or tested with a multimeter;
- When an interturn short circuit occurs, the winding must be rewinded or the armature must be replaced.
Diagnosis of breakdown and repair of an angle grinder can be performed under voltage. For your own safety, delegate this work to professionals.
Sources:
https://stroy-podskazka.ru/shurupovert/remont/ https://toolparts.com.ua/novosti/-iakoria-testerom-rekomendatsii-spetsialistov
Device engine diagnostics
If the screwdriver motor continues to run when the button is lowered, the button will have to be replaced.
When the engine continues to rotate when the button is lowered, which did not happen before, then the button changes completely. The reason for the button continuing to rotate may be its release, which was not observed before. In this case, it is necessary to change the button completely, or it is necessary to replace the transistor separately.
You can check the speed controller using a multimeter set to the circuit testing mode. The speed controller circuit is not included in the general circuit that operates as a result of fully pressing the button. This is where contact closure begins. There are two wires connected to the electric motor of the screwdriver, and the same number is connected to the battery button.
The power button is connected to the control element or field-effect transistor through 3 wires, which is located outside the screwdriver body. It is necessary to connect probes in order to test the continuity of the supply connected to the electric motor and to the wire that is the input.
If possible, the probes are connected not only to the device’s motor wire, but also attached to the reverse input contacts. The device can show whether there is contact or not. Next, all measurements are carried out in a similar way for the other wire, which is the input. Then you should move the reverse lever to repeat the measurements. If there are no contacts, then these changes affect the button.
The cause of the breakdown should also be looked for in the motor brushes of the screwdriver.
If all elements of the device are in good working order, as shown by the operations that were carried out earlier, then be sure to check the condition of the motor brushes. This can be done by disconnecting the motor from the button and connecting a multimeter to its wires through probes.
If there is no low resistance in the circuit, this may indicate that the brushes are worn out. This does not exclude the possibility of anchor breakage, which can occur in rare cases. A winding break may also occur. In this case, the engine is completely replaced. If only the brushes are worn out, you can restore the screwdriver motor with your own hands.
To restore the motors of some models of screwdrivers, only the brushes are changed, and the element is not completely disassembled. To repair other models, the back cover of the engine with brushes is separated from its body. For this purpose, the folding of the lid is bent, without touching its edges, because they must be returned to their original place after assembly is completed.
Brushes with flexible wire are connected using spot welding method for attachment to the holder. It is possible to solder wires for new brushes. For this purpose, you can use only refractory solder.
Design
Inside any mini drill there is a grinding machine, that is, a device for direct grinding. All of the above functions are performed thanks to attachments and cutting tools installed in the chuck.
A significant difference between the design and a standard size drill is the rotation speed of the spindle sleeve. Popular models of mini hand drills maintain speeds from 10 to 30 thousand per minute. Due to the high speeds, there is no need to secure the workpiece being processed, because it will not be pulled out of your hands. This feature is very convenient when working with engraving and grinding.
Interestingly, the Hammer mini drill is equipped with a flexible shaft, which allows you to use attachments in the most difficult to reach places without unnecessary discomfort. It is very convenient to use a flexible shaft when you do not need to hold the drill in your hand. To do this, the electrical appliance is suspended on a special stand. This approach will free your hands, reduce vibration and overall noise levels.
Screwdriver motor repair
When using a screwdriver for a long time, the bearings may wear out or become clogged.
Before assembling the electric motor of the screwdriver, using a thin wire that serves as a clamp, each brush is removed from the brush holder, and the cover is installed in its original place. At the same time, the brushes release and bend around the edges of the body, which helps to better press the back cover.
If the screwdriver operates for a long time, this may be accompanied by the process of bending the shaft related to the gearbox due to heavy loads and pressure on the tool. The cartridge, screwing onto the shaft, sometimes causes strong beating during operation of the device. The support sleeve or shaft bearing may become severely worn. As a result of damage to the bushing or only the bearing, and not the shaft, only they are replaced.
Brushless screwdrivers are a must-have tool not only for amateurs, but also for professionals
In recent years, a tool such as a screwdriver has become very popular both among professionals and amateur craftsmen. Using it you can quickly and efficiently perform many different operations, for example:
- Tightening the screws.
- Tightening and unscrewing nuts and bolts.
- Drilling holes of various diameters in all kinds of materials.
- Mixing solutions, construction mixtures.
- Grind and polish surfaces of various sizes.
- Cut materials with a circular nozzle.
- Process the edge, make indentations using cutters.
Initially, all screwdrivers were mains powered, but very quickly models with compact rechargeable batteries appeared. In addition to improving it, the designers began to work on the “heart” of the screwdriver - its engine. Initially it was a commutator type, but now it is being replaced by instruments with so-called brushless motors.
Thanks to a significant number of their advantages, brushless screwdrivers are gradually conquering the market for both professional and amateur tools. Most modern models of brushless screwdrivers are equipped with 12 or 18 volt 32 V models are less common .
Batteries for screwdriver
The battery of a screwdriver consists of individual electrochemical elements, which, unlike primary elements, are capable of restoring their chemical composition of the electrolyte during the process of recharging them. How to repair a screwdriver battery if your screwdriver fails (broken). First of all, let's look at what the principle of generating electricity from such individual battery cells is based on. The example shows a manganese-zinc element (Fig. 1).
The zinc vessel in such an electrochemical battery is an electrode with a negative charge. The positive electrode here is a carbon rod. The carbon rod is in a medium of active material - manganese dioxide, and a condensed solution of ammonia is used as an electrolyte.
That is, the fundamental principle here is the use of reversible electrochemical systems. The substances of electrochemical batteries formed during the discharge process seem to return to their original state as a result of exposure to electric current (during the process of recharging the battery). The screwdriver is powered by a battery - a group of electrically interconnected elements located in a common housing, as can be seen in the photograph (photo 1).
From a ballpoint pen
To make a drilling device from a ballpoint pen, no electrical elements are needed, and no skills in working with power tools are required.
You will need a ballpoint pen with an automatic mechanism, hot-melt adhesive, a stick with jumpers at the end that rotates the drill, and a drill of the required size. The main load falls on the body, so you need to choose samples made of metal or thick plastic.
Build process
The ballpoint pen is completely disassembled. A drill is inserted into the lower part of the body, from which the rod usually comes out. The shank is fixed into the hole on the stick. To ensure that the entire working structure of the tool becomes a single mechanism, the parts are fixed to the inner walls of the body with hot-melt adhesive. The drilling process will be performed through mechanical action on the stick, which serves as the handle of the device.
Serial and parallel connection of elements
The screwdriver battery consists of individual elements. The electrical circuit of such elements can have both parallel and serial connections (Fig. 2).
The serviceability of the elements can be checked after a certain time of charging them, that is, the presence of voltage on each element or the battery as a whole is checked. If, when measuring the voltage of an element, the value on the display of the multimeter device is less (for example, not 1.2V, but 0.8V), it means that this element has lost its electrochemical properties during operation. Such elements are subject to replacement. Electrochemical cells for the battery (photo 2)
need to be selected in accordance with their technical characteristics, that is, by voltage and current. The indicator on the body of the removed battery cell, for example, is:
- voltage: 1.2V;
- current: 1200mA - 2900mA,
- therefore, it is necessary to select elements with precisely such indicators. Connecting elements together
performed with jumpers (photo 3). For such a replacement, you will need a soldering iron, soldering tin and soldering acid.
How to check a screwdriver
This topic provides an example from my own practice.
So, the photograph in front of us shows a Bort screwdriver.
Initially, to find a screwdriver malfunction, you can check the total resistance of its electrical circuit.
Before checking, the start button must be turned on, that is, the button must be secured, as shown in the photograph (photo 4).
Then, use a Multimeter to measure the resistance of the electrical circuit of the screwdriver (photo 5).
To do this, set the Multimeter device in the resistance measurement range, then use the probes of the device to touch the output contacts (on the handle) of the screwdriver, as shown in the photograph (photo 5). When measuring, the device display indicates a resistance that is not comparable for the operation of this power tool. The resistance value here is an indicator of a short circuit. The display of the device shows that this screwdriver is faulty. But we need to establish a specific reason - what is the malfunction?
To find the cause of the malfunction, you need to disassemble the screwdriver and check the electrical connection diagram (photo 6).
Screwdriver diagram
In this electrical circuit, as we can see, there is a transistor.
The transistor is mounted on a metal plate (photo 7), which serves to remove heat when heated. The transistor is checked for the presence of resistance between the transitions (emitter - collector - base). To check the transistor and not focus on the type of transistor (npn, pnp), any two legs of the transistor are checked in both directions.
In this way, the absence of conductivity between the collector and the base of the transistor was established. But what could cause the transistor to fail? We carry out diagnostics for individual electrical connections, namely, for the screwdriver motor (photo 8).
The photo shows an unacceptable resistance value for the electric motor (photo 8). What exactly is the cause of an electric motor malfunction? Let's look further.
The electric motor of the screwdriver is a commutator motor, powered by direct current. There are graphite brushes on the end part of the electric motor cover (photo 9). The graphite brushes in this example are in good condition. Here you also need to check the conductivity of the contact connections (wire - brush).
The rotor of the electric motor consists of windings (photo 10) connected to each other in series. The stator of an electric motor is a permanent magnet with two poles, that is, the stator of an electric motor has no windings.
You can verify this - the motor housing attracts metal objects (photo 11).
From this we can conclude that a malfunction of the electric motor causes an insulation breakdown between the wires of the rotor windings.
Disassembling a screwdriver
Most often, in order to find a fault and repair the device, you will need to disassemble it. Since all devices are similar in appearance, resembling the shape of a pistol, their disassembly can be presented in the form of recommendations given for repairing an Interskol screwdriver:
- First of all, the battery pack is disconnected. To do this, you need to press the latch and unfasten the module.
- Unscrew all the screws around the perimeter of the device using a Phillips screwdriver.
- After unscrewing the screws, the two halves of the housing are separated, while holding the structural parts installed in the grooves.
- The speed switch, start button and reverse mechanism are carefully disconnected.
- The gearbox is removed from the removed half. To remove it, you will need to rotate the gearbox in its seat.
Assembly occurs in reverse order . In this case, it is necessary to ensure that all removed elements and wires are located in specially made recesses for them.
To lubricate the mechanical parts or restore the gearbox, the latter often has to be disassembled. To do this, first remove the protective plate, then unscrew the screws in a circle and remove the top cover. Viscous materials, for example, Litol, are used as lubricants. It is important to note that it is almost impossible to carry out serious repairs to a screwdriver gearbox with your own hands, since gears are not produced separately by manufacturers. Therefore, if it is damaged, you will have to replace the entire unit.
The next element that has to be disassembled is the cartridge. It is a quick-clamping design that is secured with a threaded connection, a screw, or a Morse taper. With the first method, you will need to unscrew the fastener using a hex key, and then, placing the key in the chuck, tighten it tightly. The cartridge is unscrewed by turning the key.
With the second type of connection, use a screwdriver to unscrew the screw located in the middle of the chuck jaws counterclockwise. Next, having installed and clamped the L-shaped key in the jaws, with a sharp movement the key must be turned counterclockwise. Removing the fastener using a Morse taper occurs by carefully striking the end of the cartridge.
Main causes of malfunctions
Screwdrivers are either corded or cordless. Their main faults are almost the same, and the differences are related to the type of power supply.
Corded screwdriver
If the device does not turn on, first check the condition of the socket, and then, if it is working, inspect the plug. Often the screwdriver does not start because the contacts burn out. If both nodes are intact, you should inspect the cable to make sure that it is intact and not broken or bent. Possible causes may also be a faulty power button, worn out electric brushes, or a burnt-out motor winding.
If the equipment sparks, you need to look for a defect in the armature, electric brushes or motor commutator.
A self-starting screwdriver indicates that the power button has broken down.
If the cartridge is loose, the cause is damage to the gear shaft. If the chuck is jammed and the drill bit or bit cannot be removed, the clamping jaws are jammed. The reason is lack of lubrication or breakdown of the internal components of the cartridge. If this mechanism spins, the problem is the gearbox is faulty.
If the ratchet is defective, inspect the petals of its locking device, the spring and the pins.
Cordless screwdriver
If the equipment does not turn on, check the charger and battery health. When discharging quickly, its condition is diagnosed using a special tester.
Other malfunctions of a cordless screwdriver are similar to network equipment.
Complete analogue of the factory “Dremel”
To make it, you will need a motor with a 5V or 12V power supply, which can be removed from a broken children's toy, a miniature fan, a printer, a tape recorder, or simply bought on Aliexpress. If you plan to use the drill for more than just drilling printed circuit boards, you can make a convenient housing from a polypropylene water pipe. We select the diameter so that the motor holds tightly to the walls. Ventilation usually runs along the shaft. You can use an empty tube of construction sealant.
End caps can be cut from any material: for example, PVC or acrylic. If the engine is powerful enough, a charger from an old mobile phone will not work. You need a current reserve of at least 3A (for 5 volts). A good option is an old computer power supply (you can buy it for pennies on the radio market).
The collet chuck can be purchased in the store: the department of components for engravers and Dremels. If there is a need to adjust the speed, you can make the circuit yourself, or purchase a ready-made unit.
The illustration shows a Chinese regulator and a power supply from an Internet router (12V, 1.2A).
With this homemade “Dremel” you can not only drill miniature holes. By installing the appropriate attachment, you can work with a milling cutter, cutter, or cutting disc.
How to disassemble
Disassembling the screwdriver is performed on a table or other flat surface to avoid loss of parts or fasteners.
Screwdriver
To disassemble the screwdriver, you first need to remove the battery and then unscrew all the screws. Then the case is carefully opened, trying not to damage the structure. If difficulties arise, you need to inspect the device again. There may be fasteners left somewhere or the parts are connected by staples that need to be removed.
After the case is opened, remove the parts one by one and lay them out on the table in the order in which they were removed. You can take several photographs so as not to make mistakes during the assembly process of the equipment.
Gearbox
A breakdown of this unit is indicated by strong vibration during operation, unusual noises or other signs. For repairs, you will need to disassemble the screwdriver gearbox. It includes ring gears, satellite gears, and carriers. All parts are removed from the housing one by one, then thoroughly cleaned and lubricated.
The procedure is carried out on a flat surface, removing all the parts, laying them out in the correct order so as not to experience problems during reassembly.
The disassembly itself looks like this: the cartridge is removed, the housing is disassembled, the gearbox is separated from the engine. Next, the plate is removed, all parts are removed from the housing, and the bolts connecting the halves of the gearbox are unscrewed. Use pliers to adjust the diameter of the spring to improve gear engagement. Next, the coupling is disassembled - the retaining ring, washers, and bulk bearing are removed. The shaft is removed.
After disassembly, faulty elements are replaced with new ones. Sometimes, for example, when a shaft is bent, it is necessary to purchase a new gearbox.
Engine
If the motor does not work, the problem is usually associated with the brushes, or less often with the armature winding. In the first case, the brushes are replaced with new ones. In the second, you will need to change the engine itself. The gear pressed onto the shaft of this unit remains intact; it must be disconnected with a special puller or improvised tools. The part is then placed onto the new engine using a hammer and a hard surface.
button
Repairing a screwdriver button is usually impractical, but sometimes it is enough to simply disassemble it and thoroughly clean it. Conventionally, it includes three nodes:
- control button for turning on and off, as well as speed adjustment;
- soft start lever;
- reverse button.
If the part is collapsible, to separate it, you need to find the plastic latches and bend them. The button that cannot be disassembled is replaced with a new one.
Mini drill attachments
A cutter made from a wheel from a lighter. Ordinary drills may not be enough if you are not a radio amateur, but are engaged in model making or other types of creativity that require the use of a mini drill or drill. Some attachments are easy to make yourself:
- Milling cutter. You can use a spinning drum from a lighter. Place it on a suitable size bolt and secure with a nut.
- Grinding head. A small nail will do. Place a cork champagne cork on it or wrap a cylinder of electrical tape around it. Cut a rectangle out of sandpaper of the required grit and glue it around the circumference of the head cylinder. To process different materials, you will need several of these heads.
- A circular saw. The upper or lower part of a C-size battery – the so-called “barrel” – is suitable for manufacturing. The battery material is strong enough to make a compass disk. To mark, use a compass to mark the hole in the center. The oblique teeth must be the same size to avoid runout during operation. To fix it in the drill chuck, use a bolt and secure the disc to it with nuts. As you can see, it’s not difficult to make a mini drill with your own hands from a motor if you are full of enthusiasm. Many scrap materials that you most often throw away will work. The only thing you will have to spend money on is a collet: making it yourself is extremely difficult.
How to test the motor and button with a multimeter
To determine the functionality of the button and motor, a multimeter is used.
To diagnose the motor, the gearbox and the wiring connecting the part to the start button are disconnected, and then the resistance of the armature winding is measured. If there is no reading, this indicates a winding break. If the numbers on the screen are very low, a short circuit has occurred.
To test a button with a multimeter, the wiring connecting its input terminals to the battery is twisted, and the tester probes are connected to the outputs. The device is switched to resistance measurement mode and turned on. If the values on the display are close to zero, the part is working properly. When broken, the screen shows infinity.
Homemade collet coupling of the simplest design
The simplest collet, operating on the principle of a coupling, can be made of steel wire with a diameter of 1 mm. It should be borne in mind that the collet of the proposed design is not a universal clamping device and can only be used for drills of the same diameter
It is important that the transverse size of the drills used corresponds as closely as possible to the diameter of the output shaft of the drive motor. In addition, it is important to consider that such a collet can only be used when drilling materials with low viscosity
Homemade wire clamp
To manufacture a collet coupling of the proposed design, the following consumables, fixtures and tools will be required:
- a cylindrical metal blank, the diameter of which corresponds to the diameters of the output shaft of the electric motor and drill;
- steel wire;
- electric soldering iron;
- soldering flux.
How to repair
If the screwdriver cannot be turned on, this means that the problem is related to the electrical part. For network tools, the socket, plug, power cord, button, and motor are checked in sequence. On batteries, the charging unit, battery, power button, and motor are diagnosed.
Problems with the mechanical part (extraneous sounds, noise, vibration) are associated with malfunctions of the gearbox, ratchet or clamping motor.
Charging block
If the cordless screwdriver does not start, remove the battery, charge it, and check its operation after a couple of hours. If the problem persists, diagnose the charger and battery using a multimeter.
To check the charger, select a DC voltage measurement on the tester and set the nominal to 20 V (or 200 V if the battery nominal is 24 V). Next, the charger is connected to the network and the voltage at the output terminals is measured. The value should exceed the battery parameters by approximately 2V. If the values are lower or there are no readings, the memory is faulty. It is very difficult to repair it if you do not have skills in working with electronics, so it is more advisable to purchase a new charger.
Battery
To check the health of the battery, simply replace it with a working one and see if the equipment starts. If this is not possible, the battery is charged and removed after three to four hours. Next, connect a tester to the terminals and measure the voltage at the output. If the readings on the multimeter are lower than the nominal values, the battery is broken.
First you need to disassemble the battery. To do this, unscrew the screws and divide it into two halves. If the battery is not removable, which is very rare, it is disposed of and a new one is purchased in return.
Having disassembled the battery, the user will see a certain number of barrels (cans), depending on the battery voltage. The nominal value of each of them is 1 Volt; to obtain 12V or other values, the banks are connected in series. Further:
- Examine contacts between banks. If breaks are detected, restore the circuit.
- Measure the voltage on each barrel. If it is below 1 V, this element will need to be unsoldered and replaced with a similar one. The necessary parts can be purchased or taken from an old, unused battery.
- Having restored the circuit and changed the banks, the battery is assembled, charged and its operation is checked.
What's better
A brushless motor has more advantages. The first is efficiency. It is 90%, while the analogue is only 60%. To put it simply, with the same battery capacity, inverter screwdrivers will last longer without recharging. This is an important characteristic if you have to work away from a power source.
The brushless model weighs less. This reduces hand strain and makes operation easier. Comparing the characteristics, we can say that an inverter screwdriver is more useful, efficient and reliable. The only problem is the cost.
Any tool will break sooner or later. If there is no need for precision, and the model is needed for infrequent household use, then many choose cheap brushed motors. However, when you need to buy a device that can last for a long time, it is recommended to spare no expense and buy a brushless screwdriver.
The screwdriver is selected based on preference. A brushless model is more useful and will be a better purchase if the user can afford to invest in the tool.
Causes of breakdowns of different brands of screwdrivers
Typically, screwdrivers break for common reasons, regardless of their brand and cost. Most often they are associated with incorrect user actions. Among them:
- Operation errors. The equipment is used only for its intended purpose. If you start drilling concrete with a low-power device, it will only work for two to three days.
- Exceeding the permissible operating time. Screwdrivers are intended for home and professional use. The former should work no more than a couple of hours a day, the latter can be used longer.
- Failure to comply with storage rules. The equipment must not be kept in damp or cold areas. Moisture causes mechanical and electrical parts to oxidize, and cold damages batteries. In addition to dampness, the devices are afraid of direct sunlight. Overheated screwdrivers are highly likely to burn out during operation.
- Batteries are not charging correctly. It is not allowed to leave them discharged for a long time, or to exceed the charging time. At least four to eight times a month, start the tool and allow it to work for a short time.
By following the recommendations for care and use, the owner of the equipment will ensure its long service life, regardless of whether it was produced in China or Europe.
If a screwdriver breaks down, you can diagnose the device and repair it yourself. Most broken parts cannot be repaired or are quite difficult, so they will need to be replaced with working ones. When purchasing spare parts, you need to check that the new elements match the old ones. If this is not the case, at best the equipment will not be assembled, and at worst it will be completely damaged.
Why are brushless tools so expensive?
The main disadvantage of such a tool is its high price. It is due to the presence of an expensive power board and electronic control. Thanks to this, the electric motor becomes more reliable.
But the high cost of such a tool sometimes becomes a decisive factor when purchasing a tool. Which screwdriver is better, brushed or brushless, each user decides for himself. And many are inclined to favor a cheaper product.
Important! Replacing parts with brushless tools is always expensive.
Scope of application
The mini drill is widely used to perform various tasks.
- Creating holes in plastic, circuit boards and other objects. Of course, the device will not be able to drill through thick iron, but it will be strong enough to make a hole in a sheet up to one millimeter thick.
- Screwing and unscrewing small head and thread screws. Such fasteners are found mainly on automatic machines (switches), electrical wiring panels, office equipment, as well as in small, low-power electric motors.
- Equipped with special attachments, it can be used as an engraver or grinder; for this purpose, spherical attachments with a rough working surface are placed in its cartridge. During rotation, the nozzle processes the part or applies the required pattern.
These are the main areas where a mini-drill is used, but, in addition to them, it has found extensive use in everyday life, for example, for processing (cleaning) two objects made of plastic or glass that are being glued together. When preparing the joints, both products are cleaned, after which the surfaces are adjusted so that the pieces are closely adjacent to each other.