When working on a lathe, very often there is a need for different speeds of rotation of the workpiece. This is explained by the fact that different operations require their own speed. As a result, lathes, and not only those, are equipped with entire groups of pulleys. These pulleys, in turn, allow you to change the speed of rotation of the workpieces, throwing the transmission belt to a certain point. There are some disadvantages to this, due to the fact that the machine must be stopped and so on. Therefore, as an option to solve the problem, we suggest you make a homemade variator for the machine.
This is not to say that this option does not have its problems and drawbacks. On the contrary, there are such disadvantages, and the main one is significant belt slippage, in comparison with a V-belt drive. But such slipping is a good protection for the motor from jamming of workpieces. In addition, even such a simple method will allow you to change the rotation speed of the workpieces without turning off the machine, and the rotation speed will be adjusted very smoothly.
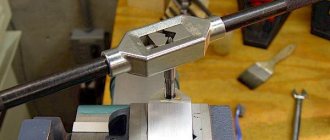
Well, let's see how to make such a variator yourself. First of all, you need to make wooden cones, choosing a hard type of wood. Cones do not have to be made using a machine. They can be made from disks cut with a jigsaw. So, it is necessary to cut them at an angle that will be equal to the angle of inclination of the cone. Therefore, to perform such an operation it is far from necessary to use an electric jigsaw; a manual one will do just fine. When all the disks are cut out, they need to be assembled into one single cone. So, the discs can be placed on good glue, or knocked down with nails. In this case, use small nails and keep in mind that they need to be hammered in evenly so as not to subsequently disturb the center of gravity of the cone. Therefore, be extremely careful.
Sawing blanks with a jigsaw according to the angles described above
Now that the cones are ready, they need to be placed on metal rods. Moreover, you need to plant it as deeply and firmly as possible. Once you have placed the cone on the rod in its final position, be sure to secure them with screws.
This is how the cones are fixed
In order for the belt to move freely along the cones and lock into the position we need, it is necessary to make a guide on rollers. In the figure below, you can clearly see the design of the guides, and wooden spools can be used as rollers, on which threads are usually wound.
This is what the roller guide looks like
You can also use regular ball bearings as rollers. Even if they are not wide enough, you can install two, three or more bearings depending on their size and the size of the track along which they will move. And of course, you can use fluoroplastic rollers, as shown in the figure, but this option will cost more than others.
Once the guide is ready, it will need to move along the cones by moving the nut. In turn, this nut is screwed onto a rotating screw (and freely rotating), or a threaded rod. But, in order to prevent the screw from moving along our cones, two washers are screwed onto its end, which are tightened against themselves. If you are using a threaded rod, do this on both sides. You can glue the guide nut with glue or solder it.
Also, you need to make a handle that will rotate the screw. Here, you can do it as your experience tells you, but as an example we will give a picture of the execution of just such a handle.
In this case, the handle does not need to be soldered. It is enough to clamp it between the nuts, of course, if there is a hole in the center of this plate.
We remind you that stable and normal operation of the variator will be using a belt with a circular section. Therefore, do not miss important details, and start making a homemade variator with your imagination, experimenting with this or that solution.
Homemade variator for snowmobile drawings
Do-it-yourself homemade snowmobile: photo of the assembly of a tracked snowmobile with a Lifan engine.
The author decided to build his own snowmobile and, perhaps, he succeeded; then I bring to your attention a photo of the main stages of making a homemade product.
First of all, the author decided on the engine; it was decided to purchase a 13 hp Lifan 188 FD engine equipped with an electric starter.
Also, for the construction of a tracked snowmobile, the following were purchased: drive and driven variators, rollers, drive and driven shafts, sprockets.
The author used a 0.5 meter wide caterpillar from the Raida motorized towing vehicle.
A frame was welded from profile pipes; parts of the frame were bent using a pipe bender.
The chassis has been assembled.
Rollers from the Buran snowmobile, slips from the Tiksi snowmobile.
The photo shows the installation process of the driven variator.
The front suspension is assembled, the engine is mounted on rubber mounts.
The author cut out linings for the engine compartment from plastic.
The seat is covered in leather.
The headlight is borrowed from a scooter, the hood is made from the hood of a VAZ 2110.
There is easy access to the engine.
Skis from the Taiga snowmobile.
The homemade tracked snowmobile is ready and waiting for good snow.
After final finishing and painting, the author tested his homemade product.
The author announced the construction budget:
- Engine - 12.5 thousand rubles.
- CVTs - 9 thousand rubles.
- Caterpillar - 7.5 thousand rubles.
- Skis from a snowmobile - 5 thousand rubles.
- Shafts driving, driven - 2 thousand rubles.
- Rollers, slides - 4 thousand rubles.
- Frontal - 1 thousand rubles.
- Scooter headlight - 450 rub.
In addition, turning and welding work was also required.
I recommend watching the video of the author of the homemade product, where he talks in detail about his snowmobile.
Homemade author: Alexander Barabanov.
Homemade motorized towing vehicle from a chainsaw: drawings,…
How to make a cart bottom
The most unreliable, but fastest way to make a bottom for a cart is to carry out the work using a cut wooden board. However, if you want to get a strong and durable device, then the bottom material should be metal sheets with a thickness of at least 2 millimeters. A cart with such a bottom will last for many years without rotting or requiring frequent repairs.
When all intermediate steps and components have been completed, you can begin assembling the unit. To do this, it is better to follow a certain sequence:
- The main pipe is welded to an additional one, which serves as an axle for the cart. You can also use any ready-made vehicle wheel assembly.
- The walk-behind tractor hitch is attached to the opposite side of the pipe. You need to make sure that the welding is strong so that the welded parts do not separate at the most critical moment.
- The hubs are firmly secured to the ends of the main axle, best also using welding.
- Next, you should install the wheels, secure them with nuts and bolts, tighten them securely and tightly so as not to lose the disks along the way.
- Next, a parking device is attached to the beginning of the pipe so that the trailer occupies a horizontal position when it is uncoupled from the motor vehicle and is standing idle.
- The last step is to attach the body and wings.
After completing all the steps, the cart is almost ready for use. You just need to attach a chair and footrests for the person who will operate the unit. For this, a steering wheel and corresponding levers are used. The convenience and comfort of the driver can be improved by attaching a backrest to the seat and upholstering it with soft material, or simply placing a pillow under the back.
Having familiarized yourself with how to make a cart for a walk-behind tractor, you can easily and simply, following the instructions outlined, make the device with your own hands, significantly reducing material costs, and get an excellent assistant when working in the garden and personal plot, which will allow you not only to save strength, but and reduce time.
Tags: option, elements, types, folding, frame, large, difficult, independently, two, therefore, case, trailed, connected, suitable, dependencies, channel, conditions, manufactured, any, st, welding, rod, chassis, weld, friend, bushing, connect, photo, provides, row, consists, working, then, articulated, springs, depends, profile, select, equipped, first, construction, transportation, frame, load-bearing, cultivator, terrain, provide, rack, emphasis, engine
Posts 1 page 16 of 16
Share12011-10-11 14:25:18
- Author: Mr. Got'e
- Administrator
- From: Karaganda
- Registered: 2011-05-23
- Posts: 1710
- Gender: Male
- Age: 36 [1983-04-04]
- Skype: Assotov
- Time spent on the forum: 18 days 18 hours
- Last visit: 2016-07-01 16:23:00
- I ride: Suzuki Bandit 600s
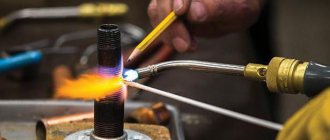
Due to the fact that we sell only two types of weights for the 157QMJ engine, one is standard, as supplied from the manufacturer, the other is heavy, completely corroded with bronze. And I decided to make my own in different weights! In the next topic you have already seen how I turned ordinary standards into heavy loads, this is how factory ones were used. This is where the idea of loads made exactly the way I wanted came to me! With any weight, for better transmission tuning! Why was the fluoroplastic material taken?
From Wikipedia: Fluoroplastic is a polymer material produced chemically. Fluoroplastic contains fluorine atoms, due to which it has high chemical resistance. Poorly soluble or insoluble in many organic solvents, insoluble in water and not wetted by it.
Fluoroplastics are characterized by a wide range of mechanical properties, good dielectric properties, high electrical strength, low coefficient of friction, low wear values; resistant to various aggressive environments at room and elevated temperatures, weather-, corrosion- and radiation-resistant, weakly gas-permeable, non-flammable or self-extinguishing upon fire. Very high heat resistance (up to 300 °C). The material has cold fluidity.
So the material itself very much satisfied all the necessary characteristics; I had a piece lying around since Soviet times, so it came in handy. But as far as I know, you can buy it in hardware stores, and gaskets are often made from it to replace copper ones. Well, that's not the most important thing. So I took this piece of fluoroplastic to the operator, handed over the dimensions and in the end we got the following 12 weights, from which two sets of weights can be made:
Since the material is very light, they could not be used in this form. But the interest was great and for the sake of this the variator was quickly disassembled (by the way, this is all done within 20 minutes. Disassembly-replacement-assembly). The results were not so much unexpected as they were cool. He was tearing it out from under him! polished and burned rubber! The engine speed was simply unrealistically crazy! But the speed never rose above 30 km per hour! Well, it was interesting to experiment! And naturally, as often happens in my head, the idea did not take long to arrive! I note that this time there was not even “doping” and “idea generator” in the form of beer! Anyway! The main thing is the end result. What I did in 6 weights was to drill 10 holes and cut threads in them, and in the other 6 weights to 8 holes. The result is the following:
I’m still thinking about what to do with them next, either fill them with lead, or screw the bolts in there and cut off the caps. In general, once I decide and do it, I’ll post the overall result.
Source: www.scooter.forum.com.kz
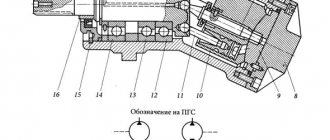
CVT design features
CVT device
CVT device
Structurally, the cvt variator consists of the following elements:
- A V-belt drive consisting of pulleys and a belt.
- Friction Clutch Pack or Torque Converter - designed to decouple the transmission from the engine and provide a neutral gear (availability varies by model).
- Planetary mechanism is a device designed to change the direction of rotation of the input shaft (reverse mode).
- Differential is a device for distributing torque to the driving wheels of a car.
- The transmission control unit is an electronic system that reads data from sensors and transmits corresponding signals that change the operating mode of the variator. A number of cvt models provide the ability to manually change speed using electronic control settings. In this case, the switching occurs in steps, similar to an automatic transmission. Economy or sport mode functions may also be provided.
- Ratchet – a device for blocking movement during parking (P-parking).
- Hydraulic system.
- Sensors (speed of input and output shafts, temperature of working fluid, selector position).
- Frame.
The pulleys of the variator gearbox mechanism are controlled by a hydraulic system, which must ensure synchronous movement of the cones or rollers of the continuously variable transmission. It consists of:
- Hydraulic pump;
- Hydraulic valve block;
- Control hydraulic cylinders;
- Filter.
The pump is driven by the engine crankshaft and is in constant operation while the engine is running.
CVT working fluid
The oil in CVTs is specially designed for use in continuously variable transmissions. At the operating temperature of the oil (from +60ºС to +70ºC) its frictional properties begin to appear.
At increased vehicle speeds (more than 150 km/h), the oil may overheat (temperature more than +80ºC), which reduces the service life of the variator. Oil cooling, depending on the model, can be carried out through the housing of an additionally installed radiator (oil cooler).
The correct operation of the CVT is also affected by oil pressure and oil level. A decrease in its level can lead to slippage of the belt (chain) and clutches.
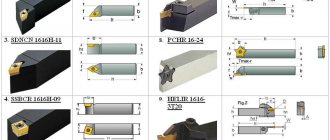
Belt and chain structure
Variator belt
Parts such as the chain and the variator belt deserve special attention. The latter is a prefabricated metal strip. It consists of several cables or strips (up to 12 pieces), which are fastened with steel plates (brackets) of complex shape.
To protect against wear and slippage, the belt has a special coating. When the variator operates, the belt comes into contact with the pulley cones with the edges of the plates, which provides the necessary pushing properties of both sides without loss of flexibility and the occurrence of deformations.
Conventional leather or silicone belts have too short a service life, and therefore are not used in gearboxes. The variator belt can only be replaced by a steel chain (chain variator), which also consists of plates in contact with pulleys (cones).
ProVariator.RU
DIY drawings for a summer house and vegetable garden will be useful to everyone. A dacha is the ultimate dream of, if not every average person, then certainly every second person. Not everyone, of course, will be lucky enough to become the owner of a country plot in their lifetime, but those who are lucky will need to constantly monitor and improve it, which requires considerable expenses. Do-it-yourself homemade products for your dacha and garden help you keep your dacha in impeccable condition. Today we will tell you a few secrets on how to save money on buying the necessary things for your garden and make them at home. Of course, not everyone can make a grader with their own hands or self-propelled guns for a tractor, but most of the homemade products will definitely come in handy on the farm.
Digging equipment
Potato diggers of various types are very popular among farmers. These devices save people from hard manual labor, speeding up the harvesting process several times. The walk-behind tractor has a very simple design. It can be made from metal that remains after the construction and renovation of a house.
To work you will need:
The attachment to the walk-behind tractor is made in a suspended or trailed (modular) design. The hanging tool only digs up the tubers, leaving them lying on the surface for subsequent manual harvesting. A modular potato digger not only extracts the crop from the ground, but also collects it in a mobile container on a chassis.
The manufacture of a digger is carried out in the following sequence:
Adjustment and adjustment of the digger is carried out using racks and steel ties.
Rules of operation and care
The operating rules are dictated by the extreme operating conditions of the box, as well as the manufacturer’s recommendations. To maintain the performance of the variator over tens of thousands of kilometers, the owner must:
- lubricate the fixed shaft with special products such as cyatim or litol; this procedure must be carried out every 3,000 km;
- After 5 thousand mileage, the box should be partially disassembled on a preventive basis to check for wear of the bushings and liners.
It is important to avoid overload during operation.
What is a CVT and how does it differ from a classic automatic transmission?
In short, a CVT is an automatic transmission with continuously variable gear changes. Its main purpose is to smoothly and softly change from one gear to another, without jerking or distinct “clicking”, while maintaining optimal acceleration dynamics and minimal fuel consumption. Actually, the CVT was created as a means of saving, since in the civilized world the environmental factor has long been the main priority for the development of vehicles.
Classic automatic transmission
Variable speed drive
If you ask yourself how a CVT differs from an automatic transmission, the answer will be “everyone!” Perhaps the only similarity is that the variator and automatic transmission equally do not require clutch control, as happens with a manual transmission. Otherwise, the principle of operation is completely different: in an “automatic” transmission, the gears are connected using planetary gearboxes, which join the work gradually as needed. To engage the next gear, the engine must first be accelerated to the required speed, and this is unnecessary fuel consumption. In a variator, transmissions are implemented using V-pulleys and a belt (chain), without the presence of gears at all in the main mechanism.
Improved engine performance
How to increase the speed of a walk-behind tractor? In this regard, nothing can be radically changed, since it’s all about the engine’s performance. To improve its performance, it is necessary to lubricate the main parts of the engine as often as possible. But the main thing is to change the oil in a timely manner. If you do not do this, the engine (and with it the walk-behind tractor) will quickly fail.
If you often have to work in frost or extreme heat, special attention should be paid to candles. The speed and overall efficiency of the engine largely depends on their quality. In order for the walk-behind tractor to plow more soil in an hour, you should replace the old spark plugs with new ones of better quality. This will make it possible to start the unit faster and protect the car from overheating or freezing.