When repairing the steering and chassis, almost every car owner is faced with a problem (tire rod ends), which is quite problematic to solve without a special tool.
The reason is the design features of the named elements: their fingers have a cone-shaped shape, with which they enter the mounting sockets; over time, the place of this entry becomes dirty, oily, rusty, making the connection of the surfaces too dense, almost uniform, that is, one that cannot be separated by simple physical force . You need an assistant - a ball joint remover - a tool that greatly simplifies pressing out.
It is not difficult to become its owner: to do this, you need to go to the nearest auto store and purchase it there, or make a ball joint remover with your own hands using any of the methods presented below, which we have grouped depending on how the force is created in them.
Lever pullers.
Lever pullers are a tool consisting of a pair of levers connected to each other in the middle. They also have a coupling bolt on one side. In the process of acting on the ball joint, this bolt is unscrewed, bringing the ends of the levers together, one of which is located between the support and the eye, the second - under the finger.
Read also: Double square antenna calculation by frequency
Such pullers are also quite effective, but they are larger in size, so they may not be applicable everywhere.
Which restoration method is better?
- The threaded plug looks preferable since there is no temperature effect on the support. However, this method requires a thick bottom, which is not always present on compact parts.
- A glass with thread is the golden mean. Welding occurs without affecting the plastic, but the strength characteristics of the metal deteriorate.
- Welding is the simplest, but ineffective method. After treatment at high temperatures, new polymer inserts lose their properties and their service life is reduced.
- Flaring is an ideal method from a quality point of view. You actually get a new ball joint, manufactured using factory technology. However, this technique does not work at home.
Consultations from a practitioner on video
Wedge type puller.
The simplest in its design, however, it also copes well with the task assigned to it. To make it you will need:
- take a small metal plate (enough size for a matchbox);
- using a grinder (angle grinder)/machine with an abrasive wheel, give it the shape of a wedge, the resulting workpiece in profile should take the shape of a triangle;
- Using the same grinder, starting from the upper corner of the triangle, you need to make a vertical cut in it at 2/3 of its height, a width slightly larger than the diameter of the ball joint pin;
- To make working with the tool easier, it is recommended to weld a metal rod to the middle of the base of the wedge, although you don’t have to do this if you don’t have such a rod at hand.
This is the kind of bracket you should end up with.
Then it's a matter of technique:
- insert the wedge you just made between the ball body and the eye;
- Hitting the rod (the base of the wedge) with a hammer, hammer in the homemade support puller until the finger pops out of the socket.
IMPORTANT!
When using this type of puller, there is always a risk of damage to the boot, so this tool can only be used in the event of a planned replacement of tips or supports. If the repair of the steering mechanism or suspension does not require such a replacement, it is better to abandon the “wedge” type puller.
Puller directly for ball joints.
Used for cars (Citroen, Peugeot) whose ball joint is screwed into the lever. And since it is screwed in and not pressed in, it is impractical to use the above tool options; you need a special puller, which we suggest you make from an 8-centimeter thick metal pipe for 2”.
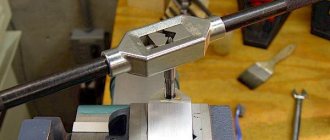
- At one of the ends of this pipe, equidistant from each other, using a grinder or a hacksaw, make 4 rectangular tenons 5x7 mm.
- At the second end, using the same tool, again, cut slots equidistant from each other to a depth of 3 cm so that you end up with 8 petals.
- Use a hammer to slightly bend these petals towards the center of the circle, thereby reducing its diameter.
- Take a 24mm nut and weld it to the narrowed side of the workpiece. The DIY ball joint remover is ready.
It’s simple to use: put it on the support so that the spikes fit into the existing grooves of the ball body, then use a 24mm wrench to turn the welded nut, thereby removing the suspension element you need.
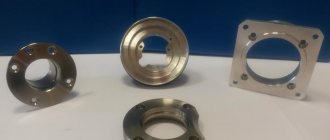
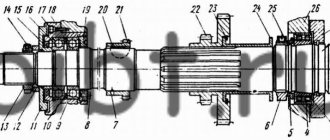
Design and purpose of the node
The ball joint is designed for reliable movable fastening of the wheel hub to the suspension arm. The ball joint consists of a ball pin, a housing and a plastic insert. The body of the ball joint is either spot welded from two halves with stamped, spherical recesses with a hole for a finger in one of them, or it is a thick-walled metal cup into which an insert with a finger is inserted, after which the bottom is placed, and the edge is rolled so that the structure does not disassemble. Sometimes the liner is not made, but the gap between the body and the ball is filled with softened polyamide plastic. An extruder is usually used for this. It is also used as the main equipment in companies for the restoration of ball joints. To protect the mating surfaces of the hinge from water and dirt, put a rubber boot on top.
As long as the boot is intact, the ball joint practically does not wear out. Intensive wear of the ball begins after the boot becomes unusable, with dirt getting inside. Therefore, keep an eye on the boots, since timely replacement of an unusable boot will extend the life of the unit.
True, the joint of the welded body is not airtight, so water gets into the body through it, even with a whole boot. Therefore, if the assembly body consists of two parts, it is advisable to fill it with lithol through a grease fitting.
When is ball restoration justified?
Typically, the ball joint is pressed into the body of the suspension arm and steering rod, being one with them. Therefore, complete replacement of hinges is an expensive procedure due to the replacement of an entire structure.
To save money, you can try to restore the ball joint, although this part is considered unrepairable:
- To repair this unit, you can dismantle it, disassemble it and replace worn polymer inserts and anther. In this case, a grinder is used for disassembly, and welding is used for restoration.
- Another option would be a method where a special polymer composition is poured into the part under pressure. With its help, gaps between parts resulting from wear are leveled.
Many experienced repairmen recommend disassembling this element in any case to grind the ball of the pin axis. This approach will ensure the durability of the repaired part. In addition, in this case, you can evaluate the condition of the finger itself and replace it if necessary.
Restoration does not make sense in the case when the finger dangles inside the body and is even removed from the hinge without disassembly and special effort.
Diagnostics
If you hear knocking or creaking noises from the suspension while driving your car on rough roads, these sounds may be coming from worn ball joints. It is better to determine the source of unpleasant sounds together: one person goes down into the inspection hole and puts his hand on the ball, and the other rocks the car. When you feel the sound with your own hands, remove the support, clamp it in a yew, and check the hinge play. The finger should not move from slight efforts, but it should not bite either, otherwise the unit will require repair or replacement.
Read also: Do-it-yourself manual potato hiller drawings
This check must also be carried out in the following cases:
- Creaking sound when turning the steering wheel.
- Spontaneous wobbling when driving in a straight line.
- Tight steering wheel.
What goes wrong
The design of the ball joint is quite durable and can last for thousands of kilometers. However, over time, the polymer liner wears out. This is the only weak point. It is he who takes on the main load from uneven roads.
A torn boot aggravates the situation; when it tears, dirt, dust, sand, etc. get inside. All this begins to work like “sandpaper”, a metal ball (finger), begins to erase the polymer insert.
That is, only two main parts are subject to wear - the polymer insert and the rubber (silicone) boot - they are the ones that need to be restored.
I would like to note that in very advanced moments, when the liner is worn down to the ground, the “metal ball” itself suffers, because it begins to rub against the metal of the case walls. But this is a completely neglected case.
Removal & installation
- Ball joint remover.
- Jack.
- Car stand.
- A set of keys.
- Pliers.
- Mount.
The ball puller is usually not universal. If you do not find a suitable puller, it can be successfully replaced with a hammer. You just need to know where to hit. There is no need to knock your finger out of its seat. The blow should be perpendicular to the finger, and it should be hit on the eye (since the conical finger, a slight landing pressure will squeeze it out of the eye). Hammer is a universal puller. It should not be too heavy or too light; 600 grams will be just right.
Removal: Loosen the wheel. Raise the car on a jack. Remove the wheel. Turn the steering wheel so that it is convenient to work. If the pin nut becomes cotter, remove the cotter pin using pliers. Unscrew the nut. Take a puller and squeeze your finger out with it. Unscrew the ball housing fastening. Using a pry bar, press down the lower arm and remove the ball joint. Removing and repairing tie rod ends and ball joints is no different, you just need to use another puller. The recovery methods are identical.
Installation: Attach the hinge body to the lower arm, tighten the fasteners, use a pry bar to press the lower arm, insert the pin into the seat. Screw the nut onto the pin and tighten it. If the finger rotates, pull the lever upward (the pin with the seat is conical, so when the finger is pressed in, it stops turning in the seat). Don't forget to tighten the nut. No puller is needed for installation. The next replacement of supports will not force you to fiddle with cotter pins if you change the nuts to self-locking ones.
Removal and installation
If after carrying out diagnostic measures it becomes clear that the unit is worn out, it must be repaired. Many novice car owners cope with all the work and restore the ball joints with their own hands. To remove and install the support after repair, you will need several tools:
- Special puller for supports.
- Car stand.
- Jack.
- Mount.
- Pliers.
- A set of keys.
Most often, ball joint pullers are not universal. If you cannot find the required tool, you can solve the problem using a hammer. Moreover, its weight should be about 600 grams. In addition, you need to know the place where you should strike so as not to damage the node.
There is no need to try to knock your finger out of the seat. The blow should be directed perpendicular to the finger along the eyelet. To remove the ball joint, you first need to loosen the front wheels and jack up the car. After this, the wheel is removed.
If the nut on the pin has a cotter pin, it should be removed using pliers. This will allow you to unscrew the nut and use a puller or hammer to squeeze out the pin. After this, you should unscrew the housing mount and, using a pry bar, press the lower lever to remove the support.
Recovery
- Emery or grinder.
- Extruder.
- An electric drill with a large chuck (so you can hold your finger in it to sand the ball with sandpaper).
- Metalwork yews.
- Welding machine (preferably semi-automatic).
- Compressor.
Restoration of supports can occur in two ways:
- Converting a non-separable hinge into a collapsible one, grinding the pin ball and replacing the liners.
- Repair by injecting softened plastic into the gap between the ball and the body using an extruder.
Of course, you shouldn’t buy equipment for a one-time repair, but you can quickly make a simple extruder with your own hands from an old brake master cylinder by attaching a lever to it to press the piston. You can heat it to soften the plastic with a torch or blowtorch.
Carrying out work
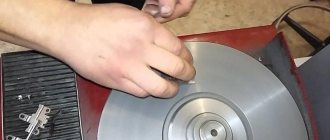
Repair and restoration in the first way begins with dismantling the supports. To disassemble a body welded from two cups, you need to drill out welding points on one of the cups and separate the cups using a chisel and hammer. On a body with an inserted bottom, grind off the flared edges using emery or a grinder, and knock out the bottom with a hammer to the end of the finger. An insert with a finger is inserted into the body of two cups, the halves are pressed against each other and several tack welds are made, trying not to overheat the insert. For a case with the bottom removed, measure the outer and inner diameters and make a steel ring in accordance with these dimensions, about 10 mm high with a thread inside and a plug screwed into it. Weld the ring to the body, cool, insert the insert with the pin into the body, screw in the plug, press the liner with it, drill a Ø 2 mm hole in the ring close to the plug and secure it with a cotter pin.
Do-it-yourself repair and restoration using the second method usually takes place without disassembling the unit.
A hole with a diameter of about 6 mm is drilled in the bottom of the body, its size depends on which extruder is available to you. The gap between the ball and the liners is cleared of dirt and blown with compressed air to remove sand and chips. Through a hole drilled in the bottom, using an extruder, softened plastic is injected into the gap between the pin ball and the body. Let it cool and the repair is ready. The disadvantage of this method is that you cannot see whether the geometry of the ball has been preserved and you cannot polish it to remove traces of corrosion, so the restoration results will be short-lived.
Repair work
It should be immediately noted that after the repair is completed, the ball joint will not be completely restored and its service life will be shorter. However, if everything was done correctly, then you don’t have to worry about the safety of the unit’s operation. There are several ways to restore the ball's functionality. At home, two technologies are most often used:
- Repair of ball joints with polymer using SJR technology.
- Collapsible - the body is converted from a non-separable one into a collapsible one, after which the ball surface of the pin is polished and the liners are changed.
Using polymer
The essence of this method is to inject heated polymer material into the housing. In this case, the support does not need to be disassembled, but an extruder must be manufactured. It is worth noting the main advantages of this method:
- Since the housing structure is not destroyed, high reliability of the factory connection is ensured.
- The polymer fills all the voids and wear-out areas that caused the support to fail.
- When the material hardens, it forms a solid liner, the characteristics of which are at least as good as the factory part, and sometimes even superior.
- The polymer contains special ingredients that provide high-quality dry lubrication of the finger.
- High strength under impact loads is achieved.
To use this technology, a hole must be drilled in the lower part of the body, the diameter of which is selected in accordance with the extruder used. It is necessary to thoroughly clean the gap between the liners and the ball surface of the pin from dirt, and also blow the assembly with air to remove chips and grains of sand.
The polymer is injected into the housing using an extruder through a pre-drilled hole. Once the plastic composition has hardened, the repair work can be considered complete. The only drawback of this technology is the inability to check the geometry of the spherical surface of the finger.
Collapsible method
After the support is removed, it is necessary to disassemble the housing. To do this, you will need to drill out all the welding points in one half, then divide the part into two parts using a hammer and chisel. Then the flared edges are ground down and a blow is applied to the end of the pin to separate the bottom of the body. After measuring the inner and outer diameters of the body, a ring with similar dimensions and internal threads is made, as well as a plug that is screwed into this part. The height of the ring should be about 10 cm.
After this, a new liner and the restored finger are placed in the body. Having connected the two parts of the body, they should be secured by welding. Care must be taken to avoid overheating the liner.
Then the previously made ring must be welded to the body. After this, all that remains is to screw the plug into the body to tighten the liner and drill a small hole in it (diameter about 2 mm) for the cotter pin.
Useful tips
- Do not undertake restoration of the hinge if the pin is removed from it without disassembly; repair will not help such an assembly, but only replacement. The hole for the finger in the body must be smaller than the diameter of the ball in order to. If the liner wears out, the finger cannot fly out of the body, causing an accident.
- When restoring a hinge with your own hands, disassemble it completely and grind the ball of the finger, no matter how you intend to restore the assembly. Then the fruit of your work will not need replacement so soon. Even if you are planning to use an extruder for restoration, do not be too lazy to disassemble the hinge to see if the pin needs replacement. If you don't need it, then just polish his ball.
Read also: Diode 10 ampere 12 volt
DIY gimbal joint for Steadicam
About choosing a joint for a Steadicam, about making a universal joint from threaded wings, and about adjusting the universal joint fork.
Choosing a hinge design for a Merlin-type steadicam
The design of the Merlin type steadicam allows the use of two types of joints, ball and gimbal.
The ball joint greatly simplifies the design of the steadicam, but it is not capable of transmitting rotation from the handle to the moving part of the steadicam.
Such a hinge is easier to manufacture, but more difficult to reduce the friction that occurs between the ball and the heel. There are, however, ball joints that have less friction. The heel of such hinges is filled with small balls. But I couldn’t get such a hinge.
During the experiments, I still tried to make a ball joint from a ball from the telescopic antenna attachment point and a caprolon heel. But the friction in the hinge turned out to be too great, even after using a fluoroplastic gasket. So, I had to think about making a more complex cardan joint.
A universal joint is easier to reduce friction, but much more difficult to manufacture. But, if I got something into my head...