Decorating walls is a current trend, but not everyone knows how to apply plaster to walls. The original design largely depends on the composition of the mixture, the method of throwing it and stretching it over the surface. There are different ways to apply decorative plaster; in most cases, the result is unthinkable without specialized tools. A simple spatula or a notched trowel can work wonders in the hands of a master.
What tools are needed for plastering work?
For high-quality finishing of walls and ceilings, theory and practice are important; you also need a suitable tool for plastering walls. Special devices are used to perform simple manipulations that leave “traces” on the surface in the form of a textured pattern. This is the whole secret of the process of plastering prepared walls with inimitable decor.
When purchasing new tools for plastering walls with your own hands, do not rush to work without skills. It is important to get used to them so that the movements are performed confidently, so you need to watch master classes and practice your skills on a training surface, for example, on a balcony or in a bathroom.
In order to save money during the construction of a private house or country house, many stages have to be completed independently. Having decided to take this step, you will have to master at least the basics of several construction specialties, and understand the tools for plastering work and their purpose.
Main varieties:
- Spatulas;
- Trowels;
- Graters;
- Falcon;
- Rule;
- Rollers;
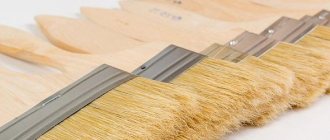
- Brushes and Brushes;
- Corner aligner;
- Plasterer's grinding tool;
- Decorative finishing devices;
- Bucket and construction mixer - for preparing the mixture.
As a rule, a trowel, a falcon (for the ceiling) and spatulas for plastering walls of various shapes are a “gentleman’s set” for a novice master.
For high-quality finishing of walls and ceilings, theory and practice are important; you also need a suitable tool for plastering walls.
Operating rules
To significantly increase the period of active use of a plastering tool, you should perform several simple steps:
- Products should be stored in a dry place without access to moisture;
- use the tool for its intended purpose and select the correct size and material of the equipment;
- After finishing use, you should immediately wash and dry all tools.
A huge selection of construction plastering elements and devices allows you to perform assigned tasks quickly, efficiently, accurately and simply. The practicality of the materials used greatly facilitates work in any conditions and with any volume of working surface, making it easy and quick.
Hand plastering tools for applying plaster
Having prepared the room, they move on to the main stage of work. Some of the tools for plastering will be useful from the previous list, some will have to be added.
There are 2 known methods of pre-treatment:
- “Wet” plaster is a classic method of applying building mixtures.
- “Dry” wall covering with plasterboard, plywood or other panels.
The main tool for leveling walls with plaster:
- Universal building level and plumb line (for quality control);
- Aluminum rule (a wide strip with a pointed angle for wide coverage of a wide area of the wall being processed);
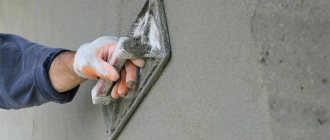
- Plaster spatula;
- Trowel (a flat plastering tool with a pointed nose and a wooden handle);
- Scoop (to scoop up the dry mixture);
- Trowel (smooth “sole” with a parallel handle);
- Grater (to rub the surface) and grater;
- Falcon (flat with a vertical handle, convenient for working on the ceiling);
- Corner aligner;
- Beacon profiles (needed to level surfaces with large curvature, which is why walls are plastered).
For plastering, use the above-listed plasterer tools and solutions:
- Limestone (with sand);
- Lime-cement;
- Gypsum-lime (alabaster).
You will need a primer for pre-impregnation, which increases the adhesion or “adhesion” of smooth walls.
The primer increases the adhesion or “grip” of smooth walls.
Types and purpose
Specialized tools for plastering work and methods of applying the solution play an important role in the quality of work.
The distribution of the plaster mixture can be done with a float, trowel or trowel. They are all smooth, the way the handle is attached and the way they work are different.
Trowels have several varieties and differ in functionality:
- Triangular in shape with a rounded nose - trowel (mason's trowel);
- Trapezoidal (for finishing);
- Grout (for distributing the mixture);
- Serrated (to obtain parallel grooves);
- Narrow trowel;
- Corner (for high-quality processing of convex corners);
- Trowel for filling joints (the form provides a supply of mortar).
Each type involves a certain method of manipulation. It is rather a professional tool for plastering. For a beginner, it is enough to have a trowel, 1 universal (smooth) and a serrated trowel. You need a trowel, 2-3 spatulas and a grater, level the plaster on the wall using the rule.
The distribution of the plaster mixture can be done with a float, trowel or trowel.
Selecting the right spatula or set
When planning to buy a spatula, take into account several varieties - for facade work and painting spatulas. It is not difficult to distinguish them; the latter have a thinner blade thickness and greater elasticity. The first ones are distinguished by their larger width, since they carry out a large scope of work.
Pay attention to the handle. To purchase high-quality tools, make sure that the blade is made of high-quality material, otherwise the tool is disposable and cannot be used in the future. It will simply get damaged during the first task. Choose a spatula with a comfortable rubberized handle with a comfortable surface that is tightly attached to the working part. In this case, it is guaranteed that it is convenient when applying the mixture to the walls.
Types of spatulas
When purchasing painting spatulas, keep in mind that due to their flexibility, these tools are not durable. Intensive use will quickly make them unsuitable for subsequent work.
Spatulas are also available with different working blade widths. Options for performing main work are offered with a width of 40-60 cm, and “auxiliary” ones, used for working in hard-to-reach places, offer a width of 6 to 15 cm.
When planning to purchase spatulas, buy a set. It is useful in the current situation and in the future. An excellent choice is to purchase tools with widths of 50, 150, 400 and 600 mm. As for wide spatulas, they are purchased when they are convenient for the room where the work is taking place. For a small room to putty its walls, a spatula with a working surface width of 40 cm is sufficient.
If you do not install special corners in the corners of the room, then purchase a corner spatula. Only a specialist can work with it. This tool creates even 90-degree angles, but since this requires experience and skills, it is better to make the angle using perforated elements, which are then puttied.
Accessories and mechanisms
A prepared surface is half the success when decorating walls with decorative plaster. Having figured out what tool is needed for plastering walls, it is important to know everything about the mechanical method and technology of applying the mixture.
There are small nuances when plastering wooden walls - the mortar adheres tightly to thin slats, called “shingles”. They are fixed diagonally with nails to the wood.
When plastering wooden walls, the mortar adheres tightly to thin slats, called “shingles.”
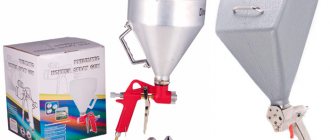
To speed up large-scale work, mechanized labor is usually used. It is convenient to use special spray guns and pistols to apply the starting lineup. The mechanical method guarantees the quality of application of plaster mixtures for various purposes:
- The first layer is the spraying of the cement mixture.
- Primer layer.
- Cover with preliminary leveling.
- Decorative, improved or finishing layer for painting, depending on the functionality of the room and design tasks.
At the initial stage, the walls are prepared by removing the old layer of paint and crumbling putty. Next, the defects are masked; if possible, a notch should be applied so that the solution holds better.
The undeniable advantages of mechanical processing of walls:
- Reducing the time required to complete a large amount of work. What can be done by hand in 3 weeks can be done mechanically in 3-5 days.
- Machine plaster “sticks” better and reduces the likelihood of mistakes if you work quickly and confidently.
- The ability to do work better. Any technique speeds up the process and performs it equally over the entire surface. But the finishing work is done manually.
To check the result, check the surface with illumination in a dark room. If you look from the side, it is easier to identify all the defects - depressions and bulges.
To speed up large-scale work, mechanized labor is usually used.
After drying, the finishing layer is sanded with a special plastering tool or rubbed by hand in 2 stages:
- Rough work (in a circular motion);
- Smoothing with a trowel from top to bottom (from ceiling to floor), then horizontally.
After drying, the finishing layer is sanded with a special plastering tool or rubbed down by hand.
Today in Russia the most popular equipment is from the brands Putzmeister, PFT and Kaleta. Some multifunctional machines perform not only throwing the mixture or grinding, but also preparing the surface for self-leveling and “warm” floors.
To perform work at the household level, it is better to rent equipment. Compact equipment is more convenient for beginners, but it is important to first familiarize yourself with how to apply plaster on a wall correctly.
To perform work at the household level, it is better to rent equipment.
Grids, mixers and machines
High quality of the solution is unthinkable without mixing using technology. Mortar for decorative plaster is produced in dry form, it is packaged in small bags. For preparation, it is important to follow the proportion indicated in the instructions for the Knauf mixture or another manufacturer.
Construction mixer and plaster bucket (another container) for preparing a high-quality mixture. The mixer stirs without dry lumps, it is easy to prepare a mixture on any basis:
- Cement;
- Plaster;
- Limestone.
The mixer can be stirred at different speeds. You need to work quickly with gypsum plaster, mixing a small amount - it hardens quickly. Read the recommendations on the packaging on how to apply the plaster - not all mixtures are suitable for machine spraying.
With the correct consistency, a reduction in consumption per 1 sq.m is guaranteed. If the mass is too thick, it is heavier and thicker than it should be, it will slide off the wall without a painting mesh or shingles.
The liquid suspension can spread, but without it it is impossible to make some textured designs with a roller or trowel. Manufacturers add special additives and hardeners to the mixture, each with its own polymerization period. This is taken into account when preparing the amount of solution and the processing time of 1 “square” of surface. The tools for performing plastering work with this composition must also be indicated - manual or mechanical.
The mixer can be stirred at different speeds.
Some types of decor are sprayed with a spray gun, others with a cartouche gun. It speeds up the process of decorating any surface:
- Concrete facade with unplastered walls;
- Plastered coating;
- Wooden shields;
- Plastic panels;
- Neat brickwork;
- Cellular concrete.
The gun operates in a semi-automatic mode, when the sprayer directs the supplied mixture from the container using a compressor. This is a very good semi-mechanical device for plastering walls, but for high-quality spraying it needs to be at the same distance from the walls or ceiling.
The gun operates in a semi-automatic mode, when the sprayer directs the supplied mixture from the container using a compressor.
Price of quality.
Tools for finishing plaster of different brands, sizes and qualities vary in price.
For example, the cost of a spatula varies from fifty to five hundred rubles. The price of a trowel is from one hundred thirty to one thousand rubles. The rule will cost from four hundred to two thousand rubles. A grater costs from one hundred to four hundred rubles. You can buy a tool for applying plaster at a finishing materials store or order it online. The costs for it are included in the costs that will have to be incurred for performing plastering work per square meter. However, according to professionals, it’s worth the investment. A good and correctly selected tool will allow you to do the job at the highest level. data-matched-content-ui-type=”image_stacked” data-matched-content-rows-num=”2″ data-matched-content-columns-num=”3″ data-ad-format=”autorelaxed”>
Decorative finishing tools
Combining devices of different shapes expands your work possibilities. The technology for applying Venetian plaster involves the use of several types of spatula and a “trowel” of two types:
- Rectangular;
- Trapezoidal shape.
The technology for applying Venetian plaster involves the use of several types of spatula and trowel.
Removable blocks for rollers have the greatest capabilities:
- Structural rubber attachments - to form an unusual texture reminiscent of reptile or python skin;
- Screen type – for printing an ornament;
- From leather (smooth or crinkled, they create a semblance of a “living” surface);
- Made from textured wood;
- Plastic analogues of rubber;
- Pile and fabric samples;
- Porous and spongy nozzles made of polystyrene foam and foam rubber (used less frequently).
You can make attachments and devices yourself. Homemade plasterer tools and their purpose depend on the technology and the preferred pattern. Here the possibilities are practically unlimited. The design can be made using crumpled aluminum foil, rubber bands over foam rubber, scraps of plastic bags and corrugation.
Using decorative attachments on a roller makes it easier to work on drying plaster. Less often - a more liquid solution or a special composition with fillers on the finished surface.
Using decorative attachments on a roller makes it easier to work on drying plaster.
A bush hammer is a tool for plastering walls, reminiscent of a chop hammer. It is used to form chips for a “stone” texture and the effect of putty that has fallen off the brickwork. A chisel is also used for these purposes.
Using special stencils or prints, it is easy to extrude a special pattern that imitates “wild stone” and other natural surfaces. Sometimes a “reverse effect” is needed, since urban styles often use the semblance of unplastered walls.
Bush hammers are used to form chips for a “stone” texture and the effect of putty that has fallen off the brickwork.
Decorating methods largely depend on skill and professional experience, but a painter-plasterer cannot do without a good tool. Even for a beginner who has decided to perform the most labor-intensive part of the repair with his own hands for the first time, it is important to understand these nuances. It is recommended to stock up on a minimum set of professional tools and equipment for performing plastering and painting work.
Let’s summarize for those who decided to do their own repairs for the first time. With the help of mechanical devices, the work goes faster, but it is important to maintain the distance to the wall or ceiling and the rate at which the composition is thrown. The quality of work largely depends on the correctly selected devices used to apply plaster, level the surface and form a decorative coating.
Description of the profession
Plasterers usually work as part of a construction team. Basically, they have several additional specializations, most often painters. Therefore, in addition to directly finishing the walls with cement mortar, they also prepare the surface for painting, apply paint and varnish composition or glue wallpaper.
The plasterers are connected at the final stage, when the main excavation, welding, installation, and masonry work has already been completed. Workers clean surfaces, prepare the necessary solutions and apply them to the walls manually or using a trowel. In this case, various techniques can be used at the request of the customer.
How much does he earn?
When choosing a profession, one of the decisive factors is the level of wages.
As in many other professions, a worker's salary will depend on several factors:
- place of residence;
- work experience (grade and qualifications);
- scale of the object;
- deadlines for completing the work;
- work format and complexity.
In Russia, the minimum wage for this position is 15 thousand rubles. The maximum level reaches 150 thousand rubles per month. This type of income is offered by large companies in big cities. The average level varies from 60 to 75 thousand rubles per month.
Application area
The rule is used to perform several types of work:
- Laying ceramic tiles. The rule helps to remove excess glue and correctly install the tiles. Moreover, its use significantly reduces operating time.
- Treating walls with putty. The tool in this type of work can be used instead of a large spatula. And this is much more convenient, since using the rule you can cover large spaces.
- Leveling concrete screeds and self-leveling floors. Using the rule will allow you to process the floor faster than other devices.
- Treatment of walls with cement and gypsum plaster, with and without beacons. In these works it is very difficult to do without a rule, but with it the walls will turn out to be of high quality.
Devices for preparing walls and ceilings for plaster
Each stage of surface treatment requires its own devices, which is why it is so important to have plastering tools and know their purpose.
A wall is rarely perfectly flat, and it has to be prepared for painting or finishing plastering using different methods. If it is “bare” masonry or reinforced concrete blocks, the surface is leveled with starting mixtures for beacons. The old layer in the secondary housing stock has to be renewed, paint removed and peeling off.
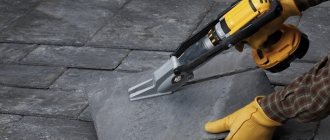
Work begins with a thorough cleaning of the surface - removing wallpaper, paint and a layer of old plaster. Can be used:
- Chisel;
- Chisel;
- Special hammer.
A careful inspection of the ceiling and walls can often reveal small cracks and crevices, chips and blisters of putty. Before applying plaster to the wall, all detected defects must be eliminated. The cracks are first widened, then sealed with gypsum mortar or putty using a spatula. Next, the room is vacuumed, the wall is washed or moistened with a brush or sponge. Prepare the mixture for the next stage of work.
Before applying plaster to the wall, all detected defects must be eliminated.
What are they, description
Basic tool for preparatory work:
- A spatula is a practical device in the form of a steel flat spatula with a plastic (plastic) handle. They differ in width. A universal tool for applying plaster, which is also convenient for removing old wallpaper and peeling paint, distributing the composition over the surface, and removing excess.
A spatula is a practical device in the form of a steel flat spatula with a plastic (plastic) handle.
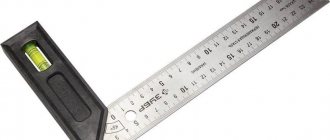
- The building level is necessary to determine the curvature and defects of the walls; it is convenient for them to check the results of the work.
The building level is necessary to determine the curvature and defects of the walls.
- Sandpaper is used for final grouting and removing nicks and burrs in corners and at the junction of materials.
Sandpaper is used for final sanding and removing burrs.
- A hatchet and a special hammer. With their help, it is convenient to make chaotic notches, after which the composition holds more tightly.
With the help of a hatchet it is convenient to make a chaotic notch, after which the composition holds more tightly.
Use reinforcing or painting mesh, or “spider web” in rolls for painting. They strengthen crumbling surfaces and hold heavy mixtures.
The mesh strengthens crumbling surfaces and holds heavy mixtures.
In some cases, it is necessary to treat the walls with waterproofing, antifungal compounds and antiseptics (wood) and anti-corrosion compounds (metal).
Varieties
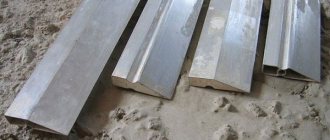
The rule for carrying out finishing work with plaster is a flat wooden strip up to 2 m long. The main disadvantage of such a tool is considered to be its tendency to deform under the negative influence of moisture. This problem can be eliminated by using, for example, a special impregnation for wood - drying oil.
The rule of the modern type is a 3-meter profile up to 12 cm wide, made of aluminum. This lightweight metal rule will not be subject to deformation, therefore, such a tool is very durable.
For example, an h-shaped rule can be equipped with a hydraulic level built inside, this greatly simplifies the DIY workflow. This tool can also be used for other work in which there is a need to use a long level.
To check the wall for evenness, a rule is applied to it; by looking at the gap formed between them, the plane is examined and the presence of curvature is judged. A value of 1.5 cm is considered an acceptable deviation.