Slope calculator
The slope calculator
will help you calculate the slope, elevation or distance at the right time without any problems.
The calculator can calculate the roof slope
.
pipeline slope
.
slope of the stairs
.
road slope
, etc. It is also possible to calculate the elevation between points or the distance from point to point (useful in geodesy).
Operating procedure:
1. Select the value that you need to calculate2. Select in which unit of measurement you want to set/calculate the slope (3 types to choose from: degrees, ppm, percent)3. Set the 1st unknown4. Set the 2nd unknown5. Click the “Calculation” button
For reference:
- slope in degrees is calculated using the tangent of the angle:
tgx = h / L
- slope in ppm is calculated using the following formula:
x = 1000 * h / L
- slope in percentage is calculated using the following formula:
x = 100 * h / L
Slope calculator
created as an addition to the main online calculations on the site, and if you liked it, then do not forget to tell your friends and colleagues about it.
What is taper? Formula for calculating taper. Designation of taper in drawings.
Taper . Taper is the ratio of the diameter of the base of the cone to the height. The taper is calculated using the formula K=D/h, where D is the diameter of the base of the cone, h is the height. If the cone is truncated, then the taper is calculated as the ratio of the difference between the diameters of the truncated cone and its height. In the case of a truncated cone, the conicity formula will look like: K = (Dd)/h.
Designation of taper in drawings . The shape and size of the cone is determined by drawing three of the listed dimensions: 1) the diameter of the large base D; 2) diameter of the small base d; 3) diameter in a given cross section Ds having a given axial position Ls; 4) cone length L; 5) cone angle a; 6) taper with . It is also allowed to indicate additional dimensions in the drawing as a reference.
The dimensions of standardized cones do not need to be indicated on the drawing. It is enough to indicate in the drawing the symbol of the taper according to the relevant standard.
Taper, like slope, can be indicated in degrees, as a fraction (simple, as a ratio of two numbers or as a decimal), or as a percentage. For example, a 1:5 taper can also be expressed as a 1:5 ratio, 11°25'16", with a decimal of 0.2 and a percentage of 20. For tapers used in mechanical engineering, OCT/BKC 7652 specifies a range of normal tapers. Normal tapers - 1:3; 1:5; 1:8; 1:10; 1:15; 1:20; 1:30; 1:50; 1:100; 1:200. Also 30, 45, 60, 75, 90 and 120° can be used.
Calculation of slope for external sewerage
For your own home, you need to know that installing a stormwater system is a very troublesome job. Storm drainage consists not only of a pipeline, but also of ditches that also drain water. The minimum slope per meter of storm pipes also depends on the type and what diameter it has.
For storm sewerage, pipes should have a diameter of 150-200 mm, and the slope at 200 mm should be 0.007, and at 150 mm – 0.008. that is, the larger the diameter, the smaller the slope. Since water in such a sewer will flow in any case without any difficulties. The slope also depends on the surface of the drainage system. If it is rough, the more you need to do it and vice versa.
For the external system, a level is used. After all the pipes are connected, thanks to the level, their correct slope is set. But it is very difficult to cope alone. For such work you will need at least 3 people: one sets the slope, the other monitors what level the level shows, and the third, of course, manages this process.
Basic rules for calculating the slope and installing a sewer pipe:
- For a pipe with a diameter of 50 mm, 3 cm of angle is required per meter, and if it is 110 mm in diameter, then 2 cm.
- The total length of the pipeline angle for both the external and external systems is 15 cm.
- When calculating standards for an external sewer system, according to SNiP, you need to take into account how much the ground freezes.
- Using the above formulas, it is possible to calculate the correct slope of the pipe yourself, but in turn, to confirm your calculations, you need to consult with specialists.
Thus, having learned all the details about the tilt, everyone will be able to carry out such work on their own. But do not forget to find out all the recommendations from specialists. Use different tilting methods for apartments and private homes. Take into account all the details, carry out the calculations correctly. Then your system will last a very long time, it will be reliable, and you won’t have to worry about it being able to break through at any moment.
More materials:
- air valve for sewerage 50;
- sewer return valve internal 50 mm;
- vacuum sewer valve 110 mm.
Rules, requirements, standards for the design and construction of stairs
In order to correctly design a staircase, it is necessary not only to choose its location wisely, but also to take into account the staircase design standards set out in the relevant chapters of SNiP.
The following are the basic norms, rules and requirements that must be taken into account when designing and constructing stairs.
Parameters of landings and flights
The width of the flights and landings determines the capacity of the stairs and depends on fire safety (evacuation) requirements and the expected dimensions of the things being carried.
- Minimum width of a flight of stairs : for internal stairs - 80 cm, for 2-storey buildings - 90 cm, for residential buildings with higher floors - 105 cm, for public buildings - 135 cm
- Maximum flight width : for residential buildings - 140 cm, for public buildings - 240 cm.
- The useful width of a flight of turning stairs and stairs connecting more than 2 floors must be at least 1.0 m to ensure the simultaneous passage of two people and the carrying of large items.
- The width of multi-flight stairs must be the same along the entire length of the stairs.
- There must be a gap of at least 50 mm between flights of stairs located in opposite directions to each other.
- The width of landings must be at least 120 cm and not less than the width of the flight.
- The length of the landings between flights must be at least 1.3 - 1.4 m (this is the average length of two steps of an adult)
- The length of landings at the entrance doors can be 1 m if the doors are sliding or open in the direction opposite to the stairs. Otherwise, the length of the platform is equal to the width of the door leaf + at least 60 cm.
Slope of stairs, calculation of steps
When designing a staircase, two things are simultaneously taken into account: the convenience (safety) of moving along the stairs and minimizing the space occupied by the staircase. The safety of the stairs depends on its slope and the parameters of the steps.
- The number of steps in one flight of stairs should be no less than 3 and no more than 16. With a smaller number, it is easy to stumble; more steps make the staircase “tired” and an intermediate platform is required.
- It is advisable to provide an odd number of steps in a flight, since it is more convenient for a person to start and finish moving up the stairs with the same foot.
- The recommended slope of the stairs is in the range of 1:2 - 1:1.75 (from 20 to 26.7 degrees).
- Maximum slope of stairs for walking 1:0.85 (50 degrees)
- Minimum slope of stairs for walking 1:2.75 (20 degrees)
- Maximum height of stair steps : in residential and public buildings – 19 cm, for internal stairs – 20 cm, for basement and attic – 21 cm.
- The minimum height of steps is 12 cm.
- Maximum width of stair steps : in residential and public buildings – 26 cm, for internal stairs – 23 cm, for basement and attic – 21 cm.
- The minimum width of steps is 25 cm. For stairs leading to non-residential premises (basement, attic), the minimum width of steps is 20 cm.
- The height of the steps of the stairs within the same flight should not differ by more than 5 mm.
- With a step width of up to 26 cm, its overhang should not exceed 3 cm.
- Winder (wedge-shaped) steps on the inner border of the useful width must have a tread at least 10 cm wide and 26 cm wide at the center line of the flight.
- The radius of curvature of the center line of the march with winder steps must be at least 30 cm.
- The distance between any step of the stairs and the ceiling must be at least 2 meters.
How to convert the roof slope in degrees to percentages table and therefore the choice of materials
Depending on the slope of the roof, a certain roofing material is used and the number of layers required for a given slope is arranged (Fig. 2). Roofing materials according to their technical, economic and physical properties are grouped into groups 1-11, which are indicated on the graph by arcuate arrows. Sloping lines indicate the slope of the slope. The thick inclined line on the graph shows the ratio of the height of the ridge h to half of its location 1/2. The ratio 1:2 (shown at the top of the inclined line) shows that the vertical segment h fits on the horizontal segment 1/2 twice. On a semicircular scale, this inclined line shows the slope of the roof in degrees, and on a vertical scale, it shows the slope as a percentage. In a similar way, using the graph, you can determine the smallest slope for a particular group of recommended roofing materials:
i = h. (1/2) = 2.5. (12 / 2) = 5 / 12 or 5.12.
To express the slope as a percentage, this ratio is multiplied by 100:
i = (5 / 12) 100 = 5 100 /12 = 41.67.
The calculated slope of 41.67%, subject to the given structural dimensions of the roof, ensures normal discharge of storm water.
Roll roofs of various types with roof slopes up to 2.5% are installed in four layers on adhesive bitumen mastic. Hydroisol GI-G, GI-K, glass roofing material S-RM, roofing material RKM-350B, etc. are used as roll materials. Operable roofs are constructed from five layers. A protective layer of gravel 20 mm thick on antiseptic mastic is poured over the roofing carpet.
Slope in percent
Slopes in degrees and percentages 1º - 1.7% 1% - 34′ 20″ Just for reference.
You wouldn’t be ashamed to say that the magnitude of the slope is directly and linearly proportional to the angle - this is simply ignorance of the basics of mathematics! or just misinformation! “a secret”: the slope is the ratio of the opposite side to the adjacent side - in mathematics they call the “tangent of the angle”, now open the textbook and look at the graph of this function - as you can see, it does not look like a straight line at all.
Even the simplest example: an angle of 45º. and slope = 100% - this no longer fits into your formula. or do you think that at 45º the legs are not equal?
In some documents I saw that this bias is written much more, what is this connected with?
This may have something to do with it - that the slope in some cases is much greater! For example, some of us still write the slope of a pitched roof in fractions, not in degrees. so if you compare the slope in fractions for the road and the slope for the roof slope, the difference can be huge, but there is no mistake in this.
Tangent and distance
The percentage designation of the road slope reflects the tangent of the angle of inclination. It was required to simplify the understanding of the elevation level and calculations for drivers. The meaning of this marking is based on trigonometric calculations of triangles. If you imagine a slide in the form of a geometric figure, then you can distinguish two legs and a hypotenuse in it. We remember from school that the ratios of the sides of a triangle are reflected in the values of sine and cosine. They help to calculate one of the sides based on the angle of inclination of the hypotenuse. Meanwhile, in calculations, the ratio of sine to cosine, which is called tangent, is often used. If you set the hypotenuse at an angle of 45 degrees, then the sine and cosine will be exactly the same, and the tangent will be 1.
To calculate road slopes, this ratio is taken as the basis. An angle of 45 degrees is taken as 100%, and the length of the adjacent leg, that is, the horizontal projection of the road going uphill, is 100 m. Not all cars can climb such a slope, but only those that have ideal weight distribution, good tires and powerful motor.
Question answer
Can I challenge a camera ticket if there is no new warning sign?
Types of roofs and choice of their material
Types of roof shapes.
For each building, the roof slope is calculated individually.
There are 4 types of roofs:
Flat floors are not absolutely horizontal, but have an angle of inclination, but it is not less than 3º, while the roof is equipped with special drainage funnels with a wall slope of about 1.5º.
During operation, wind exerts pressure on the roof surface, so tall roofs are more susceptible to this effect, and on very flat roofs, a hurricane can tear off the roof covering.
The angle of inclination of the roof depends on the material chosen for the roof, as well as the plane of the slope.
With an increase in the size of the inclination angle from 11º to 45º, this pressure increases almost 5 times. Taking into account wind loads, in areas with light winds this size is chosen within the range of 35-40º, and where the speed of movement of air masses is high - 15-25º.
It should be noted that at large values of the angle of inclination of the floor plane (about 50º), in winter the snow will slide off it under its own weight, reducing its pressure on the roof to zero.
The choice of material, and sometimes the number of its layers during installation, depends on the steepness of the slope plane.
The diagram relates the minimum roof slope to the roofing material and helps in choosing both if necessary. The vertical scale indicates the slope in percent, the arcuate scale indicates the slope in degrees, and the shelves indicate the ratio of height to ground level. The material is conditionally grouped according to its technical and economic properties into 11 categories.
Practice shows that roll materials are used to cover roofs with a slope of 0-25% (0-10% is a three-layer coating, 10-25% is a single-layer coating, but the material must be sprinkled). Asbestos-cement slate is laid on roofs with a slope of up to 28%, steel sheets - up to 29%, tiles - more than 33%.
How to maintain the required slope
Determining the slope of the sewer is not enough. It still needs to be maintained during installation. The most convenient option is to have a special level with a protractor. If you don’t have professional equipment, you’ll have to be cunning.
Construction level with protractor
There are ways to control the angle of a sewer pipe using a regular level:
- Having drawn a line on the wall with the desired slope, apply a building level to it and make a mark on the plastic in the place where the edge of the bubble is located. When placing the pipes, position them so that the bubble is in the desired position.
- If you take a meter level, you can attach a pad of the required width to one side. This method does not work in short sections, but it is convenient to install a long pipeline.
Internal sewerage
When laying a pipeline, it is necessary to maintain a given slope and prevent deflections and sagging. By the way, when laying outlet pipes from different plumbing fixtures, it is necessary to withstand different slopes (see photo below).
Slope of drain pipes from various plumbing fixtures
When laying an internal pipeline, you can draw the required slopes on the wall and align the pipes along them. You should not focus on the floor level; it is better to mark a horizontal line. It’s easier to do this if you have a level; if you don’t have one, you can use a bubble level. After this, having calculated the required difference (described above), you “lift” the far end. Once again check the accuracy of the calculations and drawn lines. Afterwards you can begin installation.
Example of internal sewerage layout
In bathrooms and toilets, the required level is usually laid out using a thick sand-cement mortar. Anyway, then the pipe is finished off - a plasterboard box is placed, onto which the tiles are then glued. A more modern option - laying pipes in a groove is not available to everyone - panel houses do not have such thick walls. When laying sewer pipes from the kitchen, stands and wedges are often used. After the pipeline is laid with the required slope, it is fixed to the walls using special holders. They are installed in increments of no more than 40 cm.
External sewerage
The sewage system on the site is laid in trenches. When laying the route, try to make it as straight as possible. Any turns are a potential place for a blockage to form. If you can’t do without turning, install a tee next to it, bring the pipe just above ground level and cap it with a sealed cap. This will be the right decision - you will be able to clean the plugs quickly and without problems.
When laying an external sewer, dig a trench with a flat bottom. The depth of the trench is 20 cm more than necessary - this is a place for a sand cushion. If the length is short and the drop is small, the bottom can be left as it is - flat. If the difference is large, you will have to form a slope. At this stage there is no need to maintain the tilt too much - do it approximately. Then the bottom is leveled, all stones and roots are removed, the holes are leveled, and compacted. There must be a flat, dense base.
Key points to remember
Sand is poured onto the leveled bottom. It must be sprinkled in layers of 5 cm, leveled, compacted (spill with plenty of water). By laying 4 layers in layers, we get a cushion of 20 cm. Pipes are laid in the sand, forming a given slope. The slope can be checked with a long building level (1.5-2 meters or more). If this is not the case, you can tape a bubble level to a long, flat strip (beam) in the middle with tape. This way you can achieve minimal error.
After the pipe is laid and its slope is checked, it is covered with sand. It should cover it almost halfway. The sand is carefully leveled and spilled. After this, the pipe is covered 1/3 with dense sand (the level can be higher). Then you can fill it with soil.
Calculation of ridge height
Roof slope degree/percentage ratio
After you have decided on the roof structure, decided what material will be used, taken into account all climatic conditions and decided on the slope of the roof, it’s time to find out how to calculate the height of the ridge.
This can be done using a square or mathematically. For the second option, the span width of the house (h) is divided by 2. The resulting number is multiplied by the relative value.
To find it, use the table below (Fig. 4). As you can see, the values are written for each angle of inclination. To make it clearer, let's give an example. The width of the building is 6m, the roof slope is 20 degrees. We get:
The height of the ridge is 1.08 meters. Using this formula, you can find out the slope of the roof (this is sometimes necessary when repairing an already finished roof). How to count? In reverse order.
The roof slope angle is the ratio between the height of the roof ridge and half the pitch.
What we get: 1.08:3=0.36, multiply this value by 100 and get the roof slope as a percentage: 0.36x100=36%, look at the table and see: 36%=20 degrees, which is what we needed to prove.
We learned how to calculate the slope angle of a roof, and how to determine this value using an inclinometer, what is this tool?
This is a rail with a frame attached to it. Between the slats there is an axis to which the pendulum is attached (two rings, a plate, a weight and a pointer).
Inside the cutout there is a scale with divisions. When the rack is in a horizontal position, the pointer coincides with zero on the scale.
To determine the roof slope angle. The inclinometer rod is held perpendicular to the ridge (at an angle of 90 degrees). The pendulum pointer will show the desired value in degrees. To convert to percentages, use the table above (Fig. 3).
Very often, during the construction of roofs, you can hear the phrase “roof slope”. What it is?
Slope
Flat surfaces of parts located obliquely are indicated in the drawing by the magnitude of the slope. We will show you how to calculate this value with an example. The wedge shown in Fig. 6.40, I, has an inclined surface, the slope of which must be determined. From the size of the largest height of the wedge, subtract the size of the smallest height: 50 – 40 = 10 mm. The difference between these values can be considered as the size of the leg of a right triangle formed after drawing a horizontal line in the drawing (Fig. 6.40, b
). The magnitude of the slope will be the ratio of the size of the smaller leg to the size of the horizontal line. In this case, you need to divide 10 by 100. The slope of the wedge will be 1:10.
Rice.
6.40. Determining the magnitude of the slope
In the drawing, slopes are indicated by the sign
and the ratio of two numbers, for example 1:50; 3:5.
If you want to depict in a drawing a surface of a certain slope, for example 3:20, draw a right triangle, one of the legs of which is three units of length, and the second is 20 of the same units (Fig. 6.41).
Rice.
6.41. Constructing slopes and applying their values
When drawing parts or when marking them, to construct a line along a given slope, it is necessary to draw auxiliary lines. For example, to draw a line with a slope of 1:4 through the end point of a vertical line (Fig. 6.42), a straight line segment 10 mm long should be taken as a unit of length and four such units should be set aside along the continuation of the horizontal line (i.e. 40 mm ). Then draw a straight line through the extreme division and the top point of the segment.
Rice.
6.42. Drawing a line along a given slope
The top of the slope sign should be directed towards the slope of the surface of the part. The sign and dimension number are placed parallel to the direction in relation to which the slope is given.
Calculation of the slope angle to the horizon
It can be simply measured with an inclinometer, which is a bar with a frame with a pendulum with an arrow showing the degree value. But today this device is no longer relevant, since there are many drop and electronic inclinometers with much greater measurement accuracy and ease of use.
In the absence of geodetic measuring devices, there is a simple mathematical method that allows you to relatively accurately calculate the angle of inclination of the rafters. To do this, use a tape measure and a plumb line. A plumb line is lowered from the ridge to the floor of the building and the height h is measured. Then, from the point at which the plumb line touched the ceiling under the ridge, we measure the distance to the bottom point of the slope - position l.
The angle of inclination of the roof depends on the material chosen for the roof.
The angle of inclination of the slope i is equal to the ratio of the height of the ridge to the foundation (with the same units of measurement) i = h:l. In this case, the slope is expressed by a ratio that shows to what height the roof rises over the course of a unit of laying (how many meters the upper edge of the roof will be raised on one meter of horizontal flooring). To calculate the same slope as a percentage, multiply the resulting ratio by 100%. If you need to know this value in degrees, we translate it using a table.
For example: roof height h = 3.0 m, laying length l = 6.5 m. Then i = h:l = 3.0:6.5 = 1:2.17. This is an example of measuring slope by ratio. i = 3.0:6.5 = 0.4615. In percentage terms, this value is calculated by multiplying it by 100%: i = 0.4615. 100% = 46.15%. To determine the angle in degrees, we translate from the table and get 25º. If there is a need for a more accurate degree value, then from the resulting ratio, using a calculator or special tables, we calculate the cotangent, which will be equal to 24.78º.
It should be noted that a slope of 100% is when the roof height is equal to the pitch, that is, it corresponds to a 1:1 ratio or a slope angle of 45º. But you should not think that the percentage value of the slope and its degree value have a direct relationship. After all, the percentage slope is the value of the tangent of the angle at the bottom point of the slope, multiplied by 100%, and the graph of the tangent (tangent) has never been a straight line. And if 100% is 45º, then 50% is not 22.5º, but about 27º (more precisely 26.56º).
https://youtube.com/watch?v=kpnzjnJhgbQ%26feature%3Dshare%26list%3DPLxGukzvbwLed88MOnNdM0yBnuDYcVUW8H%26index%3D4
Standards for ramps 2022
According to the standards of SP 59.13330.2016 (taking into account the changes that came into force on May 15, 2022), the ramp must have the following characteristics:
List of documentation recommended for review:
- SNiP 35-01-2001 contains regulations for the adaptation of residential buildings and socially significant facilities for people with limited mobility. As well as specific restrictions on the installation and parameters of ramps.
- GOST R 51261-2017 contains technical requirements for stationary support devices.
- SP 30-102-99 contains requirements for the entrance area.
- SP 59.13330.2016 contains regulations on the accessibility of buildings and structures for people with limited mobility
The angle of inclination of the ramp should not exceed the slope in the ratio of 1:20 (5%). In this case, percentages are often confused with degrees. As a result, the ascent/descent is many times higher. The angle of inclination is the ratio of length to height of lift.
Remember! When the height difference is more than three meters, lifting devices are used instead of ramps. In this case, the presence of a ramp will be useless and inaccessible to a wheelchair user.
Reference! In some cases, a slight increase in the angle of the ramp is allowed:
- During the temporary construction of a ramp (repair or reconstruction of a building). If its height does not exceed 0.5 m, and the gap between the platforms is no more than 6 m, the slope can be 8% or 1:12
- If the lift height does not reach 0.2 m, the slope is permissible in a ratio of 1:10 (10%).
- The length of the continuous movement of the ramp march should not exceed 9.0 m, then it is necessary to organize a turning area or rest area.
- The length of the horizontal platform of the straight ramp must be at least 1.5 m.
- Ramps must have double-sided fencing with handrails at a height of 0.9 and 0.7 m.
- The surface of the ramp should have a non-slip texture.
- The surface of the ramp should visually contrast with the horizontal surface at the beginning and end of the ramp.
Determining slope during construction work
Roofing specialists are often faced with the need to measure roof slopes. Knowing these parameters allows you to choose the type of materials that will be used, check with the recommended values for buildings, and choose the method of roofing work.
In order not to perform complex mathematical calculations every time, a special tool was developed called an inclinometer. This device is quite simple. A special frame is attached to the rail, inside which the pendulum is fixed; it has a weight and a pointer. The rail is installed in a horizontal position on the roof section being measured and the numerical value of the slope is determined on the scale using the indicator.
If you know the value of the roof slope in degrees, you can convert it into percentages using special tables. They already contain percentage values for each angle from one to forty-five degrees.
Tips in the article “Types of laminate installation” here.
How to cut rafters at the right angle and the right size, watch the video:
What factors influence the choice of roof slope?
Despite the fact that humanity is constantly developing and no longer depends on natural circumstances, it is still these conditions that often influence the choice of inclination.
Atmospheric precipitation, the accumulation of which threatens roof failure or the appearance of dampness and fungus.
If constant rains, downpours, thunderstorms and snowfalls are common in a given region, then the roof slope should be increased. Quickly ridding the roof of water is the key to the longevity of the structure.
In regions with strong winds, such as the steppes, it is more important than ever to find a middle ground. The wind can simply overwhelm a roof that is too high, or tear off a flat one.
The most optimal roof slope is from 30 to 40 degrees. In regions with strong gusts of wind - from 15 to 25 degrees.
When choosing a roof slope, it is imperative to take these two serious factors into account. Having understood this issue, further work on the flooring will be significantly simplified.
According to GOST and SNiPs, which are in force on the territory of the Russian Federation, the roof angle should be measured only in degrees. In all official data or documents, only degrees are used. However, it is easier for workers and builders “on the ground” to navigate in percentages. Below is a table of the relationship between degrees and percentages - for more convenient use and understanding.
Using the table is quite simple: we find out the initial value and correlate it with the desired indicator.
There is a very convenient tool for measuring called an inclinometer. This is a rail with a frame, in the middle there is an axis and a division scale, to which the pendulum is attached. At a horizontal level, the device shows 0. And when used vertically, perpendicular to the ridge, the inclinometer shows a degree.
In addition to this instrument, geodetic, drip and electronic instruments for measuring slope are also widely used. The degree of slope can also be calculated mathematically.
To calculate the slope angle, you need to find out two values: B - vertical height (from the ridge to the eaves), C - position (horizontal from the bottom point of the slope to the top). When dividing the first value by the second, A is the slope angle in degrees. If you need a roof angle percentage, refer to the table above.
What indicators affect the slope of the stairs?
As has already been noted more than once, the slope of the stairs is influenced by the width and height of the steps. Low steps and a wide tread provide a flatter, but at the same time more bulky design, respectively, higher and narrow steps allow you to use less space, since the maximum angle of rise of the staircase increases.
It is believed that the optimal step height is 15-18 cm . A higher value leads to difficulties when moving, and a lower value leads to inappropriate enlargement of the structure.
The width of the tread directly determines the effective depth of the steps. It is selected based on the average step length of users and the technical capabilities of the room. Recommended width 27-30 cm .
Almost all design features of the product are determined by GOST 23120-78 “Flight stairs, platforms and fences”.
Which roofing material to choose
Roof coverings vary in structure, strength, and price range. Yet the most important criterion for choosing a material is its structure. The rougher the surface, the longer precipitation will linger on the roof.
There are several types of roofing material that affect the determination of the amount of slope.
- Roofing from roll bitumen materials is used with a minimum roof slope of 0 to 3 °. Roll roofing is quite easy to use and has several advantages: flexibility, strength, thermal insulation.
- With a roof slope of 4° or more, a seam roof is used, which has an increased degree of wear resistance and strength. This is due to the fact that this material consists of polymers.
- Slate coating is usually used from 9 °.
- Various types of tiles (ceramic, bitumen, metal and cement-sand) are used if the angle of inclination exceeds 11 °. Tiles, in particular metal ones, are one of the most popular types of roofing today, since their use is possible in various climatic conditions.
- Above 39°, wooden roofing is usually used, but such material requires constant attention and proper care.
In order for your roof to be built correctly and last a long time, it is not necessary to seek the services of specialists. It is enough to correctly calculate the angle of inclination of the slope and select the appropriate material.
Watch the video and find out what the roof should be like
When creating design documentation, very often the slope is indicated not in degrees, but as a percentage. This allows you to avoid problems with the installation of the finished structure.
The slope in degrees is calculated for steep roof slopes, so it will be more convenient. But when we are talking about a small angle, then using percentages to indicate the slope value will help to avoid errors in calculation and installation.
To find out the percentage value of the slope on a plot of land, you can use the following methods:
- The simplest and most accurate way to determine the slope angle is leveling. Using a special device, all the necessary quantities are measured and simple calculations are made using a simple ratio. The height difference is divided by the distance, then the result is multiplied by 100%. Modern levels are equipped with built-in memory, which greatly facilitates the work of measurers;
- You can measure the slope on your own site without using expensive equipment. Site plans or topographic maps often indicate elevations. These places are marked on the land plot, pegs can be used for this purpose, then the distance between them is measured with a surveying compass. Mathematical calculations are made according to the same scheme as when working with a level;
- Using the interpolation method, the percentage slope value can be calculated from the topographic map. To do this, the difference in elevations is also determined, which is divided by the distance and multiplied by 100%.
Dimensions of stairs in a private house. Calculation of staircase dimensions
In this article we will analyze what a comfortable staircase is: configuration, length, width of steps, step height, angle of elevation and opening parameters, which you need to think about when designing a house .
*All unfamiliar terms from this article can be found in our dictionary.
Example 1: 17-stage design:
We start from four standard indicators of a comfortable staircase:
- Step height - 180 mm
- Step tread (the place where the foot stands) - 300 mm
- Staircase width (step length) - 1000 mm
- The slope of the stairs is no more than 40 degrees
For example, let's take the most popular lifting height:
- The height from the floor of the first floor to the floor of the second floor is 3060 mm.
- Height from ground floor floor to ceiling 2750 mm
Taking into account the overlap of 75 mm, the working part of the steps will be 225 mm.
Let's calculate the required number of steps to rise to a given height. To do this, divide the height from the floor of the first floor to the floor of the second floor by the lifting step (step height):
Number of steps = 3060/180=17
The center-to-center distance of the modules is 225 mm, that is, if you look from above, then without overlap we are left with only the upper step, which occupies 300 mm.
Let's calculate the length of a straight staircase of 17 steps:
Occupied floor space = (16*225) + 300 = 3900 mm
*It is worth considering that the upper step can be attached one step below the floor level and the floor will be the last step, therefore, on such a ladder it will be possible to climb 17 steps of the ladder and one floor step = 3060 + 180 mm.
Calculation of the minimum opening for the stairs:
For any staircase, an opening comparable in size to the dimensions of the staircase itself is sufficient, but we need to know the dimensions of the most compact opening for comfortable movement. To do this, you need to understand at what height we rest our heads on the ceiling when climbing.
As stated in the condition, the height from floor to ceiling is 2750 mm, with a step step of 180 mm, we can rise outside the opening by only 4 steps:
Height at the fourth stage = 180*4 = 720 mm
Distance between the ceiling and the fourth step = 2750 - 720 = 2030 mm
From the length of the staircase 3900 mm, we subtract the space on the floor, which is occupied by 4 steps, and we obtain the required opening length:
Staircase opening length = 3900 - 225*4 = 3000 mm
Conclusion on a staircase of 17 steps:
As can be seen from the calculations of the dimensions of the staircase, to install a comfortable straight structure at a height of 3060 mm, we need 17 steps with a pitch of 180 mm and an opening 3000 mm long. The angle of inclination in this design is 38 degrees, and the length is 3900 mm.
Example 2: removing 2 steps
In order to better understand how the parameters of the opening and the staircase depend on each other, let’s consider another example and reduce the cost of our design by removing two risers, after which we will design a staircase of 15 steps without changing the height:
Let's calculate the resulting step of the stairs; to do this, divide the height of the rise by the number of steps:
Step of a staircase of 15 steps = 3060/15 = 204 mm
Because If we have 2 steps less than in the previous example, then the distance along the floor of the staircase will also take up less:
Floor distance = (225*14) + 300 = 3450 mm
The height from floor to ceiling remained unchanged, but the step pitch changed and now between the fourth step and the opening remains:
Distance between the fourth step and the ceiling = 2750 - (4*204) = 1934 mm.
This height is enough for a tall person to move comfortably.
As in the previous example, we calculate the required opening length for such a staircase:
Construction opening length = 3450 - (225*4) = 2550 mm
Conclusion on a staircase of 15 steps:
As can be seen from the second calculation, when one value changes, all the others automatically change, that is, the staircase is individual for each room. This design will not be as comfortable as the previous one, because the most comfortable stairs have a pitch of 160-180 mm. The tilt angle in this example is 41 degrees.
Let's calculate the dimensions of a turning staircase in a private house in the same opening. Because a design with winder steps takes up less space than a staircase with a landing, so we will design exactly that.
As can be seen from the project, on the turning side, free space is required for 4 steps 4 * 225 = 900 mm.
That is, with the same length and width of the opening, we can change the configuration of the staircase. The main thing to remember is that the center distance is 225 mm.
Slope calculator
Slope calculator
will help you calculate the slope, elevation or distance at the right time without any problems.
The calculator can calculate the roof slope
.
pipeline slope
.
slope of the stairs
.
road slope
, etc. It is also possible to calculate the elevation between points or the distance from point to point (useful in geodesy).
Operating procedure:
1. Select the value that you need to calculate2. Select in which unit of measurement you want to set/calculate the slope (3 types to choose from: degrees, ppm, percent)3. Set the 1st unknown4. Set the 2nd unknown5. Click the “Calculation” button
For reference:
- slope in degrees is calculated using the tangent of the angle:
tgx = h / L
- slope in ppm is calculated using the following formula:
x = 1000 * h / L
- slope in percentage is calculated using the following formula:
x = 100 * h / L
Slope calculator
created as an addition to the main online calculations on the site, and if you liked it, then do not forget to tell your friends and colleagues about it.
Roof slope and its importance in building houses
Driving past populated areas, we often look at the roofs of houses and buildings. Some resemble the steep slopes of Elbrus, others resemble the sloping slopes of the Far Eastern hills. Why do the floors have such different slopes? The slope of the roof contributes to the rapid removal of precipitation from the territory of the structure and is measured by the angle between the plane of the roof slope and the horizon plane. The greater the slope angle, the steeper the roof, and vice versa, as it decreases, the roof becomes more sloping or flat until it becomes horizontal. Architectural professionals measure this angle in degrees (º), percentage (%) or numerical ratio. If the angle is very small, then use the measurement in ppm (hundredths of a percent). For reference: 1º - 1.7%; 1% - 34′ 20″.
The slope of any roof is a very important element. Its value is calculated depending on the climate and the roofing material used.
The slope of the plane of any part of the roof is a very important element in house construction, and its value is selected depending on the climate and the roofing material used. It affects its reliability, tightness, the possibility of drainage, and therefore the durability of the building as a whole. To correctly select the roofing material, as well as to calculate its consumption and the height of the structure, you need to know how to calculate the roof slope.
Why do you need to know the angle of inclination?
The design documentation of buildings takes into account a huge number of individual factors, while specialists try to take into account the maximum number of customer requirements. But only under one condition - their wishes do not have a negative impact on the strength and reliability of structures and meet the existing regulatory requirements of state standards
The roof is considered one of the most important elements of any building or structure; during its design, the first place is not design, but safety, reliability and durability. In modern buildings, the roof not only protects it from precipitation, but also prevents the loss of thermal energy.
Calculation of slope for an apartment
To install a sewer system for a sink, washbasin and bathroom, you need to choose pipes with a diameter of 40-50 mm. There should be a slope of no more and no less than 2.5-3.5 cm per meter. The minimum value of the slope coefficient per meter is 0.012, and the standard value is 0.02. For a toilet, the required slope is 85-100 mm, and for a common riser - 100 mm. To calculate the slope coefficient, the formula is used:
V*√(H/d)>K,
where K is the coefficient for plastic and glass pipes 0.5, and for others 0.6,
N is the coefficient of how quickly the pipeline fills,
V is the speed of fluid movement along the line,
D is the internal diameter of the pipe.
To correctly set the level of inclination of the pipe in the apartment, it is enough to use a regular ruler.
How to calculate occupancy levels
For plastic and cast iron pipes, it is mandatory to calculate the level of water filling. Thanks to this indicator, you can find out at what speed the water should move so that it cannot become clogged. And of course, the exact value of the slope per meter depends on this indicator. To calculate the filling rate, you need to divide the water level in the pipe by the diameter.
The minimum indicator according to SNIPA is 0.3, and the maximum is 1. But, in practice, this occupancy rate is in the range of 0.3-0.6. It is the optimal one.
What should the slope be?
How to understand what a pipe slope is? In SNiP it is written in fractions - in the form of decimals. It will look like this: 0.03 or 0.008. The numbers are deciphered as follows: this is the difference in heights of the two ends of a meter-long piece of laid sewer pipe. The number 0.03 means that one end of the meter pipe is raised by 3 cm. Accordingly, the number 0.008 means that one edge is raised by 0.8 cm or 8 mm.
Recommended slope of sewer pipes of different diameters (50 mm, 100 mm, 150 mm)
The pipeline is usually much longer than one meter. You can calculate how much higher one end should be than the other by multiplying the selected slope by the length of the pipeline. For example, we will lay a sewer with a slope of 3 cm/m, its length is 25 m. This means that its far end will be lowered by 3 cm * 25 m = 75 cm.
Dependence on pipe diameter
Sewage systems are divided into internal - installed in an apartment or house, and external - which are laid on the street. In both cases, it is necessary to maintain the required slope of the sewer pipe. When they say this, they mean the indicator recommended by sanitary standards. It depends on the diameter of the pipes used: the smaller the cross-section, the greater the slope must be given.
| Diameter of sewer pipes | Normal slope | Smallest allowed |
| 50 mm | 0.035 (3.5 cm) | 0.025 (2.5 cm) |
| 100 mm | 0.02 (2 cm) | 0.012 (1.2 cm) |
| 150 mm | 0.01 (1 cm) | 0.07 (7 mm) |
| 200 mm | 0.008 (0.8 cm) | 0.005 (0.5 cm) |
The table shows the slope of the sewer pipe, which will ensure normal operation of the system. If for some reason it is not possible to make the required slope angle (this happens in areas with complex terrain), the slope angle can be reduced to the specified limit norm. The chance of getting problems increases, but not much.
What to do if the slope is greater than required
Sometimes it is not possible to make the required slope - conditions vary. In this case, there are two solutions:
- Lay the pipe as best you can (but the difference per meter should not be more than 15 cm per meter) and hope that everything will work. If there is a large slope, it is recommended to install tees with upward bends on the route after a while - so that it is possible to clear blockages. The likelihood of their formation at large slopes of the sewer pipe is high.
- Lay the pipe with the recommended slope in such an area where this is possible, then install a drop well, and again take the pipe out of it at the required slope. Several such wells may be needed.
The first option is a cheaper device, but it involves frequent blockages in the pipes. Of course, with intensive use of sewerage (large amounts of water), there may be no problems, everything can work without problems. But this is rather an exception. By the way, when using plastic pipes, the likelihood of blockages becomes lower - they have smooth walls, on which precipitation rarely forms. The second option is more expensive and labor-intensive, but it guarantees the functionality of the system.
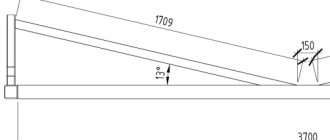
Ramp calculator
In accordance with SP 59.13330.2016 “Accessibility of buildings and structures for people with limited mobility. Updated edition of SNiP 35-01-2001" "The maximum height of one rise (flight) of the ramp should not exceed 0.45 m with a slope of no more than 1:20 (5%). If the difference in floor heights on the traffic paths is 0.2 m or less, it is allowed to increase the slope of the ramp to 1:10 (10%).”
| Ratio | Interest | Degrees |
| 1:20 | 5% | 2,9° |
| 1:12 | 8% | 4,8° |
| 1:10 | 10% | 5,7° |
Calculator to calculate surface length (mm) based on an angle of 4.76°
Enter the parameters of the future ramp based on the object data. Parameters must be entered in millimeters. Click the "calculate" button. The length of the inclined platform is calculated in millimeters. You will also receive recommendations regarding the parameters that you have obtained.
The main current regulatory document for determining the slope of a ramp and its length in the Russian Federation is SP 59.13330.2016 “Accessibility of buildings and structures for people with limited mobility”
For a flight height of up to 800 mm, the swing angle is 2.86°. For a flight height of up to 200 mm, the swing angle is 5.71°. For temporary structures with a flight height of up to 800 mm, the swing angle is 4.76°.
A ramp is a device for adapting socially significant objects and open spaces: entrance to a building, accompaniment of stairs, pedestrian crossing, etc. A ramp is necessary to make the life of people with limited mobility more comfortable: elderly people, with a stroller or heavy luggage, with crutches after injuries, wheelchair users.
The active development and promotion of the federal program “Accessible Environment” has encouraged many organizations to install ramps at the entrance. However, this is often done either for show, or by organizations that do not have the skills and knowledge of existing standards. Therefore, the finished product does not always meet state standards. The result is inaccessibility for people with disabilities.
Methods for calculating percentage slope
To find out the percentage value of the slope on a plot of land, you can use the following methods:
- The simplest and most accurate way to determine the slope angle is leveling. Using a special device, all the necessary quantities are measured and simple calculations are made using a simple ratio. The height difference is divided by the distance, then the result is multiplied by 100%. Modern levels are equipped with built-in memory, which greatly facilitates the work of measurers;
- You can measure the slope on your own site without using expensive equipment. Site plans or topographic maps often indicate elevations. These places are marked on the land plot, pegs can be used for this purpose, then the distance between them is measured with a surveying compass. Mathematical calculations are made according to the same scheme as when working with a level;
- Using the interpolation method, the percentage slope value can be calculated from the topographic map. To do this, the difference in elevations is also determined, which is divided by the distance and multiplied by 100%.
10.6. Determination of the boundaries of the drainage area and the flood area
A drainage area is the area from which precipitation water flows to a given drainage point. In Fig. 10.6 shows the AB dam on a horizontal plane with a height of 185 m with a water surface (indicated by shading). It is required to show on the plan the boundary of the area from which precipitation water flows to the dam.
The boundary of the drainage area is shown by a dotted line, which follows the CDDMEF watershed lines. To do this, first, in the upper reaches of the valley, they find the middle of the M saddle and the tops of the hills adjacent to it. From the watersheds to the dam, the boundary runs perpendicular to the horizontal lines. The map also determines the flood area - the area that is flooded with water as a result of the construction of an artificial reservoir. The work begins with mapping the position of the dam, taking into account the water level in the future reservoir. The condition will be met if, at the site of construction of the dam, the horizontal lines of the same name with a given height are connected on the opposite slopes of the watercourse. The flood area will be limited to the horizontal line closed by the dam (Fig. 10.7).
If the contour marks do not correspond to the level of the future reservoir, then to determine its contour, points with a given height are found by interpolation, which are then connected by a curve
You should pay attention to the features of delineating the drainage area of a river and a reservoir: for a river the boundary is closed at its mouth, for a reservoir - at the ends of the dam