The most reliable way to organize water supply for a country house is to connect the internal water supply network to the existing system.
But it is not always possible to shut off the main water supply, so the question arises about making a connection to the water supply under pressure. This operation can be performed either with or without welding. But in any case, such work must be carried out by qualified specialists if they have special permission and a formalized permit to carry out the connection.
Steel pipe installation
Pipes made of steel are characterized by their rigidity and simultaneous plasticity. Their installation can be carried out in a manner similar to inserting polymer analogues. When working with them, you must follow a certain sequence of actions:
- the surface of the area for insertion is cleaned of corrosion deposits;
- a pipe is mounted on it;
- The seams are welded and then checked for leaks;
- the pipe is connected to a threaded or flanged valve, through which the main pipe is drilled under pressure;
- installing a new pipeline branch.
The upper layers of the main are drilled using a hammer drill, and the remaining few millimeters are worked out manually.
Required materials when connecting to the central pipeline
Depending on the material of the water pipe, it may be necessary to use certain additional pieces of equipment.
To cut into a plastic pipe with a pressure of about 1.6 MPa, it is necessary to use a ring saddle clamp. This device contains a spiral with a cutter, used when forming a hole
When purchasing a saddle for tapping into a water supply system, you should pay attention to the barcode marked on its body. It ensures the accuracy of the parameters of the created hole
To tap into a cast iron or steel pipe, you need to buy a saddle clamp. This device is divided into two parts, which are tightened with bolts during operation. The metal saddle is equipped with a locking plate.
It is mounted to the pipeline with a bracket. Insertion into a steel water supply can be carried out without the use of a saddle by welding the pipe, however, with this method, the diameter of the main pipe matters, which must have a large cross-section.
Today, thanks to their reasonable price and excellent quality, saddles with built-in valves and a cutter have gained great popularity among specialists. They are usually used when inserting into a pipeline under a pressure of no more than sixteen bar.
They are equipped with a coupling, which allows installation with a welding machine. The most attractive feature of such saddles is their good resistance to corrosion processes, extending their service life to fifty years.
The final stage of the tie-in
The final step in any pipeline connection process is to test the connected system components.
For this purpose, water under pressure is supplied to the created new branch, and the accumulated air is released from the other end of the pipe using a tap placed on it.
After checking all elements of the water supply system for leaks, you can dig a trench laid from the main line to the point of connection with the home network.
How to choose materials for insertion
Connection to the main water supply is made using pipes made of various materials - polyethylene, cast iron, steel, including those with protective coatings.
When using cast iron materials, its properties should be taken into account, especially such as increased fracture capacity. It is necessary to choose pipes made of spheroidal graphite cast iron, which is more ductile, and during the processing process do not apply significant force to the tool.
The pipe used for tapping must be smaller in diameter than the main pipe.
Watch the video
5-2 Insertion of cold water into the city water supply network
The connection is made with pipes measuring 50 millimeters or more.
When connecting to a plastic pipeline, products with built-in heating elements are used that can thermally make a hole, while at the same time a calibrating cutter is installed to obtain an accurate joint.
At pressures up to 1.6 MPa, saddle clamps are used in the plastic line, creating uniform pressure over the entire contact area, which prevents deformation of the plastic product.
The use of saddles with a built-in cutter and check valve allows welding in the connection, after which the service life of such an insert increases to 50 years.
The cost of tapping into a water supply system
The price tag for a polymer clamp is 100–250 rubles. In this case, a fitting installed on a pipe with a diameter of 32 mm will cost 100 rubles, and for 75 mm fittings – 250 rubles.
The cost of a stainless steel clamp, complemented by a flange outlet, is 9–10.5 thousand rubles. The delivery set of this equipment includes a rubber gasket and 6 studs that provide the ability to fix the staples.
Electric welded saddles produced by the Italian company Eurostandard Spa, having a diameter of 40–250 mm, can be purchased for 25–80 euros. As for the cost of work, the average price tag for services of this type ranges from 2 thousand to 2.5 thousand rubles.
Step-by-step introduction to the internal network
If it is necessary to cut into an old steel pipeline, then the main method is to arrange a branch by welding a tee. This will require a large amount of work.
If a pipe made of plastic or its derivatives is connected to the main line, then you will need to cut out a section of the pipe taking into account the size of the tee being mounted. But when performing such work, inconvenience arises due to the close distance between the network and the wall of the building.
A simpler method of installing a branch is to insert a pipe with a curved flange. A consumable with a pipe whose diameter corresponds to the pipeline dimensions is preliminarily rejected. The section is cut lengthwise so that its part with the pipe fits tightly onto the pipeline as its other wall.
The previous blank is placed on the pipe with the hole. The fixation site is treated with sealant. The resulting flange is tightened with 2 clamps on the sides relative to the pipe. Subsequently, the remaining part of the network is fixed to the pipe.
On the modern plumbing market you can buy adapters, special saddles and other devices with which the insertion is made (regardless of the conditions for laying the network).
If a saddle is used, the pressure in the system does not change. A saddle is a clamp made of 2 parts. Using bolts, these parts tightly compress the consumable on both sides. The tap is fixed to the saddle using a special connection.
If the diameter of the hole is no more than 1/3 of the diameter of the pipe, then it is drilled with a special device. He joins the tap in time. If the hole is ready, the tap is closed and the device is dismantled. An outlet pipe is mounted to the installed tap.
To connect the house, a saddle with a valve and a built-in cutter is used. For its installation you will need sleeve welding. A similar product is used for pipelines whose pressure does not exceed 16 bar. During installation, the line is not blocked, and when drilling pipes there is no leakage and no chips are formed. The connection does not corrode and has been in use for more than 50 years.
How to connect to a public water main
Before cutting into a water pipe under high fluid pressure, familiarize yourself with three technology options, which vary depending on the material from which the pipes are made (they can be polymer (PP), cast iron, galvanized steel).
For a polymer central route, an insertion into a water supply pipe under pressure looks like this:
- A trench measuring at least one and a half meters is dug, the area where the work will be carried out is exposed, and a trench is dug from there to the house;
- At the end of the excavation work, a saddle is prepared for insertion into the water supply system - this is a collapsible crimp clamp that looks like a tee. The straight branches of the saddle are divided in half, and a tap is installed on the vertical branch to shut off the pressure. Using a special nozzle, a pipe is drilled through the tap for tapping. The most reliable saddle design is a collapsible welded one. Such a clamp can be easily divided into two halves, assembled above the insertion area, and connected by welding to the main route. Thus, the clamp for tapping into the water supply is welded into the body, providing a reliable and completely sealed water supply to the housing;
- The pipe is drilled with a conventional drill and electric drill. Instead of a drill, you can use a crown, but the result is important, not the tool;
- A through hole is drilled until a stream of water comes out of it, after which the drill is removed and the valve is closed. For safety reasons, at the end of the drilling process, the electric tool is replaced with a hand drill or brace. If you drill a hole not with a drill, but with a crown, it will automatically ensure the tightness of the drilling site. In addition to these options, there is a solution using a special cutter, which is rotated with an adjustable wrench or an external brace;
- The last stage of inserting into the central water supply system is to install your own water supply system, laid in the trench in advance, and connect it to the central route with an American crimp coupling.
To fully control the insertion site, it is advisable to arrange an inspection above it - a well with a hatch. The well is set up in a standard way: a gravel-sand cushion is made at the bottom, reinforced concrete rings are lowered into the trench, or the walls are laid out with bricks. Thus, even in winter it will be possible to shut off the water supply if it is necessary to repair it in the house.
For a central water supply pipe made of cast iron, tapping using the saddle method looks like this:
- To tap into a cast iron pipe, it must first be thoroughly cleaned of corrosion. At the very point of drilling, the top layer of cast iron is removed by a grinder by 1-1.5 mm;
- The saddle is built into the pipeline in the same way as in the first point, but to completely seal the joint between the pipe and the crimp, a rubber seal is laid;
- At a further stage, a shut-off valve is attached to the clamp nozzle - a tap through which the cutting tool is inserted.
- Next, the body of the cast iron pipe is drilled, and do not forget about the need to cool the cut site, as well as change the crowns in a timely manner.
- A hole is drilled for insertion into the main water supply using a carbide or diamond bit;
- The last step is the same: the crown is removed, the valve is closed, and the insertion site is scalded with special electrodes.
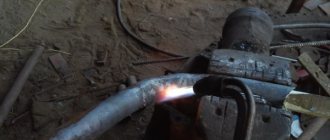
A steel pipe is a little more ductile than a cast iron one, so pipe insertion is carried out using a method similar to the solution with a polymer main, but a saddle is not used, and before inserting into a galvanized steel water supply, the following steps are carried out:
- The pipe is exposed and stripped;
- A pipe made of the same material as the main pipe is immediately welded onto the pipe;
- A shut-off valve is welded or screwed onto the pipe;
- The body of the main pipe is drilled through the valve - first with an electric drill, the last millimeters - with a hand tool;
- Connect your water supply to the valve and the pressure connection is ready.
Connection to the main pipeline
When working with a main pipeline in which it is not possible to drain water, you must proceed as follows:
- First, get to the insertion site by digging out a significant layer of soil.
- Make a cut.
- Completely install the water supply circuit from the embedded element to plumbing fixtures or other objects.
Excavation work usually involves digging a pit of 150x150 centimeters. It is important to ensure that the bottom of the pit is slightly lower than the pipe (about 50 centimeters). Work can be carried out using an excavator, but no more than to a depth of 30-50 centimeters from the pipe itself, and then shovels are used. The location of the insertion point in the well greatly simplifies the work.
When using a “saddle” or a collapsible clamp, you need to puncture the reinforcement. This technology is similar to a tee on a water pipe, more familiar to inexperienced plumbers. A shut-off valve is screwed onto the side outlet, acting as a plug after a hole appears in the line. Read also: “Types of saddles for HDPE pipes, mounting and installation options.”
When working with plastic pipelines, it is permissible to use single saddle clamps or a combination such as a saddle-clip.
Polymer materials are best processed using an electric-welded collapsible clamp. Two parts of this design are mounted clearly at the insertion site, then soldered to the pipe. Such a connection has increased strength and absolute tightness.
The process is completed by diverting the side pipe from the clamp valve to the flow meter installed in the house.
Options for inserting into a plastic pipe
Let's look at how to cut into a plastic water pipe in different ways: by crimping a clamp with an overlay, connecting a manifold or tee, installing an electric welding saddle, and ensuring the cut through a pipe.
Installation of the trim clamp
This unit consists of two parts secured with clamps and bolts. The upper part is attached to the pipe through a sealing gasket that prevents water leaks. For good clamping, both parts of the pad must be selected to the appropriate size according to the markings.
In the first upper part there is a technological hole for connecting a new water supply line.
Possible connection via:
- Stopcock element,
- presence of a built-in cutter and safety valve,
- metal end in the form of a flange,
- Possibility of plastic end for gluing.
After placing the clamp with pads, I direct the upper part towards the planned branch of the new line. The assembly is fixed with bolts, which are pre-selected in size taking into account the diameter of the assembly. A special device is used to drill a hole in the line through the pipe of the mounted fitting.
This method also allows you to connect pressurized water to a plastic pipe. To do this, a built-in valve is installed in the unit, turning which drills a hole. After obtaining the desired result, the valve closes and the cutter rises.
This is a very beneficial way to solve water connection problems in cases where it is not possible to stop the water supply or it is extremely inconvenient. This solution simplifies the procedure and makes it possible to carry it out online.
Clamp or collector device
Installing a tee can be called a classic solution to the problem. Together with the installation, prepared by removing part of the pipe from both sides, a separate part is mounted in the form of a tee or manifold. Next is soldering.
Electric welding saddle attachment
This mechanism resembles the method of attaching the lining described above, but with differences. It, just like a tee, provides a tight and reliable fastening through soldering at the molecular level of the material.
This is achieved by installing electric heating coils in plastic, which are welded with a special welding device that has a program configured for each unit to prevent overheating. After which the plastic, heated to a certain temperature not exceeding the critical temperature, sticks to the plastic and ensures tight and strong contact.
Insertion through a pipe
A good method for low pressure pipes. The principle of fastening is that it is installed on pipes using a pipe and a clamp, without welding. The elements of the device of the required diameter are selected, otherwise the unit may leak water. The fastening will allow you to quickly and easily install the outlet.
Choosing the best solution
Without a doubt, the most versatile and effective method, given the complexity of installing the unit, is overlays. Compared to other methods, it provides reliability and flexibility in installation.
Joining of profile pipes
The most affordable way to connect profile pipes is by installing fastening clamps. Using these simple devices, it is convenient to assemble any type of small-sized metal structures, erecting canopies and shelving, greenhouses and fences, canopies and modular partitions.
The use of fastening clamps makes it possible to ensure the connection of pipeline elements, the stability and strength of which is not inferior to welded
The undeniable advantage of using fasteners is ease of installation and the ability to disassemble the assembled structure an unlimited number of times.
To implement this method you will need only three components:
- Rolled pipes cut to size.
- Required number of fastening clamps.
- Wrench.
Crab clamps can be “X”, “G” and “T”-shaped elements, with the help of which it is convenient to join straight sections of pipes, corner structures and simultaneously connect up to four segments within one unit.
When assembled, they have the shape of a square or rectangle, the sides of which tightly fit the joined parts of the metal pipes.
Crab clamps are made from galvanized or powder-painted sheet metal having a thickness of 1.5 mm
Fastening with crabs should not cause any particular difficulties. Anyone can insert the cut pipes into the clamp and secure the clamping sticks by tightening the bolts on the system.
But this method can only be used for profile pipes with a cross-section of no more than 20 x 20 mm, 20 x 40 mm and 40 x 40 mm. In addition, joining of elements can only be done at right angles.
You can connect square pipes without welding by installing fittings of a given profile.
For joining and inserting pipes, an adapter coupling is used, the diameter of which is one unit larger than the cross-section of the structural elements being joined
There are several types of fasteners in the form of fittings:
- Couplings - at joints on straight sections.
- Crosses and tees - for installation in branching areas;
- Elbows and turns – if it is necessary to change the direction of the pipeline.
With the help of fittings, you can obtain a fixed fastener, the only vulnerable point of which is the susceptibility to corrosion, which is typical for the ends of the joined elements inserted into it.
This situation occurs as a result of the accumulation of condensate inside the fastener. It will cause rusting if the metal pipes are not treated with an anti-corrosion compound.
Detailed description of the main stages of work: insertion into the water supply system
When deciding how to make a tap into a water supply system without turning off the pressure in the central system, you need to carefully familiarize yourself with each stage of the work. First, you need to calculate the route of the pipes. The optimal depth for them is considered to be 1.2 m. The pipes should go straight from the central highway to the house.
Materials: cast iron and others
They can be made of the following materials:
- polyethylene;
- cast iron;
- Cink Steel.
Artificial material is preferable, since insertion into the water supply system will not require welding in this case.
To simplify the work, a well (caisson) is built above the insertion site. To do this, the pit is deepened by 500-700 mm. A gravel cushion is poured at 200 mm. Roofing material is rolled out onto it, and concrete 100 mm thick is poured with a 4 mm reinforcement grid.
A cast plate with a hole for the hatch is installed on the neck. Vertical walls are coated with a waterproofing substance. At this stage, the pit is backfilled with previously selected soil.
The canal is dug manually or using an excavator. The main thing is that the depth meets the requirements of the project. It is located below the soil freezing limit in this climate zone. But the minimum depth is 1 m.
It is better to use artificial material for insertion
DIY installation in 7 steps: clamp, saddle, sewerage diagram, coupling
The installation process uses the following technology.
- The device for tapping under pressure is located in a special lining of the clamp. This element is installed on a pipe that has been previously stripped of thermal insulation. The metal is rubbed down with sandpaper. This allows you to remove rust. The cross-sectional diameter of the outgoing pipe will be narrower than that of the central one.
- A clamp with a flange and a pipe is installed on the cleaned surface. A shut-off valve with a bushing is mounted on the other side. The device in which the cutter is located is attached here. With her participation, integration into the overall system is carried out.
- A drill is inserted into the pipe through the open valve and the seal of the blind flange. It should match the size of the hole. Drilling is in progress.
- After this, the sleeve and cutter are removed, and the water valve is closed in parallel.
- The inlet pipe at this stage must be connected to the flange of the pipeline valve. The protective coating of the surface and insulation materials are restored.
- Along the route from the foundation to the main canal, it is necessary to provide a slope of 2% from the tie-in to the inlet outlet pipe.
- Then a water meter is installed. A shut-off valve is mounted on both sides. The meter can be located in a well or in a house. To verify it, the shut-off flange valve is closed and the meter is removed.
This is a general tapping technology. The puncture is carried out in accordance with the type of material and design of the reinforcement. For cast iron, grinding is carried out before work, which allows the compacted outer layer to be removed. A flanged cast iron valve with a rubber-coated wedge is installed at the insertion point. The pipe body is drilled with a carbide bit. What matters here is what material the cutting element is made of. A cast iron flanged valve requires the use of only durable crowns, which will have to be changed about 4 times during the tapping process. Pressure tapping into a water pipe is carried out only by competent specialists.
For steel pipes it is not necessary to use a clamp. The pipe needs to be welded to it. And a valve and a milling device are already attached to it. The quality of the weld is assessed. If necessary, it is further strengthened.
The polymer pipe is not sanded before the pressure tapping device is placed on the puncture site. A crown for such material can be either strong or soft. This is another reason why polymer pipes are considered beneficial.
The next stage involves conducting a test. Shut-off valves (flange valve, gate valve) and joints are checked for leaks. When pressure is applied, air is released through the tap. When water begins to flow, the system is inspected with the channel not yet buried.
If the test is successful, a trench and pit are buried above the insertion site. The work is carried out in compliance with safety regulations and in accordance with the instructions.
This is a reliable, productive method that allows you not to disturb the comfort of other consumers. Work can be carried out in any weather
That is why the presented method is so popular today. Connecting to the water supply is a very important technical event.
Main stages of the procedure
The choice of insertion method depends on the pipe material, operating pressure in the system and its operating conditions. It can be performed at an angle of 45 and 90 degrees, positioned upward or to the side.
Step #1 - determining the insertion area
Before you start cutting into the water supply system, it is necessary to clearly determine the location of the route. The central highway should be located in a straight line.
When determining the depth of a pipeline, they are guided by the level of freezing characteristic of a given area
For mid-latitude regions, this figure varies in the range of 1.2-1.5 meters.
At this stage, it is also necessary to determine what other communications “lie” within the site, so as not to accidentally damage them during the excavation and installation process.
Step #2 - selecting the necessary materials
For connection, pipelines made of polyethylene, cast iron or galvanized steel with a diameter of 50 mm and above are used. Work on highways with pipelines made of polyethylene excludes the use of electric and gas welding.
When working with cast iron, it is worth considering that it is a rather fragile material. Therefore, the pressure on the tool during operation should be minimal, and drilling should be performed at low speeds.
When choosing pipes for tapping, it should be taken into account that the diameter of the outlet pipe should not exceed the size of the one in which the hole is made. To connect to a plastic pipeline, the pressure of which is about 1.6 MPa, saddle clamps are used.
The devices are equipped with a heating coil and a cutter necessary to create a hole. The presence of a barcode on the body of the part allows you to set welding parameters with the required accuracy.
The body of the saddle clamp is made of durable plastic: installation of the device requires the use of additional equipment
To make a tie-in without turning off the water supply on pipes made of asbestos-cement, steel or cast iron, use a saddle or saddle clamp. It consists of two parts and is equipped with bolts, thanks to which it tightly compresses the pipe on both sides. The device is attached to the pipeline using a bracket.
Saddle clamps are made of metal, the modules are equipped with a locking plate or a special mechanism
Recently, clamps are often used, the modules of which are equipped with a cutter and built-in valves. They are used for inserting pipelines with a pressure within 16 bar. Such devices are equipped with couplings and allow insertion by welding.
The main advantage of these clamps is their resistance to corrosion, thanks to which they can last more than half a century. Craftsmen often use drilling clamps to insert pipes under pressure. They are sold complete with attachments and swivel connectors.
The drilling clamp is equipped with a rotary-bolt mechanism, which, after installation, is used as an adjusting or shut-off valve
There are several types of drilling clamps on sale that can be installed on pipes with a diameter of 80 to 300 mm.
You also need to prepare the following tools:
- bayonet and shovel;
- hammer drill with drill;
- cutter device;
- crown;
- Bulgarian;
- a piece of sandpaper.
When choosing a drill diameter, they are guided by the rule of equality of the size of the tool and the internal cross-section of the pipe being cut into.
Step #3 - excavation work
To expose the highway, they dig a pit. It can be dug by hand or using an excavator. But even when performing excavation work using mechanization, as soon as the metal strip laid on top of the highway is exposed, further manipulations should be performed manually.
Having exposed a section of pipe, they begin to dig a trench in the direction of the house. It is laid below the freezing level of the soil.
On the section of the route in the direction from the tie-in into the highway to the entrance of the outlet pipe under the foundation of the house, a slope of 2 degrees should be provided
Any manipulations with a pipeline under pressure require strict adherence to safety precautions and strict implementation of all stages of the operation.
Step #4 - diverting from the main line
Using one of the methods described above, a connection is made into the existing water supply system under pressure. At the final stage, the pipe of the external branch of the water supply system is laid in a trench and connected to the shut-off valve using a crimp coupling.
When diverting a water supply line from the main, the beginning of the new water supply line will be located at the valve of the clamp, and the end - at the water flow meter. The meter, the main purpose of which is to record the volume of incoming water, is positioned so that it is located between the shut-off valves.
The metering device can be placed directly in the cavity of the well, or it can be brought into the interior of the house
To protect the meter from reverse flow of liquid, it is necessary to install a check valve.
If the tap into the water supply involves passing the input through the wall, then during installation a gap should be provided in the structure - a space of 0.2 meters in size. After installation is completed, this space is sealed with waterproof seals or resin strands. To disguise the formed seals, they are covered with a cement finish.
Step #5 - adjusting and testing the system
The correct alignment and connection of all system elements is checked by testing. To do this, pressure is applied to the new pipeline line, and the air accumulated in the system is released through a tap located at the other end of the pipe.
Having made sure that the water supply is tight, all that remains is to bury a trench laid from the point of connection to the house.
Tapping into a pipe under water pressure
To cut into a pipe under pressure, you need one compression connection - a saddle. This connection can be purchased at plumbing stores, but before purchasing, check what diameter of pipe you need to cut into.
We install the clamp on the pipe and tighten the bolts connecting its halves. When tightening the bolts, you must avoid distortions between the halves of the saddle. It is advisable to tighten the bolts crosswise.
Installing a compression connection on a pipe under water pressure.
Afterwards, you need to screw a regular ball valve of suitable diameter into the thread of the saddle. How to choose a high-quality ball valve and open it if it is jammed can be found in this article.
All that remains is to drill a hole in the pipe through the open ball valve.
First, we determine the diameter of the drill. To obtain a good flow of water, it is advisable to drill a hole with as large a diameter as possible. But in this case, the ball valve has its own hole. This hole is smaller than the internal diameter of the tap thread. Therefore, the drill will have to be selected for this hole.
When drilling, it is important not to snag the fluoroplastic seals inside the ball valve with the drill. If they are damaged, the faucet will no longer maintain water pressure.
For drilling plastic pipes, it is best to use feather wood drills or crowns. With such drills, the fluoroplastic seals of the faucet will remain intact and such drills will not slide off the pipe at the very beginning of drilling.
When drilling, you don’t need to worry about the chips; they will be washed away by the flow of water when the hole is drilled.
To drill holes safely and easily there are a few tricks.
Since there is a high probability of getting doused with water while making a hole, it is not advisable to use a power tool. You can, of course, use a mechanical drill or a brace. But it will be difficult to drill metal pipes with them. You can use a cordless screwdriver, even if it is flooded with water, the electric shock will be insignificant. But at one important moment the screwdriver may not have enough power. When the hole is almost drilled and the drill bit is almost through the pipe wall, it can jam in the metal pipe wall. And then the situation will turn out that water is already flowing under pressure onto the tool, but the hole has not yet been drilled to the end. This may not necessarily happen, but it's worth keeping in mind.
Particularly desperate people use an electric drill, but the work is performed with a partner, who unplugs the drill from the outlet when water appears.
To protect the instrument from the flow of water, you can put it in a plastic bag.
A plastic bag wrapped around a screwdriver.
Drilling a hole in a pipe through a ball valve.
Or place a circle with a diameter of 200-300 mm made of thick rubber directly onto the drill, which will act as a reflector. You can even use thick cardboard instead of rubber.
A cardboard reflector placed on an electric drill drill.
There is another simple and affordable way. Take a 1.5 liter plastic bottle. A part with a bottom of about 10-15 cm is cut off from it, and a hole is drilled in the bottom. We put this bottom on the drill with the cut-off part from the drill and with this device we drill the pipe. The bottle must cover the tap. The flow of water will be reflected by a semicircular bottom.
Security
The next stage is carried out by an invited team. Before connecting to the gas pipeline, you need to:
- draw up a diagram of connection angles;
- choose the insertion method, calculate the order and method of reducing pressure, determine ways to maintain the indicator at the desired level;
- calculate and select the required amount of materials, tools, rescue and protective equipment;
- close the taps, valves, plugs on the connected pipe;
- stock up on the required amount of water to prevent fire or fire.
Before insertion, control testing of pipes, connected system and air outlets is carried out.
Methods
Often the material of the water supply pipeline determines both the material of the branch line pipe and the insertion method. If the central or secondary pipe is steel, then it is also better to use a steel pipe. As a last resort, make a transition section in the form of a fitting made of a steel pipe with a valve, to which then connect a pipeline made of another material.
Tapping of steel pipes is done in two ways:
- using a welding machine by welding a fitting to the water supply;
- using a steel clamp without welding.
Both methods are used both when tapping into a pipeline that is under pressure and without pressure. But on high-pressure pipelines, welding is recommended to be used only in emergency, emergency cases, as well as when organizing additional safety equipment. In the normal mode of work, actions are required to completely shut off the section of the water pipeline where the tie-in is made using welding.
The algorithm for working with welding on an existing pipeline is as follows:
- a hole is dug with an excavator to a level above the laid pipeline of approximately 50 cm;
- the section of pipe into which the insertion is planned is manually cleared of soil;
- the insertion site is cleared of anti-corrosion coating and other protective layers, and the specific area of connection of the fitting or branch pipeline is cleaned to shiny metal;
- the fitting is welded to the tap;
- after the metal heated by welding has cooled, a drill is inserted into the fitting through the tap and a hole is drilled in the wall of the water supply;
- when water flows through the fitting, the drill is removed and the tap is closed (the insertion is completed, further laying of the water supply line begins from the valve on the fitting).
A mortise clamp is a simple piece consisting of two halves of semicircular shapes. These halves are put on the pipe and tightened together with bolts and nuts. They differ from ordinary clamps only in the presence of a threaded hole on one of the metal parts. A fitting is inserted into this hole, serving as part of the outlet line. The hole for the pipe can be located anywhere in the water supply system, and when screwing in the fitting, it will always be at right angles to the linear plane of the pipeline surface.
The rest of the process is similar to tapping using welding: a drill is inserted into the fitting through a tap and a hole is drilled. If the tap is of small diameter and the pressure in the water supply is within 3–4 kgf/cm², then the tap can be screwed on without any problems even after drilling (if it is threaded and not welded). Additional lines are also connected to the cast iron main using clamps.
Insertion into pipes made of plastic or polyethylene occurs using plastic clamps or saddles (half-clamp with fasteners). Clamps and saddles can be simple or welded. Working with simple devices is not much different from inserting a clamp into a steel pipe. And welded saddles or clamps contain all the equipment necessary for welding. This saddle assembly is installed on the pipe in the intended location, the terminals are connected to electricity, and after a few minutes the insertion will be automatically completed.
Obtaining permission to carry out work
Considering the importance of the water main as an object for providing a vital product, permission to make a tie-in must be obtained from the local water utility department. The method of execution is not important - with or without welding.
A connection made without permission is considered illegal and is followed by administrative measures with financial penalties.
An approved copy of the site plan is issued by the Federal Center, which registers land ownership, and the technical conditions for connection are formulated by the Vodokanal department. They must contain the following information:
- place of insertion;
- main water pipe size;
- data that may be needed when making inserts.
Such a document can be executed by a specialized design organization, but this does not negate its approval by the water utility.
The document for the production of the insert will be registered at the local sanitary and epidemiological station office. The set of documents submitted to the SES is accompanied by a statement about the need to connect to the central water supply network.
Taking into account all sorts of restrictions, it is obvious that saving money by applying your own efforts is only possible when performing excavation work. The rest can only be performed by specialists with special permits.
Connecting to a water supply under pressure is prohibited under the following conditions:
- the pipeline is made of large diameter pipe;
- in the absence of a connection to the central sewerage system;
- if the tie-in does not provide for the installation of water flow metering devices.
Tap-in technology
Let's consider from a practical point of view how to make a hole in a pipe with water. There are two non-specialized rules when tapping into a pipeline:
- The pipe being cut into must be smaller in diameter than the pipe in which the hole is being made.
- The diameter of the drill must correspond to the internal diameter of the pipe being inserted, which, for its part, must be smaller in diameter than the main pipe.
If you need to cut into an iron water supply, you will need to use a saddle clamp for cutting in with drilling. The saddle clamp is called because its lower part is a semicircle that looks like a saddle. There are a couple of varieties of similar clamps. Before installing this device on the pipe, it must be carefully cleaned of dirt and rust (if any). The clamp, in addition to the “seat,” has a shut-off valve in the upper part with a hole for drilling and a drill. Both parts on the pipe are bolted to each other. The clamp fits well to the surface of the pipe using rubber seals. After securing it, make a hole with a drill until water appears. After this, the drill is unscrewed and the plug is closed with a special screw so that water does not flow out of the pipe. In the future, such a clamp can be used as a shut-off valve. It is also possible to use a clamp with a valve already screwed into it.
Once the hole is ready, the drill is removed and the valve is closed. Now it is possible to do other work on installing the water supply system. It is also possible to attach a special machine to a simple iron clamp, the main elements of which are a handle with a ratchet, a locking bolt, a shaft with a drill at the end, and a flushing tap. All this is enclosed in an iron case and attached to the clamp using rubber seals. The guide sleeve allows drilling in a given direction. It is used to drill iron and cast iron pipes.
To drill a cast iron pipeline under pressure, bimetallic crowns and clamps of a special design are used. The nuance of working with cast iron is that:
- you need to work with light pressure. Cast iron is a brittle metal and does not work well under compression and tension;
- pre-clean the surface of the pipe from a special layer applied to the surface to prevent corrosion;
- Do not allow the crown to overheat;
- work at low speeds.
If you want to cut into a plastic pipeline, then it is better to use an electric-welded saddle clamp. It is made of special plastic, equipped with a heating coil and a drilling mechanism. There is a barcode on the seat body that allows you to accurately enter the required parameters: welding and cooling time, etc. The clamp is bolted to the pre-cleaned pipe. Using a special welding machine, the spiral is heated and the outlet is welded (there are terminals on the clamp for welding connection). Then, an hour after cooling is complete, a hole is made with a special cutter and the shut-off valve is screwed on.
Metal-plastic is used for the most part to distribute water around a house or apartment. Therefore, the diameter of the pipes is small. If there is no inlet valve and it is not possible to shut off the water through special work (housing office, water utility), then to supply water to an additional point you will have to cut in under pressure. The use of clamps in this case is not advisable due to the small diameter of the pipe. How to make such a sidebar? Very simple. You need to prepare a water container, a floor cloth, a tool, a valve and special fasteners. The pipe is cut. The end from which water flows is lowered into a container of water. A nut and clamp are attached to it. After this, a valve is inserted into it in the open position, which is clamped with a nut. Later, after closing the tap, it is possible to continue installation.
Working with cast iron pipelines
A cast iron pipe can be drilled under pressure using special clamps with bimetallic crowns.
It is important to know the following features of this process:
- cast iron is an extremely brittle material, which requires caution from the worker;
- before drilling a pipe, you need to clean it from the anti-corrosion coating;
- it is unacceptable to overheat the crown on the clamp;
- the equipment should operate at low speeds.
After the stripping is completed, it is necessary to install a collapsible type saddle in place of the insertion. This place must be sealed with rubber pads. The pipe itself is drilled with a carbide crown, which simply cannot be replaced during the procedure.
The insertion sequence is as follows:
- The pipe is excavated and cleaned in the right place.
- The top layer of hot cast iron is cut using a grinder.
- A removable saddle is mounted. The joint between the reinforcement and the clamp is sealed using a rubber seal.
- The shut-off valve is then attached to the flange elbow required for insertion of the crown.
- The pipe is drilled with constant cooling of the cutting site.
- The crown is removed, and the water is shut off with a valve.
We must not forget about maintaining a constant slope of the embedded pipe towards the house. We are talking about a value of 2 degrees.
When should you cut into a pipe?
Tapping into the plumbing system is performed in a wide variety of situations. We will not describe them all; we will only note the main directions.
The tapping of the water supply itself should be done in special cases. You can’t just crash into a pipe (especially someone else’s), you must have a special permit for this. It is still possible to operate with private water supply systems without a huge pile of documents, but with public water supply systems things are different.
If the pipe is damaged during the tapping of the water supply, the fine will increase significantly. Provoking an emergency will raise the stakes even further. Well, if an accident happens and it is proven that the pipe was damaged precisely due to the actions described above, then the consequences for the defendant will be very sad.
The moral here is that if you are planning to crash into a main or central canal, then you can act only after you have all the permits, and act carefully.
Permitting documents
Tapping into a water supply system on your own property does not require obtaining any permits. In this case, it is quite enough to make appropriate changes to the water supply system plan. The situation is completely different if you want to make a connection into a centralized water supply pipe. If you do this on your own initiative without obtaining permission from the competent authorities, this may lead to penalties against you. Such actions must be carried out only legally.
Also, such work requires a certain amount of care, since damage to the water supply system can cause a serious accident, which will lead to the need for restoration work, the cost of which, as well as fines, will have to be paid by the person responsible for the event. Tapping into the main highway for the purpose of organizing a diversion must be consistent with precautions at each stage of the work.
Tapping methods without welding
You can cut into a main pipeline without using welding. This technology is used by many specialists, since welding work requires compliance with safety rules. In this case, special equipment will be required for welding. Welding work is considered complex and time-consuming.
Non-welding tapping technologies include:
- installing a collector is the optimal solution for a large private house. The compact collector system is also installed in the apartment. A water pipe is installed at the entrance of such a system. The collector has several outputs. Their number depends on the system model. The pipeline is connected to any outlet. Adapters are used to fix the hoses;
- installation of a tee - this insertion method is used if a single outlet is provided. The water supply connection is first unscrewed, and then a tee is installed in this place. The pipeline is expanded or shortened by cutting threads;
- the process of cutting the pipe itself - the technique is optimal if there is no external connection. A grinder is used to perform cutting. A tee with a pre-cut thread is installed;
- the use of a thin pipe - a hole is prepared in the system onto which a seal or clamp is fixed. To install the outlet, tightening screws are used.
Methods of cutting into sewers
The sewer pipe to which the plumbing equipment is connected can be located vertically or horizontally. Methods of cutting in with different line locations at 110 mm. are no different; they are divided into main types: correct and incorrect.
The right way
To carry out work in a plastic pipeline, standard plumbing parts are used: tees, regular and expansion couplings. The method consists of the following operations:
- Measure the length of the riser, which must be cut taking into account the dimensions of the mounted parts. It should be equal to the size of the tee and expansion coupling, taking into account the depth of the mounting sockets.
- The pipe is cut in the right places, its outer and inner edges are protected.
- Coat all parts with silicone grease and insert them into the cut in a certain order. There are several installation options:
- The tee, which is used to insert into the system, is fixed in the following way: the lower part of the tee is connected to the riser with an adapter coupling with rubber sealing rings, the upper part is secured with a compensation coupling. This technology is used for installation in vertical risers.
- With the second method, the outlet is located in the compensator itself, and there is no need to use an extra part in the form of a tee. Typically, the lead is located at an angle of 45 degrees to the center line of the compensator - this allows this method to be effectively used for cutting into horizontal sections.
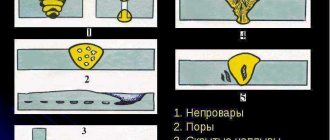
Rice. 4 The main parts for correct tapping are an oblique bend, a tee, an expansion joint and a coupling
The correct method can be connected to a 110mm line. pipes that match in size or 50 mm bends.
In the case of steel or cast iron sewer pipes, they are shortened to fit the tee for insertion, which is then welded to the break point with a welding machine.
Wrong way
This technique is designed for cutting into an existing sewer line without completely cutting the pipeline, but using cutting, when a hole of the required diameter is made in the pipe.
Then the outlet pipe is placed over the cut hole and its body is secured. When carrying out work, special adapters or saddles are used, through which the sewer line is connected to the outlets of plumbing fixtures.
Construction of a well for the construction of a site
To simplify the installation into an existing water supply system, it is convenient to use an inspection well. The diameter of the structure should be about 70 cm. This space is enough to place shut-off fittings (in the form of a valve or gate valve), as well as perform all the necessary manipulations for insertion.
In the future, during the period of operation, the presence of such a structure will facilitate the work of repairing the home water supply system.
The water pipe tie-in unit, used to disconnect the input for the period of repair work, will be placed immediately inside the shaft near the connection point with the external water pipeline
To construct a well, a new pit of the appropriate size is dug. The bottom of the pit is covered with a gravel “pillow”, forming a layer 10 cm high.
To make a reliable foundation, sections of roofing material are spread over the leveled gravel fill and a concrete screed 10 cm thick is poured. When creating the fill, concrete grades M150 and M200 are used.
After three to four weeks, when the concrete has acquired the necessary strength, a shaft is erected above the slab. To do this, the walls of the pit are lined with bricks, cement blocks or reinforced concrete rings. The neck of the structure must reach zero level.
If the well is to be installed in an area where the groundwater level rises to one meter during the flood period, it is necessary to construct a waterproof structure.
It is most convenient to purchase a ready-made plastic container for this purpose. From below it is anchored to a concrete slab, from above this structure is covered with a cast slab equipped with a hole for installing a hatch.
No pressure
To insert a pipe into a HDPE pipe without pressure, it is necessary to use saddle bends without a cutter.
To insert into a HDPE water pipe, it is recommended to use a compression saddle, which is secured with bolts. The compression saddle pipe has an internal thread into which a ball valve or coupling is screwed to connect to a HDPE pipe. The seal is achieved using a standard rubber ring, which is firmly pressed when tightening the bolts. A hole in the support pipe is drilled using a drill.
Let's move on to step-by-step instructions:
- clean the surface;
- insert the o-ring (gasket);
- we put two half-clamps on the pipe;
- secure them with mounting bolts;
- we stretch the fastening connections so that the clamps close together;
- we drill a hole that goes into the tee of the clamp using a drill;
- install the saddle using the seal.
Electric welded saddle
Electric-welded HDPE pipe saddles are installed using a built-in heating element, which melts the plastic base. The molten base becomes liquid, and when solidified, it forms a reliable monolithic connection with the supporting pipe. Rotation 360 degrees around its axis makes it possible to accurately install the part, and indicators built into modern electric welding saddles facilitate the process of electrodiffusion welding of the structure.
When installing, you need to find a flat section of a water supply or other HDPE pipe, thoroughly clean it of possible contaminants and degrease it.
The electric welded saddle must similarly be prepared for work. After completing the preparatory work, you can carry out welding, and after it, cut in using the screwing method from the side of the main part of the milling element. After welding is completed, the cutter is returned to its original position, and a cover is installed in the hole.
Electric welding deal drawing
Crimp clamp
A lightweight analogue of an electric welded saddle is a crimp clamp. There are the following types of clamps (linings) for inserting into HDPE pipes:
- with shut-off valve;
- with a built-in cutter, with a safety valve for inserting HDPE pipes;
- with a flanged or threaded metal end;
- with a plastic end.
In order to insert into a HDPE pipe, the clamp must be put on the pipe and secured to it with bolts. After this, drilling is done through the outlet pipe and the outlet itself is attached.
You should not drill holes without first installing a clamp or saddle on it, as you can make a mistake with the diameter of the drill. It is optimal to drill through the branch pipe of a fitting already installed for the branch. So the diameter of the drill will be slightly smaller than the internal cross-section of the embedded outlet and you will install it in the required place.
What documents need to be collected and prepared?
The basis for drawing up a cold water supply contract is an application on behalf of the customer or his representative acting by proxy, or an offer from a water supply service chosen by the customer.
The application must include the following information:
- Subscriber details:
- For individuals – postal address of registration or place of residence, full name, passport details or other identity document, contact information.
- For legal entities and individual entrepreneurs – registration number in the State Register and the date of its entry, location indicating the postal and registration address at the place of residence, individual tax payer number (TIN), bank details and documents confirming the subscriber’s right to sign business documentation.
- The name and location of the object in respect of which the contract is being drawn up.
- Information about other sources of water intake, indicating the volume and owners through whose networks water is supplied.
- If standards are established for the customer for the disposal of sewage water in cases where there are no septic tanks for dachas and country houses on the site, their composition and properties are indicated in the dynamics of changes over the year.
- The area of the customer’s individual plot with the objects located on it and its characteristics.
- Data on the type of activity in the case of regulated spillways.
The list of papers submitted with the application includes the following documents:
- A photocopy of the certificate of property rights to the object or device connected to the water supply line, necessary for connection to the system.
- A copy of the passport or other document confirming the subscriber’s identity. Power of attorney for drawing up business papers, if the customer is acting as his authorized representative.
- Standard documents established by law for organizations, partnerships, housing cooperatives when drawing up agreements with resource-supplying authorities.
- Information necessary for calculating consumed volumes - the area of irrigated land, housing and auxiliary premises, the number of storeys of buildings, the number of residents.
- Photocopies of documents and previously concluded contracts for connecting the subscriber to the water supply main.
- Photocopies of reports on connection, washing and disinfection of lines and equipment on the customer’s territory inside the house and on an individual plot when connecting to the water supply main.
- Photocopies of papers for water meters to verify compliance with their legal requirements, installation diagram and information about their readings at the time of drawing up the contract. The norm does not apply to consumers with a intake volume of less than 0.1 cubic meters per hour and when the installation of meters is optional.
- Sampling site diagram.
- Photocopies of documents confirming ownership of an individual land plot.
- Balance of maximum consumption indicating the intended use and load according to needs (for household needs, fire protection, filling swimming pools, periodic water consumption for irrigation).
- A positive expert decision from a federal or private examination in cases where it is required by law.
- Documentary photocopies of papers about other sources of water supply, contracts with water supply services and their licenses for the use of subsoil, indicating the volume of supply.
Rice. 3 Plumbing diagram in a private house - example
Possible connection methods
Connecting the new blue fuel supply network to the existing one is carried out using tapping or welding.
In the first case, the operation of the main pipeline does not undergo fundamental changes, since the process of cold tapping into a gas pipe is carried out without the use of welding. The volume of the pumped substance and its pressure do not change and are still kept within the operating range of the network.
This method is used to connect new consumers. To perform work related to the central network, you must have permission and permission to carry out gas hazardous activities.
Without special training, it is absolutely forbidden to interfere with the functioning of the main pipeline. Violation can result in tragic consequences, resulting in death or imprisonment.
In some cases, tapping into a gas pipeline should be done with the intersection of the axes of the networks. Explanations for the diagram: 1 – attached pipe, 2 – working gas pipeline, 3 – “window” (cut-out wall), 4 – visor, 5 – wooden disk, 6 – welded shock, 7 connecting pipe, 8 – extraction rod, 9 – cover (+)
The second connection option is more familiar to most ordinary people. It is reliable and has stood the test of time. However, a specialist who carries out insertion in this way must have a high level of professional qualifications and also have a special permit.
The methods of joining themselves are:
- insertion into a gas pipeline under low pressure;
- under medium and high pressure gas, when special devices are used;
- with the gas turned off and the pipes completely freed from it.
The choice of connection method to the gas pipeline depends on a number of factors. Therefore, the decision must be made by the people making the connection on a case-by-case basis.
As for the contractor, there may be 2 options: representatives of the gas service or employees of a private company who have the legal right to carry out actions, as well as the necessary equipment and permission to carry out gas-hazardous work.
Moreover, in the second case, the office can undertake obligations to prepare and execute a package of documents for legal connection to the main gas network. However, all additional services will affect the final cost of connection.
Not only the flawless performance of the gas pipeline, but also the safe operation of the entire gas transportation system depends on the correct choice of pipes.
Insertion into a water supply system made of metal pipes
- the flange is made independently from a pipe, the internal diameter of which coincides with the diameter of the laid line. Compliance with this condition will ensure the necessary tightness for the entire system;
- You can use a tee with the required diameter. To do this, a part of the pipeline without a pipe is removed from the part. Then the consumable is cut and a hole is made. To fix the pipeline, welding or a pipe is used;
- experts advise welding the flange to the pipeline. Welding work is performed along the entire perimeter of the product. The welding technique can be replaced with sealant and clamp.
Using a special device, holes are made in consumables under pressure. The principle of the method under consideration:
- removal of insulation;
- cleaning the pipe surface.
- installing a flange on the supply pipeline and then securing it with a clamp;
- connecting the valve to the flange;
- installation of a drilling device;
- insertion of the cutter through the valve;
- hole cutting;
- removal of drilling equipment;
- shutting off the water supply from the pipe.
Using the technology described above, it is possible to insert into a steel pipe without welding. This technique is somewhat different from the technology of inserting into a polypropylene product without using welding. Therefore, before starting installation work, it is recommended to determine the type of consumables used. It is calculated with a reserve. Upon completion of work, the system is checked for leaks. If it is violated, additional repair work is carried out. They can be done independently or with the help of specialists. If the system is sealed, the line is ready for use.
General rules for recusal
The insertion is made using one of the described methods. In this case, the front end of the pipe is connected directly to the embedded element, and the second - through a water flow meter - to the distribution of the internal water supply.
Thus, the installation location of the meter is the gap between the valve/valve of the insert and the valve connecting to the internal water supply network. When installing the device, it is also necessary to use a reverse valve to prevent the formation of reverse flow of liquid.
For cases where the introduction of water supply into a house involves crossing a wall or foundation, the hole in them should be larger than the diameter of the pipe itself, approximately 200 millimeters.
Once installation and necessary testing have been completed, it must be sealed using resin strands or a waterproof seal. The finishing of the surface is done with cement mortar.
Gas pipeline capacity
When cutting into a city gas pipeline, preliminary work is performed - calculating the throughput. In this case, the purpose of the gas pipeline is of fundamental importance. For domestic needs, a simple low-pressure system is installed. In such conditions, calculations are performed using the simplest formulas, taking into account only the diameter of the pipe and the average pressure in the network.
Qmax = 0.67 DN² * p, where
- Qmax – throughput;
- DN – nominal diameter of the pipe – internal diameter indicated in the documents;
- p – the sum of the working pressure in the gas pipeline and 0.1 MPa.
When calculating, average values are used - pressure surges; the magnitude of the friction force that occurs during movement is not taken into account.
If the connection is made to lines with higher pressure, other parameters must be taken into account. The formula is used: Qmax = 196.386×D²×P/Z×T, where:
- Qmax – maximum throughput;
- D – internal diameter of the gas pipeline;
- P – sum of working pressure and 0.1 MPa;
- Z – gas compressibility coefficient;
- T – temperature of the supplied gas in Kelvin.
From here the dependence of throughput on temperature is clearly visible. To increase this parameter, it is necessary to maintain a stable temperature of the supplied fuel and insulate the gas pipeline.
Connection of asbestos-cement pipes
Asbestos-cement pipe products, the material for which is Portland cement mixed with asbestos fibers in a ratio of 4:1, are connected by installing couplings and fittings.
The choice of method depends on the operating pressure in the system:
- For pipes with a working pressure within 3 kgf/cc, when inserting, use asbestos-cement double-breasted couplings equipped with rubber seals. Sections 150-200 mm long have a slightly larger diameter than the size of the pipes being connected.
- For pressure pipelines with a working pressure of 3 kgf/cc, special fittings called Gibot couplings are used. They are collapsible structures with flanges and cast iron bushings, complemented by rubber sealing rings.
In both options, rubber sealing rings play a key role in achieving joint tightness.
When choosing fittings and couplings for inserting asbestos-cement pipes, the main attention is paid to the elasticity of the sealing rings of the fasteners
The technology for performing tapping using couplings and fittings is similar to that when working with metal fittings
The only thing is that since asbestos-cement products are quite fragile, the insertion should be done with the utmost care