Making a powerful burning laser with your own hands is not a difficult task, however, in addition to the ability to use a soldering iron, you will need to be attentive and careful in your approach. It’s worth noting right away that deep knowledge from the field of electrical engineering is not needed here, and you can make a device even at home. The main thing when working is to take precautions, since exposure to a laser beam is harmful to the eyes and skin.
A laser is a dangerous toy that can cause harm to health if used carelessly. Do not point the laser at people or animals!
Briefly about the laser
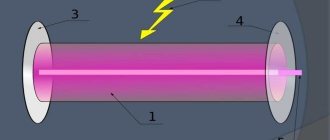
A laser, or as it is scientifically called, an optical quantum generator, is a special device that converts incoming energy into a narrowly directed beam. In the modern world, such products are most often used in the space sector and in production . However, every fan of “digging” into electronics can do it on their own, that is, at home with their own hands and without the use of special devices.
As mentioned above, a laser can be made from a DVD drive. However, do not expect that it will be similar in power to the Death Star weapon from Star Wars . A do-it-yourself optical laser is unlikely to cope with iron or wood. However, it will be quite possible for them to cut:
- Paper.
- A small sheet of plastic.
- Polyethylene film.
- And other light and thin products.
If you don't need a thread, you can use a laser from a DVD drive to:
- Burn patterns or designs onto wooden surfaces.
- Highlight various objects located at a great distance.
- Use as decoration at home.
- Make straight lines (since the beam is clearly visible), which will be especially useful during construction and repairs.
In addition to the above options, you can create a wide variety of tasks with a laser made by yourself from a DVD drive. His potential is especially well revealed in the creative field.
How can you use Arduino
A small board that has its own processor and memory, contacts - Arduino - is used in the process of designing electronic devices.
This is a kind of electronic constructor that interacts with the environment. Through contacts to the board you can connect light bulbs, sensors, motors, routers, magnetic locks to doors - anything that is powered by electricity. Arduino is effective for developing programmable devices that can do many things:
- plot the route of movement of the device (CNC machine);
- in partnership with Easydrivers, you can control the stepper motors of the machine;
- PC software can be implemented through this open programmable platform;
- connecting a Line Track Sensor to Arduino will allow you to track white lines on a dark background and vice versa;
- it is used to build a robot and various machine components;
- perform restriction of stepper motors (when traveling abroad).
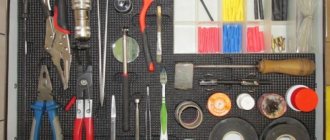
Required Tools
To make a laser, you will need certain components. All of them are sold in regular electronics stores, so you don’t have to put in any extra effort. So, for production you will need:
- Disk drive (DVD drive). You can use a faulty model, as long as the laser diode works.
- Soldering iron. Almost any one will do; more power is not required.
- Several small wires are necessary to connect parts to each other.
- Portable collimator (or regular laser pointer).
- 2 resistors with a resistance of 10 ohms.
- 3 AAA batteries (pinky batteries).
- 2 capacitors, one - 0.1 µF, the second - 100 µF.
- Pliers.
- A small screwdriver.
- Small knife.
- In some cases, an LM-317 chip may be required.
As you can see, to make a laser from a DVD drive , you do not need any complex components.
Making a drill from a blender
Kitchen appliances are often used to make various tools. You can make an electric engraver yourself at home. For this you will need:
- blender;
- jaw chuck with key;
- jaw chuck attachment;
- file.
The manufacturing process consists of several stages.
- First, the blender body is disassembled. Then remove the factory nozzle and cut off part of the body. Then turn on the blender and grind the diameter of the working part to the desired size. To do this, use a flat file for metal work.
- After this, the body is reassembled. Then attach the attachment to the blender shaft. The jaw chuck is secured to it using screws.
DVD drive requirements
As mentioned above, it is very important that the laser diode in the device is in working order. Therefore, it would not be superfluous to make sure of this. Otherwise, you will have to buy components from people selling spare parts.
You should also pay attention to the brand of the product. Devices from Samsung are not suitable for creating lasers. The reason lies in the absence of a special housing , due to which the diode is especially susceptible to mechanical damage, contamination and thermal stress. It is quite possible to break it with a simple touch of your hand.
The best option is disk drives from LG. In addition to protecting the optical diode, crystals of various powers are installed in them. This allows you to know how much power the laser itself will have.
In addition to the performance of the diodes and the brand of the product, it is also necessary to take into account the type of DVD drive. A regular disk drive is designed purely for reading information from media . Therefore, to make a laser, you will need a recording drive that has an infrared emitter.
To summarize, there are 3 main requirements for a disk drive:
- The device can write information to disk (recording models).
- Laser diodes are in working order.
- There is diode protection (the drive is not from Samsung).
Creating a laser engraver
For simple work, such as burning patterns on wood, complex and expensive devices are not needed. A homemade laser engraver powered by a battery will be sufficient.
Before making an engraver, you need to prepare the following parts for its assembly:
- Laser diode from a DVD-RW drive.
- Focusing lens.
- Aluminum U-shaped profile or non-ferrous metal tube with an internal diameter of 15-20 mm.
- Electrolytic capacitor 50 V, 2200 µF.
- Resistor 5 Ohm.
- Film capacitor 100 nF.
- Tact button.
- Switch.
- Thermally conductive adhesive.
- 18650 battery and holder for it.
- Shoe sponge box.
- Scotch tape, including double-sided tape.
- Hot glue gun with consumables.
- Charge controller.
- Jack 2.1 x 5.5 mm.
Remove the write head from the DVD drive.
Carefully remove the focusing lens and disassemble the head housing until you see 2 lasers hidden in heat-distributing casings.
One of them is infrared, for reading information from the disk. The second one, red, is the one who writes. In order to distinguish them, apply a voltage of 3 volts to their terminals.
Pinout:
Be sure to wear dark glasses before testing. Never test the laser by looking at the diode window. You only need to look at the reflection of the beam.
You need to select the laser that lights up. You can throw away the rest if you don’t know where to use it. To protect against static, solder all leads of the diode together and set it aside. Saw off a 15 cm section from the profile. Drill a hole in it for the clock button. Make cutouts in the box for the profile, charging socket and switch.
The schematic diagram of a DIY DVD laser engraver looks like this:
Using wires to pins B+ and B- of the charge controller, solder the battery compartment. Contacts + and - go to the socket, the remaining 2 go to the laser diode. First, solder the laser power supply circuit by surface mounting and insulate it well with tape.
Make sure that the terminals of the radio components do not short circuit with each other. Solder a laser diode and a button to the power supply circuit. Place the assembled device in the profile and glue the laser with heat-conducting glue. Secure the remaining parts with double-sided tape. Reinstall the tact button.
Insert the profile into the box, bring out the wires and secure it with hot glue. Solder the switch and install it. Do the same procedure with the charging socket. Using a hot glue gun, glue the battery compartment and charge controller into place. Insert the battery into the holder and close the box with the lid.
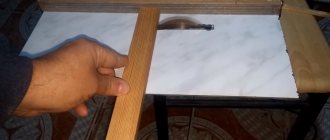
Before using it, you need to set up the laser. To do this, place a sheet of paper 10 centimeters from it, which will be a target for the laser beam. Place the focusing lens in front of the diode. By moving it further and closer, achieve a burn through the target. Glue the lens to the profile in the place where the greatest effect was achieved.
The assembled engraver is perfect for small jobs and entertainment purposes such as lighting matches and burning balloons.
Remember that the engraver is not a toy and should not be given to children. The laser beam causes irreversible consequences if it comes into contact with the eyes, so keep the device out of the reach of children.
Disassembling the drive
This process must be performed with extreme caution. If handled carelessly, you can not only damage the device, but also harm your eyes . The fact is that the laser can blind for some time and negatively affect visual acuity. Therefore, follow all the steps below slowly:
- Open the drive tray (the place where the disc is inserted).
- Turn the device over and unscrew the 4 screws located in the corners.
- Remove the cover.
- Turn the DVD drive over again.
- Remove the aluminum cover.
- Unscrew 2 screws under it.
- Disconnect the cables connecting the drive to the chassis (the one that moves the tray).
- On the chassis, unscrew the only screw on one side and three on the reverse.
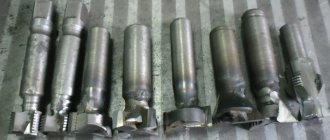
- Carefully disassemble the product and remove the board with optical lenses and diodes.
- Remove the protection without making much effort (it looks like a small corner that needs to be turned).
- A diode will be detected.
- The “legs” of the diode (the place where it is attached) must be wrapped with wire - this is a kind of protection against static electricity.
- Using pliers, remove the diode.
- Use a small knife to pry up the diode and carefully remove it from the mount.
The device of a laser engraver for home use and its operating principle
The basis of a laser printer is the optical system. At their core, these are heterogeneous lenses assembled together. Their task is to focus the light flux from a laser LED into the smallest point, amplifying it.
Also, the role of the transmission and control systems cannot be underestimated. The first includes servos that synchronize the laser with a given program. The latter, consisting of sensors and computing circuits, ensure error-free operation of equipment systems.
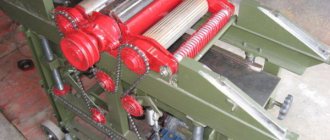
PHOTO: bing.comFactory-made laser engraver
The mechanical part consists of the main supporting parts and auxiliary mechanisms that make up the structure of the unit itself. And finally, cooling. Without this system of coolers and radiators, the laser would instantly overheat and burn out - it gets very hot during operation.
Power supply
Some of the work is done. Now the homemade device must be provided with electric current. The power supply of a standard diode should be 3V, and the flow rate should be up to 400 mA . These values may vary depending on how fast the disk is written.
There are 2 ways of eating, each of which has advantages and disadvantages. However, each one is powered by a battery(s).
First option
A distinctive feature of the first method is voltage regulation using a resistor. The laser does not require high power. So, the components of a drive whose write speed is 16X will need 200 mA . You can increase this value to a maximum of 300 mA, otherwise there is a possibility of damaging the crystal and forgetting about the homemade laser.
The main advantages of this method are the reliability of the product and ease of manufacture. The main disadvantage is possible problems with the placement of batteries.
Second way
It will be more difficult to create a laser using this option. In addition, the finished device is more suitable for stationary placement. The point is the driver (LM-317 chip) , which is a board for creating a certain power, as well as limiting the electric current.
As you can see in the diagram, to create a laser you will need:
- Directly, the LM-317 chip.
- 2 resistors at 10 ohms.
- 1 variable resistor per 100 Ohm.
- 1 diode
- 100 µF capacitor.
Regardless of the environment as well as the power source, the driver will maintain 7V power.
Homemade laser engraver for working with large areas
Any drawing for assembling the so-called KIT kits from the same Chinese friends is taken as a basis. Finding an aluminum profile is not a problem; making carriages with wheels is also not a problem. A ready-made laser module is installed on one of them, the other pair of carriages will move the guide truss. The movement is set by stepper motors, the torque is transmitted using toothed belts. It is better to assemble the structure inside a box with active ventilation. The acrid smoke released during engraving is harmful to health. When used indoors, exhaust to the street is required.
Important! When operating a laser of this power, safety precautions must be observed.
If you are working with metal plates, the reflected glare from the beam can damage the retina. The best protection will be red plexiglass. This will neutralize the blue laser beam and allow you to monitor the process in real time. The control circuit is assembled on any programmable controller. The most popular systems are Arduino UNO, sold on the same Chinese electronics websites. The solution is inexpensive, but effective and almost universal. The most common option is connecting to a personal computer. The creation of a design and engraving parameters takes place using any standard graphics editor.
Important! It should be remembered that most Arduino-based controllers only work with vector images.
If your image is raster, you should trace it.
By connecting and programming the USB controller, you will be able to output an engraving task directly from digital media (flash drive), having previously created a file on the computer. Result:
A laser head engraving machine is so affordable that it can be purchased not only for commercial use but also for personal use.
Making crafts for children, saving on advertising materials for your own company, design items for your home - this is an incomplete list of uses for the machine.
A self-made installation will delight you at minimal cost.
DIY laser engraver from a DVD drive - video instructions
Optics
The easiest way to make a homemade collimator is from a regular laser pointer. Even the cheapest Chinese option . All that is required is to take out the optical lens from the “laser” (it is very noticeable).
The beam width will be greater than 5 mm. Of course, such an indicator is considered very large and cannot claim to be a laser. The stock collimator lens will help reduce the diameter to 1 mm. True, to achieve such a result you will have to work hard. The main thing is not to rush and not to lose composure.
Varieties
There are quite a few design options for laser diodes. They differ from each other in the location of pn junctions, the configuration of the semiconductor element and other features. The following types exist:
- diode with pn homostructure. One of the first designs that is practically never seen today. Requires high initial power and input signal interruption to prevent overheating;
- with double heterostructure. They are a small-thick crystal enclosed between two additional layers that enhance the flux of photons and expand the active region;
- with quantum wells. They are formed by reducing the middle layer of elements with a double heterostructure. Quantum wells with different energy levels appear, which play the role of a barrier at the pn junction, capable of releasing photons;
- heterostructural elements with separate confinement. Most laser diodes are made using this technology. Its peculiarity is the application of additional layers to a thin central crystal, resulting in the effective formation and concentration of the light beam;
- with feedback distribution. A special notch is made in the area of the pn junction, which ensures the creation of a diffraction grating. This stabilizes the wavelength, resulting in a more stable light beam. They are used in the field of telecommunications, as well as in various types of optical devices;
- VCSEL. This is a laser belonging to the elements of surface radiation. It is equipped with a vertical resonator, thanks to which the direction of the beam changes - while in other types of crystals the light moves parallel to the edges, then in this design it is emitted in a perpendicular direction. There is another modification of such an element - VECSEL. It has an almost similar configuration, only with an external resonator.
Software installation
Your laser cultivator, which must operate in automatic mode, will require not only installation, but also configuration of special software. The most important element of this support is a program that allows you to create the contours of the desired model and convert them into an understandable extension for the laser engraver controls. This program is available for free and you can download it to your computer without any problem.
The program downloaded to the computer that controls the engraving device is unpacked from the archive and installed. In addition, you will need a library of contours and a program that will send data about the created drawing or inscription to the Arduino controller. This library (as well as the program for transmitting data to the controller) can also be found in the public domain. In order for your homemade laser product to work properly and the engraving performed with its help to be of high quality, you will need to configure the controller itself to the parameters of the engraving device.
Necessary materials
To make your own laser engraver using Arduino, you will need the following consumables, mechanisms and tools:
- hardware platform Arduino R3;
- The prototype board is equipped with a display;
- stepper motors, which can be electric motors for printers or DVD players;
- 3 W laser;
- laser cooling device;
- DC/DC constant voltage regulator;
- MOSFETs;
- electronic boards that control the laser engraver motors;
- stop switch;
- a case in which you can place all the structural elements of a homemade engraver;
- timing belts and pulleys for their installation;
- ball bearings of various sizes;
- four wooden boards (two 135x10x2 cm and the other two 125x10x2 cm);
- four round metal rods with a diameter of 10 mm;
- bolts, nuts and screws;
- lubricant;
- cable ties;
- computer;
- drills of various diameters;
- a circular saw;
- sandpaper;
- vice;
- standard set of locksmith tools.
The electronic part of the machine will require the largest investment
Main conclusions
Laser diodes are widely used in various fields of technology and as decorative installations and lighting devices. They are known quite limitedly in everyday life - as laser pointers, target designators, building levels and other devices. The design features and capabilities of these elements are under study and development. Experts believe that the use of lasers is not yet widespread enough, but their prospects are very high. In your comments, you can express your own thoughts about the design and properties of laser diodes.