- January 9, 2021
- Repair Tips
- Ivan Gresko
In the production of cabinet furniture, some manufacturers use nails to fasten parts together. Their disadvantage is that they cannot provide repeated assembly and disassembly. In this regard, it is much more convenient to use self-tapping screws. However, they destroy the texture of the workpiece. This is especially noticeable when using fiberboard and chipboard.
Therefore, many craftsmen prefer traditional bolts and nuts. At one time, these furniture fittings provided high strength joints. However, it cannot be called ideal. The fact is that bolts and nuts worsen the appearance of the structure.
According to experts, the furniture eccentric screed is considered the most reliable. Despite the fact that furniture production is a complex technological process, it can be assembled at home. For this reason, many novice craftsmen are interested in the question of how to tighten the eccentric. This fastening method is considered the most reliable. Therefore, many try to use it. How to tighten the eccentric correctly? What are the pros and cons of this type of fastening? The answers to these questions are in the article presented to your attention.
Description of fastening method
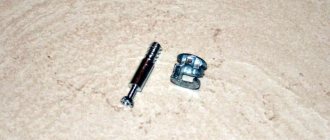
Before wondering how to tighten the eccentric, you need to familiarize yourself with the device of the eccentric coupler. In general, it consists of two components. This is an eccentric and a rod. The first is on one piece of furniture, and the second is on another.
The connection of furniture parts is carried out by turning the eccentric in the rod. The sizes of these parts can be very different, for example, 34, 26 or 10 mm. The most common is the 15mm eccentric. The size depends on the dimensions and purpose of the furniture that is assembled. For example, for small shelves a 10mm cam is suitable. To connect parts in cabinet furniture, you will need large parts (34 and 26 mm).
Composition and varieties
Modern manufacturing companies sell many types of eccentric fasteners, which necessarily consist of the following parts:
- Rack;
- Futorka (analogous to a regular nut);
- Eccentric;
- Sleeve made of plastic or metal (stainless steel);
- Plugs.
To choose a suitable mount, you need to pay attention to several criteria:
- Eccentric dimensions;
- Type of stand (double-sided, short – 4 centimeters, long – up to 6 centimeters);
- Method of securing the stand.
When going to the store, you can prepare the necessary photos of the furniture eccentric in advance. Based on them, the sales consultant will immediately select suitable fasteners.
All such parts are ideal for creating products from chipboard, chipboard and even natural wood. Fasteners connect elements in hidden places where they are almost impossible to notice.
The eccentric can only be viewed from the inside. To give the furniture a more attractive and neat look, the fastening is additionally covered with a special plug.
Advantages of an eccentric coupler
Judging by the reviews, many craftsmen prefer this method of fastening. The high popularity of connecting furniture structural elements using eccentrics is explained by the fact that the parts can be assembled and disassembled repeatedly. It is noteworthy that this is done quickly. Great physical effort is not required. In addition, the craftsman has the opportunity to connect products at a variety of angles.
This is also possible with confirmations. However, after the next disassembly and reassembly, the material loses its rigidity. It is worth noting that this method not only ensures the reliability and strength of the fasteners, but also does not spoil the appearance of the furniture. Euroscrew (as furniture makers also call eccentric) is not very expensive, has a long service life and is able to withstand impressive loads.
Confirmat
It is a direct descendant of self-tapping screws for a knife screwdriver, who liked to hammer in correctly instead of carefully screwing in. Using the confirmation will not cause problems even for an inexperienced user. It is a self-tapping screw that has an increased diameter and is also not equipped with the usual tip. The furniture confirmat is designed for use with a special hexagonal nozzle. You can't screw it in with a regular Phillips screwdriver. Such fasteners have become especially in demand with the growth in the production of cabinet furniture. The latter is assembled from laminated chipboards using facades or MDF inserts.
With the help of the confirmat, two furniture parts are fastened only at an angle of 90 degrees. If a different angle is required, then fasteners are used, which will be discussed below. Since the confirmat does not have a sharp tip, it cannot simply be screwed into wood. Before assembly, holes are drilled in the parts. Near the head, the confirmat has a slight thickening, which requires the use of a 6 mm drill. For the threaded part you will need a consumable with a diameter of 5 mm. It is most convenient to use special drills for confirmations. They are a small crown or cone into which a 5 mm drill is inserted. As soon as the drill is completely recessed into the material, the cutter makes a slight expansion under the head of the furniture fastener.
Note! The head of the confirmat must fit flush into the furniture. This is done to hide furniture fasteners with special plastic or other covers.
Usually the furniture board is 16 mm thick, so the hole is drilled in the end in the middle. If a hole is drilled in a furniture board from the front, then an indent of 8 mm is made from the edge in order to smoothly join the parts
This is done to hide furniture fasteners with special plastic or other covers. Usually the furniture board is 16 mm thick, so the hole is drilled at the end in the middle. If a hole is drilled in a furniture board from the front part, then an indent of 8 mm is made from the edge in order to smoothly join the parts.
Confirmats can be used in conjunction with other fasteners, for example, dowels. This is done for a more durable joining of furniture parts. It is worth understanding that the fixation of furniture parts can be ensured at the highest level only during the first assembly. If you frequently assemble and disassemble furniture, the confirmators will not be able to fix the parts with the required rigidity. When screwing in furniture fasteners, it is necessary to select the correct force. If it exceeds the required limits, then the confirmat will simply begin to scroll or damage the second part.
Advice! It will be easier for inexperienced masters to reach the confirmation manually.
Those who have been working with cabinet furniture for a long time have learned to feel the tool and avoid deforming parts by excessive tightening.
Weak sides
Despite the presence of undeniable advantages, the eccentric coupler is not without some disadvantages. Weaknesses include:
- The need for accurate calculations. It is important to correctly mark the holes for mounting hardware. Otherwise, the furniture pieces will be fastened crookedly.
- Labor intensity. Due to its complexity, this installation technology is only available to experienced craftsmen.
- If we compare eccentrics with confirmed ones, they are somewhat more expensive.
Installing a furniture eccentric with your own hands
An eccentric fastener (rastexes, minifixes, eccentric clamp - whoever calls it that) is one of the most common types of furniture fasteners.
Minifixes are good because parts fastened with their help can be disassembled and reassembled many times, without loss of rigidity, which would not happen when using confirmats, where with each assembly/disassembly the fastening will lose rigidity.
There is only one drawback to minifix furniture - it is painstaking work to install it. If you do not have expensive filler equipment, to install it yourself, you need to very carefully mark and accurately drill three different holes in three different planes, which usually takes a lot of effort and time.
This work does not tolerate mistakes in marking. After all, you won’t be able to adjust the connection in the end.
Also, its cost cannot be called completely cheap. The price of a minifix is usually 3-4 times more expensive than a confirmation.
Therefore, it should be used in the most necessary cases.
What you need for work
Before tightening the furniture eccentric, prepare the following tools:
- Screwdriver.
- Screwdriver.
- Ruler and pencil. Many home craftsmen use a template. You can make it yourself or get a ready-made one.
- Drill. They should have a diameter of 8 and 5 mm.
- Milling cutter. Some people call this tool a Forstner drill.
When everything you need is available, you can start doing the work. Let's take a closer look at how to tighten the eccentric in furniture.
Where to begin
First of all, you need to do the marking. Using a ruler and a pencil or a template, clearly define the places where the holes will be. Check again whether you have marked them correctly, since further assembly and the final result depend on accuracy. To reliably and efficiently tighten the eccentric, you next need to do the following:
- Carefully drill a hole for the groove in which the rod will be located. To avoid damaging the workpiece, use a limiter at this stage.
- When the hole is ready, insert the rod. It is desirable that it protrudes above the canvas by about 0.6 cm.
Furniture items
A few examples of furnishing a kitchen combined with a living room:
- 1. Sofa. It becomes an object that zones space. The sofa is placed with its back facing the place where food is prepared. In small rooms (less than 20 sq m) a corner is placed, which is placed against a wall installed perpendicular or parallel to the kitchen.
- 2. Set. According to designers, minimalist models without elaborate details look modern. The service, vases or glasses are placed on an open shelf. You can buy a fashionable display case for them. Furniture is placed near the wall. If the space is large (20 sq. m, 25 sq. m or 30 sq. m), then in the central part you can install an island, which also has sections for kitchen appliances.
- 3. Furniture set. The style should be combined with the design of both rooms. In small rooms, a compact table and chairs made of transparent material or painted in light colors look good. You can add a table with a round top to your living room interior. In spacious rooms, the kit is installed near the wall or in the central part. An elongated rectangular dining table would look good here.
Read here: How to make a bench - beautiful and unusual options for making garden benches (135 photos)
Installation of the second connection part
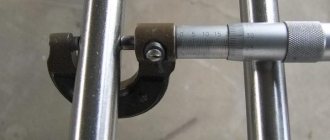
Before installing the eccentric, you need to prepare a groove for it. Drill it out using a Forstner bit. According to experts, depth is important for the groove for the eccentric. In general, you can limit yourself to a 15mm hole.
It should be noted that the groove cannot be made through. The eccentric must fit into it completely to its full height and at the same time be flush with the workpiece blade.
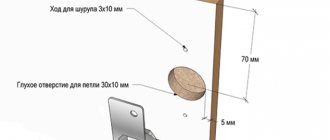
To avoid making a mistake with the location for the hole, use a template or ruler. Step back 34 mm from the bottom edge, and 5 mm from the side end. The center of the hole for the eccentric groove will be at the intersection point.
Making a passage for the rod
When the holes for the fasteners are made, begin preparing the passage for the rod. It is performed on the surface of the workpiece where the eccentric is located. The passage for the rod should be located on the end side. To perform this step you will need an 8mm drill bit. It is important that the passage is centered relative to the eccentric groove.
Therefore, at this stage, use a ruler, tape measure or template. If this recommendation is neglected, the prepared grooves may not match. As a result, the furniture will be assembled crookedly.
What is a furniture jig and how to use it
If you have a furniture jig, this will make it much easier for you to mark and drill holes for any type of fastener. A jig is essentially the same template, which is a special device or bar on which holes of different diameters and at different distances are applied. With their help, you can make perfectly accurate markings and drill passages of the size you need. Various materials are used to make this assistant:
The product is a solid base with many holes at different distances required from each other. Additionally, it can be equipped with a mechanism for fixing and adjusting the distance between the holes.
Use a special drilling jig to help you hold the drill at the right angle.
Thanks to the device, you will install the drill exactly at a right angle to the blade, without deviations. This is a great help when working on narrow surfaces, such as the ends of chipboards. After all, if the groove is not located at an angle of 90 degrees, assembling the body elements into a single whole may become impossible.
Types of conductors
Depending on the functions performed and design features, templates can be of several types:
- Invoices. This type of device serves as an assistant for drilling holes on flat elements by placing it on the workpiece. The device is not attached, but only held by hand. Suitable for use on chipboard or fibreboard surfaces.
- Rotary. The rotating device allows you to move it vertically or horizontally and rotate it at different angles. This device is convenient to use provided that the part that needs to be drilled has a complex shape.
- Tiltable. Tiltable assistants are convenient for working with elements that are located in planes that are different from each other.
- Universal. The devices are convenient because they can be customized for the production of furniture of various configurations.
Final stage
Now you can connect the parts of the furniture structure. For this purpose, attach the workpieces so that the rod is in the passage. How to tighten eccentrics? This is quite easy to do. First, insert the eccentric into the groove, and then carefully tighten it using a Phillips screwdriver.
As a result, the furniture elements will be securely fastened to each other.
What to pay attention to
To properly tighten the eccentric, experts recommend positioning the rod correctly. It should not be twisted too much. Otherwise, the eccentric will not rotate 180 degrees. Then you will not be able to secure the connection. If the rod is not fully tightened, then the parts in the furniture structure will not be connected tightly enough. Which drill bit to choose for an eccentric tie depends on the size of the rod. The hole through which it will be connected to the eccentric is most often made with a diameter of 8 mm.
Scope of application
This type of fastening, such as minifixes, is used when it is necessary to hide fastening elements, for example, on a furniture facade. Due to the peculiarities of drilling grooves for screws and eccentrics, this method is common mainly for factory installation of furniture. But knowledge of the basic principles, the availability of specialized equipment and a little skill will allow a novice home craftsman to master this type of fastening.
The main purpose of an eccentric coupler is to connect parts at right angles. This connection happens:
It is used for conjugating furniture parts of tables, cabinets, and chests of drawers. The parts are connected in the same way when installing cabinets and shelves. Experts recommend using wooden dowels as an addition, which will guide the elements being connected, and the eccentric will tighten them.
The mechanism for connecting furniture elements using a minifix without a sleeve is as follows:
- A screw is screwed into a hole with a diameter of 5 mm on the surface of one of the elements being connected.
- The second element is put on the screw with a hole measuring 8 mm located in the end part.
- An eccentric is inserted into a groove on the surface of the second element, 15 mm in diameter.
- Using a screwdriver, the eccentric is rotated 180 degrees in a clockwise direction, securing the connection. A simple screwdriver, flathead or Phillips, or a hex wrench can be used.
The principle of fastening parts with a tie to a sleeve is similar. The difference is that the hole for the base of the screw is made with a 10 mm drill, in which a plastic sleeve is attached to PVA glue, into which the screw is screwed. The remaining steps are the same as when using a minifix without a sleeve.