An eccentric coupler is one of several types of fasteners that are used when assembling cabinet furniture. The main advantage of the eccentric coupler is its hidden installation, i.e. There are no fasteners on the front surface of the furniture. An eccentric coupler is used to connect parts at an angle of 90 degrees.
Fig.1.
An eccentric coupler is used to connect furniture parts at an angle of 90 degrees. To connect 2 parts it is necessary to use two eccentric couplers. The main advantage of the eccentric coupler is its hidden installation. Therefore, it is often used where fasteners need to be hidden, for example, on the facade of furniture.
Installing an eccentric coupler
Let's look at how an eccentric screed is used using the example of a countertop and a cabinet. An example of the use of an eccentric coupler is a desk, or any case where it is necessary to connect two parts in a hidden way.
An eccentric coupler consists of two parts: a rod and an eccentric. The rod is installed in one part, and the eccentric in another.
Fig.2.
To install the eccentric coupler, you need to drill several holes. In one part, a blind hole is made for an eccentric with a diameter of 15 mm and a depth of 12.5 mm (the distance between the center of the hole and the end of the part is equal to the length of the rod), as well as a hole for a rod with a diameter of 8 mm (the distance between the center of the hole and the surface of the part is 8 mm). In another part, a blind hole with a diameter of 5 mm and a depth of 12 mm is made for installing the rod.
The installation of the eccentric coupler begins with markings. Before marking the parts, you need to know the installation size. In the example below, the installation dimension is 26 mm. You can find out the size either on the packaging, or upon purchase, or by measuring the stem. From the head to the beginning of the thread.
Marking the holes for the eccentric coupler
It is convenient to do the marking as follows. It is necessary to place the parts to be connected on top of each other, and mark the location line of the eccentric coupler.
Fig.3.
It is convenient to make markings on both parts being connected at once. The position of the rod relative to the front or rear end of the part is marked on the parts (usually 5-7 cm). On the part in which the eccentric will be installed, mark the center of the hole along the eccentric.
In the photo, two parts are connected at once, so I did the markings at the same time.
Next, on the part where the eccentric will be installed, the center of the hole for it is determined. In the photo above, this is a horizontal serif. The length of the segment is the installation dimension equal to 26 mm.
Hole drilling tool
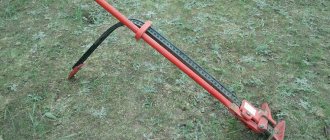
After the markings are made, it is necessary to drill all the holes. The holes on the tabletop are made with a regular drill with a diameter of 5 mm. It is convenient to use special wood drills. Using a similar drill only with a diameter of 8 mm, a hole is drilled in the end of the mating part.
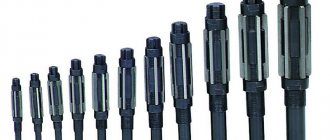
In order to make a sample for the eccentric, a special Forstner drill is needed. These special drills come in different diameters, so for high-quality installation of the eccentric, you should purchase a drill with a diameter equal to the diameter of the eccentric.
Fig.4.
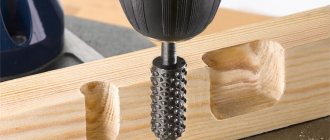
The hole for the eccentric is made with a Forstner drill with a diameter of 15 mm. Here it is important to accurately observe the depth of the hole. Traditional hole depth is 12.5 mm. You can maintain the depth of the hole using a drilling depth limiter.
Using this drill, we make a hole with a depth equal to the thickness of the eccentric, which is about 12.5 mm.
Fig.5.
After the hole for the eccentric is ready, drill a hole with a diameter of 8 mm for the rod. The order of drilling the holes is important, so drilling a hole too deep for the rod will not allow the hole for the eccentric.
Examples of application of an eccentric coupler
Fig.6.
Fig.7.
Fig.8.
What is a furniture eccentric screed?
The set of parts for a furniture eccentric coupler, depending on the type and manufacturer, includes from two to four elements: a rod, a coupling for attaching the rod to the body, an eccentric (cylinder) and a plug that covers the end surface of the eccentric.
The strength and invisibility of the parts is ensured by the rotation of the cylinder around its axis. On visible surfaces, large eccentrics are covered with plugs, but it is not necessary to close cylinders with a diameter of less than 15 mm.
The rod is made from aluminum or zinc alloys under high pressure. It is created in such a way that when screwed in, the coupler will always function correctly - since they have a ledge that rests against the end of the coupling or the surface of the part. The T-shaped head is equipped with a special slot, which determines the correct screwing of the rod into the hole. The slot can be straight, Phillips or universal. The reliability of the screed itself depends on the lower surface of the rod, because it is the one that takes on all the force.
The rod can be of different designs, for a classic connection, double-sided or angular.
There are two main types of couplings - plastic and metal couplings. The former are pressed into the surface and secured using special outer rings, while the latter are screwed into special previously drilled holes. With any of the above mounting methods, it is important to know that the strength of the tie depends on how the head is mounted, and if the position of the rod head is too low or too high, then the force in the connection will be weak. This is especially true for parts with an eccentric diameter of 15 mm.
The eccentrics of the couplers look similar to a cylinder, but they have different diameters, heights and thicknesses. The end of the cylinder on one side is equipped with a cross-shaped slot, which ensures rotation during assembly. That is, all the efforts of the manufacturers of the elements of such a screed are aimed at making it as strong as possible, and for this it is necessary to prevent the reverse rotation of the eccentric even under significant loads, vibrations and other factors that may affect its position.
Practical tips for installing an eccentric coupler
Pay attention to two features: firstly, the drilling depth is 12 -13 mm, and the thickness of the chipboard is 16 mm; secondly, the drill has a sharp protrusion necessary for precise drilling, measuring somewhere around 3 mm. Both of these circumstances lead to the fact that it is easy to make a mistake and punch through the laminated chipboard.
Fig.9.
A fairly common defect when drilling a hole for an eccentric. Due to the large depth of the hole, the drill can penetrate through and damage the integrity of the surface of the part.
To avoid these problems, you should use a special drilling depth limiter, with which you can accurately control the drilling depth.
How to attach an eccentric tie?
The eccentric tie is fastened using a drill, cutter, ruler, screwdriver, awl and pencil. Three holes are made in the parts intended for connection.
All these holes must have different sizes. Next you need to make a hole of 5 millimeters. A drill is used for this purpose.
Two holes are also made in another part. A cutter is used for this purpose. The thickness of the hole must fully correspond to the thickness of the eccentric. This will ensure it fits as accurately as possible. You need to make another hole at the end of the part using a drill.
At the last stage, you need to screw in the eccentric rod. The second part is mounted on this device. Using a minifix, this structure is clamped.
You can also assemble a minfix with a plastic sleeve. This action is performed in the same way as installing a metal minfix.
How to install an eccentric coupler - video
We looked at the method of connecting parts with an eccentric coupler, and the technology for making holes. The main difficulty in using an eccentric coupler, and, as a consequence, its low popularity, is the difficulty of drilling holes and the need to use special drills. It is quite difficult to make an accurate additive at home. However, the secrecy of connecting parts and the possibility of repeated assembly and disassembly of furniture without damaging it makes the eccentric coupler indispensable in many cases.
How to properly install a furniture eccentric coupler
Eccentric ties are always made together with a dowel connection. When the former create a force between the parts, the latter determine the specified relative position of the parts, which is mandatory for installing a stable screed.
To install minifix furniture, you will need drills with a diameter of 7 and 10 mm, as well as a cutter with a diameter of 15/25 mm. The installation diagram is quite difficult to understand at first glance for a beginner.
Installation of a furniture eccentric coupler is accompanied by drilling three holes in different planes:
- 5 mm in diameter on the inside of the sidewall (vertical).
- 7-8mm in diameter at the end of the shelf or tabletop (horizontal).
- Use a cutter with a diameter of 15 mm on the “wrong” side of the shelf or tabletop (horizontal).
In a similar way, a furniture eccentric tie is installed for fastening the rear walls and false panels. In this case, the role of the horizontal is “performed” by the front part, and the principle of fastening remains the same.
How to install a double-sided eccentric coupler is more clear in the diagram.
To make it easier to apply markings for drilling under the eccentric, it is convenient to use furniture jigs. They are sold ready-made. You can also make them yourself from scrap materials.
The strength of the eccentric coupler is influenced by the quality of the materials themselves and the correct installation. High-quality parts are a little more expensive, but if you want a strong and reliable screed, then you shouldn’t skimp on parts. But even if all the elements of the screed are of the highest class, but the holes are made incorrectly, or the rods are installed incorrectly, then the quality of the screed itself drops significantly. Be careful.
Marking for eccentric coupler
Before you start making grooves for the eccentric tie, you need to make markings. The markings are quite easy to do manually using a ruler. To do this, it is convenient to place the parts to be connected on top of each other with a slight offset and make marks for the grooves.
Fig.3.
Marking the eccentric coupler. Marking can be done manually. If carried out carefully, this will not affect the installation of the eccentric coupler.
A more convenient and accurate way of marking is to use a special template. The template for the eccentric coupler allows you to accurately mark the installation location and avoid making mistakes. You can buy it ready-made or make it yourself. The finished template allows you to mark grooves for fasteners of any size, which completely covers the entire dimensional chain of rods.
Fig.4.
Template for eccentric tie. Using this template, you can accurately mark the eccentric coupler.