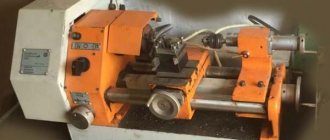
Many craftsmen have purchased an industrially produced household woodworking desktop device UBDN (Kharkov) for their home workshop. We can directly say that this simple machine is extremely necessary for the home.
Unfortunately, the designers of the device did not fully provide for the needs of craftsmen and the reserves for its use.
Is it possible to expand the range of use of the device?
Many UBDN-1 owners are probably thinking about this question. Practice shows that small and simple innovations in the design of the device make it possible to perform many additional wood processing operations.
For example, on my machine I make lining from boards for upholstering the walls of a garden house, make various platbands, baseboards, corners, slats, glazing beads, window and door frames and other products. I select quarters and grooves of different sizes on wood blanks, make an oval, groove, etc.
This does not require any complex modification of the UBDN-1.
First of all, it is necessary to make additional cutouts in the machine plate in the hole for the jointing drum, as shown in Fig. 1. The size of the cutouts is 22X20mm. This makes it possible to use a cutting tool up to 20 mm wide and select a groove, quarter, etc. to a depth of up to 12-15 mm. When making cutouts, the quality of jointed lumber does not deteriorate.
Rice. 1. Additional cutouts in the UBDN-1 plate
An additional wooden strip 25 mm thick, 50 mm wide and 600 mm long must be attached to the metal guide angle with two bolts, fitting it to the inside of the angle. An oval recess for a drum with knives is selected on the bar. After this improvement, you just have to make the tool (knives) you need. For example, I make it myself from tool steel (Fig. 2). By moving the guide angle and the workpiece or workpiece, you can select quarters and grooves of different sizes on one or more sides of the workpiece. The processing may have to be carried out with different knives, changing their position, since in one pass the knife is not always able to select the desired profile.
Rice. 2. Homemade knives: 1, 2 – for cutting grooves and quarters; 3 – creating an oval; 4 – trench samples; 5 – chamfering; 6 – production of glazing beads; 7 – samples of spikes; 8 – manufacturing of platbands
It is better to select a groove or a quarter in two steps, first processing to a depth of 5-7 mm, and then achieving the required processing depth of 10-15 mm).
An indispensable tool for selecting quarters, and especially grooves and grooves, are cutters, which can be purchased at tool stores. When purchasing tools (disks and cutters), pay attention to the diameter of the hole in the tool, as it should be 32 mm.
One of the serious disadvantages of the machine is that, according to the factory instructions, it is allowed to cut boards no more than 25 mm thick, while at home there is often a need to cut boards of greater thickness.
I used a factory-made circular (rip) saw with a diameter of 200 mm with a large tooth on my device, which made it possible to cut boards 50 mm thick or more.
To do this, it is necessary to make an additional new top plate. I made it myself from scrap sheet steel. The design of the plate, dimensions and shape are similar to the factory one included with the device. However, innovations are also necessary - a protrusion of 50X50 mm is made on the left side of the slab, the length of the groove in the slab for the passage of the saw blade is increased to 210-220 mm (Fig. 3).
Rice. 3. Additional plate
We will also have to make a new protective cover for the saw blade from sheet steel. It is made similarly to the one included in the kit, but in larger sizes (at least 210-220 mm) and several
modified design of attachment to the machine. You cannot operate the machine without a casing. I also install the casing when working with factory sanding discs, the diameter of which is 200 mm and the thickness is 3 mm.
The disc can be used to cut the necessary metal blanks from angles, sheet and reinforcing steel, sharpen tools, drills, cut wire, etc.
When using a cutter (I have a cutter 023-02 X6vF), it is necessary to make an overlay (plate) for the machine plate from a chipboard, because the factory top plate included in the kit, used for cutting boards, is not suitable in this case. To attach the cover plate to the machine plate, the holes in the plate and the guide angle are used. In this case, the bolts securing the angle to the plate are replaced with longer ones. It is necessary to select a groove for the cutter in the slab.
UBDN-1 combined household woodworking machine. Purpose, scope
The UBDN-1 desktop woodworking machine is a compact desktop device for processing softwood and hardwood lumber.
The woodworking machine UBDN-1 is designed to perform the following work:
- cutting lumber with a thickness of no more than 25 mm
- jointing of lumber, width no more than 100 mm
- drilling holes with a diameter of no more than 6 mm
- milling grooves with a width of no more than 6 mm
- turning of workpieces with a diameter of no more than 70 mm
- tool sharpening
The machine must be operated in closed, dry domestic premises, except residential ones. After 15 minutes of operation, stop the device for 10 minutes to cool the engine. Every 500 hours. To operate the device, it is necessary to lubricate the bearings of the jointing drum and the electric motor.
To lubricate the bearings of the jointing drum it is necessary to: unscrew the nuts 20, remove the covers 21, remove the old grease and fill the bearing with new grease in the amount of 3-5 grams per bearing.
Electric motor bearings should be lubricated in household appliance repair shops.
Any rolling bearing grease can be used as a lubricant.
The design according to the degree of moisture protection is unprotected.
The UBDN-1 machine can operate under the following conditions.
- altitude above sea level – up to 1000 m;
- ambient temperature – from plus 5 to plus 40 °C;
- relative humidity of the surrounding air – no more than 80% at a temperature of plus 20 °C.
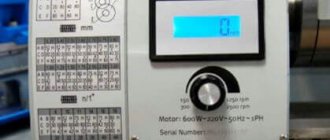
The machine's electric motor is powered and controlled from a single-phase alternating current network with a rated voltage of 230 V and a frequency of 50 Hz. The machines do not require permanent grounding.
To watch online, click on the video ⤵
Carriage and table adjustment on a wood processing machine UBDN Read more
How to make a woodworking machine UBDN more convenient to use Read more
UBDN-2. Device for sharpening planing knives./ Planer blade shaping tool. More details
UBDN-2. Modernization of a woodworking machine. More details
Turning fixture for (from) machine UDBN-1 More details
Modification of the woodworking machine UBON-1 Read more
The most budget carriage for a Mogilev machine in half an hour. Budget the carriage to Mogilev machine More details
Woodworking machine UBDN More details
Making a bee frame (bottom block) on a UBDN 1 machine Read more
Woodworking machine Elektromash UBDN | Footage More details
Handles for files with your own hands. On a lathe UBDN-1 Kharkov. More details
Ubdn 6u cutting depth adjustment. More details
How to disassemble the UBDN machine Read more
6) Modernization of a woodworking machine. How to modify the machine with your own hands DIY Read more
Source
Description of the design of the woodworking machine UBDN-1
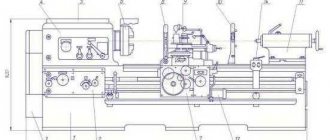
The device consists of a prefabricated housing in which a drive asynchronous single-phase electric motor is installed. The engine mounting system is “soft”. Rotation from the engine to the jointing drum shaft is carried out using a V-belt drive. The pulley on the motor shaft is made of insulating material. The device body is isolated from live parts by double insulation. When repairing the drive, double insulation must be maintained. The protruding ends of the jointing drum shaft are used to install various interchangeable tools and accessories. In the middle part of the shaft there is a drum with knives attached to it for jointing lumber. In addition, a table for milling and drilling work and a turning device are attached to the device body.
The device is turned on by a switch located on the side wall of the device.
Second life of UBDN
Greetings to all interested!
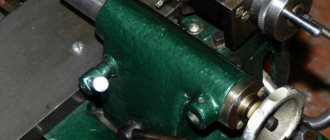
I got a wood lathe and realized that I really needed a machine for making blanks. In principle, I already have a large planer (knives for 300) and a miter-cutting Corvette, but it’s not rational to pull out and unfold all this equipment for the sake of a couple of bars to sharpen handles for files. I started looking at what was smaller (portable, tabletop, 220V) and cheaper. At a flea market I bought a working UBDN complete with a turning device, but without a sawing table. The lathe made from it is so-so - I didn’t even try. I immediately threw out my original disc - I bought it with 200mm carbide teeth - people installed it in the forums and responded well. I went through all the equipment, the bearings rattle a little, but they are intact and the grease is full, the electrics were also in good order, but the housing turned out to be a bit runny. Assembled in fact from thick sheet metal, it simply warped and pressed the shaft bearings, plus the vibration - it tried to crawl away. I quickly got tired of it, threw out the original bottom (it was later used for parts) and made a base from a piece of channel bar: holes, threads, ears for mounting the engine. From vibration, I welded 4 corners and screwed thick rubber feet onto them. From the old owner there was some kind of collective farm made from a door spring that did not tension the belt in any way, went to the auto store and got a suitable spring.
I decided to immediately make not only a saw table (with increased dimensions), but also attach a drill chuck to the free end of the shaft and, for convenience, install a table with a guide to it - fortunately, there were factory grooves for adjusting its height. This is where the bottom of the machine came in handy, along with every little thing I found in the workshop. I tried it - it drills normally, only the speed is high and the sharpening angle of the drills needs to be changed.
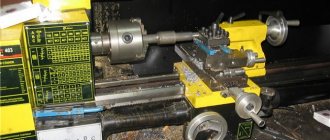
I painted it, started assembling it, cut out the table, but due to some circumstances (the main work) I completed it to a working state only now. As a result, I sharpened the knives on a plane, installed a new disc, adjusted everything, screwed it in place, and started the first shavings. To my complete surprise (the engine fit in all the standard places, but the power on its shield was almost two times lower than on the machine one), I calmly sawed a 20mm birch along a knot and not quickly, but without noticeable tension, a 50mm pine board. He also planed decently.
As I understand it, the increased diameter of the disk increases the torque on the shaft, but on the other hand, due to the trajectory, the tooth travels a shorter distance in the tree, the angular velocity is much higher and the number of teeth is greater, which gives this effect. A thick, hard and heavy bottom has only one drawback - it is much harder to carry such a machine, but in other respects there are continuous advantages. Another improvement - I bent the plate in half under the jointer, now the sawdust pours out of the machine on its own.
I haven’t used it much in my work, at the trial level, but so far I’m happy, even though people don’t praise these machines.
My immediate plans are to make a casing for the saw (both top and bottom) and a guide for sawing.
Jointing of lumber on a combined machine UBDN-1
List of parts for jointing on the combined machine UBDN-1 (Fig. 3)
- 6 - plate
- 18 — pusher
- 19 — fencing of the jointing drum
- 20 - nut
- 21 — bearing cover
For jointing of lumber on the combined machine UBDN-1 it is necessary:
- Install the knives according to Fig. 2;
- Install a protective guard for 19 jointing knives. In this case, the fence spike should enter the hole in plate 6;
- Secure the fence with an M6 screw, which is installed by turning the protective strip (red) all the way clockwise;
- Turn on the device and feed lumber
When feeding lumber, the red strip of the protective fence 19 moves away, revealing the jointing knives. After the material passes under the action of the spring, the bar returns to its original position, closing the knives, protecting hands in the danger zone.
Beekeeping magazine – Woodworking machine
Several years ago I purchased a desktop woodworking machine UBDN-1M from the Tiraspol Machine-Building Plant and soon became convinced of its great advantages. However, its design has certain disadvantages, which after minor improvements can be eliminated by the owner himself. I had to work through a lot of notes on this topic in our teacher - the magazine “Beekeeping”. Of course, the decisions did not come easily, each of them is the fruit of painful searches and reflections, mistakes and failures, joyful discoveries and happy finds. And the “Page of the Amateur Beekeeper” plays a special role here; it is probably the most favorite section of many. There everyone finds something important and interesting for themselves.
So, let's start with some improvements to UBDN-1M. The owners of this device know how much trouble is caused by chips that accumulate on the table after flying out of a niche, from where they are driven by a stream of air forced by a rapidly rotating shaft with knives. When there are a lot of chips, they clog the entire cavity of the niche and begin to fly out through the upper slot in the slab, that is, under the board or block being processed. This situation means stopping the engine, removing the chips and picking them out of the working niche. Of course, this holds back work and makes the employee nervous.
I solved this problem as follows (Fig. 1): removed insert plate 1; blocked the niche opening 2 with a sheet of roofing sheet. Below, above the working shaft with knives at the base of the device, I cut a window 3 measuring 150x110 mm. I also cut a slightly larger window in the table. Now the shavings do not cause me any trouble - they themselves pour into a specially made box made of plywood, located under the table.
I note that the thickness of the base plate is 3 mm, so first you need to drill a chain of holes along the pre-marked perimeter contour, then use a chisel to cut out the window itself, and clean the burrs of its edges with a file.
Some troubles are caused by sawdust flying from under the circular saw onto the floor. This drawback was eliminated by making a sawdust pipe 2 below the protective casing 1 (Fig. 2) and installing a collection box 3. The box is removable; it is removed when filled with sawdust or removed altogether.
For sampling folds, quarters, tenons, etc. It is necessary for the circular saw to go deep into the material to a certain depth, sometimes changed several times during the working day.
The machine does not have a vertically adjustable overhead plate, so I designed a simple table that can be adjusted using wedges (Fig. 3). This is a plane 1 made of boards or plywood 10–15 mm thick with two pairs of legs 2 attached to it; The length and width of the table are arbitrary.
To adjust the desired reach of the saw above the table surface, two wedges 3 are provided, which are placed under the front legs, while the rear legs should be temporarily secured with nails 4 to the table on which the machine stands.
Thus, we achieve the necessary rigidity of the structure, and therefore accuracy when processing the workpiece. Another advantage of such a table is that a wide variety of equipment, limiters and devices for processing parts can be attached to its surface using nails, and the larger dimensions of the table compared to the machine are undeniably more convenient when processing long parts.
N.I.PODYAVILOV
Omsk region, Znamensky district
Drilling and milling of lumber on a combined machine UBDN-1
List of parts for drilling and milling on the combined machine UBDN-1 (Fig. 4)
- 3 - top plate
- 6 - plate
- 12 - shaft
- 22 — cartridge guard
- 23 - cartridge
- 24 - stops
- 25 - table
- 26 — latch
- 27 - rack
To perform drilling and milling of lumber on the combined machine UBDN-1, you must:
- Unscrew the 6 screws securing plate 6 and remove it. Unscrew from the table 25 the two clamps 26 installed on it with M6 nuts. Insert the nuts into the slots available on the inside of the stand 27 and attach the table 25 to the stand 27 using clamps 26, screwing them into the nut through the holes in the wall of the table 21>,
- Install the protective fence 22. To do this, insert the guide pins of the guard 22 into the slots of the rack 27, install washers on the inside of the pins and secure them with the attached cotter pins. When installing the guard, the 22 springs must remain outside the device.
- Place table 25 at the required height, stops 24 at the required drilling (milling) depth
- After this, install plate 6 in place, having previously inserted the corner of the fence 22 into the grooves of this plate
- Place plate 3 in non-working position (see Fig. 4)
- Place drill chuck 23 on the conical end of shaft 12 and secure the drill (cutter) in it.
- Turn on the device and feed material
Turning on a combined machine UBDN-1
List of parts for turning on the combined machine UBDN-1 (Fig. 5)
- 12 - shaft
- 28 — bushing
- 27 - stand
- 29 - handy
- 30 - cone
- 31 - nut
- 32 - flywheel
- 33 - stand
- 34 — bracket
- 35 - pipe
- 36 - cutter
To perform turning on the combined machine UBDN-1 it is necessary:
- Place plate 3 in non-working position (see Fig. 5)
- Insert pipe 35 into the holes located in the lower part of the racks 27 and secure it with two bolts at the bottom of the device. In this case, you need to ensure that the pointed ends of the bolts fit into the holes in the pipe and securely fix it.
- Install bushing 28 (left thread) on shaft 12
- Install bracket 34 with support 29, stand 33 on pipe 35. The stand, bracket and support are installed in the required position depending on the size of the workpiece being processed and secured with bolts.
- Place the workpiece between bushing 28 and cone 30
- Press the workpiece with the flywheel 32 and lock it with the nut 31
- Turn on the device and start processing the workpiece using cutters 36
- The glass included with the device is intended for internal turning. It is installed instead of bushing 28
Tool sharpening on a combined machine UBDN-1
List of parts for sharpening on the combined machine UBDN-1 (Fig. 6)
- 3 - top plate
- 9 - nut
- 11 — steel washer
- 12 - shaft
- 37 - handy
- 38 — bar
- 39 — grinding wheel casing
- 10 — bushing
- 40 — cardboard washer
- 41 — grinding wheel
- 42 — cardboard washer
To sharpen a tool on a combined machine UBDN-1 you must:
- Place grinding wheel 41 on shaft 12 and secure it with cardboard washers 40, 42, steel washer and sleeve 10 and nut 9;
- Install casing 39. In this case, the protrusions in the lower part of the casing should fit into the hole in the bottom plate of the device;
- Place the plate 3 in the non-working position and screw the M6 screw through the hole in the plate and casing 39, attaching the plate and casing to the stand 27;
- Place the hand rest 37 on the casing 39 in the required position;
- Before starting work, the grinding wheel must be rotated idle for 2 minutes.
Expanding the capabilities of the combined machine UBDN-1 (V. G. Shirikov)
Making simple changes to the design of the UBDN-1 machine will allow you to expand its capabilities, for example, to make lining from boards for upholstering the walls of a garden house, to make various platbands, baseboards, corners, slats, glazing beads, window and door frames and other products. Select quarters and grooves of different sizes on wood blanks, make an oval, groove, etc.
Manufacturing of lining on the UBDN-1 machine
First of all, in the top plate of the machine it is necessary to make additional cutouts in the hole for the jointing drum, as shown in Fig. 1. The size of the cutouts is 22x20 mm. This makes it possible to use a cutting tool up to 20 mm wide and select a groove, quarter, etc. to a depth of up to 12-15 mm. When making cutouts, the quality of jointed lumber does not deteriorate.
Additional cutouts in the top plate UBDN-1 of the combined machine UBDN-1. Fig.1
An additional wooden strip 25 mm thick, 50 mm wide and 600 mm long must be attached to the metal guide angle with two bolts, fitting it to the inside of the angle. An oval recess for a drum with knives is selected on the bar.
Homemade knives for the combined machine UBDN-1. Fig.2
After this improvement, you just have to make the tool (knives) you need. It can, for example, be made from tool steel (Fig. 2). By moving the guide angle and the workpiece or workpiece, you can select quarters and grooves of different sizes on one or more sides of the workpiece. The processing may have to be carried out with different knives, changing their position, since in one pass the knife is not always able to select the desired profile.
- Grooving and quartering knife
- Grooving and quartering knife
- Knife for creating an oval
- Gutter knife
- Chamfering knife
- Knife for making glazing beads
- Thorn picker
- Knife for making platbands
Three-phase motor on UBDN-2.
The most common case of a faulty tool, in my opinion, is guaranteed unreliability, most likely, “snatched” reliability from the manufacturer. They describe in the passport according to the maximum characteristics, but the tool works according to the average floating ones.
The old UBDN-2 machine could not withstand half an hour of continuous operation at an average load. The DAV-71 single-phase capacitor electric motor installed on it did not start up due to an interturn short circuit in its windings. A common reason for such machines.
I didn’t want to restore the engine, since its power of 370wt was insufficient compared to the desired one. Longitudinal cutting of a two-meter 30mm pine board took several minutes. The jointer took birch, acacia and oak with difficulty. And the operating mode of the machine specified by the manufacturer is six minutes of work and four rests.
Good job dump. Always helps. This time a three-phase electric motor was found for UBDN-2. True, without a fan cover and terminal box, but there is nothing terrible about that. The size of the electric motor terminal box would not match the dimensions of the electric motor compartment. The electric motor shaft exactly fit the size of the pulley hole from the drive of the old electric motor.
The first step was to assemble the mount for the electric motor, since the previous one did not fit. The electric motor on UBDN-2 is hinged, the belt is tensioned by a spring attached from the machine body to the electric motor body. The new mount for the three-phase electric motor was also made hinged and the tension spring remained standard.
The electrical and technical characteristics of the found electric motor we needed matched the characteristics of a standard capacitor electric motor. The turnovers are the same. There are six ends at the output from the winding with the ability to switch windings Δ 220/γ 380.
The power is slightly higher - 550W according to the passport with a three-phase connection. The electric motor windings were connected in a triangle and a test run was performed.
A simple electrical circuit for starting a three-phase electric motor to a 220v network.
After measuring the current consumption at idle and under load, we decided to leave the series-connected standard 2x15μf (~8μf) capacitors as working ones. They reduce no-load current and load current.
An industrial capacitor /LAST ONE/ 80μf - 500v was used as a starting capacitor. The standard switch remained in place. A button with two paired closing contacts was installed on the body. Our UBDN-2 electrical circuit greatly complements the factory one, since to drive the machine we no longer use a single-phase capacitor electric motor, but a three-phase one.
An electromagnetic intermediate relay of the RP-21/220v/ series was introduced into the circuit, which works as an electromagnetic starter.
After switching the standard switch to the contact closure mode, one pair of contacts supplies voltage to all windings of the electric motor, working and starting capacitors, to one terminal of the RP21 electromagnetic relay coil and to a pair of start button contacts. The second pair supplies voltage to the paired group of contacts of the start button.
When the button is pressed, its contacts close the circuit of the relay coil and at the same time connect the starting capacitor in parallel with the working capacitor. The contacts of the start button are independent, and the contact group of the electromagnetic relay is connected in such a way that when its armature is activated, the relay will block itself and remain on after the start button is released. The electric motor is stopped by switching the standard switch to the contact interruption mode.
A specially designed electromagnetic relay is installed horizontally and rigidly attached to the UBDN-2 housing. This is necessary for emergency shutdown of the electric motor.
The relay coil is powered through a standard switch and through its one contact group. During any vibration with an acceleration of 1g or more, the contacts will open. If the machine falls when it tilts a board with a jointer or saw, the clamping nut of the saw will unscrew; in emergency conditions, accompanied by sharp vibration of the machine or impacts on it, the electric motor will turn off.
After complete assembly of the UBDN-2 with a new electric motor and a new electrical circuit, the machine was run for an hour with a circular saw of a larger diameter and a jointer on dry wood, that is, large loads were created, which the machine would not normally be brought to. Watch the video
Starting the installed electric motor on the UBDN-2 machine takes no more than one second, the power is quite enough, the electric motor does not overheat. It’s just that they didn’t install a switch for connecting to a three-phase network, although we don’t need it, because we only have one phase with 220V.
vesyolyikarandashik.ru