turning tool necessary for working on a lathe. A high-quality tool is very expensive, so one chisel costs from 3 thousand rubles, and the cost of some can reach 20 thousand rubles. Not everyone is ready to shell out that kind of money for turning chisels, taking into account that for work it is necessary to have 3 or 4 cutters of various configurations.
In this article I will talk about the types of turning cutters , their purpose and methods of making them yourself from blade to handle.
I won’t drag it out and start talking about what kind of incisors there are and what they are needed for.
Meisel (oblique incisor)
A turning tool with a flat blade and a sharpened blade at an angle of 45-55 degrees. Meisel is necessary for almost all types of work: turning, trimming, finishing parts. The width of the lathe chisel can vary from 10 to 40 mm, the thickness within 4 – 6 mm, despite the fact that the wider the blade, the thicker it should be.
Reyer (semicircular chisel)
Semicircular turning tools are needed for rough roughing of the workpiece. A very useful cutter if you need to remove a large thickness. This type of chisel is very difficult to make on your own, because it is not easy to find a semicircular blank made of high-quality steel.
Flat cutter
The cutter is designed for turning smooth areas. The chisel blade is flat and comes in different widths depending on your needs. The thickness of the canvas is 4 – 6 mm.
Rounded cutter
It also has a flat blade of the same thickness of 4 – 6 mm and the width you need. Rounded turning tools are used for both rough roughing and finishing of concave areas of the product.
Parting lathe cutter
A cutting turning chisel (cutter) is needed for cutting products and processing cone-shaped recesses.
A significant advantage of purchased turning tools is that they are made of high-quality high-speed steel. It is the lack of high-quality material and tools for its processing that makes it difficult to make chisels at home.
I'll give you an example of how I made chisels myself. A turning chisel consists of a blade and a handle, which are naturally made separately. Let's start with making the canvas.
The main and probably the only tool I used when making a turning chisel was a grinder (angle grinder). But for work, I needed the following consumables:
- cutting wheel
- grinding wheel
- Velcro plate
- sandpaper of different grits (from 80 to 600)
As a blank, I took an old file.
Why a file? It's simple: fairly strong steel, blade thickness 6 mm and width about 40 mm, the file has a shank, which will make attaching the handle much easier.
I will make a reservation: if the length of the file allows you to make 2 blades, then by cutting the source on the second half you can use a grinder to cut out the shank. By the way, the length of the blade without a shank should be 150-180 mm.
I’ll tell you using the example of making a meisel - an oblique turning tool . The procedure is as follows:
Take a file and use a grinder to cut it at an angle of 40 degrees. Then, using a grinding wheel, we roughly sharpen the blade. Before you start, make sure you have a container of cold water to cool the blade you are sharpening.
In order not to overheat the steel, cool the workpiece more often and do not sharpen for too long. After the rough grinding is completed, we begin sharpening the blade using sandpaper. In order to work using this method, you need to fix the grinder on the workbench.
As you sharpen the blade, change the abrasive wheels to smaller ones, not forgetting to cool the workpiece.
When sharpening is finished, you need to round the bottom edge of the turning chisel and the face - the wide sides. For this job, I preferred using sandpaper.
Oddly enough, sandpaper did a much better job than a sanding wheel. The rounded bottom edge is needed so that the chisel can move more easily along the tool rest.
Do not forget that we used a file as the starting material, which without smoothing will be very difficult to move along the tool rest.
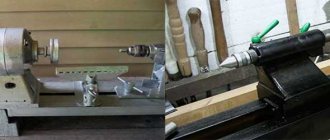
The next step will be making a handle for a turning chisel .
It turns out to be a small vicious circle: we need turning tools to make turning tools . I had a couple of similar chisels of simply terrible quality. One is rounded from an old chisel, the other is a meisel from a piece of raw metal, which became dull almost from one blow on a branch.
It's just a sad sight, but, nevertheless, with their help I managed to turn out several handles. The materials I used were: larch, apple, cherry, pine, cedar.
Based on my experience, I will say that it is better not to use pine and cedar, because they make the handle very light, which makes the turning chisel very inconvenient.
The design of the handle was partially looked at on the Internet, and partially made for myself. The length turned out to be 280 mm. You can download the drawing of a handle for a turning chisel from the link and use it both for clarity and as a template. Do not forget that you will need a copper or brass ring approximately 20 mm wide so that the handle does not burst when inserting the blade.
So. When both the handle and the blade of the turning chisel are ready, all that remains is to connect them. We stuff the prepared ring onto the neck of the handle. We take a drill and a drill with a diameter slightly smaller than the diameter of the shank. Drill a hole exactly in the center with a depth equal to the length of the shank. If the hole is not made exactly in the center, then the handle and the blade will connect at an angle.
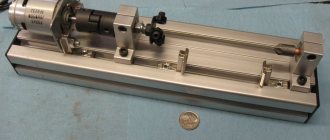
Design of a simple homemade tap holder
To make a simple DIY tap holder, you will need the following parts.
- Long coupling nut.
- Bolts or studs for it (2 pcs.).
Photo No. 1: coupling nut and two bolts
Note! From this set you can make universal tap holders for thread-cutting tools of several sizes. Therefore, please observe the following rules.
- The diameter of the shank of the largest tap should not exceed the diameter of the bolts/studs screwed into the coupling nut.
- Maintain proportionality. Do not use nuts that are too large for small tap holders and vice versa.
- If necessary, it is better to make several knobs.
How to make cutters for a wood lathe with your own hands, their prices
The production of original wooden products on machines requires the availability of a variety of high-quality auxiliary tools. In most cases, wood lathe cutters are used for this. Thanks to them, it is possible to bring the workpiece to the required geometric parameters.
Manufacturers offer all kinds of sets, including products with cutting edges of various configurations. You can also make your own wood cutting tools with your own hands.
Wide selection of shapes and models
When processing wood blanks professionally, it is important to correctly select the appropriate tool for wood turning. A wide selection and large sets with diverse tips will allow you to cover a significant part of the work.
Varieties
Based on functionality, wood chisels are usually divided into the following groups:
- Rough peeling . The tool has a pair of working edges that meet at an acute angle. It is believed that this design is significantly safer than radius analogues.
Raiser for rough roughing
- Finish turning . Similar types of cutters for a wood lathe remove a small layer of chips and are not intended to give the workpiece a shape, but their purpose is to give external smoothness to the outer surface. Metal tips are available with left or right sharpening.
Finishing tool
- wood cutter They are used to work with non-standard surfaces.
Shaped can have almost any configuration
- Cut-off cutter . It is currently relevant for one operation in which it is necessary to separate some part from the workpiece.
Cutting width 10 mm
- Boring . With the help of such products, excess material that appears during the processing process is removed. A special ledge located in the cutting area helps in such an operation.
Boring tool to remove excess wood
- Round wood turning tools They are used for processing radius workpieces. The working part can be either radius or with small technological teeth.
Reyer for turning bowls
- Wood turning at the end is carried out using a conventional cutting file.
- As auxiliary equipment, special stops are used on cutters that limit the depth of cut.
In addition to the standard set, professionals use homemade wood lathe cutters in their work. This approach increases productivity and helps expand the range of finished products.
If you plan to engage in wood processing for a long time, then you cannot do without high-quality tools, which are made from tool-grade steel. It is able to withstand high production intensity, which homemade products are not always capable of.
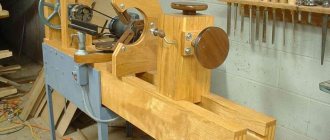
Homemade wood turning tools
The greatest difficulty in the production of each type of chisel for a lathe is the selection of blanks for the cutting part. In addition to ensuring appropriate hardness, you have to think about the possibility of installing the metal part in the holder. It will allow you to fix the cutter in the desired position for comfortable processing.
When to use center mounting
installation of the workpiece using a mandrel: 1 - middle part of the mandrel; 2 - flat; 3 — center holes; 4 - blank
- This is how long parts are machined, the length of which is five times the diameter;
- if you need to create concentricity of surfaces during fixation;
- the further stage of turning takes place on grinding equipment;
- technology does not provide for other methods.
Chisels for a wood lathe: types and sizes
Creating wooden cylindrical products is impossible without a hand tool - a chisel for a lathe. It is from under its blade that the unnecessary amount of material is removed and the workpiece acquires an artistic decoration.
Turning chisels can be bought ready-made, but such kits are very expensive, especially high-quality ones. Cutters for wood processing are easy to make yourself, which will be discussed further.
What types of chisels are there?
For professional processing of a wooden workpiece on a lathe, various working tools are required, including a rich set of chisels. Based on their functional role, they can be divided into groups:
- For rough processing. They have 2 cutting edges located at an angle to each other.
- Meisel for finishing. This cutter is a blade with a flat plane and an angular sharpening on the left or right side. The angle of inclination of the cutting part may be different.
- The semicircular reyer chisel is used for working with non-standard products.
- The cut-off cutter is used to remove fragments of wood when forming a pattern.
- A boring tool for wood turning has a shoulder to help remove excess material released during the pointing process.
- Round chisel for processing round products. Its tip can be smooth or jagged.
- Cutting file for processing the end sections of the workpiece.
- The cutter stop is installed on the tool to adjust the turning depth.
The main reasons for metal magnetization
Magnets are media that create their own magnetic field. Main groups of magnets:
- paramagnetic materials;
- ferromagnets;
- Diamagnets.
Steel products based on alloys of iron, cobalt or nickel refer to substances whose own magnetic field is higher than the external one, i.e. to ferromagnets. The magnetization of a substance is considered to be the sum of the magnetic properties of particles per unit volume.
At the moment the Curie temperature threshold is reached, spontaneous domains with magnetization are formed, which spread until they are completely filled. Under normal conditions, it is possible to obtain a magnetized tool when working close to electric motors, magnetrons and other elements. The metal takes away the properties of magnetism from a nearby emitter, thereby becoming magnetized.
Magnetized screwdriver
Magnetized paper clip
Working with small parts with a magnetized tool can cause a lot of trouble. Sharpening metals with increased magnetism properties is impossible to ideal sizes, because... the material is covered with shavings.
Safety precautions when sharpening cutters
The master sharpening the cutter must follow the safety rules to avoid injury:
- check the serviceability of sharpening equipment;
- wear safety glasses or work through a protective screen on the machine;
- do not touch the equipment and cutter until they have cooled after sharpening;
- make sure that there is no grease or other greasy substances on your hands (otherwise the tool may slip out of your hands and cause injury);
- When cleaning equipment and cleaning the workplace, wear gloves and use brushes.
If an automatic machine is used, it is important to read the instructions for it, check that the moving parts are lubricated and that the abrasive wheel is securely fixed. The cutter must be fed smoothly onto the wheel. Do not touch the machine until it has come to a complete stop.
Production personnel are required to undergo safety training. Home craftsmen should study the standards on their own.