Classification
Metallurgists classify metal alloys according to several criteria:
- manufacturing method:
- cast;
- powder;
- production technology:
- foundries;
- deformable;
- powder;
- homogeneity of structure:
- homogeneous;
heterogeneous;
- type of metal - basics:
- black (iron);
- non-ferrous (non-ferrous metals);
- rare metals (radioactive elements);
- number of components:
- double;
- triple;
- and so on;
- physicochemical characteristics:
- refractory;
- fusible;
- high strength;
- heat resistant;
- hard;
- antifriction;
- corrosion-resistant, etc.;
- purpose:
- structural;
- instrumental;
- special.
Types of alloys based on them
Metals and alloys based on them have different physical and chemical characteristics.
The metal having the largest mass fraction is called the base.
Definition and types of technological properties of metals and alloys
The technological properties of metals and alloys determine their ability to change under the influence of hot or cold processing methods. They are based on the physical and mechanical characteristics of materials.
The following technological properties of metals and alloys are distinguished:
- O+processing by cutting;
- susceptibility to deformation due to malleability, stampability, bends, kinks, flanging, etc.;
- weldability;
- foundry properties;
- soldering ability;
- hardening, etc.
It is the technological properties of metals and alloys that determine how the workpiece will behave during processing.
Let us dwell in more detail on the main technological properties.
Weldability.
This is a technological property of metals and alloys, due to which they form strong compounds with each other. The workpieces are joined by melting the material and its subsequent cooling. Depending on the source of heating of parts, welding is divided into gas, arc, electric contact, ultrasonic, etc.
Deformability.
This technological property is understood as the ability of metals and alloys to change under the influence of plastic deforming operations, such as bending, forging, stamping, rolling, pressing, etc. In this case, the integrity of the workpieces is not compromised. This property of materials is influenced by their chemical composition, mechanical properties, deformation rate, temperature at which operations are performed, etc. The deformation method is selected after performing technological tests, during which the deformability of various alloys and metals is assessed.
Properties of alloys
The properties possessed by metal alloys are divided into:
- Structurally insensitive. They are determined by the properties of the components and their percentage. These include :
- density;
- melting temperature;
- thermal and elastic characteristics;
- coefficient of thermal expansion;
- structurally sensitive. Determined by the properties of the element - the base.
- All alloy materials exhibit characteristic metallic properties to one degree or another:
- shine;
- plastic;
- thermal conductivity;
- electrical conductivity.
- In addition, properties are divided into:
- Chemical, determined by the relationship of the material with chemically active substances.
Mechanical, determined by interaction with other physical bodies.
- The main characteristics of alloy materials that influence their suitability for use in a particular engineering structure are:
- Strength is a characteristic of the strength to withstand mechanical loads and destruction.
- Hardness is the ability to resist the penetration of solid bodies into a material.
- Elasticity is the ability to restore the original shape of a body after deformation caused by external load.
- Plasticity is the opposite property of elasticity. Determines the ability of a material to change the shape of a body without its destruction under an applied load and maintaining this new shape.
- Viscosity - the ability to resist rapidly increasing (shock) loads
Mechanical properties
To quantitatively express these properties, special physical quantities and constants are introduced, such as the elastic limit, Hooke's modulus, viscosity coefficient and others.
Properties of metalarticle on the topic
Metal properties
Metals are a category of chemical elements that have specific physical, chemical, mechanical, and technological properties.
The physical properties of materials include density, melting point, electrical conductivity, thermal conductivity, magnetic properties, coefficient of thermal expansion, etc.
Density is the ratio of the mass of a homogeneous material to a unit of its volume.
This property is important when using materials in aviation and rocket technology, where the structures created must be light and durable.
Melting point is the temperature at which a metal changes from solid to liquid. The lower the melting temperature of the metal, the easier the processes of its melting during welding occur and the cheaper they are.
Electrical conductivity is the ability of a material to conduct electric current well and without heat loss. Metals and their alloys, especially copper and aluminum, have good electrical conductivity. Most non-metallic materials are unable to conduct electric current, which is also an important property used in electrical insulating materials.
Thermal conductivity is the ability of a material to transfer heat from more heated parts of bodies to less heated ones. Metal materials are characterized by good thermal conductivity.
Magnetic properties i.e. Only iron, nickel, cobalt and their alloys have the ability to be magnetized well.
The coefficients of linear and volumetric expansion characterize the ability of a material to expand when heated. This property is important to take into account when building bridges, laying railway and tram tracks, etc.
Chemical properties characterize the tendency of materials to interact with various substances and are associated with the ability of materials to resist the harmful effects of these substances. The ability of metals and alloys to resist the action of various aggressive environments is called corrosion resistance, and the similar ability of non-metallic materials is called chemical resistance.
Mechanical properties of metals
Metals have a number of mechanical properties:
- metal hardness
The hardness of a metal is its ability to prevent the penetration of another harder substance into the material.
Almost all metals are in a solid state. The exceptions are mercury, gallium, cesium and francium.
- metal strength
This is a property that determines the degree of destruction of a metal when exposed to it physically or mechanically. A metal alloy that hardly deforms when exposed to impact and is distinguished by its strength is steel. The weakest metal is mercury.
- metal viscosity
It is believed that the more a metal resists under increasing shock loads, the more ductile it is.
- fragility of metal
This property is the opposite of viscosity. Defined when the metal can be destroyed by force. Cast iron is considered the most fragile metal.
- plasticity of metal
The greater the load a metal can withstand without collapsing and maintaining its given shape after the impact on the material has stopped, the more plastic the metal is.
- metal elasticity
This property is the ability of a metal to return to its original appearance after exposure to external forces. Elasticity is an important quality in the manufacture of springs, which must return to their shape after being stretched.
In order to determine the mechanical properties of metals, mechanical tests are carried out. This is what makes it possible to identify the hardness, strength, ductility of the metal, as well as other mechanical properties of this material.
In static tensile tests, values characterizing the strength, ductility and elasticity of the material are determined. Tests are carried out on cylindrical (or flat) samples with a certain ratio between length l0 and diameter d0. The sample is stretched under the action of the applied force P (Fig. 1, a) until destruction. An external load causes stress and deformation in the sample. Stress σ is the ratio of force P to cross-sectional area F0, MPa:
σ = P/F0,
Deformation characterizes the change in sample dimensions under load, %:
ε =[(l1-l0)/l0]·100,
where l1 is the length of the stretched sample.
Deformation can be elastic (disappearing after the load is removed) or plastic (remaining after the load is removed).
During testing, a tensile diagram is drawn, which represents the dependence of stress on deformation. In Fig. 1 shows such a diagram for low-carbon steel.
Rice. 1. Static tensile tests: a – test diagram; b – tensile diagram
After testing, the following characteristics of mechanical properties are determined.
The elastic limit σу is the maximum stress at which plastic deformation does not occur in the sample.
The yield strength σт is the stress corresponding to the yield point on the tensile diagram (Fig. 1).
If there is no yield plateau on the diagram (which is observed for brittle materials), then the conditional yield strength σ0.2 is determined - the stress causing plastic deformation equal to 0.2%. Ultimate strength (or temporary resistance) σв is the stress corresponding to the maximum load that the sample can withstand during testing.
Relative elongation after rupture δ—the ratio of the increment in length of the sample during tension to the initial length l0, %:
δ =[(lk-l0)/l0]·100,
where lк is the length of the sample after rupture.
Relative narrowing after rupture ψ is the decrease in the cross-sectional area of the sample, related to the initial cross-section of the sample, %:
ψ =[(F0-Fk)/F0]·100,
where Fк is the cross-sectional area of the sample at the fracture site. Relative elongation and relative contraction characterize the plasticity of the material.
The hardness of metals is measured by pressing a hard tip of various shapes into the test sample.
The Brinell method is based on pressing a hardened steel ball into the metal surface under a certain load. After the load is removed, an imprint remains in the sample. The Brinell hardness number HB is determined by the ratio of the load acting on the ball to the surface area of the resulting print.
The Rockwell method is based on pressing a hardened steel ball with a diameter of 1.588 mm (scale B) or a diamond cone with an apex angle of 120° (scales A and C) into the test sample. Indentation is carried out under the action of two loads - preliminary equal to 100 N and final equal to 600, 1000. 1500 N for scales A, B and C, respectively. The Rockwell hardness number HRA, HRB and HRC is determined by the difference in indentation depths.
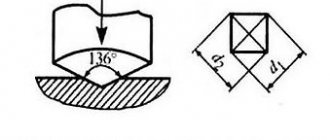
The Vickers method uses indentation of a diamond tetrahedral pyramid with an apex angle of 136°. The Vickers hardness number HV is determined by the ratio of the applied load to the surface area of the indentation.
Impact strength is determined by the work A spent on the destruction of the sample, divided by its cross-sectional area F; J/m2:
KC=A/F
Tests are carried out by hitting a special pendulum pile driver. For testing, a standard notched sample is used, mounted on the supports of the pile driver. A pendulum of a certain mass strikes the side opposite the cut.
Technological properties of metal
The technological properties of a metal are determined by changes in the mechanical and physical properties of the metal. This occurs depending on the processing of the metal by cutting, casting, forging and other methods. What are the technological properties of the metal?
- malleability of metal
Represents the ability of a metal to deform.
- hardenability of metal
This property is determined during the hardening of the metal and is determined by the deeper the metal can be hardened, the greater the hardenability it has.
- metal fluidity
Flowability is the ability of a metal in a liquid state to spread, filling a certain shape
- metal weldability
This property can be revealed when two metal parts are connected by welding.
Weldability is the technological property of materials (metals) or their combinations to form joints during the welding process that meet the structural and operational requirements for them. This definition of weldability should be distinguished from weldability as the mere ability to form a joint. Nowadays, in principle, most materials can be joined by welding, but the designer is always interested in the quality of the joints.
The material changes its properties in one way or another during the welding process. These changes depend both on the material itself, its physical and chemical properties, and on the welding method and modes. Moreover, it should be taken into account that the degree of influence on the material by phenomena associated with welding can be very significant. Therefore, without taking into account the analysis of the weldability of a particular material, the conditions under which the welding process itself occurs, the design features of the welded product or assembly, the designer cannot select the material for the manufacture of the product and rationally design it.
Weldability is a complex, complex property of materials. It cannot be determined by any one test or one technique. Assessment of weldability is directly related to the characteristics of the material and its operating conditions. However, some criteria for assessing weldability are quite general for a wide range of metals and alloys.
Changes in the chemical composition and distribution of elements in a welded joint. During welding, the metal can heat up quite strongly, and with thermal methods it melts in a small local area. Under such conditions, the chemical composition of the metal changes. The degree of changes depends on the chemical activity of the metal itself, the composition of the surrounding temperature, the quality of preparation of the metal surface for welding, and diffusion processes in the weld pool.
| The influence of welding heating on the structure and mechanical properties of the base metal. The most noticeable changes in structure and properties are observed in metals that have polymorphic transformations. The latter can occur with or without a change in volume. Steels of the pearlitic and martensitic classes, for example, are alloys that have pronounced polymorphism properties with a change in the volume of the structure within 3-5%. Titanium alloys undergo polymorphic transformations, accompanied by a slight change in volume (0.15%); Refractory metals and some alloys of non-ferrous metals do not have such transformations. Regardless of the presence and nature of polymorphic transformations, three main areas are distinguished in a welded joint: first - the metal is heated to a temperature above the solidus line; second - the metal is heated to temperatures sufficient for phase transformations or recrystallization processes to occur; the third - with a temperature below the temperature at which these processes occur. The first region includes the seam itself and the fusion zone; |
the second is the heat-affected zone;
the third is the zone of mechanical or thermomechanical influence. The third region is adjacent to the base metal.
| Rice. 2. Diagram of structures in the heat-affected zone when welding steels: 1 - zone of deposited metal; 2 - zone of incomplete melting; 3 - overheating zone, 4 - normalization zone; 5—zone of incomplete recrystallization; 6 – zone of recrystallization and high tempering; 7 - low temperature tempering zone |
In Fig. Figure 2 shows a diagram of zones of structural changes in relation to welding carbon steel. Maximum changes in the structure of the metal, its chemical composition, as well as the likelihood of various types of defects occurring are observed in the weld and fusion zone. The overheated area is characterized by a significant increase in grain and the presence of complete structural and phase transformations. In the area of complete recrystallization, the heating temperature is higher than the temperature of phase transformations, however, the intensity of transformations is less than in the overheating area, as well as the residence time of the metal at these temperatures is shorter, so a significant increase in grain does not occur here. In the considered zones of hardening alloys, the formation of typical hardening structures is possible. The associated decrease in the ductility of the metal can cause the appearance of defects such as cracks and contribute to a decrease in the strength of the product.
In the zone of partial recrystallization, as a result of the disintegration of hardening structures, a significant decrease in the strength of the metal is observed, which must be taken into account when welding pre-heat-treated or cold-worked metal. Similar phenomena can be observed in the high-temperature tempering zone. The zone of low-temperature tempering and mechanical influence is characterized by less significant changes in the metal. In the case of welding metal in the annealed state, a change in the properties of the metal is not recorded in this zone.
The area of the base metal that has not undergone melting, the structure and properties of which have changed as a result of heating during welding, is called the heat-affected zone. Its value depends on the properties of the material, its thickness, welding method and mode, and the nature of the sources of welding heat. The greater, for example, the heat concentration of the heating source, the higher its temperature, the higher the welding speed, the smaller the zone of influence. So, with arc welding it is less than with gas welding. The minimum heating area is achieved when welding with electronic or light beams, which provide a high concentration of thermal energy.
If the strength of the material decreases in the high tempering zone, it is necessary to carry out strengthening heat treatment after welding. However, this is not always possible. Thus, when manufacturing large-sized products from high-strength materials, it is difficult to harden after welding. It is also necessary to take into account the high labor intensity of this operation, the significant expenditure of energy and time, as well as the deformation of the heat-treated product.
Another way to increase structural strength is to physically harden (frettage) the seam and the heat-affected zone. Various options for strengthening mechanical treatment, however, are not applicable to all structures. High strength of cylindrical products is ensured by the use of spiral seams. With an “oblique” location of the seam, the stresses in it, as is known, will be lower than with a longitudinal location of the seams.
Local weakening of the mechanical properties of the metal caused by welding heating is compensated in some cases by thickening the welded edges obtained by metal forming or chemical milling. However, in this case one has to take into account the inevitable increase in the mass of the structure and metal consumption.
The properties of the welded joint are affected not only by the maximum temperature, but also by the time the metal remains in the region of elevated temperature, the so-called thermal cycle.
The structure and mechanical properties of a welded joint change not only under the influence of heat. Changes also occur with mechanical or thermomechanical welding methods. Often, an increase in hardness and a decrease in ductility in the heat-affected zone occurs due to physical hardening (hardening). Similar phenomena can, for example, occur during cold and ultrasonic welding, when the process of formation of a welded joint is accompanied by significant plastic deformations without significant heating.
Due to the difference in the mechanical properties of the welded joint and the base metal, there is a need to evaluate them. This is accomplished by conventional mechanical testing, but specimens are often prepared in such a way that the mechanical properties of individual zones of the base metal adjacent to the weld, weld metal or weld can be determined.
Operational (service) properties include heat resistance, heat resistance, wear resistance, radiation resistance, corrosion and chemical resistance, etc.
Heat resistance characterizes the ability of a metal material to resist oxidation in a gas environment at high temperatures.
Heat resistance characterizes the ability of a material to maintain mechanical properties at high temperatures.
Wear resistance is the ability of a material to resist destruction of its surface layers due to friction.
Alloy theory
A metal alloy is a material obtained by fusing two or more metals or metals with non-metals and having metallic properties. Substances that form an alloy are called components .
A phase is a homogeneous part of an alloy, characterized by a certain composition and structure and separated from other parts of the alloy by an interface. Structure refers to the shape, size and nature of the relative arrangement of phases in metals and alloys. Structural components are separate parts of an alloy that have the same structure with their characteristic features.
Types of alloys by structure. According to the nature of the interaction of the components, all alloys are divided into three main types: mechanical mixtures, chemical compounds and solid solutions.
A mechanical mixture of two components A and B is formed if they are not capable of interaction or mutual dissolution. Each component crystallizes into its own crystal lattice. The structure of mechanical mixtures is heterogeneous, consisting of separate grains of component A and component B. The properties of mechanical mixtures depend on the quantitative ratio of the components: the more of a given component in the alloy, the closer the properties of the mixture are to its properties.
A chemical compound is formed when alloy components A and B react chemically. Moreover, the ratio of the numbers of atoms in the compound corresponds to its chemical formula AmBn. A chemical compound has its own crystal lattice, which differs from the crystal lattice of its components. Chemical compounds have a homogeneous structure, consisting of grains of identical composition and properties.
When a solid solution , atoms of one component enter the crystal lattice of another. Substitutional solid solutions are formed as a result of partial replacement of atoms of the crystal lattice of one component with atoms of the second (Fig. 6, b).
Interstitial solid solutions are formed when atoms of a dissolved component are introduced into the crystal lattice of a solvent component (Fig. 6, c). The solid solution has a homogeneous structure, one crystal lattice. Unlike a chemical compound, a solid solution does not exist at a strictly defined ratio of components, but in a concentration range. Solid solutions are designated by lowercase letters of the Greek alphabet: α, β, γ, δ, etc.
Status diagram. The phase diagram shows the structure of the alloy depending on the ratio of components and temperature. It is constructed experimentally using the cooling curves of the alloys (Fig. 8). Unlike pure metals, alloys do not crystallize at a constant temperature, but within a temperature range. Therefore, there are two critical points on the cooling curves of alloys. At the upper critical point, called the liquidus point (tl), crystallization begins. At the lower critical point, which is called the solidus point (tc), crystallization is completed. The cooling curve of the mechanical mixture (Fig. 8, a) differs from the cooling curve of the solid solution (Fig. 8, b) by the presence of a horizontal section. In this area, crystallization of the eutectic occurs. A eutectic is a mechanical mixture of two phases that simultaneously crystallized from a liquid alloy. Eutectic has a certain chemical composition and is formed at a constant temperature.
The phase diagram is constructed in temperature-concentration coordinates. The lines of the diagram delimit areas of identical phase states. The type of diagram depends on how the components interact with each other. To construct a phase diagram, a large number of cooling curves are used for alloys of various concentrations. When constructing a diagram, critical points are transferred from the cooling curves to the diagram and connected by a line. In the resulting areas on the diagram, phases or structural components are recorded. The line of the phase diagram on which crystallization of the alloy begins upon cooling is called the liquidus line , and the line on which crystallization ends is called the solidus line .
Types of state diagrams. The state diagram of alloys forming mechanical mixtures (Fig. 9) is characterized by the absence of dissolution of the components in the solid state. Therefore, in this alloy, the formation of three phases is possible: liquid alloy Zh, crystals A and crystals B. The ACB line of the diagram is the liquidus line: in the AC section, upon cooling, crystallization of component A begins, and in the CD section, component B begins. The DCB line is the solidus line, on it the crystallization of A or B is completed and at a constant temperature the crystallization of the eutectic E occurs. Alloys whose concentration corresponds to point C of the diagram are called eutectic, their structure is a pure eutectic.
Alloys located on the diagram to the left of the eutectic are called hypoeutectic; their structure consists of grains A and eutectic. Those alloys that are located to the right of the eutectic in the diagram are called hypereutectic; their structure consists of grains B surrounded by eutectic.
The state diagram of alloys with unlimited solubility of components in the solid state is shown in Fig. 10. For this alloy, the formation of two phases is possible: a liquid alloy and a solid solution a. There are only two lines on the diagram, the top one is the liquidus line, and the bottom one is the solidus line.
The phase diagram of alloys with limited solubility of components in the solid state is shown in Fig. 11. Three phases can exist in this alloy - a liquid alloy, a solid solution of α component B in component A and a solid solution of β component A in component B. This diagram contains the elements the previous two. The ACB line is the liquidus line, the ADCEB line is the solidus line. Eutectic is also formed here; there are eutectic, hypoeutectic and hypereutectic alloys. Along the lines FD and EG, secondary crystals of αII and βII are released (due to a decrease in solubility with decreasing temperature). The process of separating secondary crystals from the solid phase is called secondary crystallization.
The state diagram of alloys forming a chemical compound (Fig. 12) is characterized by the presence of a vertical line corresponding to the ratio of components in the chemical compound AmBn. This line divides the diagram into two parts, which can be considered as independent diagrams of alloys formed by one of the components with a chemical compound. In Fig. 12 shows a diagram for the case when each of the components forms a mechanical mixture with a chemical compound.
Main types of alloys
The most numerous types of metal alloys are made based on iron. These are steels, cast irons and ferrites.
Steel is an iron-based substance containing no more than 2.4% carbon, used for the manufacture of parts and housings for industrial installations and household appliances, water, land and air transport, tools and devices. Steels have a wide range of properties. The common ones are strength and elasticity. The individual characteristics of individual steel grades are determined by the composition of alloying additives introduced during smelting. Half of the periodic table is used as additives, both metals and non-metals. The most common of them are chromium, vanadium, nickel, boron, manganese, phosphorus.
Alloy steel
If the carbon content is more than 2.4%, such a substance is called cast iron. Cast iron is more brittle than steel. They are used where it is necessary to withstand large static loads with small dynamic ones. Cast iron is used in the production of frames for large machine tools and technological equipment, bases for work tables, and in the casting of fences, gratings, and decorative items. In the 19th and early 20th centuries, cast iron was widely used in building structures. Cast iron bridges have survived to this day in England.
Cast iron radiators
Substances with a high carbon content and having pronounced magnetic properties are called ferrites. They are used in the production of transformers and inductors.
Copper-based metal alloys containing from 5 to 45% zinc are commonly called brasses. Brass is slightly susceptible to corrosion and is widely used as a structural material in mechanical engineering.
Yellow brass
If you add tin to copper instead of zinc, you get bronze. This is perhaps the first alloy deliberately obtained by our ancestors several thousand years ago. Bronze is much stronger than both tin and copper and is second in strength only to well-forged steel.
Lead-based substances are widely used for soldering wires and pipes, as well as in electrochemical products, primarily batteries and accumulators.
Two-component aluminum-based materials, which contain silicon, magnesium or copper, are characterized by low specific gravity and high machinability. They are used in the engine, aerospace, and electrical component and appliance industries.
Changing technological properties using steel as an example
The most common material is steel. The technological properties of steel alloys are affected by their chemical composition - the impurities included in it can increase or decrease certain characteristics of the material:
- The higher the carbon content in the alloy, the higher its hardenability and the lower its susceptibility to forging. Forging and rolling are possible for metals and alloys that contain no more than 1.4% of this chemical element.
- Manganese reduces the thermal conductivity of metals and alloys and, as a result, the possibility of their welding. However, when heated evenly and slowly, such materials are excellent for forging.
- Nickel has a positive effect on the plastic technological properties of metals and alloys; materials in which it is present are easily forged. However, when heated, nickel promotes the formation of scale. It is not destroyed during forging, penetrates into the metal and reduces the quality of the finished product.
- Chromium helps to increase the strength of metals and alloys; therefore, workpieces containing it should not be processed by forging or rolling, as there is a high probability of cracks.
- The high content of molybdenum in the composition of metals and alloys reduces their technological property such as thermal conductivity. This point is important to consider when choosing a processing temperature; heating and cooling must be carried out in strict compliance with the requirements prescribed by the technology. Forging is possible with the use of more powerful equipment
- Vanadium, on the contrary, improves the quality of forging and increases the resistance of steels to overheating.
The technological properties of metals and alloys are negatively affected by the presence of sulfur and phosphorus in their composition. Their high content causes red brittleness (brittleness when heated) and cold brittleness (brittleness when cooled) of the workpieces. Despite the fact that it is impossible to completely purify alloys from the presence of these chemical elements, production strives to reduce their content in the composition as much as possible.
The technological properties of metals and alloys directly depend on their chemical composition, therefore, before choosing one or another processing method, the composition of the material to be processed is carefully analyzed in production. If this is not done, problems are likely to arise both during the processing process and during the further use of finished products.
Zinc alloys
Zinc-based alloys are characterized by low melting points, corrosion resistance and excellent machinability. They are used in mechanical engineering, the production of computers and household appliances, and in publishing. Good anti-friction properties allow the use of zinc alloys for bearing shells.
Titanium is not the most affordable metal; it is difficult to produce and difficult to process. These shortcomings are compensated by the unique properties of titanium alloys: high strength, low specific gravity, resistance to high temperatures and aggressive environments. These materials are difficult to machine, but their properties can be improved by heat treatment.
Alloying with aluminum and small amounts of other metals increases strength and heat resistance. To improve wear resistance, nitrogen is added to the material or cemented.
Scope of application of titanium alloys
Titanium-based metal alloys are used in the following areas:
- aerospace;
- chemical;
- atomic;
- cryogenic;
- shipbuilding;
- prosthetics.
Aluminum alloys
If the first half of the 20th century was the century of steel, then the second was rightly called the century of aluminum.
It is difficult to name a branch of human life in which products or parts made of this light metal would not be found.
Aluminum alloys are divided into:
- Foundry (with silicon). Used to produce conventional castings.
- For injection molding (with manganese).
- Increased strength, with the ability to self-harden (with copper).
Main advantages of aluminum compounds:
- Availability.
- Low specific gravity.
- Durability.
- Cold resistance.
- Good machinability.
- Electrical conductivity.
The main disadvantage of alloy materials is low heat resistance. When reaching 175°C, a sharp deterioration in mechanical properties occurs.
Another area of application is the production of weapons. Aluminum-based substances do not spark under strong friction and collisions. They are used to produce lightweight armor for wheeled and flying military equipment.
Aluminum alloy materials are widely used in electrical engineering and electronics. High conductivity and very low magnetizability make them ideal for the production of housings for various radio and communications devices, computers and smartphones.
Aluminum alloy ingots
The presence of even a small proportion of iron significantly increases the strength of the material, but also reduces its corrosion resistance and ductility. A compromise on iron content is found depending on the requirements for the material. The negative effect of iron is compensated by adding metals such as cobalt, manganese or chromium to the alloy composition.
Magnesium-based materials compete with aluminum alloys, but due to their higher price they are used only in the most critical products.
Technological testing of metals and alloys
Process tests include tests for bending, upsetting, flattening, beading, folding, etc. Many samples and tests are carried out in accordance with developed and approved standards.
Depending on the results of technological tests, a decision is made on the possibility of manufacturing parts and structures of appropriate quality from the available material using one or another operation performed in this production.
The bending test is carried out in accordance with the requirements of GOST 14019-80. It is used to determine whether metals and alloys are able to withstand bending without destruction. The sample is placed under a press and bent to the required angle. If the bending angle is 180°, then the material can withstand extreme deformation. The absence of cracks, tears, delaminations and other defects indicates that the sample has passed the test.
