A battery-powered screwdriver is a useful power tool for household chores, construction, and when assembling a wide variety of structures. Its main advantage is the ability to perform work autonomously until the batteries run out. For various reasons, it may be necessary to modify the screwdriver to connect to a 220 V network. This modification is relatively easy to carry out independently in various ways; special tools are not required for this. Depending on the option chosen, making changes will require different time and financial costs.
Converting a screwdriver to power from a 220V network
If the battery fails and it cannot be repaired, the only way out is to convert the cordless screwdriver into a mains one.
In this case, the power of the power supply must exceed the power of the engine, taking into account possible overloads at the moment of completion of tightening. It is not indicated in the device passport, but this parameter is written on the body of the electric motor, or it can be calculated by connecting the device to a constant voltage source through an ammeter. For a 70W motor, a 120W power supply is sufficient.
Important! The charger's power is insufficient to operate it. When converting a cordless screwdriver into a mains-powered one for 220 volts, you must use a different power supply
Using an external power supply
The external power supply device is larger in size than the built-in one, but in any case, if you power the screwdriver from the mains, the tool will be “tied” to the socket by a wire.
External power supply
The current coming from the power supply reaches 10-15A, so the cable cross-section must be at least 1mm².
Computer power supply
The simplest and cheapest option is to use a power supply from an old computer with a power of at least 300W and a current of 15A.
In old units there was a switch, in modern ones - to turn it on you need to short-circuit the wires going to the device. The color of these wires depends on the model. This can be found on the Internet or by selection.
The 12V output is located in a four-pin connector: black “–”, yellow “+”.
Such devices have a built-in fan, so when making a housing for it, it is necessary to make holes or install it with the fan facing outward. It's best to simply hide the excess wires inside the case.
Important! A 14.4 or 18 volt screwdriver will operate at reduced power
Car battery charger
The requirements for this device are the same as when using a computer unit.
If so, it is advisable to use a device with a built-in voltmeter and voltage regulation. Some models have a current-limiting resistor installed inside. It needs to be short-circuited.
How to make a homemade power supply
In addition to the purchased one, you can make your own power supply. To do this, you need a 160W transformer, the kind that was installed in tube TVs.
First of all, it is necessary to determine the required number of turns. The procedure is as follows:
- disassemble the transformer;
- unwind all secondary windings from the reel;
- wind 10 turns of wire;
- assemble a transformer;
- connect to 220V network;
- measure the voltage on the secondary winding;
- divide the number of turns (in this case 10) by the measured voltage.
The resulting value is multiplied by the supply voltage of the screwdriver and the required number of turns is obtained.
Transformer
Attention! The number of turns per volt can be obtained by measuring the voltage and counting the turns in the secondary winding. The step-down winding is wound with a wire with a cross-section of 1 mm² to reduce the voltage drop in the transformer
The step-down winding is wound with a wire with a cross-section of 1 mm² to reduce the voltage drop in the transformer.
The output of the transformer is alternating voltage, but the device requires constant voltage, so a diode bridge is installed in addition to the transformer. It is assembled from diodes on radiators with a voltage of more than 20V and a current of 10A. It is mounted together with a transformer or in a battery case from which the elements have been removed.
Built-in battery power supply in case
If you have the desire, time and “direct” hands, the unit can be placed in the battery case. To do this, a ready-made device with the appropriate parameters is purchased, removed from its housing and mounted in the battery housing. The terminals are soldered with a wire with a cross-section of at least 1 mm² to the battery terminals, and the power cord is replaced with a longer one.
Built-in power supply
Types of battery cells
These devices use elements of different types and voltages, each of which has its own advantages and disadvantages.
The most common are nickel-cadmium (Ni – Cd) with a voltage of 1.2V.
Advantages:
- low price;
- stored in a discharged state.
Flaws:
- have a memory effect;
- high self-discharge;
- small capacity;
- small number of charge/discharge cycles.
More advanced nickel-metal hydride (Ni-MH) voltages are 1.2V.
Advantages:
- less memory effect and self-discharge;
- large capacity and number of charge/discharge cycles.
Flaws:
- higher price;
- do not tolerate low temperatures and storage in a discharged state.
The most advanced lithium-ion (Li-Ion) voltage 3.6V.
Advantages:
- no memory effect;
- very low self-discharge current;
- high specific capacity, allowing to reduce the weight and dimensions of the device;
- the number of charge/discharge cycles is many times higher than other types of batteries.
Flaws:
- high price;
- loss of capacity three years after manufacture.
Step-by-step instruction
The procedure is as follows:
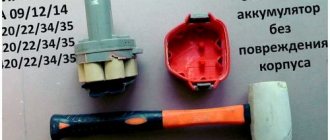
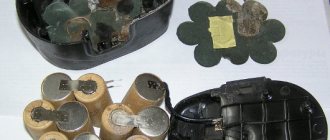
- Disassemble the battery: unscrew all the screws hidden under the stickers. The batteries located inside are interconnected. There are two wires connected to them: red (+) and black (-).
- Cut off the wires from the batteries. You need to cut it off from the elements, and not from the battery contacts.
- Connect the wire to the open contacts of the charger by soldering, having previously treated the brass terminals with phosphoric acid. This will ensure a secure connection between the brass and the copper cable.
- Insulate connections.
- Insert a weight into the housing where the batteries are located as a counterweight.
- Solder the battery terminals inside the case to the free cable contacts, observing polarity. If the polarity is violated, the tool will work, but rotate in the other direction.
- Plug in the plug and check its functionality.
- Additionally, make a hole in the screwdriver body on the left side for the wire. To ensure a tight fit, make a “lock” from insulating tape.
Work order
Before starting work, make sure that the selected power source (charger or PC power supply) is working properly, and if possible, check the integrity of the screwdriver’s electrical circuit. After this, follow these steps:
- Disconnect the battery, disassemble the screwdriver body and remove the battery pack. Inside there should be a motor with a gearbox, keys and switches (for example, a reverse toggle switch), as well as conductors connecting them.
- Strip the power supply wires. In the charger, you need to cut off the connector to the laptop, remove the outer insulation and screen, and then prepare the two internal wires for installation. In the power supply, you can remove all contacts except one Molex for four wires. We are interested in the two outermost conductors: yellow (12 V) and black (“ground”). Release these wires and remove the insulation from them.
- Prepare the wires that you will connect for soldering - degrease and tin them. If you plan to install an additional switch, make a break for it in the negative conductor.
- Connect the power source to the internal circuit of the screwdriver, observing the polarity. You can check the correct installation by turning on the device - the spindle in “normal” mode should rotate clockwise.
- Insulate all joints with duct tape or heat shrink tubing. Assemble the screwdriver body.
This completes the modification of the instrument. As an alternative, which motorists will certainly appreciate, we can recommend equipping the screwdriver with alligator contacts, with which it can be easily connected to a car battery.
Don't be afraid to experiment, but don't forget about safety precautions. Good luck!
Sources:
https://mukola.net/kak-peredelat-shyrypovert-na-220-v-pri-pomoshi-komputernogo-bloka/ https://technosovet.ru/dlya-remonta/shurupovert/kak-peredelat-na-220- volt https://elquanta.ru/instrument/peredelka-shurupoverta-ot-rozetochnojj-seti.html https://elektro.guru/elektrooborudovanie/kak-akkumulyatornyy-shurupovert-peredelat-v-setevoy.html
What is needed for remodeling
To remake a screwdriver, you need to briefly familiarize yourself with the electrical diagram of the tool. The tool is driven by an electric motor. Depending on the power and class of the tool, the voltage can be 12, 14, 18 volts. The electric motor receives power from a battery of batteries of the appropriate voltage.
The engine transmits torque to the cartridge through a mechanical gearbox. Engine speed is changed both by the gear reduction system and by a reversible electronic speed controller combined with a power button.
Screwdriver device:
- Accumulator battery.
- Speed regulator.
- Power button.
- Electric motor.
- Gearbox.
- Cartridge.
How much power does the power supply need and how much does the screwdriver consume from the power supply?
Calculating the required power of the power supply is not difficult - you need to multiply the current consumed by the electric motor of the tool by the voltage. For example, the tool is powered by a battery with a voltage of 12 volts. The current that the electric motor needs to operate is 10 amperes. We get 120 watts. But this is the minimum value.
To ensure normal operation under loads, for example, when driving a screw into hard wood, the power supply must be selected with a margin of 30-40%. Otherwise, the screwdriver will not be able to work normally under load or the power supply will fail.
The current strength, depending on the model, can be 7-10 A for household screwdrivers and 30-40 A for professional models. The battery voltage can be 12 V, 14 V, 18 V depending on the specific model.
The required voltage, power and battery capacity parameters are usually indicated on the label of the tool itself or in the technical documentation for it.
If the operating voltage of the instrument is 12 V, the number of options for choosing a power source increases, for example, you can connect it to a computer power supply. It is quite possible to purchase an old one with a power of 300 W for a low price. In addition, the output power is sufficient with reserve. The advantages of this option include: ease of modification, as well as the fact that a computer power supply with a power of 300 W or more is relatively easy to find.
The block parameters are indicated on a sticker located on the wall. For example, it states that a voltage of 220 v is supplied to the input, a current of 25 A is supplied to the output of 12 v. We get a power of 300 W.
If desired, you can use the following as a 12 V power source from the mains:
- LED driver;
- electronic transformer for powering low voltage halogen lamps;
- car battery charger.
If the instrument is designed to be powered at a different voltage, say 14 V or 18 V, there are few options for choosing a power supply. For a tool operating on a voltage of 14 V and having a maximum current of up to 25A, a universal power supply unit AIDA BSh 14 PRO is available for sale. There is also an 18 V power supply, designed for current up to 20 A, AIDA BSh-18 PRO.
You can make your own power supply for the required voltage. But this requires certain knowledge of electronics. You can see a diagram of such a power supply. There are power supply circuits that can be mounted instead of batteries.
When connecting power from the charger to the screwdriver, you must use a wire with a cross-section larger than 2.5 mm². Otherwise, the wire will become very hot, which can lead to melting of the insulation and a short circuit.
The level of voltage loss also depends on the length of the wire. The longer the wire, the correspondingly greater the losses. If you choose the wrong wire length, it may turn out that the screwdriver “does not pull”, it cannot be used to tighten a screw into hard wood, etc.
The quality of the wire connection also affects the voltage loss. Wires connected by twisting will have a high transition resistance, which will significantly affect voltage losses.
How much current does a screwdriver consume?
Before choosing a suitable power supply, you need to understand what current consumption you need to count on. Unfortunately, cordless screwdriver manufacturers do not indicate the current consumed by the motor. The capacity of the battery itself in ampere-hours, which is necessarily indicated on the battery, does not allow us to understand how much current the screwdriver consumes in operating mode
. The maximum that the manufacturer can indicate is the power in watts, but this is very rare, usually the power is indicated directly in torque.
Read also: Is it possible to disassemble a microwave oven?
If the power in watts is still indicated, we can have an idea of the current consumption and select an appropriate power supply with a small current/power margin. To calculate the current, it is enough to divide the power in watts by the operating voltage of the screwdriver, in this case it is 12 volts. So, if the manufacturer indicated a power of, for example, 200 watts - 200:12 = 16.6 A - this is the current consumed by the screwdriver in operating mode.
However, the indicated power is very rare and there is no universal figure that characterizes all 12-volt screwdrivers. You need to understand that when the motor shaft is fully braked, the currents can significantly exceed the rated ones and calculating this value is not very easy. At the same time, an analysis of various forums and our own experience has shown that a current of 10 A is often enough to operate a screwdriver; this is enough to perform many screwing and drilling functions. It is known that current surges during complete braking of the shaft can exceed 30 A.
Well, what conclusion can be drawn from all this? A 12 V power supply providing 10 A current is suitable for a screwdriver; if it is possible to use a 20-30 A unit, this is even better. These are average figures that apply to most screwdrivers.
Connecting the screwdriver to the charger
Sequencing:
- Solder or attach two wires with alligator clips to the terminals of the charger.
- Disassemble the old battery and remove the dead cells from it.
- Drill a hole in the battery case for the cable, thread the cable into the hole. It is advisable to seal the connection with electrical tape or heat-shrink tubing to prevent the wire from tearing out of the housing.
- Elements removed from the battery will disrupt the weight distribution of the screwdriver - your hand will get tired. To restore balance, a weight should be placed in the body - it can be dense wood or a piece of rubber.
- Solder the cable to the terminals of the former battery, connected to the screwdriver.
- Assemble the battery housing.
- All that remains is to test the updated tool in action.
Installation of a finished power supply in the housing of an old battery
Procedure:
- Disassemble the old battery and remove the non-functioning elements from it.
- Install the power supply into the battery case. Connect the high voltage terminals and low voltage terminals.
- Assemble and close the battery case.
- Install the battery into the screwdriver.
- Plug the power supply into the outlet and check the updated network tool in operation.
Homemade power supply
Step-by-step instruction:
- Disassemble the old battery case and remove the dead batteries from it.
- Install the elements of the electrical circuit of the power supply onto the circuit board, solder the contacts.
- Install the assembled board into the case. Use a tester to check the presence of voltage at the output.
- Connect the low voltage wires to the terminals of the old battery. Assemble the body.
- Connect the screwdriver to the electrical network and check its operation.
Connecting to an external power supply
What to do:
- Disassemble the screwdriver and find the motor power wires inside. Install the connector for the power supply into the case and solder the wires to the connector. Secure the wires with hot glue.
- Choose a suitable power supply, for example, from a laptop. Find an adapter for the low voltage connector.
- Connect the screwdriver to the new power supply and check its operation.
Connecting to a power supply from a computer
Instructions:
- Find or buy a computer power supply with a power of at least 300 W.
- Disassemble the screwdriver body. Find the motor power wires inside. Solder the connectors for the computer power supply to the wires.
- Remove the connectors for connecting the computer power supply from the case.
- Connect the screwdriver to the new power supply.
- Connect the power supply to the network and check the operation of the device.
Feasibility
Of course, working with a tool with a short cord is not nearly as convenient as using a battery-powered one. But the alteration will not take much time from a person with electrical installation skills. But it will allow you to finish urgent work. And then slowly decide what to do with the screwdriver - repair it or throw it away and buy a new one. You probably won’t want to constantly work with such a tool; a cheap Chinese electric drill with a power extension cord will be much more convenient. In addition, during prolonged operation the power supply becomes noticeably hot. In order for it to cool down, you need to periodically take breaks from work, which affects the result.
Diagram of a transformer power supply for a screwdriver
Finally, we’ll make our own transformer power supply for a 12, 14 or 18 V screwdriver. Such a source, of course, will be quite bulky, but the beauty of the design lies in its simplicity. Even a novice radio technician with only general knowledge of electrical engineering can cope with repeating the circuit.
For this homemade power supply, you will need a transformer capable of delivering the current we need at a voltage of 12-13 V (for a 12-volt tool), 14-16 V (for a 14-volt tool), or 18-20 V for an 18-volt tool. You will also have to find 4 powerful rectifier diodes and several electrolytic capacitors.
If we have a 12-volt screwdriver that consumes current up to 10 A (most household ones), then we can take a unified anode-heat transformer TAN-138-127/220-50 (TAN-138 220-50), which has 2 windings of 6 each, 3 V at a current of 10 A. It weighs, however, more than 6 kg.
| Winding | Voltage, V | Rated current, A |
| 1–2, 4–5 | 110 | 3,9/2,3 |
| 2–3, 5–6 | 7 | 3,9/2,3 |
| 7–8 | 355 | 0,285 |
| 16–17 | 355 | 0,285 |
| 9–10 | 200 | 0,25 |
| 18–19 | 200 | 0,25 |
| 11–12 | 25 | 0,285 |
| 20–21 | 25 | 0,285 |
| 13–14 (15) | 5 (6,3) | 10 |
| 22–23 (24) | 5 (6,3) | 10 |
Another option is the filament transformer TN-61-127/220-50 (TN-61 220-50). It will be able to provide a current of 8 A at a voltage of 12.6 V (two windings) or 18.9 V (3 windings). Although it weighs less, it still weighs a lot - 3 kg.
| Winding | Voltage, V | Rated current, A |
| 1–1a, 4–4a | 3,2 | 1,66/0,95 |
| 1–1b, 4–4b | 6,3 | 1,66/0,95 |
| 1–2, 4–5 | 110 | 1,66/0.95 |
| 1–3, 4–6 | 127 | 1,66/0,95 |
| 4–8 | 6,3 | 6,1 |
| 9–10 | 6,3 | 8 |
| 11–12 (13) | 5 (6,3) | 8 |
| 14–15 (16) | 5 (6,3) | 8 |
If we have the appropriate knowledge and skills, then any dismountable network transformer with a power of 200–250 W can be used to manufacture a power supply. We disassemble, wind up all the secondary windings, leaving only the network winding, and instead wind one secondary winding at the required voltage and current.
If we have a transformer with a toroidal core at our disposal, then it is better to prefer it. Rewinding is more difficult, but firstly, it does not need to be disassembled, which means there will be no problems with humming after assembly. Secondly, the dimensions of such a transformer with the same power are much smaller.
What diodes are needed? Any rectifier that can withstand a current of 10–20 A and a reverse voltage of at least 30–40 V is suitable. Electrolytic capacitors for a voltage of at least 25 V (for a 12-volt power supply) and one non-polar paper capacitor with a capacity of 1 μF for an operating voltage of at least 400 V. However, you can do without the latter. Now let's take a look at the diagram.
The mains voltage is supplied to transformer Tr1, reduced to the required value, rectified by the diode bridge VD1–VD4 and supplied through wires to the tool, to the handle or compartment from which faulty batteries have been removed and capacitors C3–C5 are installed. They are energy storage devices and provide high starting current when the screwdriver is turned on.
Capacitor C1, connected in parallel to the mains winding of the transformer, reduces the reactive component of the inductive load (transformer) and slightly increases the efficiency of the device. As stated above, you can do without it. When assembling the device, do not forget to install diodes on radiators that are not electrically connected to each other. If the radiator is common (for example, a metal case or power supply chassis), then we install diodes on it through mica insulating spacers.
So we figured out how to power a cordless screwdriver from the mains. Now we can choose a power supply suitable for these purposes or make it ourselves.
Currently reading:
How to convert a 12 or 18V cordless screwdriver into a mains one with your own hands
How to make a switching power supply with your own hands: the best assemblies and circuits
What is a power supply and what are they?
How to make a power supply or charger from an ATX computer power supply
How to use a computer power supply
Homemade power supply
It is necessary to start making a homemade power supply if you have knowledge in the field of radio engineering. It is necessary to prepare parts and tools in advance and fully concentrate on the work, during which the radio element may fail or suffer electric shock (supply voltage 220 V).
The simplest scheme
During manufacturing, it is necessary to prepare a housing for mounting radio components, a tool, a piece of getinax, wire and radio components. Then proceed with assembly according to diagram 1.
Scheme 1 – Simple 12 or 18 volt power supply.
Almost any transformer with the following parameters is suitable: power 250..300 W, secondary voltage 24..30 V, and current rated from 15 A and above. The diode bridge is assembled from powerful diodes (selected from a reference book). After assembly, it is necessary to check the supply voltage: if it is higher than the required value, then you need to reduce the voltage of winding II (reducing the number of turns). At low voltage, wind the secondary with a wire of the same cross-section. After assembly, install it in the housing.
Provided that the screwdriver is not powerful enough, you can install it directly in the battery compartment. If the power supply is assembled separately, it is recommended to provide cooling, because during engine startup the rated current increases by 7 times. As a result of this increase, a load is placed on the power supply unit, and it begins to heat up. Heating occurs due to insufficient power from the power supply. After the power supply is ready, you need to check the screwdriver: run it several times and make sure that the radio elements do not heat up. When using a converted screwdriver, you must adhere to the basic requirements:
- It is necessary to give the tool time to cool down after every 20..30 minutes of operation.
- Do not work at high heights or do it carefully (the BP may fall and, as a result, loss of balance and injury).
- Monitor the condition of the power cable; it should not be pinched (this can lead to a short circuit, which is fraught with negative consequences for the tool and people).
Thus, if the screwdriver battery outputs 18 V or 12 V, it is not at all necessary to buy a new battery or screwdriver. It all depends on the scope of use of the tool: if you need to move the tool, you should replace the battery or purchase a new screwdriver. In the case where mobility does not play a special role, you need to convert it to power from the network. By following simple recommendations and observing safety regulations, you can not only increase the likelihood of extending the service life, but also reduce the risk of injury.
Christmas decorations made from yarn
Fix Price stores sell inexpensive acrylic yarn - very soft and pleasant to the touch. It can also be useful to you in creating a New Year's mood.
PHOTO: YouTube.comYou will need some of this yarn in delicate shades and thick cardboardFrom cardboard, cut out stars or figures of deer, crescents, in general - everything that you associate with the New Year and Christmas.
PHOTO: YouTube.com Just wrap the cardboard figures with thread and secure it with a drop of hot glue. The masterpiece is ready
This is how easy it is - with cheap goods from Fix Price - you can not only decorate your home, but also make very glamorous gifts for your friends and acquaintances.
Another idea for New Year's decor using goods from the Fix Price store:
PHOTO: YouTube.comAnd in addition, a few more similar ideas can be seen in this short video:
Watch this video on YouTube
Previous STORIES Without glue: how to cover up any hole or crack, even if it’s old slate
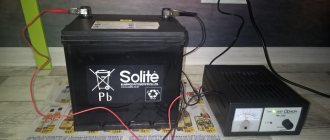
Car battery
An excellent option for powering a screwdriver is a car battery. Especially in cases where repairs are required in an area without electricity. The negative point is that the tool can only be powered from a car battery for a short time, since the vehicle runs the risk of being discharged and will not move. To start a screwdriver, an old analogue car battery is sometimes repurposed. This device is characterized by manual control of current and output voltage.
Upgrade instructions.
- The first step is to select a pair of multi-core cables. It is desirable that they be in windings of different colors for distinction, but of the same cross-section.
- On one side, contacts in the form of “crocodiles” are attached to the wires, on the other, the insulating layer is stripped to 3 centimeters.
- The bare ends are crocheted.
- Next, we begin to disassemble the screwdriver body.
- Find the contact terminals with which the tool was connected to the battery. The bent, stripped ends of the cable are soldered to them. You can do without soldering by using special plastic ties, but professionals prefer a soldering iron.
- The connections must be properly insulated, otherwise there is a risk of a short circuit.
- Both ends of the cable are neatly laid inside the housing and brought out through the handle. You may have to drill additional holes to do this.
- Next you need to assemble the tool.
- After all manipulations, the device is tested. Using “crocodiles”, the screwdriver is connected to the car charger, observing the “+” and “-”.
Such an analog power supply is convenient because it allows you to smoothly adjust the parameters, adapting to any model of screwdriver.
Power supply options
There are several options for converting a screwdriver to work from the mains. The task is to power the device's electric motor using an intermediate source.
We use a laptop charger
You can make a 12 V power supply for a screwdriver with your own hands, even without technical knowledge. You just need to find an unnecessary laptop charger that has technical characteristics similar to those for powering a screwdriver. The main thing is that the output voltage matches the desired one (12-14 volts).
To achieve this goal, you must first disassemble the battery and remove faulty elements from there. Then follow the following manipulations:
- We take the charger from the laptop.
- We cut off the output connector, expose it and tinning the ends of the wires.
- Solder the stripped wires to the battery input wires.
- We isolate the soldering points to avoid short circuits.
- We make a hole in the housing so as not to pinch the wire, and assemble the structure.
The basis is the power supply from the computer
To manufacture such a device, you will need a block from a personal computer in A.T. format. It is not difficult to find, this is an old model of a power supply device that can be easily purchased on any radio components market
It is important to know that you can use a unit with a power of 300-350 W with a current in the 12 V power supply circuit of at least 16 A
It is AT format blocks that correspond to such parameters. There is a power button on the body of this device, which is very convenient during operation. A cooling fan is installed inside and an overload protection circuit is mounted.
The procedure for reorganizing the block:
- We remove the cover of the BP case. Inside we will see a board with many wires going to the connectors, as well as a fan.
- The next step is to disable power-on protection. We find the green wire on the large square connector.
- We connect this wire with the black one from the same connector. You can make a jumper from another piece of wire, or you can simply cut it short and leave it in the housing.
Then in the output bundle we find a smaller connector (MOLEX) and perform the following operations with it:
- We leave the black and yellow wires, and cut the other two short.
- To make it easier to locate the power supply during operation, we solder an extension cord to the black and yellow wires.
- We attach the second end of the extension cord to the contacts of the empty battery compartment. This must be done by soldering, you can make a good twist, and you must strictly observe the polarity.
- We make a hole in the housing so as not to pinch the wire during assembly. The device is ready.
Power from car charger
Having a charger for a car battery, it is quite simple to make a device to power a screwdriver. To make the modification, you just need to connect the power terminals of the charger output to the power supply of the electric motor.
If you have a charging device with continuously adjustable output voltage, you can use it as an 18-volt power supply for a screwdriver.
Homemade charging devices
It’s quite simple to make a charger for a 12-volt screwdriver yourself, by analogy with the one used in the Interskol charger. To do this, you will need to take advantage of the ability of the thermal relay to break the contact when a certain temperature is reached.
In the circuit, R1 and VD2 represent a sensor for the flow of charge current, R1 is designed to protect the diode VD2. When voltage is applied, transistor VT1 opens, current passes through it and LED LH1 begins to glow. The voltage drops across the chain R1, D1 and is applied to the battery. The charging current passes through the thermal relay. As soon as the temperature of the battery to which the thermal relay is connected exceeds the permissible value, it is triggered. The relay contacts switch and the charging current begins to flow through resistance R4, the LED LH2 lights up, indicating the end of the charge.
Circuit with two transistors
Another simple device can be made using available elements. This circuit operates on two transistors KT829 and KT361.
The amount of charge current is controlled by the KT361 transistor to the collector to which the LED is connected. This transistor also controls the state of the KT829 component. As soon as the battery capacity begins to increase, the charging current decreases and the LED gradually goes out accordingly. Resistance R1 sets the maximum current.
The moment the battery is fully charged is determined by the required voltage on it. The required value is set with a 10 kOhm variable resistor. To check it, you will need to place a voltmeter on the battery connection terminals, without connecting the battery itself. Any rectifier unit designed for a current of at least one ampere is used as a constant voltage source.
Using a custom chip
Manufacturers of screwdrivers are trying to reduce prices for their products, often this is achieved by simplifying the charger circuit. But such actions lead to rapid failure of the battery itself. By using a universal chip designed specifically for the MAXIM MAX713 charger, you can achieve good charging performance. This is what the charger circuit for an 18-volt screwdriver looks like:
The MAX713 chip allows you to charge nickel-cadmium and nickel-metal hydride batteries in fast charge mode, with a current of up to 4 C. It can monitor battery parameters and, if necessary, reduce the current automatically. Once charging is complete, the IC-based circuit draws virtually no power from the battery. It can interrupt its operation due to time or when the temperature sensor is triggered.
HL1 is used to indicate power, and HL2 is used to display fast charge. The setup of the circuit is as follows. To begin with, the charging current is selected, usually its value is equal to 0.5 C, where C is the battery capacity in ampere hours. The PGM1 pin is connected to the positive supply voltage (+U). The power of the output transistor is calculated using the formula P=(Uin - Ubat)*Icharge, where:
- Uin – highest voltage at the input;
- Ubat – battery voltage;
- Icharge – charging current.
Resistance R1 and R6 is calculated using the formulas: R1=(Uin-5)/5, R6=0.25/Icharge. The choice of time after which the charging current turns off is determined by connecting the PGM2 and PGM3 contacts to different terminals. So, for 22 minutes PGM2 is left unconnected, and PGM3 is connected to +U, for 90 minutes PGM3 is switched to the 16th leg of the REF chip. When it is necessary to increase the charging time to 180 minutes, PGM3 is short-circuited with the 12th leg of the MAX713. The longest time of 264 minutes is achieved by connecting PGM2 to the second leg, and PGM3 to the 12th leg of the microcircuit.
How to redo it?
Let's look at how to convert a cordless screwdriver into a mains-powered one using a power supply from a computer. But before you go to disassemble the old system unit or to the store to buy a new power supply unit, read what is written on the screwdriver body. Usually the recommended voltage is indicated there, most often it is 12 V. For this option, finding a power supply is as easy as pie. But if a larger value is specified, then in some cases the search may take longer. In a word, remodel only a 12-volt screwdriver so as not to complicate your life.
Step 1. Remove a used 500 W power supply from the old system unit or buy the cheapest one at any store or computer repair service.
Buy a power supply
Step 2. You can read all the detailed information about the technical characteristics of the computer unit on the sticker, which is located on the side of this part.
Review the power supply specifications
Step 3. Then you can start remodeling. Disassemble the original but finished battery and remove all power elements from it.
Disassemble the old battery
Step 4. We no longer need the batteries, but save the terminal holders and terminals. Carefully remove the latter from the batteries.
Remove the terminal holders Carefully remove the terminals
Step 5. Solder a wire with a cross-section of 3 mm² to the terminals, having previously stripped it.
Solder the wire to the terminals. This is what it should look like
Step 6: Attach the terminals to the terminal holder.
Secure the terminals to the terminal holder
Step 7. Remember that your “negative” wire is blue (for example). Insert the terminals according to this information and the symbols on the battery case into the case itself.
Insert the terminals inside the housing
Step 8: While holding the terminal holder inside, drill through the top of the former battery housing with a 3mm drill bit.
Make a hole in the body
Step 9. Remove the chamfer with a larger drill so that the 3 mm screw is easily recessed into the plastic (its head should not protrude).
Remove the chamfer and screw in the screw
Step 10: Tighten the screw. This way you will secure the terminals and wires themselves inside the battery case.
Secure the terminal holders inside the housing with a screw
Step 11. Drill another hole in the battery case to bring the power wire out of it.
Make a second hole in the battery case
Step 12. We recommend securing the wire inside the housing so that it does not pull on the terminals when you pull on the cord during operation. To do this, wind several layers of electrical tape at a certain distance at the wire exit from the housing. It will not allow the wire to come out of the hole at a greater distance than required.
Electrical tape will help secure the wire.
Step 13. Assemble the battery case back, twist all the parts. The dummy battery with the ability to connect the screwdriver to the network is ready.
Assemble the battery case
Step 14 But that's not all. Now we need to connect our plug to the power supply. Look again at the information sticker on it: it will indicate what color wires provide 12 volts. Here these are yellow and black-yellow wires.
Look at the wire colors
Step 15. Connect in parallel one black-yellow and one yellow wire, as well as two black (“ground”). If you only have one 12V line, then simply use two yellow wires and two black ones.
Twist the required wires in parallel. This is how it should turn out
Step 16: Solder the wires to the XT60 power connector.
Solder the wires to the XT60
Step 17. Solder the wire coming from the dummy battery to the other part of the connector.
Solder the wire from the battery too. This is how it should turn out
Step 18. To start the power supply from a computer without the system unit itself, connect the green wire to the black wire - to ground. This can be done with a jumper from a regular paper clip.
Close the contacts with a paper clip
Step 19. The power supply is ready for use. You can turn it on. Excess wires can be cut off or wrapped into a bundle so that they do not interfere.
Excess wires can be cut off. Don't forget about isolation
Step 20. Check system functionality. In general, the screwdriver is ready to work from the network. And since a dummy battery was made for such a connection, that is, the wires were not directly connected to the device, if you wish, you can buy a new battery for such a screwdriver and use both it and this system.
The screwdriver has been rebuilt and is ready to go
Easy tool restoration
The main advantage of a cordless screwdriver is its mobility. These tools use a lithium-ion battery, which is protected from overload and complete discharge. In addition, there is protection against overcharging in the form of a separate circuit built into the element itself. The main power source (primary) is 220 V, and the battery is also recharged.
Depending on the model of the screwdriver, the battery receives a charging voltage from 14 V to 21 V. The battery output produces a supply voltage from 12 to 18 V. This type of battery lasts a long time, but if the tool is not used for a long time, the built-in discharge protection will not help battery cells: discharge occurs constantly.
To increase service life, it is necessary to constantly discharge and charge the battery. If for some reason it was not possible to “keep track” of the tool, a specific battery element often fails. There are basic ways to solve this problem:
- Replace the battery with a new one.
- Buy a new tool.
- Convert a mains-powered screwdriver.
When replacing the battery, please note that a new one is quite difficult to find. The tools are made in such a way that it is difficult to find spare parts for them. It is not profitable for a company to produce its product with high repairability, since it needs income from the purchase of products. You can only find a new battery at dealers. In addition, another option is possible: disassemble the battery and replace the faulty battery.
When purchasing a new tool, the user tends to buy a model of a higher quality, forgetting about the rules for using lithium-ion batteries. Basic rules that will help preserve the service life of the tool for a long time:
- When purchasing in winter, it is strictly forbidden to “launch” the tool immediately. You need to wait about an hour until it “warms up” to room temperature.
- Place the battery on charge.
- Perform the battery charging and discharging cycle about 3 times.
If none of the options for solving the problem are suitable, you need to start converting the screwdriver to a network one with your own hands. It's easy to do. There are many simple and complex ways. Changing the tool model has several positive aspects:
- There is no need to recharge the battery.
- The load on the mechanical part is reduced.
- Lots of power supply options.
- Increasing the quality characteristics of the product.
This is interesting: Sanding machine for parquet and floors - we look at it in detail
Glamorous trees for boudoir
The next year of the white metal Ox means decoration in white and pastel colors. Nothing red or flashy!
PHOTO: YouTube.com For a glamorous decoration, you will need ready-made Christmas trees from Fix Price, which consist of a conical frame and tinsel, as well as a feather and fluff boa, which can be found in the same store
The bright tinsel will have to be removed - you only need a cone. And then it’s a matter of literally a few seconds: wrap the cone with a lady’s jewelry and secure the ends.
PHOTO: YouTube.com Window sill, mantelpiece, festive table, table in the bedroom - this decor will look unusually gentle and simply chic everywhere
Inverter welding machine
Creating a power source from inverter welding is a more complex type of modernization, since it requires certain theoretical knowledge in the field of electrical engineering and practical skills. Rework entails structural changes to the equipment, which will require the ability to make calculations and draw up diagrams.
general information
AC or DC - which is better? In the 21st century, this question haunts many welders. Previously, the welding machine would work intermittently in any case, and the master actually had no choice. But with the advent of rectifiers and inverters on the market, the choice has increased hundreds of times. And now it’s no longer easy to figure out which device to choose.
We decided to help you and tell you about the features of both alternating and direct current.
Let's start with a break. Alternating current is the basis. This is what we get from the outlet when we connect a welding machine or any other electrical appliance. Welders of the old format (transformers) worked on alternating current. Such a device made it possible to obtain a welding current of several hundred Amperes from 220 Volts. Which is more than enough for manual arc welding.
But times have changed. Technological progress did not stand still, and over time, devices appeared that learned to convert alternating current coming from the network into direct current. Such devices include a rectifier and an inverter. Please note that when they say AC welding inverter, they mean that this device uses alternating current for power, but converts it to direct current.
What does all this mean in practice?
When DC machines went on sale, welders had a unique opportunity to compare them with traditional alternating machines. And they were surprised. Compared to modern inverters and rectifiers, transformers were much more difficult to use.
It's all about the AC characteristics. Because of them, the arc is ignited reluctantly and burns unstable. As a result, the seams are less even and durable. This is especially noticeable when the work is performed by a less experienced craftsman.
It also turned out that AC machines generate more noise, which affects the welder’s performance. In addition, a classic transformer consumes more welding electrodes, and metal is constantly splashed during work.
At this point, you probably thought: “Well, why then do we need AC devices if they have so many disadvantages?” In fact, it's not that simple. It’s not for nothing that the question “Which is better: direct or alternating current?” raises so many questions and discussions.
Alternating devices (transformers) are indispensable when you need an inexpensive, but at the same time powerful and reliable welder. Also, alternating current welding has proven itself to be excellent when welding metals with an oxide film on the surface. These are, first of all, aluminum and stainless steel. Transformers also cope well with welding contaminated parts, if there is no way to clean and grind them.
Also, AC machines can easily handle welding in the field, are unpretentious to storage and operation, and can weld even the thickest metal due to their large power reserve.
A few words about the welding arc
We mentioned above that when welding with alternating current, the arc burns unstable. This is true, and this problem requires special attention if you are a novice welder. When we talk about instability, we mean that the arc seems to “walk” when forming a seam. It deviates from the axis, and sometimes this is even noticeable to the naked eye.
Also, it is sometimes difficult for beginners to ignite an arc, since the alternating current apparatus does practically nothing to facilitate this. Beginners often strike the arc incorrectly, and it may go out during welding due to too much vibration.
These features discourage many newbies from purchasing a transformer because they are concerned about the quality of the work. But we believe that a transformer is, on the contrary, an excellent simulator for honing your welding skills. If you learn how to cook with a transformer, you can use any other device without any difficulties. In addition, the transformer is an excellent basis for rework and modification. It can be easily converted into a DC apparatus if you have knowledge of electrical engineering.
Prospect for the performance of the converted tool, “pros and cons” of its use
The condition for successful reconstruction of an old screwdriver is the serviceability of its main parts: motor, gearbox, start button, and clamping knuckle. Only the power element needs to be altered, so the rest of the “filling” must be in working order.
Of course, as a result of design changes, the tool will lose its main advantage - mobility. It will depend entirely on the presence of a nearby electrical point with a voltage of 220 Volts. But it will remain operational for a long period of time and even receive a number of advantages:
- cost savings;
- no need for periodic recharging;
- completely eliminating the possibility of loss of product functionality after prolonged inactivity.
One way to solve power problems is to use extension cords, but this option is not always available. However, the power tool will remain useful and can serve in a home workshop.