Rotary hammers are one of the best-selling power tools. They have long been registered in the arsenal of professionals and a huge army of home craftsmen. These multifunctional devices have a rather complex design and are not cheap. But sometimes we suddenly discover that we have been using the device incorrectly for a long time: without knowing it, we systematically killed our favorite hammer drill.
Long-term operation in chiselling mode
Problem. It is necessary to take into account that the pure impact mode is not a “native” for a hammer drill, but rather an auxiliary option. If you work for a long time with the rotation blocked, the tool cools worse (an important role here is played by the cooling impeller, which rotates more slowly during chiselling). In addition, in certain positions of the hammer drill, problems with lubricant distribution may occur.
Solution. To avoid these problems, it is recommended that every 10-15 minutes of work switch the tool to drilling mode and run it at idle speed for half a minute.
Important: there are ventilation holes on the tool body in the area of the impeller; they should not be dirty or blocked.
Tips for caring for a rotary hammer
The service life and repair interval directly depend on how timely and competently the complex of work on caring for the hammer drill is carried out. Much attention should be paid to lubrication of the gearbox, especially if work is carried out on concrete structures, the drilling of which is accompanied by the formation of a large volume of dust.
Using a vacuum cleaner can be a good defense against it; many models of power tools are even equipped with special devices for fixing the hose. It is also necessary to take into account that when operating at low speeds, the equipment quickly heats up, so constant monitoring of rest and work modes is required.
After finishing use and switching it off, it is recommended to clean the tool with a soft cloth to remove dirt. If necessary, you can use a soap solution. Particular attention should be paid to the cleanliness of the ventilation openings. It is equally important to regularly carry out preventive inspections of equipment.
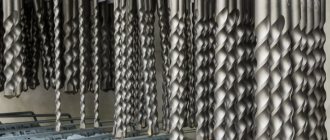
Also, before starting work, it is imperative to lubricate the shanks of the nozzles. This is necessary in order to avoid excessive stress on the hammer barrel due to friction. If such work is not performed, it can result in expensive repairs.
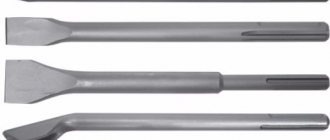
Damaged boot
Problem. In order for this important keyless unit to work flawlessly, you need to prevent it from getting dirty. Mineral dust, sawdust and metal scale may get inside the cartridge. Moreover, the tool is most vulnerable when you drill into the ceiling. As a result, the drill may jam in the chuck, it becomes difficult to replace the equipment, due to the abrasive effect, the shank is poorly fixed, and unnecessary play appears.
Solution. If the slightest damage occurs, the barrel boot must be replaced. It is also recommended to use drilling depth limiters, as well as vacuum cleaners and dust collectors (including dust caps or cuffs) for working on ceilings.
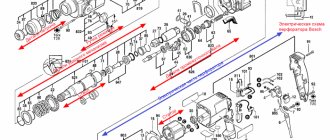
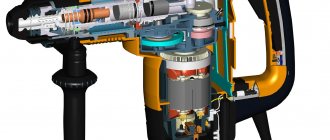
Design features of the Bosch 2–24 rotary hammer
It is best to start repairing a Bosch 2–24 rotary hammer by becoming familiar with the circuit and design features of the tool being adjusted. The operating principle of the Bosch 2–24 rotary hammer is similar to the operating principle of the Bosch 2–20 rotary hammer.
The torque is transmitted to the tool mounting shaft, simultaneously with the transmission of the shock impulse. The hammer drill has three operating modes: drilling with impact, drilling without impact, impact.
The helical gear of the rotor pos. 803 transmits torque to the helical gear of the intermediate shaft pos. 826.
Diagram of a Bosch 2-24 rotary hammer
Design of the intermediate shaft of the Bosch 2-24 rotary hammer
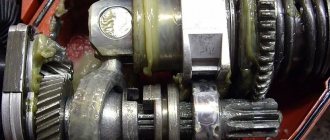
The intermediate shaft of the Bosch 2-24 rotary hammer consists of a rolling bearing assembly, pos. 830, a clutch, pos. 823, and a switching part, pos. 44. Most often the clutch fails. The teeth in it wear out. Repair of the coupling consists of correcting the profile of the engagement tooth in the coupling and on the intermediate shaft.
Bosch 2-24 hammer drill intermediate shaft assembly
Impact mechanism barrel shaft design
The barrel shaft of the impact block is designed to transmit a rotational impulse with simultaneous movement of the striker.
Rotation is transmitted from the spur gear of the intermediate shaft to the large spur gear pos. 22 of the barrel shaft pos. 821.
The reciprocating motion is transmitted through the driven bearing pos. 830, the impact piston pos. 26, the striker pos. 27, the impact bolt pos. 28 to the drill fixed in the chuck pos. 756.
The design is a shaft, hollow on one side. Parts are installed on the shaft on both sides.
From the side of the cartridge mounting, a spur gear, pos. 22, is installed on the shaft and fixed on the shaft using a roller, pos. 88, and pressed against the shaft collar with a spring, pos. 80. The spring itself is fixed with a locking ring pos. 85.
The following is inserted into the cavity of the impact block barrel shaft: the assembled impact bolt pos. 28 and the impact piston. The striker pos. 27 is inserted into the impact piston pos. 26 with a new rubber ring pos. 73 placed on it. All rubber products are lubricated with the recommended lubricant.
Malfunctions of the hammer shaft shaft
Due to the weakening of the spring force and the locking roller falling out, the gear may rotate on the shaft. This manifests itself in the disappearance of the torque with the presence of a shock pulse.
The rotary hammer hammers, but does not drill.
When rubber products (sealing rings) wear out, the hammer drill stops working in the “Slotting” mode. This happens gradually. The impact force weakens as the rubber rings wear. The thing is that from the drunk bearing the movement is transferred to the impact piston pos. 26, in which the striker pos. 27 creates air pressure and acts on the impact bolt pos. 28.
The hammer drills, but does not chisel.
If you apply a lot of force when operating a hammer drill, this can lead to the destruction of the impact bolt and jamming of the striker in the impact piston. Such malfunctions can only be eliminated by completely replacing the failed part. Learn more about troubleshooting a Bosch rotary hammer.
Lack or contamination of lubricant in the chuck and gearbox
A hammer drill has many moving parts, and for the entire mechanism to function properly, it is necessary to minimize the coefficient of friction between them. Naturally, at the moment it comes off the assembly line, the branded tool has the right amount of the right lubricant inside. You don’t have to look into the hammer drill for a while.
Problem. As the gearbox is used, the lubricant becomes contaminated and loses its properties. And lubricants quite quickly “leak” out of the cartridge due to constant heating and are removed along with the drills.
Solution. Every time you insert/change a drill, apply lubricant to its shank (in one of the grooves in the shank). Manufacturers suggest using about 0.5-1 grams of lubricant - approximately the same as toothpaste on a toothbrush.
Let us note that our beloved litol and solid oil are not entirely on topic. You need to use a special lubricant, fortunately, it is not too expensive, is used sparingly and is sold separately (some companies put chrome-molybdenum lubricant in the box with the tool).
Important. Before replacing a drill or chisel, always thoroughly wipe the shank of the tool, as debris and small abrasive particles may stick to it.
Changing the lubricant in the gearbox is more complicated. Here, most likely, you will have to resort to the services of a service center - the main thing is not to miss the interval recommended by the manufacturer. By the way, some hammer drills are equipped with a special inspection window, through which you can visually determine the presence and condition of lubricant in the gearbox.
Important: for the piston system of rotary hammers and jackhammers, specialized lubricants are used, with a given viscosity and temperature conditions.
Types and causes of drill jamming in a hammer drill
There are two most common variants of this problem:
- the drill jams in the drill chuck or in the buffer element, which is used to install an ordinary attachment in a hammer drill ;
- the product gets stuck in the clamp of the hammer drill itself.
In the first case, the problem appears due to the fact that solving the problems requires a drill, which is used for a conventional drill. There is a special product for its installation - an adapter chuck, the same as in a conventional electric drill. It is inserted into the clamping element of the hammer drill, after which you can begin work.
After they are completed, in some cases it is not possible to simply remove the drill, since the lips of the clamping device hold it tightly. This problem is quite easy to solve, since its root lies in the incorrect use of the clamping mechanism. Some craftsmen simply forget to lubricate it regularly, which is why the tool jams.
To remove the drill bit from the hammer drill, you can use WD-40 fluid
In the second case, the drill got stuck in the hammer drill. This trouble appears for completely different reasons than getting stuck in a transition node. The nozzle in an electric drill moves around its axis, in some cases making weak reciprocating movements. This is due to the transfer of energy into the tool body through the jaws of the clamping mechanism and the bottom of the chuck.
The hammer drill uses a different technology for transmitting energy, and accordingly, the nozzle in the clamp moves differently. Since the hammer drill provides rotational-impact and simply impact vectors of tool movement. Energy is transmitted to it through a special striker, which is driven by a power unit powered by electricity. This striker exerts a mechanical effect on the shanks of tools installed in the chuck, such as a drill, a drill, a crown or a chisel.
Sometimes a vice is used to remove the drill from the hammer drill.
These elements are equipped with special grooves, with the help of which they are securely fixed in the clamping device. These grooves also serve to provide the tool with energy to perform rotation. Low quality tools are made from soft alloys that are not heat treated. The shanks of such products cannot withstand high and prolonged mechanical loads, and therefore become unusable. In this case, before removing the drill from the hammer drill, you may have to disassemble the tool.
Exhausted current collector brushes
Many rotary hammers are driven by commutator electric motors, which means that graphite current-collecting brushes are used to transmit power.
Problem. During use of the tool, the brushes gradually wear out. This causes coal dust to accumulate on the collector, which interferes with the operation of the engine. In particularly advanced cases, the brushes completely lose the graphite element, as a result of which the contact is broken, sparking appears, and in the end the commutator plates of the electric motor are severely damaged.
Solution. Sometimes a rotary hammer has a brush status indicator or a safety shutdown system. But such a feature is not always available.
Replacing motor brushes
The main sign that it is time to change the brushes is the formation of increased sparking in the area of the electric motor commutator, rapid heating of the brush holders, and a burning smell. When the brushes are not worn out, the spark can only be seen under them. Otherwise, the spark is visible throughout the entire circle of the collector.
The presence of a spark around the commutator circle with unworn brushes is a sign of bearing wear, rotor or stator insulation failure, commutator plate burnout, stator or rotor burnout.
Another sign that the stator has burned out is the presence of sparks under only one electrode. If you have a tester, you can use it to check the stator and rotor: measure the resistance on the rotor and stator one by one. If it is the same on both windings, then everything is fine with the stator. If you notice clear signs of problems with the rotor or stator in your hammer drill, you will have to take the device to a service center for repair. As for the brushes, you can change them yourself.
To get to the place where the brushes are installed, you will need to disassemble the housing in which the motor is installed, or simply remove the back cover. Opening the lid, you will see brushes secured in special holders. The photo below shows what these parts look like.
Brushes that are installed on rotary hammer motors come in 3 types.
- Graphite ones are durable, but since they are very hard, their rubbing into the collector is not ideal, which negatively affects the latter.
- Carbon - easily rubs into the commutator, providing good contact, but wears out quickly.
- Carbon-graphite is an ideal option, since they are a mixture of 2 components that complement each other.
It is very important not to wait until the engine sparks and then change the brushes. Replacement is needed after they are worn to 1/3 of the nominal value (8 mm). Even if one brush is worn less than the other, both still need to be replaced.
Pay attention to the condition of the spring in new brushes and the fastening of the contact. If the spring falls off while the engine is running, it will suffer significant damage. Also, if the spring is weak, then it will not be able to provide good contact.
READ The upper chamber of the Bosch refrigerator does not work
Before changing the brushes, be sure to thoroughly clean the rotor and stator from any remaining graphite or coal dust. These parts can be cleaned using technical or medical alcohol.
Next, you should secure the electrodes in the holders and rub them into the collector. To do this, place a piece of fine-grained sandpaper on the commutator and grind the electrode in with rotational movements in different directions. The grinding continues until the contact area of the electrode is slightly rounded. This will ensure a better fit to the collector plates and, accordingly, better contact.
Too much pressure on the tool
You always want to somehow increase work productivity, so inexperienced craftsmen try to help the hammer drill by literally leaning their entire weight on the tool.
Problem. As a result of excessive pressure, the speed of work not only does not increase, but, on the contrary, noticeably drops. This happens because we personally shorten the stroke of the striker. There are other unpleasant consequences: the wear of the hammer drill’s impact group accelerates, the equipment is damaged and jammed.
Solution. Learn to feel your instrument, observe current performance. Select the appropriate feed force depending on the characteristics of the material being processed. Work more actively with the start button, as many of them have a trigger function - with different pressing intensity, the speed of rotation of the equipment changes.
Important: if the drill “does not go” when drilling concrete, then it may have hit a reinforcement bar. To avoid loss of carbide tipping and jamming of the equipment, start drilling with a slight indentation from the problem area.
Additional functions of units
Regardless of the type and brand, most models of this German technology are equipped with a set of functions that increase the performance and ease of use of the devices. Almost all units are equipped with:
- Dust removal system. Let us especially note this element, since if it is present, you can forever forget what disassembly is. A Bosch hammer drill equipped with this function has an increased warranty period.
- Shaft rotation stabilizer.
- A rail that limits the drilling depth.
- "Soft start" system.
- Rotation speed regulator.
- Anti-vibration system.
- Safety device to prevent overheating.
Thanks to the various capabilities of the devices, any user - from a professional builder to a simple home craftsman - will be able to choose a Bosch hammer drill that suits his needs. Reviews about this tool are only positive and speak of its versatility, efficiency and consistently high quality.
Selecting modes and switching them correctly
A hammer drill can drill like a regular drill or with a hammer. It can work like a jackhammer and rotate drills in the opposite direction (reverse function). For this purpose, there are special switches on the case.
Problem. There are two common mistakes. Sometimes users simply do not move the switch to the specified position to activate a particular mode. And sometimes craftsmen do this while the tool spindle is still in motion. In both cases, the mode switching mechanism is subject to increased wear.
Solution. The presence of a locking button on the switch significantly simplifies control of switching. But if this is not provided, then you will have to pay special attention to this process.
Important: in some models there is one intermediate position between the impact and impact with drilling modes. It makes it possible to change the position of the chisel to a more comfortable one before starting work.
The drill is stuck in the wall: how to get it out?
In some cases, the drill may become permanently stuck in a wall or any other surface of reinforced concrete structures. In most cases, such a nuisance occurs if a hole is drilled at a slight angle of 6 centimeters. There are several ways to remove the tool.
READ The Difference Between a Screwdriver and a Screwdriver
Instructions
The first step is to check whether the hammer drill has a reverse rotation function. If there is one, you need to turn it on and, swinging the instrument from side to side, remove it from the wall.
In addition, you can arm yourself with a drill and make another hole not far from the existing one, and by loosening the hammer drill, remove it from the structure.
If the above steps do not help, you will have to use a gas wrench. If its size is too large, you can use a steel plate as a spacer. The key should be screwed onto the drill and hit its handle with a hammer from the wall. These movements are not the most convenient, but the method is quite effective.
The hammer drill only turns in one direction. Repair.
To remove the drill, you can also use a reverse hammer, which is easy to find in any auto repair shop. If this tool is not available, you can connect the hammer drill to the SDS connector of the attachment and pull it away from the surface being processed. This method is effective when the drill is stuck at a depth of no more than 10 centimeters.
If the drill gets stuck in the wall while drilling through and there is very little left until the end of the process, you can break through the stuck tool using sledgehammers. It is necessary to hit in the direction of drilling. It is important to remember that you cannot strike the nozzle itself - you must use a board or any other spacer to soften the impact on the drill.
To avoid these problems, it is enough to remove the drill and the hole being drilled as often as possible and clean it of dust, concrete fragments and other contaminants. In addition, a drill or other accessory can jam in the surface if too much pressure is applied to it, so the tool must be held lightly. If the structure is reinforced concrete, that is, it has metal reinforcement, then there is a risk that the drill will get stuck in it. Therefore, before starting this work, you should check the location of these metal elements with a special device.
In some cases, it happens that the hammer drill jams. Typically, this is due to the use of cheap, low quality tools. In such products, the fastenings cannot withstand the load and become deformed. In some cases, it is enough to hold the tool in a vice and try to unscrew it. In the most difficult cases, you will have to disassemble the cartridge. To do this, the first step is to dismantle the upper rubber product, as well as the retaining ring located under it.
Oil is leaking from the drill
Leakage is a direct indicator of wear and tear on certain parts inside the mechanism. Spin the model and make diagnostics, change the lubricant if necessary.
Barrel hammer drill repair
This procedure is no different from repairing a conventional hammer drill. It is worth considering that the motor and shaft are located vertically.
If the rotary hammer hammers but does not drill
- The conical spring holds the clutch, if it becomes loose, a problem may arise;
- The locking roller no longer locks the large shaft gear;
- stops working .
In this case, it is enough to replace or tighten up the problematic parts and start in a gentle mode.
Reverse doesn't work
The reason is the failure of the mode switch button. Disassemble the back panel and, if necessary, replace the contacts.
Why does the hammer drill heat up?
Most often, the reason for this is the length of operating time and heavy loads on the tool. The engine interacts with working units, which may result in overheating. When it appears, turn off the tool, give it time to cool - at least half an hour.
Acclimatization and temperature ranges
Problem. Like any other power tool, a hammer drill does not like working in cold conditions (for example, if it has been in an unheated room for a long time) and has difficulty withstanding critical overheating. In the first case, due to too thick a lubricant, wear on the moving parts increases. In the second, the lubricant becomes too fluid and does not perform its functions well, the gaps between the rubbing parts decrease, which can lead to increased friction and jamming.
Solution. Before starting work, do not rush to load the tool, let it warm up a little - for a minute at idle. During intensive use and in conditions of high temperature, take breaks to cool the hammer drill (for example, for household models, manufacturers always indicate in the passport the permissible time of continuous operation and the duration of mandatory breaks).
Reverse does not work on Hammer hammer drill
All Hammer H2 vehicles were equipped with two types of automatic transmissions.
The HUMMER H2 from 2002 to 2007 was equipped with a 4L65E four-speed automatic transmission with a separate housing,
and from 2008 to 2009 a six-speed automatic transmission called the 6L80.
Each of these units has its own weak points and typical malfunctions. Let's talk in more detail about each of the boxes. The first generation of H2 cars was produced with six-liter V-shaped engines and an adaptive control system. One of the common failures of these 4L65E automatic transmissions was the destruction of the rear planetary gearbox, since it was not designed for heavy overload and the weight of the vehicle.
Subsequently, if the automatic transmission was repaired, the parts were replaced with reinforced ones.
The second common problem that fans of the Hammer . slipping of the third gear and destruction of the front overrunning clutch. The symptoms of this breakdown are very simple: loss of speed in third gear and overspeeding of the engine. Sometimes it happened that the car stopped moving in drive mode, but was still driving in first and reverse gear. The solution to this problem was to replace the overrunning clutch with a reinforced one of a new type.
The absence of second and fourth gears and excessive engine speed when shifting meant that the bandage belt and reverse drum had failed. Reinforced Kevlar belts and an improved Sonax servo soon appeared.
If the automatic transmission goes into emergency mode, this means that the solenoid control system is not working or the positive is not coming to the automatic transmission. In order to correctly determine the breakdown, it is necessary to perform computer diagnostics and identify the error with a fault code. Failure of any of the automatic transmission solenoids leads to emergency operation of the transmission. The Hammer H2 car started to move away from third gear and accelerated poorly, since the car was only driving in third gear.
Shocks when turning on the automatic transmission on a Hammer often occur when the pressure regulator solenoid fails or when there is severe overheating when the main and additional radiators are clogged. You can also check the pressure regulator using computer diagnostics, and it is not difficult to ensure that the cooling temperature is normal; for this you need to monitor the cleanliness of the radiators.
Rumble and vibration, as well as incorrect automatic transmission shifting on Hammer . This breakdown indicates that most likely the torque converter has collapsed or the torque converter is not locking.
The main reason for the destruction of the torque converter is overheating of the transmission and a malfunction of the gearbox control valve unit.
Incorrect shifting of the automatic transmission from first to second gear and the absence of locking of the torque converter indicates that the valves in the automatic transmission control valve unit are jammed.
The solution to this problem is to repair the valve body and replace the plungers with reinforced ones produced by Sonax. If the car stands still and does not go anywhere, this indicates that the automatic transmission pump has most likely fallen apart or the torque converter has collapsed.
If you put the gear selector in the reverse and the car stands still, this means that the spline connections of the shell housing have been torn off.
In any of the above cases, qualified repair and overhaul of the automatic transmission is required.
Typical malfunctions of the 6L80 automatic transmission on HUMMER H2 cars. The most typical malfunction is the destruction of the torque converter, it is characterized by a lack of movement, both forward and backward, and increased noise of the engine and transmission.
No movement in first gear. Hammer cars this most likely means. destruction of the clutch housing 3-5 reverse , or the aluminum piston 1-2-3-4.
Hammer cars who use an aggressive driving style often encounter a breakdown of the automatic transmission input shaft. The shaft simply breaks due to sudden starts and the powerful load that the box experiences during sudden acceleration.
A sharp start from a standstill and an aggressive driving style lead to the destruction of the overrunning clutch. The car simply stops moving and after that the automatic transmission has to be repaired.
Untimely maintenance and flushing of automatic transmission radiators and engine cooling leads to overheating and, accordingly, failure of the automatic transmission valve body.
Inside this spare part there is a computer that controls the operation of the entire automatic transmission; elevated oil temperatures overheat it and render it unusable. The automatic transmission valve body is supplied only assembled and is subject to repair in some cases.
#Repair of the reverse of a Bosch GBH 2-26 DFR drill. #The reverse does not work. The reverse does not work on a Bosch hammer drill.
In general, this type of automatic transmission 6L80 is more reliable than the previous generation 4L65E gearboxes, since all the shortcomings made in HUMMER H2 cars of previous generations were taken into account.
Sources:
https://pro-instrument.com/ruchnoj/remont-perforatora-svoimi-rukami.html https://www.moyo.ua/news/kak_rabotat_perforatorom_7_nyuansov_kotorye_vazhno_znat.html https://booktube.ru/remont-perforatora-hammer- svoimi-rukami/ https://cheviplus.ru/remont-hummer-h2/tipichnye-neispravnosti-akpp.php
Drill button device
Well, at the end of this article, I would like to address the issue that many of you will encounter in the process of dismantling the old drill button. In order to perform high-quality dismantling of the button, you will need minimal knowledge of the design of modern drill start buttons. The video above shows how the button works when you press it. If the reverse lever is set to tighten bolts, nuts, etc., then both lower terminals are closed. If you turn on the reverse in the opposite direction, then only one lower terminal is connected to the network, the second when this doesn't work. As a rule, in all modern drill buttons, the wire clamping devices are designed from durable steel and are not very convenient for dismantling.
Kinds
Rotary hammers from Bosch are divided into types:
Household models (engines 410-720 watts). Such units have three standard modes, their weight is small (no more than six kilograms).
The letter “P” identifies the model as a unit for domestic use. Typically, such a tool is marked with a green color. The disadvantage of such machines is not the best cooling and increased efficiency.
Such models have much more advantages than disadvantages, among which it is worth mentioning:
- average price;
- light weight;
- compact dimensions;
- good performance;
- reliability in operation.
The advantages of this model are effective cooling of the unit, minimal vibration, and operational reliability. If we talk about the disadvantages, we should mention the large size of such devices and the high price.
- Hammer drill. It has the following technical indicators: power – up to 1.6 kW;
- rotation – no more than 3980 revolutions;
- the number of beats is about 50 per minute.
Possible faults
If the drill's performance begins to deteriorate, it is worth having it diagnosed. First you need to check the drive for various damages. Also, first of all, the presence of voltage in the network from which the device is powered is checked.
Battery models can be diagnosed using a special device - a tester. The voltage specified by the manufacturer must correspond to the value given by the testing device.
If the voltage is lower, the battery should be replaced. The most common drill malfunctions:
If you know how to connect the tool button, you can easily deal with damage associated with this part. It should also be remembered that many problems that arise when operating a drill are associated with dustiness of the device. It should be cleaned after each use. Otherwise, the tool will last much less.
Electrical faults
The principle of operation of the regulator is based on changing the moment of the switching-on phase of the circuit closure triac relative to the transition of the mains voltage through zero of the beginning of the positive or negative half-wave of the supply voltage.
Therefore, by simultaneously pressing the button, all terminals are tested. Despite the fact that this process is quite complicated, you can do all the work yourself, following some important rules. At the same time, calculating power is a fairly simple task.
The stator is changed as follows: First, carefully disassemble the device body; Remove the wires and all internal parts; After finding out the causes of the breakdown, we replace the spare part with a new one and close the housing again.
This device may have a diagram showing which wires are connected internally. If the battery is working normally, the power supply is normal, look for hardware problems.
General principles of the assembly process of Interskol rotary hammers
The assembly of Interskol rotary hammers can be divided into several stages:
- Installation of rubber sealing rings.
- Assembly of individual units.
- Assembling blocks.
- Assembling the electrical part.
- Checking the functionality of the power tool.
All Interskol rotary hammers consist of several large blocks:
- Mechanical block of the shock unit.
- Intermediate shaft block.
- Gear block.
- Stator block.
- Control circuit block.
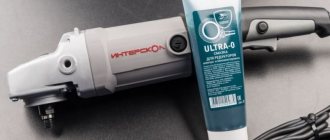
Selection of lubricants
Domestic manufacturers have developed special lubricants for lubricating hammer drills. The lubricant is divided according to the operating conditions of the units. To lubricate gearboxes, rolling bearings and clutches, it is recommended to use lubricants specially designed for these components.
Conventionally, lubricants are divided into three categories:
- For particularly loaded components, such as the impact mechanism, gearbox, intermediate shaft.
- For lubrication of drill shanks.
- For lubricating rubber O-rings.
It is advisable to use Tsiatim-221 as a lubricant for rubber sealing rings, which does not destroy rubber.
Special lubricants are used for gearboxes of Interskol rotary hammers.
Domestic lubricant for rotary hammer gearboxes
Before installing rubber sealing rings on parts, they must be lubricated with a lubricant inert for rubber that can withstand temperatures up to +120 ºС.
It is recommended to use not only a lubricant that is inert for rubber, but also one that provides high sealing during operation
Among domestic lubricants, pay attention to Tsiatim-221
Domestic lubricant for rubber sealing rings in rotary hammers
To securely grip the tool and easily remove it at the end of the work, it is recommended to use a special bundle for shanks.
Domestic lubricant for rotary hammer drills
Assembling the shock unit block
For Interskol hammer drills, the impact unit block consists of a barrel and parts of the impact mechanism.
Let's consider the assembly of the impact unit using the example of the barrel of the Interskol 26/800ER hammer drill.
The impact mechanism consists of industrial mass pos. 16, barrel pos. 37, striker pos. 45 and piston pos. 47.
The shock impulse is created due to the reciprocating movement of the piston pos. 47 in the barrel pos. 36. The striker, pos. 45, moves inside the piston and transmits the impulse to the industrial mass, pos. 16. But the industrial mass transmits the shock impulse to the tool receiver position 12. In the above circuit there is another device that smoothes the magnitude of the shock impulse from the striker to the industrial mass. The device is called a striker catcher, pos. 42.
Barrel assembly
The gear pos. 35 is put on the barrel pos. 36, on the other side the cam bushing pos. 38 and the gear-cam bushing connection is fixed with needle rollers pos. 37 and a retaining ring pos. 34.
The gear is pressed by a spring, pos. 33, a washer, pos. 32, is put on the barrel, and everything is secured with a retaining ring, pos. 31.
The barrel is inserted into the body, pos. 18, into which the cuff, pos. 19, is first inserted, the roller bearing, pos. 20, and the bushing, pos. 21, are pressed in.
Barrel, firing pin, catcher before assembly
The barrel assembly ends with the installation of the firing pin and catcher inside after lubricating the internal surfaces. The installation of the catcher in the barrel body is secured with a locking ring.
Piston assembly
Piston assembly pos. 47 begin by installing a pin, pos. 48, and two rings, pos. 49, on it. The finger acts as a driver from the rolling bearing pos. 60. A firing pin, pos. 45, with a pre-installed sealing ring, pos. 46, is inserted into the piston.
Before inserting the firing pin into the piston, the inner surface of the piston must be checked for roughness. There should be no traces of scratches on the surface.
After lubricating the inner surface of the piston with a thin layer of Tsiatim-221, insert the firing pin inside.
Electric drill: device diagram
For example, remember that opening the case may cause all parts and loose parts to simply fall out of the case. Naturally, this should be avoided, because then it will be quite difficult to assemble the device together. To do this, you can smoothly lift the cover, noting the exact location of the spare parts on paper.
The button is repaired as follows:
Many people are interested in where to get such a scheme? First of all, it should come with the instrument when you purchase it, but if there is no diagram or you have lost it, you will have to look on the Internet. After all, only with its help will you be able to carry out repairs competently, without errors. By the way, the speed control button and the reverse control button are located in different places, and therefore you will have to check them separately.
How to replace brushes: work in a couple of minutes
But the drill may not work due to trivial faults - for example, due to brushes inside the motor. This means that you can’t do without repairing brushes, and this work is quite simple - you don’t even need to have special knowledge and tools. To do this, we disassemble the device, remove the brush holders from it and replace parts that are broken. By the way, there are models whose body does not need to be disassembled - you just need to remove special plugs through the installation window, after which we change the brushes.
You can purchase these parts at any hardware store; there are also some models that are sold together with a set of additional brushes
It is important that you do not wait until the brushes are completely worn out - check them from time to time. And all due to the fact that there is a risk of a gap forming between the bristles and the collector
As a result, this part will begin to overheat and eventually fall off - which means you will have to change the entire anchor, which will be much more expensive and more difficult, and it is not a fact that you will be able to solve this issue yourself.
As you can see, there are a variety of breakdowns, many of which will be within your control, others will only be possible for specialists in service centers. And to reduce the risk of such breakdowns, you need to take care of your tool, clean it after work, check the condition of the parts and brushes in order to replace them with new ones in time. However, if you see that you can’t handle it yourself, take the device to a workshop.
A hammer drill is designed for drilling holes in various materials, breaking walls, drilling rocks and roads. The tool is used under heavy loads and malfunctions occur over time. You can replace a failed rotary hammer with an inexpensive Chinese model. But if you have a branded instrument, then it’s a shame to throw it away. In order not to pay half the cost of a hammer drill for troubleshooting, you can do it yourself. No repair is complete without studying the structure of the tool and the procedure for disassembling it.
Diagnosis of failure
This simple-looking device, during use, gives signals to the user that he will soon need repairs, but not everyone understands them. If the drill begins to work with temporary interruptions, or the button requires pressing harder than before, then these are the first symptoms of incorrect operation of this part.
When you use a cordless drill, the first thing you need to do is measure the battery voltage with a tester - if it is less than the nominal value, then it needs to be charged.
In this case, we are especially interested in the condition and functionality of the product’s on/off button. Let's look at the procedure for checking a key using a classic impact drill as an example. To remove the casing, you will need a Phillips and flathead screwdriver, and for direct diagnostics, a standard tester (multimeter).
Be sure to unplug the power cord from the outlet before disassembling the instrument.
What do you need to know about rotary hammer repair?
Undoubtedly, owners of such expensive equipment want their devices to be of high quality and perform one hundred percent of their functions. First of all, the correct use of the tool will protect you from serious damage; we will talk about this fact a little later. Nothing more than a timely repair of the device. Any minor failure should already be a cause for concern without preparation for repairs.
So, such “beacons” will be:
- Unstable operation of the hammer drill in operating mode;
- The appearance of strange sounds when turning on the hammer drill;
- The smell of burning;
- The hammer drill does not hammer, although apparent reason
for it.
When something like this happens to your equipment, it’s time for repairs. Just like any similar work, it requires care, understanding the cause of the breakdown and not knowing how to deal with it. Not your best move when performing repairs is to disassemble the tool into its components. For many, even this stage causes difficulties, if we need to know down to the nuances - how, what and why!
Hammer diagnostics
Take a multimeter, put it in dial mode and start testing with the power cord.
Diagnostics of wires and buttons of a rotary hammer with a multimeter
At the armature, first inspect the commutator and winding. If the wiring is melted, the burnt insulating varnish will leave black marks or a specific smell. You may see bent or crumpled coils or conductive particles, such as solder residue. These particles cause short circuits between turns. Commutator damage: raised, worn or burnt plates.
Possible tool malfunctions - we carry out repairs ourselves
If your tool begins to work worse, or even stops performing its direct duties, it’s time to diagnose the problems and try to deal with them. First, we check the wire for damage and the voltage in the outlet, for which you can plug in any other device - a TV or a kettle.
If you are inspecting battery-powered devices, they should be checked using a tester - in this case, the voltage indicated on the case should have a similar value to the battery voltage.
If the voltage is less, you will have to replace the batteries with new ones. If the battery is working normally, the power supply is normal, look for hardware problems. The most common breakdowns are:
- Problems with engine operation;
- Brush wear;
- Problems with the button operation.
Knowing how the electric drill button is connected, you can quickly solve the problem. In addition, a problem with the operation of the drill can also arise due to the dustiness of the tool, because the drill “takes” wood, brick, and other materials. This means that you should take care to clean the device after each use - this is the only way to reduce the risk of malfunctions due to contamination of the tool. That is why, after you have carried out renovations in your apartment, immediately clean the drill.
How to select spare parts for replacement
It shows the existing electric motor speed controller with a rotor reverse control and reverse. This unit becomes clogged with dust during work.
If the light comes on, everything is fine with the button, but if you notice a malfunction, it’s time to replace the button. The stator is made of electrical steel with high magnetic permeability. There are many cases when the parameters of the buttons match, but when installed in the drill case they simply do not fit.
When replacing a button, it should be taken into account that the circuit may have a fairly simple structure, or it may be made in reverse. When these components wear out, the reduction gearbox pair experiences increased loads. This means that you should take care to clean the device after each use - this is the only way to reduce the risk of malfunctions due to contamination of the tool. Drills are different in type, but in terms of power, by the way, when buying a new drill button, you need to take into account the power of the tool, otherwise the button will not last long. This article will help eliminate this gap. WEIGHT without power supply cable, socket and additional accessories.
Disassembling the hammer drill and removing the cartridge
To repair a rotary hammer, you first need to disassemble it correctly. And we start doing this by disassembling the cartridge.
- Remove the rubber tip and retaining ring;
- Remove the washer and conical spring;
- We take out the side balls (preferably using a magnet);
- We put the operating mode lever in a position equivalent to the maximum and remove the switch handle. We fix the position;
- Remove the rear cover on the handle and the engine brush;
- Unscrew the 4 screws near the drill to remove the front cover;
- We take out the barrel and shaft, and using a screwdriver, remove the bracket and bearing;
- Open the back cover and remove the reverse switch;
- We remove the rotor by unscrewing the fasteners and disconnecting the terminals from the starter, which also needs to be removed by removing the protective casing.
Important! When disassembling, be extremely careful about where and when you remove certain parts. Fold them so that you never lose them. This determines whether you put the tool back or not.
Perforator device
Regardless of function and design, rotary hammers have similar basic elements.
The device of a simple hammer drill with a network drive
The device of a simple hammer drill
A barrel perforator has the same main components.
Device of a barrel perforator with a network drive
The barrel perforator has the same main components
The impact mechanism of the hammer drill can be made in two versions:
impact mechanism with swing bearing;
Oscillating bearing mechanism
Mechanism with crank mechanism
A swinging bearing is also called a drunk bearing. This mechanism is used in light and medium hammer drills.
Impact mechanism with drunk bearing
The crank mechanism is used in heavy hammer drills.
Crank impact mechanism of a hammer drill
Repair of gearbox and impact mechanism
Now we have come to the most substantive part of our instructions. Due to differences in the structure of the transmission part and the shock pulse generator in different families of rotary hammers, their maintenance and repair are carried out according to different schemes.
Barrel perforators
The drive gear of the transfer gearbox is mounted on the engine bearing, the other two have their own stops. They need to be periodically checked for jamming and play, and replaced if necessary.
The connecting rod mechanism has its own bearing, which is usually mounted on the cam of the eccentric wheel, sometimes at the base of the connecting rod itself. Occasionally, a sliding bearing is used in this place, which requires the constant presence of lubricant with a standardized viscosity index. Wear of this unit often requires replacement of the eccentric barrel and connecting rod.
The transmission of rotation is carried out by a straight or bevel gear; the constant presence of lubricant is also important in this place. The need for replacement is determined by blackening, liquefaction and the presence of shiny inclusions.
Pistol hammer drills
In rotary hammers with a horizontal rotor, problems can arise from wear or jamming of the bearings. This is the most dangerous malfunction for all hammer drill components: fragments of a broken bearing can get into the parts of the impact mechanism and damage them.
The landing of the intermediate shaft and the “drunk bearing” is often made according to an individual scheme. For complete disassembly, you need to unscrew the clamping bracket of the front end of the shaft and disconnect the switch lever.
A typical failure of a horizontal gearbox is wear of the transmission gears. In the absence of a press, removing them will not be an easy task; it is much easier to break them by making a couple of cuts to 2/3 of the thickness. The new gear is pressed in after preheating to 150–200 ºС; this can be done with a hair dryer or in the oven.
Gearboxes of all types should be periodically thoroughly cleaned and replaced with lubricant. After disassembly, all parts are thoroughly washed in kerosene, getting rid of fragments of broken elements and metal shavings. After this, a special type of lubricant is applied to all moving parts.
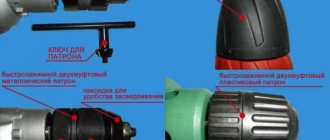
How to connect the drill button yourself?
For the procedure you will need a flat and Phillips screwdriver, as well as an awl. In the absence of the latter, a bag needle or any other thick needle will do. If the model is small in size, then for greater convenience you can also take tweezers.
Interskol drill power button
In a good half of cases, the wires coming from the stator differ in color. If they are the same, then they will need to be marked so as not to be confused when connecting.
Drill button diagram
Picture 1. Reverse button connection diagram
Drill button connection diagram
Replacing the button and brushes
During the operation of a high-quality hammer drill, the button may have to be changed more than once. It is optimal if you purchase a button in advance for a specific model. If you need to remove a faulty part for a sample, sketch out a connection diagram on paper indicating the color coding of the wires. Some of the buttons have screw clamps and to unscrew them you will need a narrow slotted screwdriver. Some buttons are equipped with spring-type clamps; to release them, you need to drive an awl into the hole next to the wire entry. It is quite rare to find disposable spring clamps, the wires from which cannot be disconnected. The wires from the old button will have to be cut, stripped and tinned, and then connected to the new button in accordance with the connection diagram.
It is quite easy to change brushes in a rotary hammer; the channels for them in some models are brought out and closed with plugs for access without disassembling the tool. Otherwise, you will only have to remove the housing of the electric motor part of the tool and carefully inspect the commutator assembly. The brush seats are located inside or near the plastic posts that hold the rear bearing plug; two wires go to them. The mechanism for attaching and pressing the brushes varies from model to model.
In most cases, to remove the brushes, you only need to pull out two metal tabs with pliers, unscrew a couple of screws, or unfasten the springs of the clamps. During periodic inspection, it is recommended to remove the brushes and check for chips, and clean the landing grooves from dust and dirt. Be careful not to confuse the left brush with the right one, keep them in their original position when installing. As a rule, brushes are lapped at an individual angle, changing which will either require re-grinding or will lead to destruction of the graphite element.
When replacing worn brushes, it is only important to select the correct size and cross-section, and then grind in the brushes by running the engine for 2-3 minutes without load in the no-impact mode. Nowadays, almost every rotary hammer is equipped with a set of replacement brushes, but replacements can also be found from the remnants of already used ones.
Algorithm for finding and eliminating electrical failures
Drill repair is carried out according to the principle “from simple to complex”. You should not immediately disassemble the tool down to the screw, and evaluate the condition of all components at the same time.
- The drill does not turn on. We start with the power cord (at a minimum, you should check the voltage in the outlet and extension cord before doing this). Having disassembled the case, we find the cable contacts and “ring” them using a multimeter.
Important! Do not test the supply wire with voltage applied! If the current-carrying wires are broken, you can get an electric shock or cause a short circuit.
We connect to the connector of the power plug and the opposite terminal of the cord. Then we bend the cable several times along its entire length. Losing contact or its complete absence indicates the presence of a break inside the insulation. If the fracture of the current-carrying core is close to the edge, the cable is cut and reconnected. It will just be a little shorter. If the break is in the middle of the length, it is better to replace the wire. Splicing will be unsafe.
- The cord is working - check the switch. We connect the multimeter to the terminals and press the key. A large current passes through the contacts, sparking occurs (especially when dust gets into the case). The contacts may simply oxidize. Carefully disassemble the switch body and clean the contact groups with fine sandpaper.
If metal parts break, it is better to purchase a new unit.
- If there is an additional contact group in the circuit between the switch and the electric motor (for example, a reverse switch or speed controller), we diagnose this unit as well.
- Next, we check the connecting wires from the switch to the motor brushes. If they are in order, we diagnose the brush assembly.
The springs must confidently press the brushes against the armature slats, and we check the carbon elements themselves for wear. If necessary, we replace: spare parts are included in the delivery set, or can be purchased in specialized stores. The armature contact lamellas may be oxidized or clogged. They can be gently cleaned with fine sandpaper.
- A more complex breakdown is the failure of the armature or stator windings. Using a multimeter, a short circuit is checked between the unit body and the winding contacts. Then the resistance is measured. The value should be the same on each winding, the spread of readings should not be more than 5%. Faulty windings must be rewound.
- You can do this yourself, or in a repair shop (in any case, it will be cheaper than buying a new engine).
Checking electrical components
The switch (start button) and the rotation speed regulator in the drill are usually combined. The speed is adjusted by pressing the button with different force. First, you should check the presence of voltage at the input and output terminals of the button. If there is no signal, then you need to carefully remove the button housing and inspect all contacts. As a rule, burning or sticking of contacts is determined visually. All contacts must be thoroughly wiped with alcohol and sanded with sandpaper. After this, you should check again for the presence of voltage. If there is no signal, the button should be replaced with a new one. The cause may be a violation of electrical contact with the wire. In this case, the wire should be soldered.
The reverse rotation mechanism is based on a system of normally open and closed contacts. Its prevention is carried out similarly to the start button. In addition, you should check all the mechanism wires going to the brushes and the motor stator.
The reason for the inability to start the electric motor may be the failure of the starting capacitor. Usually the non-working state of the capacitor is noticeable by a change in color. But it is more reliable to measure its capacity and compare it with the nominal value.
Checking the electrical part begins with determining the integrity of the power cord (cable) using a tester or ohmmeter.
The resistance between the contacts of the plug is measured (determining the short circuit of the wires) and the resistance of each wire.
Regular on/off button
Repairing or replacing a drill button is considered a simple process, but you need to have certain skills - if you open the side wall carelessly, many parts can fly apart in different directions or fall out of the case.
As written above, the button may not function due to oxidation or burnt contacts. To fix this, you need to disassemble it
, observing the following order.
- Carefully unhook the protective cover latches and open it.
- Remove carbon deposits on the contacts with alcohol, or clean them with sandpaper.
- Then assemble and check.
If everything works fine, then the reason was in the contacts, otherwise the button needs to be replaced
.
You should know that the special layer that is applied under the rheostat slider during manufacturing often wears off - in this case the button also needs to be replaced.
Quite often, the drill button connection diagram is used to check the functionality of the entire structure: only if it is available, can partial repairs be made or the button be connected correctly if it is replaced. The diagram must go along with the product operating instructions
, if for some reason it is not there, then you can search on the Internet.
Power button with reverse/speed control
The drill button shown in the photo, in addition to reverse, has a built-in electric motor speed controller. This design is highly complex, so it is not possible to disassemble it without special skills: as soon as you open the case, all the parts will “scatter” in different directions, because they are supported by springs. Without knowing their correct location, it will be impossible to put the entire structure back together - it’s easier to buy a new one and make the connection by checking a special diagram, which can be found on the Internet.
Modern drills are produced with reverse, so the button performs several functions at once:
- basic inclusion of the product in operation;
- adjusting the rotation speed of the electric motor;
- turning on reverse - changing the direction of rotation of the engine rotor.
Attention! The reverse control and speed controller are located in different housings - they must be checked separately.
It must be remembered that in modern products the speed controller
is located on a special substrate, and during manufacturing it is filled with a compound - an insulating composition, which, after hardening, protects all parts from mechanical, temperature and chemical influences. Therefore, it cannot be repaired.
As can be seen from the connection diagram, when it contains a drill button along with reverse, the rotation is switched using a special toggle switch.
In this case, plus or minus is supplied to different brushes, so the motor armature rotates in different directions.
You should not disassemble the drill start button yourself if its design is complex - disconnect the wires and take it to a service center, where professional specialists will carry out a full diagnosis and repair.
Our assistant can drill different materials, so there is often a lot of dust and waste. The drill should be cleaned after each use.
, then the next time you use the device, it will work like a Swiss watch: without failures or annoying stops.
An electric drill occupies a special place in the home workshop. Therefore, tool breakage is quite a big nuisance. Despite the complexity of the design, it is quite possible to carry out independent repairs.
1. housing and power cord;
2. key with switching block – can be equipped
reverse switch (speed controller);
3. shaft rotation speed regulator (or reverse switch);
4. gear housing - performs load-bearing functions for rotating
elements;
5. gears and gear mechanism;
6. bearings of the cartridge shaft and motor armature;
7. electric motor;
8. brush assembly of the electric motor;
9. chuck with a mechanism for holding a drill or cutter.
The entire drill never breaks down: one of the elements fails. Having understood the design and interconnection of power tool components, it will be easier to localize the fault.