The operating principle of the Bosch 2-26 rotary hammer is no different from rotary hammers of famous brands. The rotating rotor transmits torque to the intermediate shaft of the mechanical assembly of the hammer drill, while simultaneously transmitting translational motion through the rolling bearing to the hammer hammer's impact mechanism and the impact impulse. A rotational moment with a translational shock pulse is transmitted to the working tool. This principle is implemented in all rotary hammers.
But different companies that produce rotary hammers have their own design features.
Bosch rotary hammers are considered the best in their power tool segment. But nothing is eternal.
If your Bosch 2-20, 2-24, 2-26 hammer drill has stopped working, then you can restore it yourself. You need to have basic locksmith skills and a little understanding of electrical engineering. And another important detail: the design of Bosch rotary hammers is so simple that it does not cause difficulties during repairs.
When repairing power tools, including repairing Bosch rotary hammers, strictly follow safety precautions when working with electrical appliances.
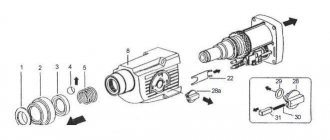
To make it easier to repair a Bosch rotary hammer, disassemble and reassemble it, study the tool assembly diagram:
Diagram of a Bosch 2-26 rotary hammer
Any disassembly of the Bosch 2-26 rotary hammer begins after inspection, test operation and identification of the causes of the device malfunction.
Video of disassembling a Bosch 2-26 rotary hammer
Operating rules or how to protect the device from damage
To ensure long-term and efficient operation of an electric hammer drill, it is enough to follow a few simple rules. In particular:
- When working, it is not advisable to put too much pressure on the tool; at least this is not necessary, and moreover, with excessive pressure, the tool will fail faster.
- It is not permissible to operate the electric hammer drill in idle mode.
- When working with porous materials, it makes sense to turn off the impact mechanism. When working with particularly hard materials, it is advisable to use a lubricant.
- When working, especially for a long time, it is necessary to monitor the heating of the housing, especially in the place where the gearbox is installed. If there is noticeable heating, you must stop the work and wait until it cools down. Water cannot be used for cooling; its use may damage gearbox parts.
- Work with the tool should be carried out in the following mode - at least a 10-minute break after half an hour of work.
Reasons for disassembly
There can be many reasons for disassembly, let’s consider the main ones:
- Prevention. Even if the tool works well, it must be periodically disassembled for lubrication and dust removal.
- Unstable work. The tool may work, or not work, or work at half capacity. This is a reason to be wary.
- Strange noises. Previously, the instrument worked quite quietly, but now some strange buzzing or rattling sounds are coming from inside. There's something wrong with the tool.
- Burning smell while working. This may indicate a motor malfunction or bad wires.
- Chiseling has become noticeably more difficult, although there are no apparent reasons for this.
Now let's look at our working tool.
Impact mechanism repair
The design of impact mechanisms differs from the type of hammer drill. Therefore, eliminating the cause of the malfunction has its own slight differences.
In a barrel unit, the impact block operates on the basis of a crank mechanism. The main malfunction of such a device is considered to be wear of bearings and rotating parts. Repairing them consists of installing new parts, while taking into account strict compliance of the brand of the element for a given model.
In a unit with a horizontal engine, the piston of the impact mechanism is driven by a swinging (drunk) bearing. Most often, damage to this unit occurs due to wear of such a bearing.
When replacing it, special attention should be paid to cleaning the gearbox from possible small fragments of the damaged element and subsequent lubrication of the installed parts
Also, the reason that the unit does not hit can be a broken striker, which also needs to be replaced with a new element.
Hammer lubrication
Once you know how to properly disassemble the hammer drill, you can move on to lubrication. It may seem that lubrication is an intuitive process and does not require special skills. This is not entirely true, you need to know a few useful tips for lubrication to make sense:
- Lubrication should be carried out even if you rarely use the tool. The nozzle, internal components - all this needs to be cleaned and lubricated.
- If your tool is made, then you need to buy lubricant from this company. This is not a strict requirement, although it is often found in the instructions for the instrument.
- Graphite grease or diesel oil is a good example of a multi-purpose lubricant.
- Do not overuse lubricants.
Disassembling the hammer drill
The case of most devices is made of two halves: rear and front. They are tightened together using screws located parallel to the direction of the drill installation axis. But it happens that the halves are attached using side fastenings. Before unscrewing the fastening element connecting the halves of the housing, you will need to remove the cartridge.
The cartridge used corresponds to the SDS-plus or SDS-Max standard. To disassemble it you will need a flat-head screwdriver. At the first stage, the chuck clamp is released from the installed drill. If the mechanism itself is jammed and cannot be untwisted, then you should tap it in a circle with gentle blows of a rubberized hammer. It would not hurt to apply flushing fluid. At the next stage, the plastic casing is pulled down and the rubber boot is removed with a screwdriver. After this, all that remains is to remove the retaining ring, using a screwdriver, and remove the spring with the ball and the retaining plates.
When the cartridge is removed, the housing parts are removed. When disassembling the tool, you should be careful, remembering the order in which the elements are removed and their location. If there is a cover on the handle, you should remove it too. After that, all that remains is to carefully separate the housing and gearbox in different directions. Using the resulting gap, the switch button is removed. The brush holder is removed.
The button for setting operating modes, despite the types of devices, is removed in the same way. The switch is set to the strike position (shown on the body as a hammer), after which it is slightly pryed and turned counterclockwise one or two centimeters. Then, the switching pad is removed by pulling it towards you and the seat is freed up.
Bosch GBH 2-26 DRE
- Drill/drill mounting type SDS-Plus
- Number of operating speeds 1
- Power consumption eight hundred W
- Max. speed nine hundred rpm
- Max. beat frequency four thousand beats/min
- Max. 5.7 J
- Maximum twenty eight Nm
- Max. (wood) thirty mm
- Max. drilling diameter (metal) thirteen mm
- Max. drilling diameter (concrete) twenty six mm
- Max. drilling diameter (hollow crown) sixty eight mm
- Mains power
Functions not possible
- Operating modes: drilling, hammer drilling, chiselling
- Screwdriver of course
- Reverse capabilities, safety clutch, spindle lock, electronic speed control
- Accessories additional handle, drilling depth limiter, locking
- Case included
- Dimensions 377×210 mm
- Weight 3.2.7 kg
- Features Vario-Lock system for fixing the chisel in thirty-six angular positions, country of origin. Germany
Usually
- Usually
- In terms of price
- By rating not by price
- By distance
- Considering delivery
- Pickup
Place orders directly through Yandex.Market
expensive, gets hot, poor vibration protection
a completely incomprehensible device. Blue Bosch, professional hammer drill. But you can’t work with it for long. It gets hot, it needs to cool down. After a couple of hours of work, the hands simply fall off from the vibration. Home – powerful, not convenient, but prohibitively expensive for a home instrument. Moreover, it is expensive: the device itself, branded equipment (one drill can cost fifty times more than on the financial market), repairs
.
Replacing the cartridge, which I had to do at my own expense, cost a third of the price of the hammer drill
. According to the act, the cartridge itself turned out to be much more expensive than in the store. After the repair, I realized that what I spent on the hammer drill was more than what it cost. When it breaks, I’ll just buy another one, especially since super-expensive drills promise to last a long time.
Collapse Read more
convenient, thoughtful, powerful
high vibration, absolutely impossible to repair - expensive, gets hot
My opinion is this: the perf is good, but not for . Even despite the fact that it is blue. For housework. and sell. However, excuse me, active use of a hammer drill in the workplace involves heavy loads. Not, by and large, the price tag for this common rumor is that Bosch directly hints at such a situation in any way: don’t spare the money, it works for us. However, it doesn't work! More precisely how - it should not work powerfully for a long time. Logical? And what happens to this perf? The first question is what strong vibration. Okay, this is a hammer drill, although in any case it is very strong when compared with similar competitors. Further. The hammer drill gets very hot. No, and again, this is not exactly a problem, but it speaks volumes about the quality. A year later the trunk was damaged. Karl, that's how it is. Professional Bosch. Repair
, it is, by and large, not expensive. Alas, after a year? The repaired barrel will last a lot. We didn't have to find out. They had just decided on the barrel, when the perf produced a sheaf of sparks, the smoke did not stink: the anchor was covered. Ultimately, what's the point in renovating? For that kind of money, I’d rather buy two with a less sonorous name, it’s twice as profitable.
Replacing the button and brushes
It is quite easy to change brushes in a rotary hammer; the channels for them in some models are brought out and closed with plugs for access without disassembling the tool. Otherwise, you will only have to remove the housing of the electric motor part of the tool and carefully inspect the commutator assembly. The brush seats are located inside or near the plastic posts that hold the rear bearing plug; two wires go to them. The mechanism for attaching and pressing the brushes varies from model to model.
In most cases, to remove the brushes, you only need to pull out two metal tabs with pliers, unscrew a couple of screws, or unfasten the springs of the clamps. During periodic inspection, it is recommended to remove the brushes and check for chips, and clean the landing grooves from dust and dirt. Be careful not to confuse the left brush with the right one, keep them in their original position when installing. As a rule, brushes are lapped at an individual angle, changing which will either require re-grinding or will lead to destruction of the graphite element.
When replacing worn brushes, it is only important to select the correct size and cross-section, and then grind in the brushes by running the engine for 2-3 minutes without load in the no-impact mode. Nowadays, almost every rotary hammer is equipped with a set of replacement brushes, but replacements can also be found using the remnants of already used brushes.
Disassembling the cartridge
The cartridge is perhaps the most important part of the tool. Tool manufacturers make the chuck using different designs and attach it to the main part of the tool in different ways. Main types of cartridges:
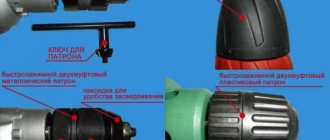
- Cam type. To insert and secure the drill, a special key is used, which is included with the tool.
- Collet type. To insert and secure the drill, simply turn the chuck.
- Double or single sleeve quick release type. No special tools are needed for insertion and fastening.
After determining the type of cartridge, we will try to remove it. The type of cartridge does not matter much; the removal process is more or less universal:
- First we need to loosen the cartridge screw. To do this, simply tap the head of the tool.
- Take a screwdriver and unscrew the securing screw.
- Fix the chuck in a vice and rotate the spindle.
The hammer drill also needs lubrication and varnishing. Even if you use it once a year, lubricant will help prevent corrosion and damage to the tool ahead of time.
How does a hammer drill work?
A hammer drill can be classified as a tool that has a device of increased complexity. However, a sequential examination of the details and principle of operation will help to thoroughly understand the nuances of the mechanism and troubleshooting.
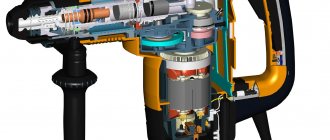
Barrel perforator structure: 1 - power cord; 2 — carbon brushes; 3 - electric motor; 4 - switch; 5 - eccentric mechanism; 6 — impact mechanism; 7 - quick-change cartridge
In a barrel hammer, the motor and drive gear are located vertically. The key difference from a pistol-type tool here is the presence of an intermediate gearbox.
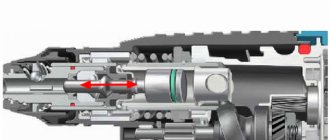
In horizontal (pistol) type hammer drills there is no transfer gear as such; rotation is immediately transmitted to an intermediate shaft located below the axis of the main spindle. This shaft is mounted on two bearings; between them there is a “drunk bearing”, which, when rotated, oscillates and sets the firing pin piston in motion. At the protruding front end of the shaft there is a gear, through which rotation is transmitted to the barrel.
Pistol type hammer drill device: 1 - switch; 2 - electric motor; 3 — brushes; 4 — “drunk bearing”; 5 — “flying” piston; 6 — striker; 7 - quick release chuck SDS
Any rotary hammer has mode switches. In the barrel, they simply lift the gears of the transfer gearbox, disengaging them. A pistol hammer drill can use one of two control schemes. In the simplest case, one switch displaces the intermediate shaft, which, being extended as far forward as possible, engages with the cartridge gear, but at the same time the rotation transmission clutch to the swing bearing is disengaged. In the middle position, both mechanisms are included in the transmission, and in the most recessed position, only the drummer works. The outdated kinematic circuit has two switches, one of which disengages the oscillating bearing clutch, and the other moves the intermediate shaft.
How to repair any Bosch rotary hammer with your own hands, knowing the design features
The most widespread among professional builders in Russia are Bosch rotary hammers, and among amateurs the household models Bosch 2–20, 2–24, 2–26.
Rotary hammers not only work well, but are also easy to repair. You can easily find any broken part on them.
The designs of the described rotary hammers are based on the same principle: transmitting torque from the rotor to the shaft of the impact block barrel while simultaneously transmitting a translational impulse to the working tool.
Structurally, hammer drills are made according to the same design, but individual components or parts have their own characteristics.
If you know the specific differences between the models of the described Bosch rotary hammers, then disassembling and repairing them yourself will not be difficult.
Along with the originals, there are a large number of counterfeit tools on the Russian market, including Bosch rotary hammers.
Below we describe the design features of the models and how to disassemble and repair them yourself.
Operating principle of a Bosch rotary hammer
The operating principle of rotary hammers is the same, but the design features differ.
The main parts used in the listed models of Bosch rotary hammers are interchangeable. This applies to the mechanical and electrical components.
But there are units made that differ in the parts used.
To repair a Bosch 2-20, 2-24, 2-26 rotary hammer, you need to know these differences. Knowledge of the design features of each rotary hammer facilitates the repair process, finding breakdowns and eliminating them.
The designs of Bosch rotary hammers are so simple that they allow you to perform simple repairs, practically with your own hands, and replace any part without contacting service departments. You must have assembly skills, have basic knowledge of electrical engineering and understand the principle of operation of a rotary hammer.
The main differences in the designs of Bosch rotary hammers
When repairing a Bosch rotary hammer, you cannot do without an electrical diagram and a disassembly diagram for the tool of the model you are going to repair.
The electrical circuits of Bosch 2-20, 2-24, 2-26 rotary hammers are almost the same. Although there are some unprincipled differences.
But mechanical blocks are equipped with parts that differ structurally from each other. The main differences are concentrated in two units: the intermediate shaft and the barrel shaft of the shock block.
The greatest differences are presented in the design of the intermediate shaft, the “drunk bearing” assembly, and the mode switch. Unprincipled features are present in the design of the barrel of the striker block, firing pin, and striker.
Let's start with the Bosch 2-20 rotary hammer.
Diagram and design of the Bosch 2-20 rotary hammer
Repairing a Bosch 2–20 rotary hammer is not possible without knowledge of the design of the tool being repaired.
The operating principle of the Bosch 2–20 rotary hammer is based on the transmission of torque from the rotor shaft, pos. 3, to the shaft of the impact block, pos. 22, through the intermediate shaft, pos. 824, while simultaneously transmitting a longitudinal impulse to the working tool.
Rotor pos. 3 transmits torque to the helical gear of the intermediate shaft pos. 824.
Diagram of a Bosch 2-20 rotary hammer
The helical gear is mounted on the intermediate shaft and transmits rotational torque to the shaft. A fixed bearing is attached to the shaft, receiving rotational torque through the clutch. Due to its design, the drunk bearing transmits translational motion to the barrel cylinder of the impact mechanism.
Design of the intermediate shaft of the Bosch 2–20 rotary hammer
The intermediate shaft of a Bosch 2–20 rotary hammer consists of a rolling bearing assembly (drunk bearing), a clutch, a large helical gear, and a small spur gear.
Most often, breakdowns manifest themselves in wear of the clutch splines, which leads to the loss of rotation of the hammer drill chuck in the presence of a shock pulse.
It can be corrected by replacing the clutch or restoring the teeth of the clutch parts.
View of the intermediate shaft of the Bosch 2-20 rotary hammer
Design features of the Bosch 2–24 rotary hammer
It is best to start repairing a Bosch 2–24 rotary hammer by becoming familiar with the circuit and design features of the tool being adjusted. The operating principle of the Bosch 2–24 rotary hammer is similar to the operating principle of the Bosch 2–20 rotary hammer.
The torque is transmitted to the tool mounting shaft, simultaneously with the transmission of the shock impulse. The hammer drill has three operating modes: drilling with impact, drilling without impact, impact.
The helical gear of the rotor pos. 803 transmits torque to the helical gear of the intermediate shaft pos. 826.
Diagram of a Bosch 2-24 rotary hammer
Design of the intermediate shaft of the Bosch 2-24 rotary hammer
The intermediate shaft of the Bosch 2-24 rotary hammer consists of a rolling bearing assembly, pos. 830, a clutch, pos. 823, and a switching part, pos. 44. Most often the clutch fails. The teeth in it wear out. Repair of the coupling consists of correcting the profile of the engagement tooth in the coupling and on the intermediate shaft.
Bosch 2-24 hammer drill intermediate shaft assembly
Impact mechanism barrel shaft design
The barrel shaft of the impact block is designed to transmit a rotational impulse with simultaneous movement of the striker.
Rotation is transmitted from the spur gear of the intermediate shaft to the large spur gear pos. 22 of the barrel shaft pos. 821.
The reciprocating motion is transmitted through the driven bearing pos. 830, the impact piston pos. 26, the striker pos. 27, the impact bolt pos. 28 to the drill fixed in the chuck pos. 756.
The design is a shaft, hollow on one side. Parts are installed on the shaft on both sides.
From the side of the cartridge mounting, a spur gear, pos. 22, is installed on the shaft and fixed on the shaft using a roller, pos. 88, and pressed against the shaft collar with a spring, pos. 80. The spring itself is fixed with a locking ring pos. 85.
The following is inserted into the cavity of the impact block barrel shaft: the assembled impact bolt pos. 28 and the impact piston. The striker pos. 27 is inserted into the impact piston pos. 26 with a new rubber ring pos. 73 placed on it. All rubber products are lubricated with the recommended lubricant.
Malfunctions of the hammer shaft shaft
Due to the weakening of the spring force and the locking roller falling out, the gear may rotate on the shaft. This manifests itself in the disappearance of the torque with the presence of a shock pulse.
The rotary hammer hammers, but does not drill.
When rubber products (sealing rings) wear out, the hammer drill stops working in the “Slotting” mode. This happens gradually. The impact force weakens as the rubber rings wear. The thing is that from the drunk bearing the movement is transferred to the impact piston pos. 26, in which the striker pos. 27 creates air pressure and acts on the impact bolt pos. 28.
The hammer drills, but does not chisel.
If you apply a lot of force when operating a hammer drill, this can lead to the destruction of the impact bolt and jamming of the striker in the impact piston. Such malfunctions can only be eliminated by completely replacing the failed part. Learn more about troubleshooting a Bosch rotary hammer.
Design features of the Bosch 2–26 rotary hammer
Repair of a Bosch 2–26 rotary hammer should begin with familiarization with the design features of the tool being adjusted. The operating principle of the Bosch 2–24 rotary hammer is similar to the operating principle of the Bosch 2–26 rotary hammer.
Diagram of a Bosch 2-26 rotary hammer
Rotation is transmitted from the rotor shaft, through the intermediate shaft, to the shaft of the impact barrel. At the same time, a bearing mounted on the intermediate shaft transmits reciprocating motion to the impact piston.
The hammer drill has three operating modes: drilling with impact, drilling without impact, impact.
The helical gear of the rotor pos. 803 transmits torque to the helical gear of the intermediate shaft pos. 823.
The intermediate shaft is similar to the shaft in the design of the Bosch 2–24 rotary hammer and is interchangeable with parts included in the intermediate shaft of the Bosch 2–24, 2–26 rotary hammers. Instructions for disassembling a Bosch rotary hammer.
Impact mechanism barrel shaft design
The barrel shaft of the impact block is similar in design to the barrel shaft of the Bosch 2-24 rotary hammer. Breakdowns are caused by malfunctions of the same parts as in the Bosch 2-24 rotary hammer.
Scheme of the barrel shaft of the percussion mechanism
Features of the shaft of the Bosch 2–26 rotary hammer are that the driven large spur gear, pos. 22, is fixed on the shaft with three pins, pos. 37, in contrast to the fixing roller in the Bosch 2–26 rotary hammer.
When disassembling the barrel shaft of the impact block of the Bosch 2-26 rotary hammer, pay attention to the method of fixing the gear. Before removing the gear, three pins must be removed. The procedure for correctly assembling a Bosch rotary hammer.
Conclusions:
- Knowing the differences between the above models of Bosch rotary hammers will allow you to quickly disassemble the tool and replace faulty parts. To do this, you do not need to contact customer service.
- Structurally, Bosch rotary hammers are so simple that they allow you to carry out repairs of almost any complexity.
- All you need is desire and basic knowledge of mechanics.
It happens that you come across counterfeit models of Bosch rotary hammers. Read more about this here.
Video about disassembling a Bosch rotary hammer
Video: How to repair a hammer drill / 2-24 / How to change the impact bolt / Drunk bearing / Maintenance / Repair
sdelalremont.ru
Tool holders
There are several ways to secure drilling or slotting equipment to a tool. They have different methods of application and design. The frequency of use in various models is also different.
Self-clamping device
The name of the cartridge speaks for itself. To clamp a drill or drill, a special wrench or any additional tools are not required. Replacement of equipment occurs at high speed. You should press the spring-loaded body with your hand and remove the unnecessary drill, and install a new one in its place.
Such devices come in two types: with one coupling and with two. If a double-sleeve clamp is installed, you need to hold its lower part with your other hand. The disadvantage is the unreliability of fastening. When you press hard or bite, the drill rotates. Despite this, such a device is used in everyday life and in production - where during the drilling process it is necessary to change equipment many times.
Impact Drill Adapter
This device will help out when you don’t have a drill at hand, but making a hole with a regular drill is simply necessary. This adapter for a hammer drill is inexpensive and is a regular collet chuck with a shank. In this case, the capabilities of the drilling device itself are expanded. Almost any modern model allows you to install such an adapter.
However, there are small caveats. When drilling with such an adapter, accuracy will suffer slightly due to the fact that the rotation speed is quite high, and the nozzle will reel in. In addition, you need to calculate the size of the adapter based on the strength of the hammer drill. If you put a more powerful adapter on a weak tool, you can damage the drill.
Installing a drill using a wrench
Such a chuck is also called a toothed chuck because of its serrated appearance, or a cam chuck because the locking process is similar to clenching a fist. Clamping occurs using a special key. The method is quite time-consuming, not only in terms of replacing equipment. The cartridge itself cannot be quickly changed either, because a special cartridge key is required. However, the clamp turns out to be the strongest and most reliable, supporting the installation of drills of the maximum size. Any shank will also work.
Types of quick release chucks
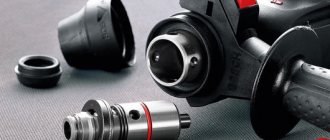
Such equipment was developed in Germany by Bosch engineers, and since 1980 it has been equipped with rotary hammers produced by them. Currently, most models of such power tools are equipped with them. Steck-Dreh-Sitzt translated means “inserted, turned, village.” From these German words comes the name of a whole class of quick-release chucks for SDS rotary hammers.
They, in turn, are divided into subclasses, depending on their diameter.
The most widely used products are the SDS-plus type. They accept drills with a shank of 10 millimeters and a diameter of 40 mm. The chuck drill itself has dimensions from 4 to 26 mm and a maximum length of up to 1 meter. This type of quick release tool holder is suitable for light to medium sized rotary hammers designed for a 5 Joule impact load. This will be enough for both housework and to meet the needs of the construction team.
An 18-millimeter seat characterizes quick-release chucks of the SDS-max category, used on heavy-duty tools weighing more than 5 kilograms. The working diameter reaches 60 mm, the seating depth in the head is 90 mm. The method of using such a tool is more powerful - the impact force increases to 30 joules. The presence of an additional groove guarantees strong fixation of the equipment.
Less commonly used are hammer drill chucks SDS-top and SDS-quick. The first is designed for drilling holes with a diameter of 16-25 millimeters and landing 40 mm. The shank has a diameter of 10 millimeters. This type of quick-change cartridge was considered as transitional between classes.
The second was developed in 2008 and is designed to hold ¼-inch drill bits.
Bosch rotary hammer device
There are two types of hammer drills:
- with a horizontal engine installation (the barrel and the engine armature are placed in parallel);
- with vertical engine installation (the same parts are at right angles).
Electrical and mechanical parts are the main components of this tool.
The electrical part consists of:
- engine;
- engine control device (sometimes combined with a switch);
- on/off switch;
- elements that dampen interference;
- power cord.
The composition of the mechanical part is as follows:
- a gearbox that is mounted on the motor shaft;
- impact mechanism;
- clutch.
This device can be supplied with various accessories in the form of a drill, crowns, a vacuum cleaner and other parts.
Device motor
The engine, being the main element of the device, drives all other parts of the mechanism. It consists of a stator and a rotor, with the rotor being a moving part and the stator not. The rotor includes an armature and a commutator. An anchor is a block containing steel plates. Windings of copper wire are wound on them. The collector, in turn, looks like a cylinder. Its design has the form of a dielectric with installed conductive plates; the armature windings are connected to these plates.
Rotation of the rotor occurs due to the magnetic flux created around it by the stator windings and leading to the occurrence of a torsional moment. In this case, the rotor uses only a constant current value, and the magnetic flux is always directed only in one direction. Power is supplied through brushes made of graphite. The brushes are arranged in such a way as to ensure electrical contact with the armature.
https://youtube.com/watch?v=Pszn95WcqME
You can use a multimeter to check the windings. To do this, one probe of the measuring device is installed on the brush holder, and the second on the input for connecting to the 220 volt network. To accurately determine the connection locations, it is easier to use an electrical diagram. If the resistance is infinite, it is concluded that the winding has burned out.
The operating resistance of the stator winding is in the range of 18–32 Ohms. For example, the popular Interskol P-26/800ER hammer drill has a resistance of 28 Ohms. When replacing the stator, you will need to disassemble the motor. Usually four screws are unscrewed, the housing is moved apart in opposite directions, and access to the engine components is freed.
The rotor is fixed in the gearbox. It is checked for short circuits with a special device. Often, by visual inspection, you can conclude about its integrity. The rotor should not be scratched or blackened, and the plates should be clean
When replacing the rotor, it is important to correctly connect the bearing to the rubber gasket
The design of a rotary hammer with a vertical (barrel) electric motor is slightly complicated due to the indirect transmission of torque. Therefore, with this type, a gearbox is used, which increases the impact and torque of the device.
Do-it-yourself Bosch rotary hammer repair
If any parts in the tool are damaged, broken, or do not perform their function well, then they simply need to be replaced. If the brushes are worn out, then during disassembly they are simply replaced with new ones. When the rim rotates slowly, the hammer drill cartridge, worn boot, and failed bearings are also replaced. But there are other problems that you can fix. If a breakdown of the winding occurs, then the stator and armature must be rewinded. You need to monitor the lubrication and lubricate some parts from time to time.
Recommendations for using a rotary hammer
As you can see, repairing a rotary hammer with your own hands is a task that anyone can handle; the main thing is to understand the structure of this useful tool for household use and follow the instructions. And to reduce the likelihood of a breakdown to a minimum, you need to follow some rules:
- Before you start working with the tool, inspect it for chips or cracks in the body. If they are found, carry out repairs.
- Read the instructions and technical data sheet of the product and follow all recommendations for working with it.
- Use high-quality drill bits that are suitable for the specific type of material.
- If the amount of work that needs to be done is large, then it is necessary to take breaks to avoid overheating.
- After working with the tool, clean its surface from dirt and dust; you can also use a vacuum cleaner to blow it out.
- Observe storage conditions. The hammer drill must be located in a special place where moisture does not penetrate, as it can damage electrical parts.
- Carry out a complete disassembly, cleaning and lubrication of the tool on a regular basis once or twice a year.
By the way, the absence or lack of lubrication is a fairly common cause of hammer drill failure. The instructions for the device should indicate which places and parts need to be lubricated and which not.
It is important to know that for gearboxes liquid lubricant must be used, which must be poured into a hole specially designed for this; for other parts, a thicker lubricant can be used
By following these simple rules, the tool will serve for a long time, and the risk of malfunctions will be minimized. But if any malfunction does appear, then, following the recommendations above, you can eliminate it without difficulty.
What malfunctions do Bosch rotary hammers have and how to fix them yourself
Nothing lasts forever. And the most reliable Bosch rotary hammers begin to break over time. But any malfunction can be repaired with your own hands if you have detailed instructions for performing repair work. Below we offer you a guide to troubleshooting Bosch rotary hammers and a method for eliminating them. The main causes of breakdowns are:
Conventionally, faults can be divided into mechanical and electrical.
Next, we will consider faults according to their affiliation, dividing them into mechanical and electrical faults.
Mechanical malfunctions of the Bosch rotary hammer
When mechanical malfunctions occur in the operation of the tool, an extraneous unpleasant sound appears, sparking intensifies in the collector area, a burning smell appears, the tool heats up excessively, its power drops depending on the duration of operation and the impact on the material.
We will look at all the faults in the diagram of the Bosch 2-26 rotary hammer. Other models, such as Bosch 2-20, 2-24, differ in the design of the intermediate shaft and the installation of various bearings.
The hammer drill stops hammering, but drills
The hammer drill does not hammer under load or in idle mode for the following reasons:
- the rubber rings of the striker, striker, and piston are worn out;
- the rolling bearing race has collapsed;
- the cylinder and the firing pin of the percussion mechanism were destroyed;
- cut off the splines of the clutch mounted on the intermediate shaft;
The hammer drill has stopped drilling, but is chiseling
The main reasons why a rotary hammer hammers but does not drill are:
- the force of the conical spring pressing the clutch has weakened;
- the locking roller does not fix the large barrel shaft gear;
- does not hold the tool locking mechanism in the barrel;
- The hammer drill does not chisel or drill.
The main reasons why a hammer drill does not chisel or drill are:
- sheared teeth on the small rotor gear or on the large intermediate shaft gear;
- The rotary hammer electric motor does not work;
- there is no power to the hammer drill motor.
Now let's talk about everything in order
Let's consider options in which the hammer drill does not hammer, but drills
Wear of rubber rings on the striker, striker, piston.
This reason appears gradually as the rubber rings wear out. At first the blow weakens, then disappears altogether.
The malfunction is eliminated by replacing the indicated rubber rings with new ones.
For any repair of rotary hammers or their components, all rubber products must be replaced.
Repair kit for rubber sealing rings for a Bosch 2-26 rotary hammer
The rolling bearing race has fallen apart (drunk bearing)
If the drunk bearing pos. 830 is destroyed, the rotational movement of the intermediate shaft cannot be converted into the translational movement of the cylinder in the impact mechanism.
Eliminated by completely replacing the rolling bearing.
Friction bearing
The cylinder, firing pin, and firing pin of the firing mechanism were destroyed
There are cases when the striker in the cylinder, pos. 26, gets stuck, which leads to destruction of the cylinder and the impossibility of creating air pressure in the barrel of the striker mechanism. And the second reason: destruction or breakage of the striker pos. 28, leading to distortion of the part and the impossibility of transmitting the shock impulse. Breakdowns are eliminated by completely replacing failed parts.
The firing pin is jammed in the piston, the piston is destroyed
The splines of the clutch, pos. 67, mounted on the intermediate shaft, were cut off
The malfunction can be eliminated by repairing the clutch or completely replacing it. When making repairs, the worn teeth on the clutch are filed down. To correct this defect, a round needle file and a drill are used. The coupling is clamped in the hand, and the tooth profiles are straightened using a drill with an appropriate file. The splines on the intermediate shaft are modified in the same way.
Restoring the teeth of the intermediate shaft clutch
Let's consider options in which the hammer drills but does not chisel
The force of the conical spring pressing the clutch has weakened
When the pressure force of the spring pos. 50 decreases, the clutch slips on the intermediate shaft without transmitting rotation from the small spur gear to the large gear pos. 22 of the barrel shaft pos. 821 of the impact mechanism. By the way, on different Bosch models, clutches are designed differently.
Details of the torque and translational impulse transmission unit
The locking roller does not lock the large barrel shaft gear
The large gear, pos. 22, is attached to the barrel shaft, pos. 01, with a roller, pos. 88, pressed against the shaft collar with a conical spring, pos. 80, and secured with a retaining ring, pos. 85.
The reason may be a weakening of the force of the conical spring pos. 80, destruction of the locking ring pos. 85, or loss of the fixing roller pos. 88.
Gear pos.22 on the shaft pos.01 of the barrel pos.821 of the shock block assembly
The mechanism for fixing the tool in the drill barrel does not hold the drill
Bosch rotary hammers use two types of chucks: SDS-plus and SDS-max. The difference is in the design of the locking mechanism.
The reason is the wear of the antennae of the chuck raster bushing, which makes it impossible to transmit the shock pulse to the working tool of the hammer drill.
Tool shanks for hammer drill chucks Bosch 2-26
Let's consider options in which the hammer drill does not drill or chisel
Sheared teeth on the small rotor gear
The gears rotate and the teeth on one of them, usually the small one, are cut off.
When the working tool jams and the clutch does not work properly, the gear teeth on the hammer drill shaft and the intermediate shaft wear out or are completely destroyed.
In this case, the rotor or large gear of the intermediate shaft is completely changed.
Bosch 2-26 hammer drill rotor with cut splines
Hammer drill motor does not work
The reasons for a non-working electric motor may be:
- short circuit in the rotor, stator;
- destruction of carbon electric brushes;
- loosening of the brush holders;
- burnout of lamellas on the rotor commutator;
- breakage of the rotor or stator windings.
The listed malfunctions are eliminated by repair (manually rewinding the windings, replacing the commutator and desoldering the winding leads) or replacing the rotor, stator, and carbon electric brushes with new ones. The majority of malfunctions in the electrical part of the Bosch 2-26 rotary hammer are confirmed by increasing sparking in the collector area.
The length of serviceable electric brushes cannot be less than 8 mm. When replacing one brush, the second should change automatically.
The rotor or stator windings can be rewound yourself at home.
Burnt rotor manifold of a Bosch rotary hammer
No power to the electric motor of the Bosch rotary hammer
The cause of this malfunction is a break in the wire supplying power to the electric motor. Most often, a break occurs at the point where the cable enters the hammer drill. The wire should be replaced with a new one or repaired. The malfunction can be determined using a tester. If there is no tester, the fault can be found using the power phase and a screwdriver with a neon indicator lamp. Connecting the power wires one by one, at the other end, using a neon screwdriver, determine the presence or absence of a phase.
The power button for the hammer drill does not work. Determined by a short circuit tester.
Most often, the failure of the punch button is caused by a short circuit of the filter capacitor. It is best to replace the button with a new one.
Power cord pos. 5 at the entrance to the tool
General electrical faults of the Bosch 2-26 rotary hammer
Failure of a rotary hammer in the electrical part is accompanied by the appearance of a burning smell, strong heating of the tool during operation, the appearance of large sparks in the area of the rotor commutator of the rotary hammer, and poor operation of the reverse switch.
The operation of the hammer drill is influenced by the condition of the carbon brushes, the reliability of the fastening of the brush holders and their correct installation.
A burning smell appears when the stator or rotor windings are short-circuited.
A drop in power of a rotary hammer with increasing load is typical when there is a break in the rotor windings or when the carbon brushes are short.
The heating of the hammer most often results from a short interturn circuit in the stator or rotor.
Large sparking in the commutator area is caused by interturn closure of the rotor or burnout of the commutator lamellas.
Malfunction of the reverse switch occurs due to burning of its contacts.
But the main reason for all breakdowns is untimely implementation of technical routine maintenance and replacement of carbon brushes.
Carbon brushes require replacement after 70 hours of operation or when worn down to 8 mm in length.
General view and dimensions of the carbon brushes of the Bosch rotary hammer
We have given the main reasons why Bosch rotary hammers fail. We may not have described all the breakdowns of Bosch rotary hammers.
If you know other faults with Bosch 2-20, 2-24, 2-26 rotary hammers, please share with us.
I wish you success!
Video of replacing a raster bushing in a Bosch 2-26 chuck Video of replacing an armature in a Bosch 2-26 hammer drill
sdelalremont.ru
How to disassemble a hammer drill
Disassemble the hammer drill sequentially. Inspect all details carefully. Even if you are looking for a problem in one unit, you may find damaged parts in other units. When disassembling the tool, the body should be cleaned of dust and dirty grease.
How to disassemble a cartridge and remove stuck equipment
Start by disassembling the cartridge so that it does not interfere with the removal of the gearbox housing.
- Remove rubber boot 1, retaining ring 2 and plastic boot 3.
Disassembled cartridge - Next, be careful, as there is a ball in the grooves of the sleeve under the fixing washer 4.
He might jump out. Ball in the groove of the sleeve - Carefully remove washer 4, locking plate 5, spring 6 and ball 7. Depending on the chuck model, there may also be rings, washers and balls.
If a drill or other equipment cannot be pulled out of the chuck, there are two options for solving this problem:
- Clamp the tool in a vice. Slightly shake the hammer drill and pull it towards you;
- Clamp the hammer drill in a vice through the rubber gaskets so as not to damage the plastic housing. Clamp the end of the equipment with a gas wrench. Tap the key with a hammer in the direction of the axis of the tool.
The second option is used as a last resort. If after several blows the drill or chisel cannot be pulled out, stop. You may damage the hammer drill. Disassemble the cartridge and gearbox. Try to knock out the equipment with a drift. After this procedure, the raster sleeve will most likely need to be replaced. To avoid this problem in the future, lubricate the end of the equipment.
How to remove the mode switch
In some models of hammer drills, the switch is removed by turning it to the extreme right, in others - to the extreme left. Consider the extreme right position.
- Set the mode switch to strike.
If there is no impact mode, use drilling impact. Switch in impact mode - Press the button in the switch and turn it just below the stroke until it clicks.
- Pull it towards you, pry it with a screwdriver and remove it.
Pry up the switch with a screwdriver
Disassembly of the electrical part of the hammer drill
- Unscrew and remove the back cover.
- Unscrew the bolts securing the power cord.
- Remove the button and wires from their grooves.
Hammer wires - Disconnect the wires from the stator.
- Unscrew the brush holder bolts and remove the brushes.
- Clean the housing from dust.
- Unscrew the bolts connecting the electrical housing to the gearbox housing. Separate both housings with a screwdriver.
- The rotor is connected to the gearbox through a shaft and can be easily removed from it. Remove the bearings from the armature using a puller.
- Remove the air intake from the electrical housing.
- Unscrew the stator from the housing. Take a piece of wood and knock gently on the ribs of the housing, and the stator will begin to come out.
Analysis of the mechanical part of the hammer drill
- Remove the plastic gear housing.
You will see an aluminum housing with a fixed bearing, an intermediate shaft, and a raster bushing inserted into it. Raster bushing and screwed bearing - Carefully clean the plastic housing of the gearbox, because pieces from the collapsed bearing remain in it. Take a magnet and go through all the holes to remove all the balls and metal shards. Clean out the grease completely. There may be pieces of plastic separator left in it.
- Remove the intermediate shaft from the worn bearing.
- To remove the helical gear, remove the retaining ring and bearing using a special puller.
Removing the helical gear - To dismantle the spur gear, you need to remove the retaining ring and spring at the other end of the shaft.
Removing the spur gear - Remove the bushing from the sleeve.
Raster sleeve removed from the sleeve - Remove the sleeve from the aluminum housing.
- There is a firing pin inside the cartridge case.
It is pulled out with a bent rigid wire. Sleeve with striker
- https://stankiexpert.ru/ehlektroinstrument/remont-perforatora.html
- https://grounde.ru/remont-perforatora-svoimi-rukami.html
- https://2lzz.ru/elektroinstrument/perforator/o-remonte
- https://moiinstrumentu.ru/princip-raboty-perforatora-pistoletnogo-tipa-s-fotoopisaniem.html
- https://pochini.guru/remont/remont-perforatora
- https://tehznatok.com/remont/kak-otremontirovat-perforator-svoimi-rukami.html
- https://obinstrumente.ru/elektroinstrument/perforator/ustrojstvo-perforatora.html
- https://instrument-blog.ru/elektroinstrumenty/remont-perforatora.html
- https://instrument-blog.ru/elektroinstrumenty/kak-zamenit-patron-na-perforatore.html
Rotary hammer Bosch GBH 2-26 DRE. features, specifications, instructions, reviews
Bosch hammer drills are used for laying electrical wiring, destroying partitions and drilling holes in hard materials. They will replace an electric drill and. Depending on the power, the tool is suitable for domestic and professional needs.
Table of contents:
Features of rotary hammers
A hammer drill is a multifunctional construction tool.
The device consists of an electric motor and gearbox, and a cartridge for attachments. The handles and control system are located outside.
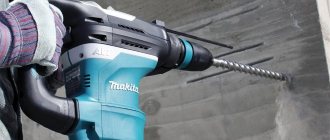
Timely repair of a hammer drill: how to properly disassemble a Makita hammer drill?
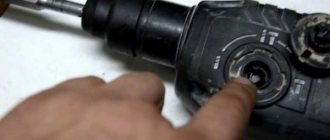
You will reach a steel ball with a diameter of 7 mm, pos. 20.
Now you can remove the housing of the mechanical part. It is black. Using a screwdriver, unscrew the four screws at the end of the housing.
Holding the black body with your right hand, press your thumb on the end of the shaft from which the cartridge was disassembled. The plastic case can be easily removed.
Next you need to remove the gearbox shaft.
To disconnect the mechanical part from the electrical part, you must first remove the electric brushes. Remember! The rotor is held in the lower part of the housing by electric brushes, which must be removed.
After checking that the electric brushes are disconnected from the rotor slats, use a screwdriver to pry the metal housing of the hammer drill at the border of the green plastic housing.
Now we move on to disconnecting the rotor from the mechanical part of the hammer drill. The rotor is held in the mechanical part by helical gears of the gearbox. If you take the rotor housing in one hand and the mechanical part housing in the other and pull in different directions, rocking, you will separate these two assemblies.
You will get a knot like this in the old grease. Next, use a hexagon to unscrew two M4×12 bolts, item 43, art. 266273-7 with an internal hex head. Pull out the shaft with intermediate spur gear 10 pos. 80, art. 226399-7.
from the inner housing pos. 49, art. 153687-8. Clean the parts from old grease.
You will end up with such a mountain of clean parts. Now carefully look through the parts, immediately throw away the rubber rings and pick up new ones.
Replace defective parts with new ones.
Mechanical malfunctions of makita 2450 and makita 2470 rotary hammers
Common mechanical malfunctions of Makita rotary hammers include:
- destruction of the quick release chuck;
- bearing failure;
- damage to the impact mechanism;
- wear of the hammer drill barrel;
- wear of the rubber striker and striker;
- gear failure.
Repair of a hammer drill chuck is carried out to replace the boot and rubber ring, as well as a conical spring and a steel ball that clamps the working tool (drill). This is indicated by the fact that the working tool? namely the drill, is poorly held in the chuck.
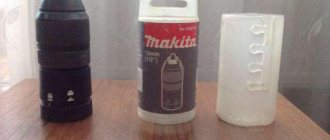
The main reason is wear of the steel ball 7.0 pos. 20, art. 216022-2. Ball wear occurs from contamination of the cartridge bore due to dust and dirt getting inside.
The general view and design of the Makita hammer drill chuck is shown in the photo below.
Repairing a makita 2450 hammer drill chuck with your own hands is easy. The cartridge must be disassembled, freed from old grease, discarded rubber parts, and replaced defective ones.
More complex faults require knowledge of the mechanical structure of the Makita 2450 rotary hammer.
Having determined the nature of the malfunction of the Makita rotary hammer, proceed to disassembling the mechanical part, called the gearbox.
Disassemble the mechanical part according to the attached video. Free it from old grease. Carefully inspect all parts, their integrity, and level of wear. All rubber products require replacement during any disassembly.
Let's consider repairing a hammer drill barrel. Let's analyze the mechanism completely. Video of disassembling, lubricating and assembling a Makita hammer drill
Disassembling the electrical part of the Bosch 2-26 rotary hammer
Disassembling the Bosch 2-26 rotary hammer, its electrical part, begins by removing the back cover on the rotary hammer handle by unscrewing three screws.
The next step is to remove the reverse switch.
Turn it to neutral and lift it towards you. The reverse switch is removed.
To remove the stator cover, you need to hold the mechanical unit in your right hand and the stator housing in your left hand, drag them in different directions, shaking them.
The stator cover will come off.
Separation of the impact unit with rotor and stator
To separate the rotor from the mechanical assembly, it is enough to drag these parts in different directions. The rotor is secured to the mechanical assembly by a small helical gear that is inserted into contact with a large helical gear of the mechanical assembly.
The rotor has been freed and you can carefully inspect the condition of the commutator and bearings.
Bosch hammer drill rotor
To remove the stator, simply remove the protective plastic protective casing and tap the end of the housing into which the stator is inserted with a wooden block or mallet. Before doing this, do not forget to unscrew the two screws securing the stator to the housing.
The stator has been removed, the rotor has been removed, you can begin to inspect them and defect all the parts that make up the electrical part of the Bosch rotary hammer.
When inspecting a disassembled Bosch 2-26 rotary hammer, pay special attention to the condition of the carbon brushes, plaque on the brush holders and the reliability of their fastening, the integrity of the reverse switch contacts, and the condition of the wire at the point of entry into the rotary hammer.
The length of the brushes should not be shorter than 8 mm. There should be no traces of sparking or carbon dust from the brushes on the brush holders; there should be no burnouts or damage to the contacts on the contacts of the reverse switch of the Bosch 2-26 rotary hammer.
Electrical part of a Bosch rotary hammer
Bosch GBH 2-26 DRE
. One of the most popular hammer drills in the middle weight with an SDS+ shank, and this is not an accident of course. At least somewhere, the policy of reducing the price of the final Bosch product did not have a stylish impact on quality and reliability. My copy was purchased back in 2008...the years fly by...
I got my very first Bosch hammer drill 20 years ago... it was a lightweight 2-20, but it had to work in hellish conditions. At that time, the hammer drill cost simply fabulous money at that time... Now the original 2-26 can be bought even for $130...
What did you save on... and what happened to the perf over 8 years (almost)... with an average load on it.
I had been planning to disassemble and replace the lubricant for a long time, but as always... either the work is perfect, or other things are up to my ears. But here I had to use the perf like a jackhammer...on the ground...and it had to be buried up to the very brushes in the ground...Sucking in the soil on one side and spitting it out on the other) Well, after this, my conscience simply did not allow me to put off maintenance.
Starting with the electrical part. Let's disassemble the handle.
Well, as always, disease 2-26, dead bearing on the manifold side.
Lifting the cuff, we discover something that is no longer surprising... the bearing is dry.
It’s amazing how manically BOSCH (and not only unfortunately) saves on bearings. Approximately 70-75% of Bosch is equipped with “non-name” bearings of disgusting quality. Having found exactly the same bearing with the same markings on Ali, we see the price... 23 cents per piece AT RETAIL...
Damn... I understand that over two decades you have made your tool twice or more accessible to the user in material terms... but how much will you save by installing, for example, SKF or NSK for $1... To remove the rotor from the gearbox housing, unscrew the two screws of the thrust plates.
There must be a fly in the ointment somewhere here... Next, we take out the mode switch... It’s no longer a secret how this is done. ...I remember when I was dismantling my first perf at about 15-16 years old, I understood that this handle was removable...but how... In the end I took it off, breaking it, picking it up with a screwdriver)) Then, when capitalizing my perf, I ended up not only on the piston, but also on the switch .
Switch to drilling mode, press in the latch and turn it some more...at about 7.30.
An interesting story from life. When I used to buy a tool from a dealer, 15-16 years ago, it was then that the price of a blue Boche began to fall... And the quality... or rather, the reliability of the tool began to fall very sharply. The services were overwhelmed 2-24 at that time, people were simply swearing... And the leadership in the pro market, at least in the Republic of Belarus, was shaken. People began to look at the exotic DeWalt, Metabo, Makita at that time... there were some rumors about some kind of space tool Hilti... No one saw it, but knowing the word Hilti was at least cool)
And what a horror it was, the dealer, when purchasing a tool from them, recommended pre-sale preparation... Of course, for additional money. We showed clients new perfs, mixers, angle grinders, out of the box... with completely empty gearboxes, the lubricant there was a maximum of a teaspoon of some kind of lithol.
For the money, the dealer already stuffed in the required 60-80g of lubricant and the tool no longer appeared in their service, at least during the warranty period.
Well... I didn’t wipe anything off, I didn’t hide it secretly, picking it out with a screwdriver... That’s all the lubricant.
It was decided to use our own lubricant. This is not the first time, so it’s a proven method. At first I thought about using polyurea Chevron...after all, there are a lot of needle bearings in the gearbox, but in the end I settled on Petrakanada, where the base is lithium...like native gear lubricants.
How to properly use and care for a hammer drill so as not to have to repair it often
In order for the tool to work as long as possible without breakdowns, you should not press hard on it during operation; it is undesirable to do the work at once. Equipment should be selected based on the features of the hammer drill and the type of future work. Try not to overheat the instrument and avoid mechanical damage .
Periodically lubricate components and parts with high-quality compounds. Especially if the device is used when working with concrete. At the end of the work, wipe with a soft cloth. Be sure to keep the ventilation holes on the case clean.
The storage location for the rotary hammer should be in a room with low humidity . Moisture negatively affects the service life; the mechanisms and parts inside the device will begin to rust. And when you plug in a power tool, a short circuit may occur due to elements covered with condensate.
Manufacturers equip rotary hammers with special devices. They prevent debris, dust and moisture from getting inside. But it is impossible to completely protect the instrument from this. In order to prevent unexpected breakdowns, diagnostics must be carried out regularly.
How the tool works
Literally, the word perforator means “drill hammer.” To increase productivity in mining operations, the jackhammer was developed in the early 19th century. The principle of operation of the device was to use a flywheel. He set in motion a bar with special tucks attached to it. The rod, under the influence of a spring, struck and returned back with a piston.
The device was constantly improved. In 1932, in Germany, the Bosch Corporation released the first rotary hammer powered by electricity. This device combined impact and torque. The operating principle developed by the company is still used in modern models of electric hammer drills.
A rock drill is a device designed to drill holes and destroy hard rock. Drills of different diameters and chisels are used as consumables. The tool is divided by application class:
- domestic;
- semi-professional;
- professional.
In addition, it is distinguished by its operating mechanism, which can be electromagnetic or pneumatic. The last type of mechanism is available in one-, two-, and three-mode. That is, you can perform drilling, striking, or both operations simultaneously.
The tool resembles a pistol in appearance and can be operated with an electric, fuel or pneumatic drive. The latter are in demand under hazardous working conditions, during which there is a possibility of explosion.
The operating principle of a hammer drill, which distinguishes it from other similar tools, is based on the impact mechanism. The electromagnetic type uses two electromagnetic coils to provide reciprocating motion of the core. It transfers inertia to the drill shank. The pneumatic type is based on the movement of a piston in a cylinder, which also performs reciprocating movements.
The operation of an electric hammer drill uses the conversion of engine rotation into the shock-rotational movement of the drill. The coupling used in the design provides protection under increased loads. The drill bearing and piston create the impact force, and the drill clamp provides the chuck.
Each manufacturer strives to improve the design through the use of design features. These are mainly minor modifications related to the use of various materials and their location. In general, the main elements remain unchanged. Such details include:
- power button;
- engine;
- impact mechanism;
- safety clutch;
- drill clamp.
Additional design features include a dust removal system and a vibration suppression unit. For a multi-mode type of tool, a work switching button is installed.
Conclusions:
- Knowing the differences between the above models of Bosch rotary hammers will allow you to quickly disassemble the tool and replace faulty parts. To do this, you do not need to contact customer service.
- Structurally, Bosch rotary hammers are so simple that they allow you to carry out repairs of almost any complexity.
- All you need is desire and basic knowledge of mechanics.
It happens that you come across counterfeit models of Bosch rotary hammers. Read more about this here.
Video about disassembling a Bosch rotary hammer
Like any electric tool, a rotary hammer requires periodic maintenance. This is largely due to its mechanical parts that need lubrication. But along with this, various types of malfunctions may occur in the device. It is easier to repair damage or carry out preventative maintenance on a tool when you are familiar with the design of the hammer drill and understand the operating principle of its components.