How to magnetize a magnet at home?
For many people, a magnet is still a mystery, although in principle people became acquainted with this metal and phenomenon a very long time ago.
Even then, a whole system for the production of various magnets was developed. Today this is far from uncommon, and even powerful magnets can be made at home. Making a magnet using improvised materials
Of course, for many this will even seem like something supernatural and may even be a shock, but even now, sitting at home, most people can make a magnet with their own hands. Below are four methods that describe how to make a powerful magnet at home.
The first and probably therefore the simplest method: to implement it, you just need to take any object that can be magnetized (the object must be metal) and move it several times along a permanent magnet, and this should be done only in one direction. But, unfortunately, such a magnet will be short-lived and will very quickly lose its magnetic properties.
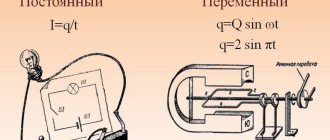
This magnetization method is performed using a 5 or 12 volt battery or accumulator. Most often it is used for magnetizing screwdrivers and is performed as follows:
• A copper wire of a certain length is taken, which will be enough to wrap the screwdriver shaft 280 - 350 times. The wire from transformers, or the one intended for their production, is best suited. • The object is insulated; in this case, the entire shaft of the screwdriver is wrapped using electrical tape. • The winding itself is carried out and connected to the battery. One end is to the plus, the other to the minus. The winding should be carried out turn to turn, evenly. The insulation must also be tight.
As a result of these manipulations, it will be much more pleasant to work with a screwdriver. This operation can turn any old unnecessary screwdrivers into a truly convenient tool.
This option describes how to make a powerful magnet in a fairly simple way. In fact, it has already been fully described above, but this particular method involves a different material. In this case, ordinary metal will be used, or rather a small piece of it, preferably cubic in shape, and a more powerful coil. Now the number of turns needs to be increased 2-3 times for magnetization to be successful.
This method is very dangerous and is strictly prohibited for use by people who are not electrical professionals. It is carried out strictly in compliance with safety precautions, the main thing is to remember that only you and no one else bears responsibility for life and health.
He talks about how to make a strong magnet at home, while spending a small amount of money. In this case, an even more powerful coil, wound exclusively from copper, will be used, as well as a fuse for a 220-volt network.
The fuse is needed so that the coil can be turned off in time. Immediately after connecting to the network, it will burn out, but during this period of time it will have time to go through the magnetization process. The current strength in this case will be maximum for the network and the magnet will be quite powerful.
DIY powerful electromagnet
First, you need to figure out what it is. An electromagnet is a whole device that, when a certain current is supplied to it, works like a regular magnet. Immediately after cessation, it loses these properties. How to make a powerful magnet from an ordinary coil and iron was described above. So, if you use a magnetic circuit instead of iron, then you will get exactly the same electromagnet.
In order to figure out how to make a strong magnet at home that will work from the network, you just need to remember a little information from the school physics course and understand that as the coil, as well as the magnetic circuit, increases, the power of the magnet will also increase. But this will require more current to reveal the full potential of the magnet.
But neodymium remains the most powerful; they have all the most desirable properties and, despite their strength, are small in size and weight. How to make neodymium magnets with your own hands and whether it is even possible will be discussed further.
Making a neodymium magnet
Due to the complex composition and special production method, the question of how to make a neodymium magnet with your own hands at home disappears by itself. But many are still interested in how to make neodymium magnets, because it would seem that if you can make an ordinary magnet, then it is also quite possible to make a neodymium one.
But everything is not as simple as it seems in reality. Serious companies are engaged in the production of such magnets; they use special technologies for very powerful magnetization of the material. And this is in addition to the fact that an alloy that is quite difficult to extract and produce is used. Therefore, the answer to this question can be clearly - no way. If someone manages to do this, then he can easily open his own production, since he will already have the necessary equipment.
Application of created magnets
Application for industrial and economic purposes
Used in various electrical appliances. They are especially common in devices equipped with speakers. Any dynamic head includes a magnet, ferrite or neodymium; in rare cases, others are also used. Magnets are also used in furniture production and toys. In production, when filtering bulk materials.
Use at home
Refrigerator magnets are one of the most common uses of magnets. Also, some use them to stop meters in order to reduce utility bills, but doing so is strictly prohibited and inappropriate.
Based on this article, you can understand how to make a powerful magnet at home, without spending any special effort or material resources. But people who do not understand electricity and generally have no idea how it works should not experiment with a powerful network, because it is serious and very dangerous for human life.
How to magnetize a screwdriver
Using a magnetized screwdriver or screwdriver is like having an extra hand.
Inventors shop at a budget Chinese online store.
Driving screws is a task that sometimes requires a third hand.
You need one hand to hold the screw, one to turn the screwdriver or operate the drill, and the third to align the objects being fastened.
Nobody has three hands, but if your screwdriver can hold a screw, you can easily do most jobs with the two you have. This is one of the reasons why professional tradesmen use magnetized screwdrivers and bits.
A magnetized screwdriver also serves other purposes. This eliminates the need to hold the screw when you have to drive it into a place that is too tight for your other hand.
It can also hold screws you remove from hard-to-reach places so they don't fall off or get lost.
Moreover, if a screw or any other metal object falls, you can use it to retrieve it.
Only ferromagnetic materials can be magnetized
DIY electronics in a Chinese store.
The atoms align with the permanent magnet's field.
You can purchase a magnetized screwdriver or screwdriver bits, but there's no point in spending the money because it's easy enough to magnetize a screwdriver yourself. However, there is one condition: the drive shaft must be made of a ferromagnetic material, which means it must contain iron, nickel, cobalt or a rare earth element such as gadolinium or ruthenium.
Fortunately, almost all screwdrivers and bits are made from a steel alloy that contains iron, the most famous ferromagnetic material. Special screwdrivers made from non-ferromagnetic materials such as superhard titanium or titanium alloys cannot be magnetized.
How to magnetize a screwdriver with a magnetizer
Touching the steel shaft of any screwdriver to a permanent magnet will magnetize the steel for about 3 months. Any magnet will do, but strong ones work better than weak ones.
At a minimum, you should use a magnet with a pulling force of 1/4 to 1 pound. Neodymium magnets, available at any hardware store, work best.
The hardware store most likely also sells screwdriver magnetizers specifically designed for this purpose.
You can buy a magnetizing screwdriver, which is basically a magnet in a plastic casing.
- Clean the screwdriver or threaded head with a rag to remove any rust or dirt. You may want to use paint thinner or a lubricant such as WD-40 if the shaft is particularly oily.
- Hold the screwdriver or threaded end, touch with one hand, and then attach the magnet to the shaft. If it "sticks" the shaft is iron material and you are ready to go. If you don't feel any attraction, you won't be able to permanently magnetize the tool.
- Slide the magnet along the shaft from the base to the tip. Turn the shaft 1/4 turn and repeat the movement in the same direction, starting from the base to the tip. Continue until you have turned the shaft a full turn.
- Check the magnetic strength by using a screwdriver to grab the screw. If the attraction is not strong enough, repeat steps 2 and 3.
- If necessary, demagnetize the screwdriver by passing the magnet along the shaft in the opposite direction.
tips
If the magnet does not stick to the screwdriver shaft, the shaft is made of a non-ferromagnetic material such as titanium.
Many of these materials are paramagnetic, meaning that they can act like magnets as long as they are in contact with a permanent magnet.
If you want to make a titanium threaded drill bit for your magnetic drill, use it together with a magnetic bit holder.
If you don't want to go to the store to buy a magnetic screwdriver or screw drill, it's unlikely that you'll want to make a trip to buy a neodymium magnet or commercial magnetizer. No problem. You probably have magnets around the house that will work just as well. Here are some places to look:
Any of these fun decorations attached to your refrigerator can magnetize your screwdriver.
- Objects stuck to refrigerator doors often have magnets strong enough to do the job. The harder it is to get an object out of the refrigerator, the better it will work.
- The speakers are built with strong permanent magnets. If you can access the back of the speaker, rub the screwdriver shaft along the flat part where the speaker wires are attached. For safety reasons, be sure to disconnect the wires first.
- Kitchen and bathroom cabinets often have magnetic latches. Rub a screwdriver along one of these magnets to magnetize it.
- Your battery drill may have a magnetic screw holder on the base. This magnet should be strong enough to magnetize your screwdriver or threaded head.
Other ways to magnetize a screwdriver
The changing current inside the coil creates a magnetic field.
Using electricity: You can magnetize a screwdriver by wrapping an insulated conductive wire around the drive shaft and connecting that wire to a power source.
This method only works with alternating current because the change in current strength and direction, known as flux, creates a magnetic field.
If you try this method, which is not recommended, you will need a step-down transformer to convert the voltage from your outlet to a safe value of a few volts. It is dangerous to insert wires directly into an outlet. Never do this.
It is much safer to use a 9V battery, which is a constant current source. The current flows in one direction from the battery and its intensity remains constant, so there is no flow to create a magnetic field.
However, you can build a charging solenoid by wrapping a wire around a short 1/2-inch copper water pipe that the screwdriver shaft can pass through freely. Connect the wire to the 9-volt battery and move the screwdriver back and forth inside the pipe to create flow.
Use insulated wire and wrap it at least 20 times around the pipe for best results.
Using a Hammer: If you hit the shaft of a screwdriver with a hammer often enough, you can push the iron atoms in the steel enough to align them in one direction and create a magnetic field.
This may take a while, but it's good to know if you need a magnetic screwdriver urgently and don't have any magnets available.
Likewise, once a screwdriver becomes magnetized, hitting it with a hammer can disturb the iron atoms and equalize the magnetization.
How to magnetize a neodymium magnet at home?
The magnetic badge can be used almost anywhere. If in childhood we played with these magnetic signs, and at school they were used to reinforce a certain topic, then in fact, they are used in almost all areas of activity, representing an important element of various electrical devices, transformers, electronic generators and engines.
Magnets are often also used in the production of various clips, holders, toys and souvenirs.
Neodymium magnet is the strongest, as it is formed from a special type of alloy, which includes iron material, boron and neodymium. Such material means determine how good a certain material is. Nowadays, magnetic products made from neodymium material are beginning to occupy an increasingly higher position in the market, as they are beginning to be used much more than standard ferrite magnets.
The magnets are connected to each other - how to separate them
How to demagnetize a magnet from a magnet (disconnect), especially if they are powerful? Let us immediately make a reservation that it is useless to separate powerful magnets by simply breaking them, and you can get injured. In this case, you can also give at least two pieces of advice:
Method 1: Using diamagnetic metal sheet
- Using a metal wedge made of some diamagnetic material (duralumin, copper, etc.), try to widen the gap between the magnets, but be careful - do not use an iron hammer (it attracts).
- Insert a sheet (can be metal) into the gap that is larger in area than the magnets, which will serve as a guarantee that everything can come back and the magnets will attract each other again.
- Secure the lower magnet, and begin to move the upper one until you feel that it is freed from the attraction of the lower one.
Method 2. Using plywood
- To separate the magnets, a sheet of thick plywood (10 mm) is used. A hole is made in it for the magnet (if it is impossible to create a gap between the magnets). This sheet will serve as a kind of stop for one of the magnets during the separation process.
- Disconnection occurs in the same way as in the first example.
Everything described above are little tricks mainly for amateur locksmiths. And now a little about the twists and turns with magnets during shopping, which most of our lovely ladies so adore.
How does a neodymium magnet become magnetized when a neodymium magnet is demagnetized?
Once a neodymium magnet has become demagnetized, it can no longer be magnetized. That's because, to magnetize such a magnet, it would be necessary to use a very strong magnetic field.
For example, if you take a certain disk with magnetic properties, measuring 70 by 50 millimeters, with an adhesive force of two hundred and ninety-five kilograms, then you can roughly understand what kind of magnetic field is needed in order to magnetize a neodymium magnet. This suggests that it will be impossible to magnetize a neodymium magnet at home, which means you will need to take a new magnetic product.
Basic methods for permanent magnets
In everyday life, it is sometimes convenient to use magnetized tools, for example, a screwdriver, which will prevent the screw from falling off at the most inopportune moment and in a hard-to-reach place. But the properties of a permanent magnet are not always useful or necessary. With the same files, drills, taps, etc. magnetized during work. It will be obviously more difficult to work due to sticking metal filings.
In this case, there are several solutions to this problem. Let's note two of them.
Method 1. Heating to a temperature above the Curie point
The Curie point is the temperature at which the symmetry of ferromagnetic atoms is destroyed. Simply put, you take your magnetized tool and heat it up quite a lot. Strict atomic symmetry is broken, and the instrument loses its magnetic properties under the influence of heat.
Method 2 . Homemade degausser
This method will require the presence of an electromagnet operating on alternating current, in the form of any coil (hollow solenoid) designed for the existing voltage in the house. There are many reel options. Suitable, say, is a coil from an old electromagnetic bell, a solenoid relay for a car starter, etc. The primary winding from some transformer is also suitable, especially if its frame is cylindrical. Secondary - can be wound up as unnecessary. We place the demagnetized tool inside for a few seconds and turn on the “unit” to the AC power supply.
How to demagnetize a permanent magnet reliably, and at what voltage? There are a couple of nuances:
- We connect the coil, designed for 220 V, directly to the electrical network. A 110-volt coil can similarly be connected directly to the network, but not for long. We connect the 12 volt coil through a step-down transformer.
- When demagnetizing, first remove the tool from the coil and only then turn off the power supply. Otherwise, the metal may not be demagnetized.
If there are no mentioned solenoids (from an old coil or transformer winding), you can wind a small demagnetizer coil with your own hands. How to successfully demagnetize a permanent magnet with it? A number of parameters will need to be met:
The resistance of such a winding will be about 8 ohms if:
- the solenoid frame will be 80 mm long, with an internal diameter of 30-35 mm;
— at the edges of the frame, when winding, leave cheeks 80 mm in diameter and 5-6 mm thick;
- wrap approximately a thousand turns of PEL (or PEV) wire with a diameter of 0.7-0.9 mm around the solenoid.
For large plumbing tools, you will need a more powerful (larger diameter) demagnetizer. It can be mounted from the demagnetization loop(s) of an old picture tube.
How can you demagnetize a neodymium magnet at home?
In order for a neodymium magnet to stop magnetizing and lose all its strength, you need to apply a very strong physical impact in the form of an impact, or heat the material at a high temperature. This type of magnet has a composition that does not allow it to withstand powerful impacts and heating reaching a high temperature level.
For example, when you hit a neodymium magnet with a hammer, you can hope that it will lose its own magnetic power. Or, if you heat such a magnet to a temperature exceeding eighty degrees Celsius, it will weaken. Many products made from neodymium material have such features. True, there are also exceptional products that can withstand heating up to two hundred degrees above zero.
In fact, you need to use neodymium magnets in a very careful way, since then you won’t have to think about how to attach such a magnet if it loses all its qualities. Naturally, such products should not be subjected to powerful impacts, nor should they be heated at high temperatures. In cases where a neodymium magnet becomes demagnetized, you simply need to throw it away.
There is no need to subject the product to certain changes in terms of shape. If you try to change the model of the magnet, you may lose all magnetic properties and also get burns, since when sawing the product, the material may start to ignite.
When the complete structure of the protective shell, created from zinc or nickel material, is damaged, corrosion begins to appear. In situations where a neodymium magnet demagnetizes on its own, this requirement can be violated.
Checking whether the strength of a magnet decreases without suitable instruments is an impossible task. In order not to think about how to magnetize a neodymium magnet, it is best to take into account all the requirements for using this material.
In loving memory of a brilliant scientist and amazing person,
Professor Nesterin Valery Alekseevich, dedicated to
Magnetization, demagnetization and calibration of permanent magnets in a pulsed magnetic field
Gusev S.A., Prikazshchikov A.V., Tkachishin E.V.
Numerous types of technical devices (electrical devices, electric motors, generators, magnetic couplings, magnetic separators, etc.) use permanent magnets (PM) of various brands, sizes, configurations, number of magnetic poles and other characteristics in their design. The widespread use of PM required the solution of technological problems in their magnetic processing: magnetization, demagnetization and calibration. PM calibration can be considered as a special case of the demagnetization process performed to obtain a given value of magnetic parameters for a group of PMs. One of the main methods for solving these problems is the use of pulsed equipment based on the discharge of electrical energy accumulated in capacitor banks (capacitive energy storage - CES) in combination with a magnetizing device, in the working area of which the necessary magnetic field is created. Solenoids and inductors serve as magnetizing devices, ensuring the formation of a magnetic field of the required direction and configuration.
When developing pulsed equipment with the most suitable parameters for solving specific problems in magnetic processing of PM, a number of factors should be taken into account:
— grade of material PM;
— magnetic processing of a single PM in an open or closed circuit;
— magnetic processing of PM before or after installation in the product;
— type and dimensions of a single PM or assembly unit of a product with a magnet (system of magnets) in its composition;
— PM magnetic processing scheme: axial or radial, single-pole or multi-pole, with a multi-pole scheme, the presence or absence of a neutral area between adjacent poles, etc.;
— number of iterations of magnetic processing of PM per unit time (installation productivity).
Magnetization.
Magnetization is a process as a result of which the magnetization of a magnetic material increases under the influence of an external magnetic field.
To achieve maximum energy output from a magnet, it must be saturated, that is, fully magnetized, although the magnet may subsequently be thermally stabilized or partially demagnetized by a reverse field. To determine the full magnetization of a magnet, the concept of technical saturation magnetization is used; this is the magnetization of a magnetic material exposed to such an external magnetic field, with an increase in the intensity of which the magnetization cannot be significantly increased.
The magnetic field strength required to saturate a magnet depends on the coercivity of the magnetic material and, to a lesser extent, on the characteristics of the components to which it may be attached during magnetization (for example, when magnetizing a PM as part of a magnetic circuit). The general rule is that to saturate the magnet it is necessary to apply a field 2-2.5 times greater than the coercive force of the PM. Table 1 presents the main characteristics of common permanent magnets.
Table 1. Typical properties of some common permanent magnets.
| Material | Residual inductionBr, T | Coercive force Ncm, kA/m | Product (VN)max, kJ/m3 |
| Sintered PM Nd2Fe14B | 1-1,4 | 3200-1000 | 190-380 |
| Sintered PM Sm2Co17 | 1,04-1,12 | 2070-800 | 200-240 |
| Sintered PM SmCo5 | 0,90-1,01 | 2400-1500 | 160-200 |
| Alloy based on Nd2Fe14B anisotropically bonded by hydrogen absorption-desorption method | 0,81-0,87 | 915-1154 | 123 |
| Isotropic magnetoplasts Nd2Fe14B | 0,4-0,7 | 1000-600 | 30-76 |
| Sintered anisotropic AlNiCo magnets | 0,72-1,26 | 1920-610 | 20-44 |
| Sintered isotropic AlNiCo magnets | 0,62-0,84 | 1190-125 | 4-18 |
| Anisotropic hard magnetic ferrites | 0,36-0,40 | 180-270 | 25-31 |
| Anisotropic magnetically plastic ferrites | 0,22-0,36 | 240-190 | 15-18 |
| Isotropic hard magnetic ferrites | 0,22-0,28 | 230-300 | 8,5-10 |
| Isotropic magnetic-plastic ferrites | 0,1-0,15 | 180-230 | 2-4 |
For example, with a coercive force of the PM in terms of magnetization equal to , the value of the magnetic field strength (peak value) required to magnetize the PM to saturation will be no less than 4800 kA/m. The typical nature of the change in the residual induction Br of a permanent magnet, expressed as a percentage, from the change in the magnitude of the magnetizing field is presented in Figure 1.
Figure 1 - Characteristics of changes in Br, % of the peak value of the magnetizing field Hnamag.
Additionally, isotropic materials achieve 98% of the maximum value at a higher required field strength of 2.5 to 3 times . This is due to the magnetization of domains, the alignment of which requires the application of a field equal to the applied peak field multiplied by the cosine of the angle between the direction of the applied field and the direction of the domain being aligned. For example, a field of 2785 kA/m achieves 97% of full magnetization for most isotropically coupled magnets, but a field of 5170 kA/m is required to achieve 99% saturation.
In the case of magnets attached to electrically conductive reinforcement, eddy currents are generated in the reinforcement material during the magnetizing pulse. These currents create a reverse magnetic field, which can prevent the magnetizing flux from completely penetrating a conductive material, perhaps even a magnet, for a short pulse, and this reduces the magnetizing field. This sometimes affects the direction of magnetic flux in the magnet and surrounding material. In these cases, during the manufacture of equipment, it is necessary to adjust the parameters of the RLC magnetization circuit in order to increase the width of the magnetization pulse and modify the magnetizing device. A large amplitude and extended peak pulse generates more heat in the magnetizer, which reduces the performance of the magnetizer and requires forced cooling or other measures. The pulse duration sufficient to magnetize permanent magnets in most applications is in the range of 100µs to 10ms. Thus, equipment design is often a compromise solution to obtain optimal PM magnetization modes and technical parameters of the installation.
Demagnetization.
Complete demagnetization of the PM may be required when assembling them in a product, when this is necessary due to the requirements of the assembly technology, certain design features of the product (during setup, adjustment, etc.) or when measuring the hysteresis characteristics of the PM from the “zero” state.
There are a number of ways to obtain complete demagnetization of the PM:
- thermal method, i.e. heating the magnets to the Curie temperature TC (°C). For magnets of different brands, the value of this temperature is different. Table 2 shows the values of these temperatures.
Table 2 Curie temperature for a series of PMs
| Magnet | NdFeB | SmCo5 | Sm2Co17 | AlNiCo | hard magnetic ferrites (Ba/SrO)6 Fe2O3 |
| Curie temperature, TC (°C) | 310-340 | 700-750 | 800-850 | 810-900 | 450 |
This method for rare-earth-cobalt PM has significant disadvantages associated with the partial irreversible loss of the magnetic properties of the material due to possible changes in its structure, as well as due to intense oxidation of the surface.
— a method for demagnetizing PM in an alternating damped magnetic field. For highly coercive magnets, this method requires a sufficiently powerful installation that makes it possible to obtain damped alternating field pulses of significant magnitude at the beginning of the oscillatory process. The direction of the demagnetizing damped alternating field is directed counter and according to the direction of magnetization of the PM. To obtain better demagnetization of the PM, the magnet is exposed to the main field, the direction of which is opposite to the direction of the residual magnetization of the magnet, and an additional field of a given amplitude, then the additional field is turned off, the direction of the main field is changed to the opposite and the additional field with a smaller amplitude is exposed, this process is repeated until it decreases amplitudes of the additional field to zero, then act only on the main field, reducing the amplitude of the field to zero with a periodic change in its direction.
— a combined method of demagnetizing the PM consists of simultaneous exposure of the PM to heating and an alternating damped magnetic field. The combined demagnetization method is based on the phenomenon of a reversible decrease in the coercivity of the PM with increasing heating temperature. The PM is heated to a temperature not exceeding 0.6 TC. Thus, demagnetization of the PM is achieved at a relatively low temperature and a small initial amplitude of the damped alternating magnetic field, the values of which can be determined for specific PMs.
Calibration
Permanent magnets supplied by one manufacturer as part of one delivery lot or in different delivery lots over a period of time, or as part of lots from different PM manufacturers, must work identically as part of the completed product. To do this, it is necessary to comply with a certain permissible range of deviation (scatter) of their magnetic characteristics. According to data for a specific brand of PM, generally accepted ranges of PM parameters vary from ±3% to ±5% for Br and from ±7% to ±10% for Hcm. In the case when the use of PM as part of certain products requires more stringent tolerances of magnetic characteristics, it is necessary to perform selective sorting of magnets by parameter values, or to carry out a regulatory effect (calibration) on the magnets leading to a change in parameters corresponding to a certain value. The materials of high-coercivity magnets are quite expensive and the process of adjusting the parameters is often more acceptable than selective selection, the use of which is possible if it is necessary to use magnets with limiting (maximum) characteristics in the product. Calibration can reduce the range of deviations to values of ±1.2% or lower, although in practice a range of ±1.5% is more applicable.
Magnetic calibration of the PM is achieved by sequentially applying a demagnetizing field to the magnet, the value of which increases each time, and the parameters of the magnet are controlled. The process continues until the magnet parameters reach the required value within a given tolerance. Therefore, the adjustable parameters of the magnet must be measured after each application of the reverse field. This process can be automated in accordance with a specific algorithm and performed using a programmable logic controller (PLC) or a computer as part of a pulse installation. It is possible to calibrate the PM in manual mode or with a one-time application of the reverse field. When using pulsed equipment for PM calibration, it is usually specified, for example, the initial state point Binit and the final value of induction Bk. The transition from the initial state to the final state must be carried out by applying a series of pulses of a demagnetizing field, the amplitude of which increases according to a certain law. For example, the PM calibration process can be represented by the dependence B=f(Uc) shown in Figure 2.
Figure 2 - Graphic interpretation of the linear algorithm of the PM calibration process
In this case, the formation of pulses is carried out according to the optimal law corresponding to the principle of “equal slope”:
Uсi = Uс(i-1) +tgφ0·(Bi-1 – Bк),
where Uсi is the battery charge voltage in the i-th demagnetization cycle;
Uс(i-1) is the battery charge voltage during the (il) demagnetization cycle;
Bi-1—PM induction after exposure to (il) demagnetizing pulse;
Binit and Bk – initial and final values of PM induction;
φ0 is the slope angle of the stepwise approximation, selected depending on the type of PM and the required level of demagnetization.
Other laws for the formation of an algorithm for the PM calibration process in pulsed fields are also possible, which provide an increase in the pulse amplitude in each cycle not only depending on the decrease in the PM field, but also on the speed of convergence of the process of one-sided approach to the point of a given induction. The choice of one or another pulse generation law depends both on the requirements for accuracy and speed of the process, and on the complexity of implementing the installation control system.
When calibrating the PM, the signal for feedback from the automatic process control system is the variable values of the parameters of the magnet located in an open or closed magnetic circuit. In practical applications, the process of demagnetization of a PM located in any electrical or mechanical product is mainly used by the term “partial demagnetization of a magnet.” The processes of influencing a magnet with a pulsed field are similar, but for the feedback signal during adjustment, different output characteristics of the products themselves, measured both directly and using various types of sensors, can be used. This can be the induction on the surface of the magnet at the control point or in the air gap of the magnetic system, determined by a Hall sensor, a signal from a strain gauge proportional to lifting force or compression, the emf of a motor or generator, a signal from a magnetic coupling torque sensor, a voltage signal for the actuation and release of a relay, etc. P. for various systems and designs with PM.
Conclusion.
Technological processes of magnetization, demagnetization and calibration of permanent magnets in a pulsed magnetic field, used in the manufacture of various electrical and mechanical products, require a careful and professional approach when designing pulsed magnetizing equipment that ensures high technical and operational performance.
Literature:
1. Nesterin V.A. Equipment for pulsed magnetization and control of permanent magnets, M.: Energoatomizdat, 1986. -88 p.: ill.
2. Permanent magnets: Handbook/Altman A.B., Gerberg A.N., Gladyshev P.A. et al; Ed. Yu.M. Pyatina. -2nd ed., revised. and additional - M. Energia, 1980. -488 pp., ill.
3. A.s.1453453 USSR, IPC H 01 F 13/00. Method for demagnetizing a permanent magnet of the RZM-Co type [Text]/ Lukin A.A., Suponev N.P., Levandovsky V.V., Lyakhova M.V. and Egorov S.M. (USSR).-3948685/24-07; stated 07/09/85: publ. 02/07/88, Bulletin. 5.
4. A.s.1141458 USSR, IPC H 01 F 13/00. Device for demagnetizing permanent magnets to a given level [Text]/ Vasiliev V.V., Nesterin V.A., Okopnik E.B., Kudryavtsev A.I., Melnikov Yu.A., Buchinyu G.Z. (USSR ).- 3679212/24-07; stated 12/27/83: publ. 02/23/85, Bulletin 7.
5. A.s.1403109 USSR, IPC H 01 F 13/00. A method for obtaining a given level of demagnetization of permanent magnets [Text]/ Weber V.L., Nesterin V.A., Okopnik E.B., Vasiliev V.V., Melnikov Yu.A., Kudryavtsev A.I. (USSR).- 3960044/24-07; stated 10/05/85: publ. 06/15/88, Bulletin 22.
6. A.s.1072116 USSR, IPC H 01 F 13/00. A method for obtaining a given level of demagnetization of permanent magnets [Text]/ Vasiliev V.V., Nesterin V.A., Okopnik E.B., Kudryavtsev A.I., Lemeshko O.V., Melnikov Yu.A. (USSR). - 3476332/24-07; stated 07/30/82: publ. 04/15/88, Bulletin 14.
7. A.s.1732381 USSR, IPC H 01 F 13/00. Method for demagnetizing a permanent magnet of the RZM-Co type [Text]/ Lukin A.A., Pushkar M.B., Lyakhova M.V., Egorov S.M. and Levandovsky V.V. (THE USSR). -4176546/24-07; declared 01/07/87; publ. 01/23/89, Bulletin. 3.
8. Magnetizing equipment; ;
9. Joseph J. Stupak Jr., Methods of Magnetizing Permanent Magnets, Oersted Technology Corp., 2000;
10. Marek Przybylski, Darrius Kaspersky, Barbara Slusarek and Sławomir Wiak;Impulse Magnetization of Nd-Fe-B Sintered Magnets for Sensors
11. Introduction to Magnetizing and Measuring Equipment; Arnold Magnetic Technologies;TN 9807rev.2016a.
12. GREGOR BAVENDIEK, FABIAN MULLER, JAMSHID SABIROV, KAY HAMEYER Magnetization dependent demagnetization characteristic of rare-earth permanent magnets, Institute of Electrical Machines (IEM), Aachen, Germany.
13. Kostadin MILANOV, Mihaela SLAVKOVA SURVEY OF REQUIREMENTS TO PERMANENT MAGNETS, Technical University of Sofia, Bulgaria, semanticscholar.org.
14. GOST 19693-74 Magnetic materials. Terms and Definitions.
Using neodymium magnet
Neodymium magnets are created in different configurations and sizes, so they are used in many areas, for example:
In creating various clamps where metal elements are fixed to each other.
In securing antennas, license plates, signs and other metal products.
In filtering oil structures in cars and other equipment.
In the formation of magnetic locks and fasteners.
In search works.
In reduction processes associated with other magnetic components.
In the creation of devices for universal use, for example, various hangers or stirring devices.
In the production of electric generators.
In making jewelry.
In water treatment using magnetic influence.
In fuel conditioning.
In sorting small components made of metal.
Neodymium magnets are products that are widely used in various commercial, industrial and domestic applications. This material has a high load-carrying capacity, as well as excellent attractive properties and a long service life.
Before demagnetizing a neodymium magnet, you need to make sure that you have all the necessary equipment for this process. To perform this process properly, you need to use special industrial equipment or a device capable of generating heating up to eighty degrees above zero.
If the product has lost its own qualities, then the process associated with the magnetization of this material is rarely performed, since this is an impractical solution. But, when it is most necessary, you can order such a process by contacting the manufacturer.
Search magnets are among the most powerful products that are used to search for metal objects of different weights in ponds, sand, and grass. It is made from highly purified rare earth metals, these include iron, boron and neodymium, which is extracted from lanthanides. The raw materials are baked in an oven, crushed to a powder, and then the blanks are made with heat treatment.
To avoid corrosion, a nickel coating is applied on top. It is impossible to implement such a production process at home. Let's figure out how to make a simple search magnet with your own hands.
Measurement of magnetic properties.
When studying magnetic properties, two types of measurements are most important. The first of them is measuring the force acting on a sample near a magnet; This is how the magnetization of the sample is determined. The second includes measurements of “resonant” frequencies associated with the magnetization of matter. Atoms are tiny "gyros" and in a magnetic field precess (like a regular top under the influence of the torque created by gravity) at a frequency that can be measured. In addition, a force acts on free charged particles moving at right angles to the magnetic induction lines, just like the electron current in a conductor. It causes the particle to move in a circular orbit, the radius of which is given by
R
=
mv
/
eB
,
where m
is the mass of the particle,
v
is its speed,
e
is its charge, and
B
is the magnetic induction of the field. The frequency of such circular motion is
where f
is measured in hertz,
e
- in coulombs,
m
- in kilograms,
B
- in teslas. This frequency characterizes the movement of charged particles in a substance located in a magnetic field. Both types of motion (precession and motion along circular orbits) can be excited by alternating fields with resonant frequencies equal to the “natural” frequencies characteristic of a given material. In the first case, the resonance is called magnetic, and in the second - cyclotron (due to its similarity with the cyclic motion of a subatomic particle in a cyclotron).
Speaking about the magnetic properties of atoms, it is necessary to pay special attention to their angular momentum. The magnetic field acts on the rotating atomic dipole, tending to rotate it and place it parallel to the field. Instead, the atom begins to precess around the direction of the field (Fig. 10) with a frequency depending on the dipole moment and the strength of the applied field.
Atomic precession is not directly observable because all atoms in a sample precess at a different phase. If we apply a small alternating field directed perpendicular to the constant ordering field, then a certain phase relationship is established between the precessing atoms and their total magnetic moment begins to precess with a frequency equal to the precession frequency of individual magnetic moments. The angular velocity of precession is important. Typically, this value is on the order of 1010 Hz/T for magnetization associated with electrons, and on the order of 107 Hz/T for magnetization associated with positive charges in the nuclei of atoms.
A schematic diagram of a setup for observing nuclear magnetic resonance (NMR) is shown in Fig. 11. The substance being studied is introduced into a uniform constant field between the poles. If a radiofrequency field is then excited using a small coil surrounding the test tube, a resonance can be achieved at a specific frequency equal to the precession frequency of all nuclear “gyros” in the sample. The measurements are similar to tuning a radio receiver to the frequency of a specific station.
Magnetic resonance methods make it possible to study not only the magnetic properties of specific atoms and nuclei, but also the properties of their environment. The fact is that magnetic fields in solids and molecules are inhomogeneous, since they are distorted by atomic charges, and the details of the experimental resonance curve are determined by the local field in the region where the precessing nucleus is located. This makes it possible to study the structural features of a particular sample using resonance methods.
Making a simple magnet
First you need to prepare everything you need. To make a magnet you will need paper clips, small pieces of metal, various items, such as a battery, a refrigerator magnet. You will also need a small nail, with which you can check the magnetization of the paper clip. It is best to take different paper clips, large and small, with or without coating. The further procedure will be as follows:
- You need to collect the metal pieces and determine which one will stick best to the paper clip.
- Rub a paper clip on the magnet and drag it like a match in one direction. Such movements must be repeated at least 50 times.
- Touch the metal with a paper clip. If it sticks, the paperclip has been successfully magnetized. It is important not to miss it, otherwise all movements must be performed again.
- If the metal does not stick, you need to magnetize the paperclip again. During the process, you need to try not to lose the paperclip, otherwise you will have to do everything again.
You can try different types of metal, such as pins and nails. It is important to determine how strong the resulting magnet is. Such a magnet is not capable of searching for large objects, but it can attract nuts and bolts.
Tip 4: How to make a continuous magnet
Magnets are needed for the production of devices. Without them, it is impossible to make, say, a rough computer disk or speaker systems. There are few natural magnets, therefore unnaturally made magnets can fully satisfy the needs of society.
You will need
- Screwdriver, oiled paper, fuse, switch, copper wire.
Instructions
1. Anyone can make a magnet using the simplest method only by passing a powerful continuous magnet several times in one direction over a magnetized object. But such a magnet will quickly lose its properties, will have a weak magnetic field and can be used for simple actions, say, getting a needle out of a crack in the floor, or tightening bolts.
2. Battery supported magnetization. An electromagnet will impart magnetic properties to a metal object. Let's look at the example of a screwdriver. Wind 200-300 turns of wire, which is used to make transformers, onto a screwdriver wrapped in an insulator and connect it to a 5-12 volt battery or accumulator. The electromagnetic field will magnetize the screwdriver.
3. You can make a stronger continuous magnet using a further method - with the help of an induction coil. The magnet blank must be of such a size that it fits entirely inside the coil. Follow the steps described above, but make the turns approximately twice as large.
4. If you use mains current, do not forget to install a fuse. After this, step-by-step connect the coil with the fuse. When plugged into the network, the fuse may burn out, but a strong electromagnetic field will have time to charge the metal located inside the coil.
Note! If you decide to make a continuous magnet at home, then do not forget about the safety rules. You must be extremely careful and remember that you are working with high voltage, and it is not safe for life. A fire may also occur due to a short circuit. Be very careful!
Useful advice A magnet may lose its properties when heated above 50 degrees Celsius, as well as in the event of an impact or fall.
Note! If you decide to make a continuous magnet at home, strictly follow safety precautions when working with electricity. Remember that high voltage current is dangerous to life, and a short circuit can cause a fire.
Features of electromagnet manufacturing
Electromagnets are made by passing electric current through metal. This creates a magnetic field. Let's figure out how to make a search magnet of this type yourself. To do this you will need the following items:
- large nail;
- battery;
- a meter of thin copper wire;
- hairpins or paper clips;
- adhesive tape;
- a tool used to strip wires.
Next you need to perform a series of sequential actions:
- Using a special stripping tool, you need to expose the end of the wire and remove the insulation. It is these ends that will be connected further to the battery. All turns should touch each other, but not stick in a thick layer. These actions continue until the nail reaches the head.
- The next step is to rotate the nail, which will help create a magnetic field, while electricity should flow in only one direction.
- The next manipulations will be with the battery. One end of the wire, which was exposed, is wrapped around the plus, and the other - around the minus. Next, use electrical tape to secure the wire tightly.
- Don't worry about how best to attach the wire and on which side, because the nail will be magnetized in any case. The magnet will have two sides: one is the north pole, and the other is the south pole. By changing the wires, only its polarity will change.
- Next, the battery is connected, electricity is passed through the wire and heats it.
A simple electromagnet made from a nail, battery and wire
I would like to be able to create a powerful electromagnet on my own for various purposes, of which there are many at once. But this is not at all easy, as practice shows.
But even a junior schoolchild can make a simple electromagnet based on an ordinary nail, a battery and a wire, and all this can be done at home by purchasing the necessary parts in advance at the store.
By the way, this idea can also be useful in physics lessons.
We'll tell you what parts and steps are needed for this little magnet.
So, we need to prepare copper wire, electrical tape, AA batteries, nail, scissors, pins before work.
First, we have to wrap the copper wire around the nail.
Products for inventors
Source: https://izobreteniya.net/prostoy-elektromagnit-iz-gvozdya-batareyki-i-provoda/
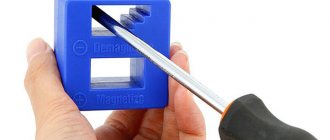
Magnetizer and demagnetizer: a useful device for pennies
Good afternoon, dear readers! Today I decided to share with you information about a useful device called a magnetizer/demagnetizer (hereinafter referred to as a magnetizer). The device is inexpensive, compact and allows you to magnetize the tip of a screwdriver or bit in a matter of seconds, as well as remove all magnetic properties from it. This is a user review, so I apologize in advance if I missed any points.
The magnetizer is supplied in a regular postal package. In appearance it is a prismatic body made of blue plastic with two holes:
There are a great many variations of these devices; I have the CMT-220 model for review:
The device is quite compact and useful, since it allows you to magnetize or demagnetize the tip of a screwdriver, bit or other tool in a matter of seconds. The dimensions are approximately 50x45x25 mm; this device will not take up much space at home or in the workshop:
The design is a plastic case consisting of two halves and two powerful neodymium magnets. I didn’t disassemble my copy, but found a photo on the Internet:
I can’t say for sure about the principle of operation, but it seems to me as follows: in the normal state, the magnetic moments of paramagnetic materials, that is, materials that are not magnets, but have the property of being magnetized in an external magnetic field, are chaotic and the total magnetic field is insignificant. When they are placed in a strong oriented magnetic field (hole with a “+” sign), their moments are aligned and they acquire pronounced magnetic properties.
When they are placed in the opposite magnetic field (the hole with a "-" sign), which is not concentrated in any direction, their moments are again arranged in a random position and the overall magnetic field becomes negligible.
No matter how crazy my theory may sound, the device works. To magnetize the tip or bit, it is necessary to pass it through the positive hole along its entire length. You can just hold it for a few seconds and twist. For a better demagnetization effect, it is recommended to twist the screwdriver tip around its axis and move it along the “ladder” several times.
As for the application, if you do not need a demagnetizer, then you don’t have to purchase the device. It can easily be replaced by a simple magnet, for example, a strong neodymium magnet or a simple one from an old speaker.
Neodymium magnets can be purchased here
Or very powerful ones, including search engines with a cable mount here
As an example, a watch screwdriver. In its normal state it does not have magnetic properties:
Therefore, in order to remove the screw from the housing hole, you have to turn it over, which is very inconvenient. But once you attach a tiny neodymium magnet, the screwdriver acquires magnetic properties and is much more pleasant to work with:
Small disk magnets can be purchased here
Massive screwdrivers require powerful magnets. Not many people have an unnecessary magnet, so for some it is easier to buy a magnetizer.
Now there is another application for demagnetization, which can no longer be realized with improvised tools. This procedure may be necessary for the following cases:
- repair of magnetic field-sensitive devices and devices, such as watches
- removing stuck chips and other magnetic debris from cutting tools
A degausser is not required so often, but its presence is still desirable.
Direct test
I used a regular non-magnetic screwdriver and a few self-tapping screws. It was enough to hold the tip once in the positive hole, and the screwdriver acquired pronounced magnetic properties:
Any screws began to become magnetic to the sting:
And even quite long ones stuck confidently:
After demagnetization, the magnetic properties disappeared:
This way you can clean the cutting tool from chips.
Let's take stock
The device works, is compact in size, does not require power or maintenance, and most importantly, costs mere pennies. Verdict – buy it, you won’t regret it!
Theories of magnetism.
For the first time, the guess that magnetic phenomena are ultimately reduced to electrical phenomena arose from Ampere in 1825, when he expressed the idea of closed internal microcurrents circulating in each atom of a magnet. However, without any experimental confirmation of the presence of such currents in matter (the electron was discovered by J. Thomson only in 1897, and the description of the structure of the atom was given by Rutherford and Bohr in 1913), this theory “faded.” In 1852, W. Weber suggested that each atom of a magnetic substance is a tiny magnet, or magnetic dipole, so that complete magnetization of a substance is achieved when all individual atomic magnets are aligned in a certain order (Fig. 4, b
). Weber believed that molecular or atomic “friction” helps these elementary magnets maintain their order despite the disturbing influence of thermal vibrations. His theory was able to explain the magnetization of bodies upon contact with a magnet, as well as their demagnetization upon impact or heating; finally, the “reproduction” of magnets when cutting a magnetized needle or magnetic rod into pieces was also explained. And yet this theory did not explain either the origin of the elementary magnets themselves, or the phenomena of saturation and hysteresis. Weber's theory was improved in 1890 by J. Ewing, who replaced his hypothesis of atomic friction with the idea of interatomic confining forces that help maintain the ordering of the elementary dipoles that make up a permanent magnet.
The approach to the problem, once proposed by Ampere, received a second life in 1905, when P. Langevin explained the behavior of paramagnetic materials by attributing to each atom an internal uncompensated electron current. According to Langevin, it is these currents that form tiny magnets that are randomly oriented when there is no external field, but acquire an orderly orientation when it is applied. In this case, the approach to complete order corresponds to saturation of magnetization. In addition, Langevin introduced the concept of a magnetic moment, which for an individual atomic magnet is equal to the product of the “magnetic charge” of a pole and the distance between the poles. Thus, the weak magnetism of paramagnetic materials is due to the total magnetic moment created by uncompensated electron currents.
In 1907, P. Weiss introduced the concept of “domain,” which became an important contribution to the modern theory of magnetism. Weiss imagined domains as small “colonies” of atoms, within which the magnetic moments of all atoms, for some reason, are forced to maintain the same orientation, so that each domain is magnetized to saturation. An individual domain can have linear dimensions of the order of 0.01 mm and, accordingly, a volume of the order of 10–6 mm3. The domains are separated by so-called Bloch walls, the thickness of which does not exceed 1000 atomic sizes. The “wall” and two oppositely oriented domains are shown schematically in Fig. 5. Such walls represent “transition layers” in which the direction of domain magnetization changes.
In the general case, three sections can be distinguished on the initial magnetization curve (Fig. 6). In the initial section, the wall, under the influence of an external field, moves through the thickness of the substance until it encounters a defect in the crystal lattice, which stops it. By increasing the field strength, you can force the wall to move further, through the middle section between the dashed lines. If after this the field strength is again reduced to zero, then the walls will no longer return to their original position, so the sample will remain partially magnetized. This explains the hysteresis of the magnet. At the final section of the curve, the process ends with the saturation of the magnetization of the sample due to the ordering of the magnetization inside the last disordered domains. This process is almost completely reversible. Magnetic hardness is exhibited by those materials whose atomic lattice contains many defects that impede the movement of interdomain walls. This can be achieved by mechanical and thermal treatment, for example by compression and subsequent sintering of the powdered material. In alnico alloys and their analogues, the same result is achieved by fusing metals into a complex structure.
In addition to paramagnetic and ferromagnetic materials, there are materials with so-called antiferromagnetic and ferrimagnetic properties. The difference between these types of magnetism is explained in Fig. 7. Based on the concept of domains, paramagnetism can be considered as a phenomenon caused by the presence in the material of small groups of magnetic dipoles, in which individual dipoles interact very weakly with each other (or do not interact at all) and therefore, in the absence of an external field, take only random orientations ( Fig. 7, a
).
In ferromagnetic materials, within each domain there is a strong interaction between individual dipoles, leading to their ordered parallel alignment (Fig. 7, b
).
In antiferromagnetic materials, on the contrary, the interaction between individual dipoles leads to their antiparallel ordered alignment, so that the total magnetic moment of each domain is zero (Fig. 7c )
.
Finally, in ferrimagnetic materials (for example, ferrites) there is both parallel and antiparallel ordering (Fig. 7, d
), which results in weak magnetism.
There are two convincing experimental confirmations of the existence of domains. The first of them is the so-called Barkhausen effect, the second is the method of powder figures. In 1919, G. Barkhausen established that when an external field is applied to a sample of ferromagnetic material, its magnetization changes in small discrete portions. From the point of view of domain theory, this is nothing more than an abrupt advance of the interdomain wall, encountering on its way individual defects that delay it. This effect is usually detected using a coil in which a ferromagnetic rod or wire is placed. If you alternately bring a strong magnet towards and away from the sample, the sample will be magnetized and remagnetized. Abrupt changes in the magnetization of the sample change the magnetic flux through the coil, and an induction current is excited in it. The voltage generated in the coil is amplified and fed to the input of a pair of acoustic headphones. Clicks heard through headphones indicate an abrupt change in magnetization.
To reveal the domain structure of a magnet using the powder figure method, a drop of a colloidal suspension of ferromagnetic powder (usually Fe3O4) is applied to a well-polished surface of a magnetized material. Powder particles settle mainly in places of maximum inhomogeneity of the magnetic field - at the boundaries of domains. This structure can be studied under a microscope. A method based on the passage of polarized light through a transparent ferromagnetic material has also been proposed.
Weiss's original theory of magnetism in its main features has retained its significance to this day, having, however, received an updated interpretation based on the idea of uncompensated electron spins as a factor determining atomic magnetism. The hypothesis about the existence of an electron’s own momentum was put forward in 1926 by S. Goudsmit and J. Uhlenbeck, and at present it is electrons as spin carriers that are considered “elementary magnets”.
To explain this concept, consider (Fig. a free atom of iron, a typical ferromagnetic material. Its two shells ( K
and
L
), those closest to the nucleus, are filled with electrons, with the first of them containing two and the second containing eight electrons.
In the K
shell, the spin of one of the electrons is positive and the other is negative.
In the L
shell (more precisely, in its two subshells), four of the eight electrons have positive spins, and the other four have negative spins.
In both cases, the electron spins within one shell are completely compensated, so that the total magnetic moment is zero. In the M
shell the situation is different, since out of the six electrons located in the third subshell, five electrons have spins directed in one direction, and only the sixth in the other.
As a result, four uncompensated spins remain, which determines the magnetic properties of the iron atom. (There are only two valence electrons in the outer N
shell, which do not contribute to the magnetism of the iron atom.) The magnetism of other ferromagnets, such as nickel and cobalt, is explained in a similar way. Since neighboring atoms in an iron sample strongly interact with each other, and their electrons are partially collectivized, this explanation should be considered only as a visual, but very simplified diagram of the real situation.
The theory of atomic magnetism, based on taking into account the electron spin, is supported by two interesting gyromagnetic experiments, one of which was carried out by A. Einstein and W. de Haas, and the other by S. Barnett. In the first of these experiments, a cylinder of ferromagnetic material was suspended as shown in Fig. 9. If current is passed through the winding wire, the cylinder rotates around its axis. When the direction of the current (and therefore the magnetic field) changes, it turns in the opposite direction. In both cases, the rotation of the cylinder is due to the ordering of the electron spins. In Barnett's experiment, on the contrary, a suspended cylinder, sharply brought into a state of rotation, becomes magnetized in the absence of a magnetic field. This effect is explained by the fact that when the magnet rotates, a gyroscopic moment is created, which tends to rotate the spin moments in the direction of its own axis of rotation.
For a more complete explanation of the nature and origin of short-range forces that order neighboring atomic magnets and counteract the disordering influence of thermal motion, one should turn to quantum mechanics. A quantum mechanical explanation of the nature of these forces was proposed in 1928 by W. Heisenberg, who postulated the existence of exchange interactions between neighboring atoms. Later, G. Bethe and J. Slater showed that exchange forces increase significantly with decreasing distance between atoms, but upon reaching a certain minimum interatomic distance they drop to zero.
Strengthening the electromagnet
To understand how to increase the strength of a magnet, you need to understand the process of magnetization. This will happen if the magnet is placed in an external magnetic field with the opposite side to the original one. An increase in the power of the electromagnet occurs when the current supply increases or the turns of the winding are multiplied.
You can increase the strength of a magnet using a standard set of necessary equipment: glue, a set of magnets (you need permanent ones), a current source and an insulated wire. They will be needed to implement the methods of increasing the strength of a magnet, which are presented below.
Reinforcement with a more powerful magnet
This method involves using a more powerful magnet to strengthen the original one. To implement this, you need to place one magnet in the external magnetic field of another, which has greater power. Electromagnets are also used for the same purpose. After holding a magnet in the field of another, amplification will occur, but the specificity lies in the unpredictability of the results, since for each element such a procedure will work individually.
Strengthening by adding other magnets
It is known that each magnet has two poles, and each attracts the opposite sign of other magnets, and the corresponding one does not attract, only repels. How to increase the power of a magnet using glue and additional magnets. This involves adding other magnets to increase the final power. After all, the more magnets, the correspondingly greater the force. The only thing that needs to be taken into account is the connection of magnets with like poles. In the process, they will repel each other, according to the laws of physics. But the challenge is gluing, despite the physical difficulties. It is better to use glue that is designed for gluing metals.
Curie Point Enhancement Method
In science there is the concept of the Curie point. Strengthening or weakening of a magnet can be done by heating or cooling it relative to this point itself. Thus, heating above the Curie point or strong cooling (much below it) will lead to demagnetization.
It should be noted that the properties of a magnet when heated and cooled relative to the Curie point have an abrupt property, that is, having achieved the correct temperature, its power can be increased.
Method No. 1
If the question arises of how to make a magnet stronger if its strength is regulated by electric current, then this can be done by increasing the current supplied to the winding. Here there is a proportional increase in the power of the electromagnet and the current supply. The main thing is ⸺ gradual feeding to prevent burnout.
Method No. 2
To implement this method, the number of turns must be increased, but the length must remain the same. That is, you can make one or two additional rows of wire so that the total number of turns becomes larger.
This section discusses ways to increase the strength of a magnet at home; experiments can be ordered on the WorldMagnitov website.
Magnetizing force and magnetic field strength.
Next, we should introduce another quantity characterizing the magnetic effect of electric current. Suppose that current passes through the wire of a long coil, inside of which there is a magnetizable material. The magnetizing force is the product of the electric current in the coil and the number of its turns (this force is measured in amperes, since the number of turns is a dimensionless quantity). Magnetic field strength H
equal to the magnetizing force per unit length of the coil.
Thus, the value of H
is measured in amperes per meter; it determines the magnetization acquired by the material inside the coil.
In a vacuum, magnetic induction B
proportional to the magnetic field strength
H
:
where m
0 – so-called
magnetic constant having a universal value of 4 p
× 10–7 H/m.
In many materials, the value of
B
is
approximately proportional
to H. However, in ferromagnetic materials the relationship between B
and
H
is somewhat more complex (as will be discussed below).
In Fig. 1 shows a simple electromagnet designed to grip loads. The energy source is a DC battery. The figure also shows the field lines of the electromagnet, which can be detected by the usual method of iron filings.
Large electromagnets with iron cores and a very large number of ampere-turns, operating in continuous mode, have a large magnetizing force. They create a magnetic induction of up to 6 Tesla in the gap between the poles; this induction is limited only by mechanical stress, heating of the coils and magnetic saturation of the core. A number of giant water-cooled electromagnets (without a core), as well as installations for creating pulsed magnetic fields, were designed by P.L. Kapitsa (1894–1984) in Cambridge and at the Institute of Physical Problems of the USSR Academy of Sciences and F. Bitter (1902–1967) in Massachusetts Institute of Technology. With such magnets it was possible to achieve induction of up to 50 Tesla. A relatively small electromagnet that produces fields of up to 6.2 Tesla, consumes 15 kW of electrical power and is cooled by liquid hydrogen, was developed at the Losalamos National Laboratory. Similar fields are obtained at cryogenic temperatures.
Experiments with neodymium magnets
Neomagnet is quite popular, its composition: neodymium, boron, iron. This magnet has high power and is resistant to demagnetization.
How to strengthen neodymium? Neodymium is very susceptible to corrosion, that is, it rusts quickly, so neodymium magnets are coated with nickel to increase service life. They also resemble ceramics and are easy to break or crack.
But there is no point in trying to increase its power artificially, because it is a permanent magnet, it has a certain level of strength for itself. Therefore, if you need to have a more powerful neodymium, it is better to purchase it, taking into account the required strength of the new one.
Conclusion: the article discusses the topic of how to increase the strength of a magnet, including how to increase the power of a neodymium magnet. It turns out that there are several ways to increase the properties of a magnet. Because there is simply magnetized metal, the strength of which cannot be increased.
The simplest methods: using glue and other magnets (they must be glued with identical poles), as well as a more powerful one, in the external field of which the original magnet must be located.
Methods for increasing the strength of an electromagnet are considered, which consist of additional winding with wires or increasing the flow of current. The only thing that needs to be taken into account is the strength of the current flow for the safety and security of the device.
Conventional and neodymium magnets are not capable of increasing their own power.
Why putting a magnet on a meter is a bad idea
To reduce water and electricity bills, some people put powerful magnets on their meters. Under the influence of a magnetic field, even during the consumption of water and light, the device does not rotate.
But a magnet is not an innocent way to save money. If a person uses water and electricity, but does not pay for them, he steals, that is, he commits an administrative offense. In the laws, this is called theft and is punishable by a fine, temporary arrest or community service.
Inspectors will probably know about the magnet
It seems that if you install a magnet only occasionally and pay a little on the bills, then no one will know about the violation. But inspectors have several ways to detect theft:
- See the magnet. Usually they try not to let the inspectors in or quickly remove the magnet before opening the doors. But it may happen that the person who placed it will not be at home, the door will be opened by a child or a grandmother who has come to stay, or the residents will simply forget about the magnet. Then the inspector will take a photo of the violation and draw up a report, and then you will be issued a fine.
- Check the indicator. Modern water and light meters have special indicators, or magnetic field sensors. It is enough to bring a powerful magnet to the meter once - and the indicator will change color forever. And some of the most modern devices can even send a message to the dispatcher, so they will instantly know about the magnet.
- Measure the magnetic field. If a magnet has recently been placed on the meter, the magnetic field around it will be abnormally large. It can be measured using a special device - a Teslameter. And if the indicator can sometimes somehow be fooled, then the Teslameter cannot be fooled: it will clearly indicate that there was a magnet on the meter.
The Teslameter is expensive and is still rarely used, but gradually this method is becoming more and more popular. You can especially often find inspectors with teslameters in Moscow and St. Petersburg.
To record a violation and draw up a report, inspectors must come to the meter in person. To do this, management companies (MCs) arrange scheduled inspections every 1–2 years. Theoretically, you can adapt to them and use the magnet only immediately after the inspectors’ visit in order to save at least a little.
But if according to the general building meter the resource consumption is the same, but according to the sum of the apartment meters it is significantly less, this indicates theft on the part of the residents. In this case, the management company can arrange an unscheduled inspection and detect the magnet.
You will be punished for installing a magnet
Most often, on the basis of Government Resolution No. 354, they are required to pay the cost of resources tenfold. The cost is calculated according to average standards and multiplied by the time that has passed since the last inspection, but by a maximum of 3 months.
That is, if you install a magnet and it is discovered in six months, you will be forced to pay 10 times more than you would pay according to the standards for three months. Standards, by the way, are often too high.
Usually people spend less than the average per month, so the overpayment will be large.
This fine is not related to theft - it only relates to violation of the meter. If the Criminal Code decides to sue, the violator faces the following penalties:
- A fine of 10–15 thousand rubles for the unauthorized use of electrical, thermal energy, oil or gas, according to the Administrative Code.
- A fine of five times the value of the stolen property for petty theft up to 1 thousand rubles, according to the Administrative Code.
- A fine for petty theft is from 1 to 2.5 thousand rubles in the amount of five times the value of the stolen property, or arrest for 10–15 days, or up to 120 hours of community service.
Theoretically, when more than 2.5 thousand rubles are stolen, the crime is no longer considered administrative, but criminal. He faces a fine of up to 300 thousand rubles or imprisonment for 1–2 years. But in fact, such punishments are not imposed in the Russian Federation for magnets on meters.
You can save money without a magnet
To save money, you don't need to install a magnet. There are several legal ways to pay much less for electricity and water:
- Use LED lamps. They consume 8–10 times less electricity than conventional ones.
- Turn off the water when you are not using it. This is useful to do even in small things, such as while brushing your teeth or in the shower while you lather up.
- Always turn off the lights when leaving a room. You can install motion sensors so that the lights turn on and off automatically.
- Install aerators on taps. They break the stream into small droplets, which creates greater pressure but reduces water consumption.
- Use a washing machine and dishwasher. They use less water than hand washing or washing, and they also use cheaper cold water rather than hot water. Electricity consumption increases, but the final payment decreases.
- Fix all leaks in a timely manner.
- If the tank has one flush mode, place a bottle filled with water in it. This will slightly reduce the volume of the tank. There will still be enough water to rinse, but the consumption will decrease.
- Install a tank with two flush modes to waste less water.
- If cold water flows for a long time before hot water, you can drain it into a bucket. Then the water can be used for flushing, watering plants or other purposes.
Reasonable consumption of resources will help you save money even without magnets, so you don’t have to fear inspections and fines.
Source: https://Lifehacker.ru/magnit-na-schyotchik/