There are special technical devices that allow you to bend a copper pipe. The need to bend a copper pipe arises at the time of construction and installation work related to the installation of a heated floor, sewerage or water supply system. The choice in favor of this material is due to its wear resistance and versatility. Even with long-term use, copper is practically not subject to corrosion. At the system design stage, all pipe bends are taken into account. This will allow you to complete the installation with pinpoint precision. The less “congestion” is formed along the path of the liquid, the higher the efficiency of the system.
Work specifics
The physical properties of the material largely determine the features of working with copper. Due to plasticity, the workpiece at the bend may decrease in diameter or even break. But you can deform a copper pipe manually. Methods for increasing bending strength will be described later.
The second feature of copper pipes is the need to heat them to effect deformation. Of course, it’s easy to handle thin-walled workpieces without a soldering iron or a gas torch, but it’s better to heat thicker elements (where there will be a bend) to make your work easier.
The third feature of bending copper pipes at home is the mandatory use of compensating elements. This is necessary to minimize the appearance of “corrugations” (waviness) on the inner wall of the tube. Examples would be sand, a steel spring, sometimes ice. Now let's look at the known methods of how to bend a copper tube at home.
Conclusion
Now you know how to bend a HDPE pipe and how to perform a similar operation with metal and metal-plastic parts. Additional details can be found by watching the video in this article.
Do you have any questions about the text? Ask them in your comments.
July 25, 2016
If you want to express gratitude, add a clarification or objection, or ask the author something, add a comment or say thank you!
Bending copper pipes is a technically simple task, but it requires attention and accuracy from the performer. Copper, as a fairly plastic material, is easily mechanically affected, and therefore the pipe can easily be bent at home using human physical strength. But accuracy is very important, because... If the load is exceeded, the metal may deform and become unusable.
To bend a copper pipe, you do not need complex equipment: all the work can be done at home using simple devices, for example, an ordinary spring or river sand, or using a special tool - a pipe bender.
Copper pipes are often used for arranging intra-house and apartment utility networks. Hot and cold water supply, heating system based on copper shows itself to be durable and retains the thermal energy of the coolant well.
During installation of a system based on copper pipes, it is necessary to change their direction and lead it around obstacles. Sometimes plumbers use flange and coupling connections, tees and elbows, but in practice they reduce the reliability of the system and leak over time due to wear of the seals.
Bending the pipes maintains the tightness of the water supply, giving it the required shape. You can physically bend the pipe manually: the thinner the diameter and wall, the easier it is to be mechanically affected.
Important! Essentially, bending a pipe involves stretching the metal surface on the outside of the bend and compressing it on the inside. If you apply more force to the pipe than required, the surface may become deformed, creating a wavy section where the metal structure is less strong. In this case, it will be almost impossible to restore the original structure of the pipe.
Bending methods
Methods for giving a curved shape to a copper pipe are divided into two categories:
- industrial;
- household
Industrial flexible tube bending refers to the use of special equipment - pipe benders. The most common are hydraulic and mechanical (manual).
VIEW Pipe bender on AliExpress → The first ones allow to minimize human physical effort, have replaceable nozzles for selecting a suitable bending diameter, and are used for large copper pipes. The latter are compact, work using human muscle power, and also have replaceable attachments in the form of a semicircle.
When repairing or installing copper pipelines, you don’t always have a pipe bender at hand. Therefore, users make do with improvised means.
Standard requirements for bending radius
During bending, the walls of the product must maintain their profile, cross-section and internal diameter. Therefore, the standard establishes that the bending radius of copper pipe must meet special requirements. Minimum rounding limits can be obtained in different ways: using mandrel pipe benders or heat treatment. They make it possible to make the size of the circle smaller. This indicator is also calculated depending on the material from which the product is made and its size. According to GOST No. 617-90, the minimum radius for bending copper pipes is:
- outer diameter up to 10 mm with a minimum required bending angle of up to 20°;
- with a diameter of more than 12 mm, the radius should not be less than 24°.
Household methods for bending copper pipes
These methods are distinguished by their applicability in a limited space, that is, in an ordinary apartment. There is no need for large equipment; bending a copper blank will not be much slower. Among the methods for bending copper tubes are:
- Spring-loaded. Allows you to bend a metal pipe at any angle. A spring is used, the length of which is equal to the length of the pipe. When bending forms of large diameter, it is placed inside the workpiece so that it rests against the walls; smaller diameter - worn externally. If it is necessary to deform a small section of the product, the spring is pushed to the place of the intended bend.
VIEW the spring pipe bender on AliExpress → How is copper pipe bending done using a spring? The sequence of actions is as follows:
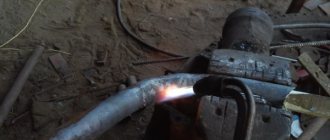
- place the spring outside/inside the tube;
- warm up the bend (or the entire pipe) with a blowtorch or gas torch;
- when the surface changes color to a darker one, begin bending;
- After deformation, leave the workpiece until it cools completely under natural conditions;
- remove the spring.
To get the product of the desired shape, you can use round metal objects as templates (for example, car rims, other pipes, etc.).
- Sand. Here again you will need a heating element and clean, sifted, completely dry sand. The sequence is:
- one of the ends of the copper pipe is clogged with a wooden plug (a wooden or rubber hammer is used!);
- the pipe cavity is filled with sand, while the workpiece is periodically tapped with a wooden plug on the surface (table, floor);
- Having filled the product completely, put on the same plug at the other end;
- apply a blowtorch or gas torch to the intended bend of the pipe, rotating the workpiece to ensure uniform heating;
- press one end of the pipe to the support, and carefully bend the other in the desired direction;
- Allow the deformed part to cool (in natural conditions or douse with water).
The good thing about this method is that if the bend of the pipe is uneven, it is permissible to straighten it - tap the place where the deformation has gone bad with a hammer. After the tube has cooled, the plugs are removed from it, sand is poured out, washed and used for its intended purpose.
If bending is performed in winter, it is possible to fill the internal cavity with ice. However, this is undesirable - when bent, it may break, and the fragments will damage the inner surface of the tube. Although, if the latter does not have special requirements, it is worth adopting the method.
Equipment
To perform the work you will need to prepare the following equipment:
In addition to the tools, you will also need sand or ice.
How to make an effective pipe bender with your own hands?
To make a pipe bender you will need the following materials:
- steel rollers 2 pcs;
- steel pipe with a diameter of more than ¾ and a length of more than 1.5 m;
- steel sheet 5 mm thick for making strips;
- 2 M20 bolts;
- steel plate 3 mm thick.
For assembly you need the following tool:
- The alignment of the holes in the rollers is checked.
- 2 holes with a diameter of 20 mm are drilled in the strips at a distance of 80 mm.
- In the central part of the 5 mm plate, a hole with a diameter of 20 mm is drilled, a bolt is inserted, and welded so that it does not protrude from the opposite side.
- A U-shaped part is created from 3 mm plates, a hole is drilled in the center, a bolt is inserted and a roller is attached.
- The plates are used to make a Y-shaped part, which must be attached to the open side of the part.
- The pipe and support strip are welded to the structure. The distance between the bar and the axle should be such that there is enough space to install the roller.
- A plank measuring 15x6 cm is attached to the supporting plate.
- A roller is attached to the Y-shaped part. The main part of the pipe bender is attached to the supporting bolt and secured with a nut.
Complicated bending of copper pipes
It happens that you need to bend a workpiece of a non-standard profile. For example, not round, but square. The spring method is not applicable here. All that remains is to use sand, a mallet, plugs and two supports. A pipe is placed on the latter, then heated, then the bend is tapped with a hammer until it is given the proper shape.
What to do if you need to bend the tube into a spiral? It's simple - you just need to find a cylindrical template with a diameter equal to the required one. The copper workpiece is slightly heated, then bent. This will create an even spiral.
VIEW Manual pipe bender on AliExpress →
DIY stainless steel coil
Category: Crazy hands | : 05-12-2015
Another craft (to order) from the “crazy hands” series. This time - a spiral coil (heat exchanger) made of stainless steel . I wanted to make it according to this scheme (long live Paint
Before making it, I looked on the Internet to see who makes such things and how.
I was interested in a video on YouTube in which the author winds a spiral heat exchanger coil onto a two-inch pipe using a machine:
I don’t have a machine, so I decided to wind a heat exchanger coil from the same tube as in the video, but manually.
A stainless steel tube with an outer diameter of 10 mm and a wall thickness of 1 mm was found. Almost four meters long. I decided to wind it the same way as in the video above - on a two-inch pipe (I had it in stock).
A little retreat
As for me, winding on a two-inch thread is an ideal option for a homemade one. Now I will explain why. It was planned to cool the coil using running water.
This means that a cylindrical casing will be needed, inside of which there will be a coil.
For better heat transfer, the casing must be selected in such a way that there is space between the spiral turns and the casing wall for water flow (and not just in the center of the spiral winding).
Because with such winding of the coil - the outer diameter of the coil turns will be around 80-85mm (the base pipe for winding = 60mm, the thickness of two turns = 2 * 10mm = 20mm, plus a few millimeters will be added due to the slight reverse expansion of the turns), then your hands will immediately We were itching to use a ready-made 110mm plumbing pipe as a heat exchanger casing.
Now, regarding preparation for winding. 1) While the stainless steel tube is still intact and smooth, it must be cleaned from the inside. Yes Yes. Despite the fact that the tube is clean and smooth on the outside, everything inside can be much worse.
What are we doing? We take a thick steel wire (mine was 3mm in diameter) and long enough (at a minimum - a little more than half the length of a stainless tube, then you will have to clean it on both sides).
We tightly wrap a wet cloth (or rather a ribbon) onto the end of the wire, and to prevent it from being torn off, we grab the fabric with a thin copper wire.
We dip this improvised “kvach” into fine sifted sand (more about it later) and either push the wire with the kvach at the end along the tube, or drag it (depending on the thickness and length of the wire) after the wire. We take out the kvacha - we look at it, we are horrified and we repeat the operation until our quality control department accepts the internal cleanliness of the tube.
Important! The tube must be cleaned before winding. After winding it will be impossible to do this.
Important!! Reel the kvach securely, because if it falls off the wire, you can get a new quest called “Ma-a-a-a-l-a-det! Now get that crap out of the tube.” Use strong wire.
Important!!! There is no need to wet or rinse the inside of a stainless steel tube with water! Because Further according to the plan, filling the tube with sand.
2) Sand. The sand needs to be dry and sifted. It is needed to pack the coil tube. Just like in the video with the machine, we plan out chopsticks from wood, hammer one chopstick tightly into the tube and, using a funnel, pour sand portionwise into a vertically standing tube while tapping the tube from bottom to top. After the tube is tightly packed with sifted sand, the second cap is clogged. The tube is ready to be wound.
Important ! Sand is necessary to protect the tube from crushing the walls during the winding process. Poor/uneven sand packing will most likely lead to improper deformation (collapse of the walls) of the tube during winding.
Winding
There are two (main) ways to wind a heat exchanger manually from a stainless tube.
Method one - we fix the improvised shaft (2″ pipe) horizontally and rotate it, thereby winding a stainless steel tube with sand around it.
The second method is to rigidly fix the shaft vertically and wind a stainless tube around it, moving with the tube in a circle.
Because With a four-meter tube you can’t turn around much, so the first option was chosen. And because There is no lathe - so on an improvised workbench, sliding bearings for a two-inch pipe were knocked together from wood:
Important! The upper height limiter (in the picture there is a block with the inscription tree) for such bearings should be equal to the diameter of the shaft (pipe 2″) + one diameter of the wound tube (10mm).
Because a previously cut 3/4″ piece was located perpendicular to the shaft - then by inserting a suitable fitting into it, I got a lever for turning the shaft.
Important! For proper winding, it is necessary to correctly secure the tube to the shaft. You can, as in the video (see above), weld a counterbored nut, insert a stainless tube through the nut, bend the tube 90 degrees and start winding.
I didn’t want to get involved with welding (at that time) - so in the shaft itself (2″ pipe) two holes were drilled right through from the edge, through which a U-shaped metal loop was inserted with a twist on the back side, which secured the end of the tube.
For additional rigidity, I wound the beginning of the tube with thick wire to the shaft.
Then, slowly, with four hands (one holds the tube, the other turns the shaft using a lever), winding is done, after winding, the choppers are taken out, sand is poured out, an extra piece of tube is sawed off and we get this spiral heat exchanger (the quality of the photo is disgusting, i.e. it was done quickly and by telephone):
As for me, the result of making a coil with your own hands is very, very good, for the first time. It's nice to even hold it in your hands.
However, in order for the heat transfer process to be more efficient, the coil turns must be carefully moved apart (so that water also circulates between them).
To do this, I had to cut about twenty wedges from dense wood (pine is not suitable) and, using a hammer, gradually driving in the wedges on different sides of the spiral, push the turns of the homemade heat exchanger apart.
Important! At the very beginning, the coils noticeably resist the wedges, so take care of your fingers and nails.
Important!! It is better to move the coils apart in several passes, gradually increasing the distance between the coils and constantly monitoring so that the coil itself does not move to the side:
After all these manipulations we get this beauty (duct tape for scale):
This beauty took three meters of stainless tube. Now it was necessary to make the heat exchanger casing.
Heat exchanger casing
As was written earlier, it was planned to use a gray plumbing pipe with a diameter of 110 mm under the casing. Therefore, the following components were purchased: 0.
5 meters of 110mm plumbing pipe, adapter coupling for 110mm pipe, two plugs for the same pipe, two 3/8″ fittings, meter rod with 8mm thread.
An adapter coupling is needed because the 110mm pipe has different diameters at the ends and plugs can only be installed on one side. True, there is a bonus - the casing becomes collapsible.
Seals
If the fitting has a threaded part with a nut, thanks to which it can be secured in the casing body through rubber seals, then the tube of the stainless coil must somehow be passed through the plastic of the casing, and in such a way that water does not leak. For these purposes, I had to make a cunning homemade rubber seal (2 pieces) (see picture) with a groove for plastic.
Some useful tips
There are several ways to obtain bent copper pipe. Each is good in its own way, but there are points that are always important to take into account, regardless of the chosen deformation method.
- The main requirement for the user when working is accuracy and attentiveness. Sudden movements will lead to excessive deformation of the pipe walls and their complete rupture.
- Parts made of annealed copper are the easiest to bend, so heating them takes a minimum of time.
- If the bend is not made where needed, you can reheat the workpiece and bend the product back. However, no one guarantees that the shape of the tube will be the same.
- If the surface overheats, the metal may simply begin to melt. It is unacceptable. The user must carefully follow the process from start to finish.
Manual bending of large-sized copper pipes is impossible at home - you can’t do it without industrial pipe benders with a hydraulic drive. Small workpieces for installation of a heating system or water supply bend easily, and with minimal effort. Even a person without experience can figure out how to bend a copper pipe at home if he is careful. Do you know other ways of working? Share with readers your experience in discussing the material.
When to use a pipe bender
It happens that the spring and sand cannot cope with the task. In this case, heavy artillery is used. A device that saves time is called a pipe bender. The mobile unit changes the shape of the pipe based on the parameters specified by the person.
The whole process comes down to fixing one end of the tube and manipulating the other. The main thing is that the bend point is correctly fixed.
Before you start, you need to choose the right tool. There are lever and hydraulic pipe benders.
Their characteristics are as follows:
- Manual or lever - its design includes 2 levers, a bending shoe and a template. There are marks on the surface of the lever, on the basis of which the required angle is set. The tube is fixed in the bracket so that the zero marks are aligned. The maximum bending angle is 180 degrees.
- Hydraulic – refers to professional equipment. They can get the job done several times faster than their manual counterparts.
A pipe bender is quite expensive.
The use of a pipe bender is justified when a significant amount of work is involved. A mobile device optimizes time expenditure if chosen correctly. The manual type is suitable for domestic needs, and the hydraulic type is suitable for industrial needs.