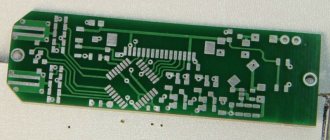
Milling machines are a convenient tool for creating printed circuit boards from textolite. Any specialist familiar with the operating principles of CNC machines can implement such a project. The quality of the finished project depends on some nuances that must be taken into account both when preparing the project on the computer and during the implementation process on the machine. We will look at them in this article.
Source: uwaterloo.ca
Read our detailed instructions on milling printed circuit boards on CNC machines.
What is a PCB CNC machine?
A CNC machine for creating printed circuit boards is a typical milling cutter equipped with a custom work table on which a thin PCB workpiece is firmly attached. CNC milling of printed circuit boards is not fundamentally different from any other work performed on CNC machines. The advantage of this method is high accuracy of work with minimal human involvement in the process. The main job of the machine operator is to prepare a virtual model of the printed circuit board and evaluate the completed project.
The correct choice of milling machine is the key to high quality final PCBs
Practice shows that radio amateurs who prefer to mill boards themselves often prefer the Wattsan M1 6090
(for large production) or
A1 6090
(for production of small series), which is due to the optimal ratio of price and quality of processing).
The first machine has a bed of increased stability, which is very important when milling PP
Designed to work with a wide range of materials, from MDF to aluminum.
It has a three-coordinate control system, NcStudio, and a rack-and-pinion table.
Allows tuning with installation of a significant number of additional options:
- installation of DSP controller;
- installation of a system that ensures portal alignment;
- use of hydraulic supports;
- complete set with a tool sensor;
- built-in aspiration system;
- installation of coolant;
- built-in rotating device;
- reliable lubrication system.
Main characteristics of the machine:
- the body is equipped with a reinforced welded frame (thickness range 8.0-10.0) mm, which has undergone heat treatment at the production stage.
This prevents its deformation throughout the entire service life of the machine.
- working field parameters are 600*900*300;
- as standard, the model has a spindle with a power of 1.5 kW (with the possibility of replacing it with more powerful options: 2.2, 3.5 kW);
- a collet chuck model ER-11 is installed;
- provides positioning accuracy of 0.05 mm;
- working speed of portal movement, 25000 mm/min;
- along the Z axis the maximum lifting height is 300 mm.
Pros and cons of CNC milling of printed circuit boards
Buying a PCB router requires understanding the return on investment you are looking for. If we compare the advantages and disadvantages of milling printed circuit boards, it is obvious that buying a machine is beneficial in any case. Even for work in garage conditions, when production is not on stream, a cheap CNC router can significantly improve the quality of circuit boards compared to hand-made ones, while reducing the time and effort required by the radio amateur.
Advantages of CNC milling machines:
- Fully automatic milling;
- Lack of chemical reagents in the manufacturing process;
- Possibility of serial and piece production with a stable level of quality;
- High speed of working with projects of any complexity.
Disadvantages when using machines:
- Relatively high initial investment;
- Little training required.
Source: habr.com
As you can see, the pros outweigh the cons. The need for training is classified as a disadvantage conditionally, and only because some disadvantages need to be cited, but in practice this is also a plus. It is not a fact that the first product will come out perfectly, but a little later, having mastered working with the machine, the user can be sure of almost one hundred percent results.
Specifics of individual stages of PP milling
The simplest way to obtain a photomask is to print it on a printer. Transparent universal film is selected taking into account its design. On the one side. It has a rough surface (with a gelatin coating). You can print an image on it using an inkjet printer. The other side, smooth, is for laser printing.
Tips regarding the practical use of the router:
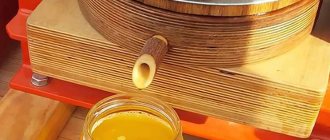
- It is required to ensure the most even and flat surface of the desktop.
The simplest solution is to create a “sacrificial table” from trimmed plywood. In the latter, the stock is milled to the size of the workpiece to a depth of 2 mm.
- The workpiece material does not always have the required flat surface; its thickness can vary in length and width.
Taking this into account, it is recommended to cut with partial cutting through the conductive layer.
- It is allowed to use a conical engraver (colloquial name, “pyramid”) with an end cap (0.4-1.0) mm for milling.
For drilling, drills of the above-mentioned diameters are used, having a shank that allows installation in a standard type collet (3.175 mm). The contour is cut with a rasp cutter (2.0-3.0) mm.
- To replace a tool (done manually), you must switch the machine to the “hold” mode.
After completing the replacement, you need to set “0” in Z. The two remaining coordinates are not changed or reset.
- During the milling process, dust is released, which is very harmful to the human respiratory system (especially when working with fiberglass laminate).
Therefore, before starting work, it is imperative to think through a system for its collection and removal, and to use respiratory protection.
In conclusion, please note that all the information presented in this article is one of the possible options for obtaining the necessary software. We will be grateful to professionals who will share with us their vision of solving the problem.
Software for creating printed circuit boards on CNC machines
Source: habr.com
There are different programs for creating printed circuit boards. Some of them are paid, some have free trial periods of use.
- Estlcam is a program for generating G-code, with the ability to control the machine directly from the program interface.
- Free Mill is a free CAM module for generating G-code.
- DeskProto is a professional CAM program for creating projects of any complexity with minimal effort.
The process of manufacturing printed circuit boards on a CNC machine
Milling of printed circuit boards is divided into two stages.
The first is an extensive preparatory stage, during which it is necessary to develop a topology and hole drilling pattern on a computer, as well as create a diagram of the finished board.
The second stage is working on the machine. It is necessary to load different files onto the machine to mill the grooves between the tracks and drill the holes, and then cut the board itself from a piece of PCB if necessary.
Having decided on the required width of the tracks and grooves between them, you should take them into account when developing the project. When the router is configured correctly, accuracy is achieved at the level of mass-produced radio equipment.
Development or search for route routing schemes
Source: cncmodelist.ru
Any suitable computer program can be used to design electrical circuits. If you are new to this business, we recommend working with the popular Sprint Layout application. The convenience of this software lies in its simple and understandable interface, which has high-quality Russification. It is easy to find many templates for Sprint Layout on the Internet, so you can reduce development time by modifying the finished project.
Taking into account the curvature of the base
Source: habr.com
An important nuance when milling printed circuit boards on CNC is the correct fixation of the workpiece on the machine table. Since the depth of the grooves is a fraction of a millimeter, it is important that the cutter runs at the same depth over the entire area of the printed circuit board.
The first thing that needs to be done is to securely fasten the textolite to the desktop so that it does not move during the process. There are several methods for this. You can use clamps or glue the textolite to the table with double-sided tape.
The second part of the task is to take into account local curvatures of the textolite slab. To do this, the machine scans the surface, lowering the tool at different points and remembering the result, which allows you to automatically build a height map.
Getting G-code from gerber files
Source: cncmodelist.ru
When a printed circuit board project has been created in the program, you should select from the menu: File - Export - Format - Gerber. In the window that opens, select the required thickness of the copper layer and click on the “Frame for fracture” button. Then you should specify the file name and location to save it in gerber format.
In the gerber file, you should use the context menu (opened by clicking the right mouse button), and then select the edge of the board with the cursor. For large printed circuit boards, bridges should be abandoned when milling. Now you can save the file by specifying the name in Latin letters. This will be the G-code for cutting a board of arbitrary shape.
Selecting milling parameters
To correctly mill boards on a CNC machine, you must select the correct values for the following machine parameters:
- Cutter rotation speed;
- Spindle feed speed;
- Milling depth in one pass.
To determine these parameters, the following conditions are taken into account:
- Spindle characteristics;
- Type of cutter;
- Features of PCB (thickness of the conductive layer).
Since there can be no universal settings, based on these characteristics you will have to identify the optimal inputs for your machine and for a specific type of PCB.
Production of circuit boards on a CNC machine
Source: cncmodelist.ru
For example, let's look at creating a printed circuit board project in the same Sprint Layout program. First, the tracks are traced, with sufficient gaps between them for the cutter to pass through. The zero layer in the program means the contour along which the finished board is cut.
Then, through the “Strategy Settings”, indicate the thickness of the cutting tool and, if necessary, indicate the need to mark holes, for which they tick the corresponding checkbox.
To control the router, you can use the Step Cam utility, where you need to set the milling depth, taking into account the thickness of the copper layer. Convert the finished file to G-code. Now the G-code file can be exported to the machine and, by specifying the zero point, the program can be executed.
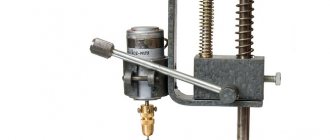
Description of the machine design
The most important thing in the design of the machine is a powerful engine. Its kit includes
- cartridge;
- key;
- about a dozen drills of various diameters.
Many hobbyists buy such motors and work with boards, holding such a wonderful tool in their hands. But you can always go further and, relying on such an engine, make a full-fledged unit with open drawings with your own hands. Polished shafts and linear bearings can be safely used for linear motor movement. In this case, there will be an excellent opportunity to minimize backlash.
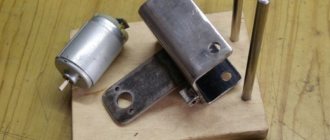
Linear bearings are widely available. As a cheap option, you can use plywood, which can be used as an important element for the main frame. You can also use plexiglass or steel to cut out the same parts. Some of the small, complex parts are 3D printed.
A couple of rubber bands are in demand as an excellent device for raising the engine to the initial mode position, but in the upper position the motor turns off in independent mode thanks to a microswitch.
It is worth noting that you need to provide a place to store the key in a small drill case, which has grooves of different depths for convenient storage of drills with different diameters.