/Accessories and decor/Decoration/
Fridge magnets are pleasing to the eye and keep our lists, photos, postcards, business cards and coupons visible. Making them with your own hands for yourself or as a gift is very interesting and easy. After all, if you think about it, to make magnetic crafts you can use almost everything that is at hand, just use your imagination, stock up on glue and mini-magnets. In this article, we presented 70 inspiring photo ideas, as well as 5 step-by-step lessons on how to make cool refrigerator magnets (and more) from scrap, natural, and even waste materials.
General recommendations for beginners
- To make refrigerator magnets, you can use three types: ferrite, neodymium (super magnets) and vinyl (rubber).
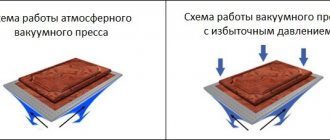
- If you want your magnetic crafts to hold only light and small sheets of paper, business cards, etc., then you can use ferrite (regular graphite-colored magnets, which are most often used for souvenir products) or vinyl. The latter is a flexible vinyl material with an adhesive base, which has a low adhesive force, but can be cut into segments of different shapes and sizes. An example of the use of a flexible magnet is presented below.
- If you want a magnet to hold heavier things, then to make crafts you need to use neodymium magnets (super magnets), which have 10 times greater adhesion force. So, for example, to make a magnetic hook for a ladle or cutting board, you will need one magnet the size of a 1-kopeck coin. Keep in mind that ideally the adhesive force of the magnet should be 2 times the weight of the craft and the object it will hold.
By the way, a neodymium magnet, unlike a ferrite one, does not lose its magnetic properties over time. Ferrite steel turns into a useless piece of iron after 8-10 years.
- Where to get or buy magnets for making crafts? They can be peeled off from souvenir products or bought/ordered in construction markets, craft stores, as well as in specialized online stores.
- When working with neodymium magnets, take precautions and do not involve children in making crafts. Keep in mind that two magnets attached to each other can even pinch your finger.
- In most cases, superglue, universal Moment glue and its analogues, as well as a hot glue gun are suitable for gluing a magnet to a craft. If your craft is intended to hold really heavy things, then it is best to use a neodymium magnet with a countersink and a screw for fastening.
- Magnets that look best on the refrigerator are those made in the same style and combined by theme, color or shape.
- Magnets can be hung not only on the refrigerator, but also on any metal surface, for example, on a magnetic organizing board, range hood or geyser.
In turn, the magnetic organizing board can be installed anywhere, for example, on a cabinet door
See material on the topic: 8 ways to decorate a refrigerator
How to make magnets for curtains with your own hands?
Magnetic curtain ties are a device that can make your life much easier. Using magnetic surfaces in your home simplifies many things that you never thought could become even simpler. For example, a magnetic surface for knives on the wall will save you from the need to constantly reach into a desk drawer; you just need to remove the knife you need from the magnetic board. The main thing is to properly calibrate the magnetic field of this device so that it holds the knives vertically, but not strong enough to tear them off.
Master Class. 1. Hook magnets made from branches
You can hang keys, towels, ladles and other things on these branch hooks.
Materials and tools:
- A dry small but strong branch with a branch;
- Hand saw or jigsaw;
- Small neodymium magnets;
- Glue;
- Drill and drill bit equal to the diameter of the magnets;
- Acrylic paint (optional).
Instructions:
- Using a saw, cut the branch so that it looks like a hook. Then cut the branch lengthwise so that the back side is flat as shown in the photo below on the left.
- In this flat back of the branch, drill a recessed hole the size of your magnet.
- Glue the magnet into the resulting cell.
- If desired, paint the craft and cover it with matte varnish. Ready!
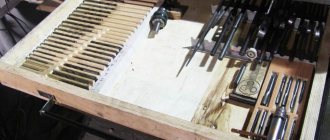
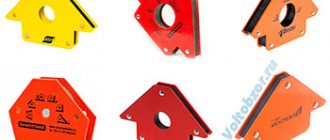
How to make a magnet for welding with your own hands?
A magnetic corner is one of the most important conditions for high-quality welding, because it allows you to carry out welding work as accurately and efficiently as possible. This complex process itself with such a part is simplified, because a welding magnet allows you to fix the parts to be welded in the desired way. When creating such a welding device yourself, it is necessary that it does not need to be literally torn from the object. It is desirable that it be “switchable”, that is, it comes unstuck without external influence. For greater clarity, when creating such a device, you should prepare drawings in advance that will take into account all proportions.
Master class 3. Magnets from tin caps (crown caps)
The idea of recycling soda or beer bottle caps as refrigerator magnets will appeal not only to environmentalists, but also to decorators. After all, they cost nothing at all, but provide a lot of opportunities for decoration.
So, for example, you can paste family photos or just nice paper (card scraps, magazine clippings, etc.) inside the lids.
Homemade photo frame magnets
You can paint the lids, fill the insides with hot glue or cork, and then glue magnets to them.
Sometimes bottle caps don’t need to be decorated at all.
Instead of beer caps, you can use larger caps, such as Nutella jars or baby food caps, to make refrigerator magnets.
Materials and tools:
- Scissors, or better yet, a hole punch for scrapbooking for cutting out circles with a diameter of 2.5 cm (sold in craft stores and costs 200-300 rubles);
- Epoxy resin, a container for preparing the solution and a stirring stick;
- PVA glue, as well as superglue;
- Small magnets;
- Photos that are suitable in size or any other pictures, for example, from a magazine;
- Beer caps (it's best to use bottles with screw caps rather than pop caps).
Instructions:
- Using a hole punch or scissors, cut round fragments with a diameter of 2.5 cm from the photographs. Of course, if you use scissors, you must first make a marking using one of the caps (or a plastic cap from a plastic bottle) as a template.
- Glue the pictures to the inside of each lid using PVA glue (the glue must be applied on top of the picture as well). Let the glue dry completely (!).
- Following the manufacturer's instructions, prepare the epoxy resin in the quantity you need. To find out exactly how much resin you will need, pour water into one of the lids, then multiply the resulting volume by the number of lids. Line your work surface to protect it from spills, then fill each lid to the brim. Let the crafts dry overnight.
- Glue magnets to the blanks. Ready!
See also: Crafts from bottle caps for adults and children
Lesson #1
You will need:
- round magnets with a diameter of 1.25 - 1.75 cm;
- glass circles of the same diameter;
- glue;
- funny pictures (circles with pictures can be cut out from old magazines).
All you need to do to make these cute magnets is glue pictures onto the magnets and glue glass circles on top (you can buy them in special craft stores).
Tip: To prevent a dark magnet from showing through thin newsprint, we recommend that you cut out circles of a suitable size from thick white paper and glue them between it and the picture.
Master class 4. Magnets from plastic mini-toys
The most stylish magnets can be easily made from plastic toys, namely animal figurines.
Materials and tools:
- Scissors or sharp knife;
- Thermal glue in a gun;
- Paint and brush if necessary;
- Small magnets;
- Plastic animal figurines.
Instructions:
- Cut the toy in half or lengthwise.
- Pour hot glue into the inside of the resulting workpiece to the very edges and leave to dry.
- When the glue has hardened, start painting the craft (including the “filling”) in 1-3 layers. At the end it can be additionally varnished.
- Now just glue the magnet to the figure and enjoy the result!
How to make a magnet in the shape of a dog with your own hands?
For many centuries, the dog has been a faithful friend and companion of man on his life's journey. Therefore, a magnet with a picture of a dog placed on the surface of the refrigerator (or any other) will become a wonderful aesthetic decoration. You will find templates for making a dog below.
Regarding materials: the dog’s fur can be made from felt, and the ears can be made from nylon tights. In addition, the puppy can be made from papier-mâché. Such a product can be decorated and diversified with various design solutions, which will add realism to the decoration.
Master class 5. Magnets from clothespins
Let's reveal a little life hack - magnets made from clothespins can not only store lists and bills, but also clamp bags of food as shown in the photo below. It turns out to be very convenient - I took the clothespin off the refrigerator and immediately fixed the opened bag with it.
Wooden clothespins can also hold a piece of paper on the refrigerator door and at the same time clamp something between the teeth.
Clothespins can be painted, decorated with glitter, covered with colored tape or appliques, or decorated using decoupage technique, following the following simple instructions.
Materials and tools:
- Wooden or bamboo clothespins (you can take regular or decorative ones for scrapbooking);
- Scissors;
- Double-layer napkin with a pattern;
- One glue brush and one varnish brush;
- PVA glue;
- Glue "Moment" or its equivalent;
- Matte acrylic varnish;
- Small magnets.
Instructions:
- Separate the patterned layer from the napkin, then cut out a strip of it slightly larger than the end of a clothespin.
- Glue the cut strip onto one end of the clothespin using PVA glue, then use a brush to carefully spread the glue over the napkin. Leave the craft to dry.
- Trim the excess napkin with scissors.
- Coat the clothespin with varnish and wait about 2 hours for it to dry.
- Glue a magnet to the other end of the clothespin. Voila! The craft is ready!
Idea No. 9
Now let’s make the pinch magnets. You will need:
- wooden clothespins;
- magnetic tape;
- glitter;
- acrylic paint and a thin brush.
Decorate the clothespin with glitter or paint it with acrylic paint, then stick a small piece of magnetic tape on the back side. Simple and original!
Photo gallery of ideas
In this photo gallery you can find other original ideas for crafts made from magnets that you can easily make with your own hands from available materials.
Support the project - share the material with your friends on social networks:Method six: oh, this is amazing Lego
To make a bright, colorful and functional souvenir, select your favorite parts from the construction set, prepare the required number of magnets and a hot glue gun.
The creation process is simple: you need to glue the part to a magnet. However, it is worth considering 2 important factors:
- DO NOT use magnetic tape. She is weak to hold the cube. Such a magnet will not last long.
- Hot melt glue can be replaced with super glue.
Legal and accounting assistance for your businessThe magic of photographs.
- Unusual and successful table setting using a table setting
It should be said that this product must dry for at least 24 hours. Such a bright magnet can be used not only by adults, but also by children.
Compound
Magnets based on this rare earth metal are designated by the formula Nd2Fe14B. The composition includes neodymium (Nd), iron (Fe), boron (B). The peculiarity of the technology is that this rare earth metal is difficult to isolate in its pure form. The sintering process with the remaining components in powder form must take place in an inert environment. Otherwise, its rapid oxidation occurs with loss of properties.
The technology for normal conditions is complex, so trying to make neodymium magnets with your own hands is impractical. Products are marked during production. The number after the letter N (25, 30, 45) indicates the code. The higher the indicator, the stronger the magnetic properties of the material. The maximum operating temperature of the magnet also depends on the number.
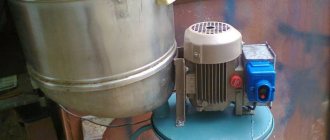
Phases - which is better - three or one?
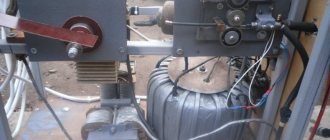
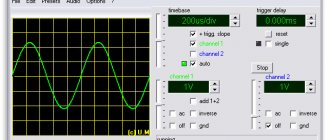
Many lovers of electrical equipment follow the path of least resistance and, in order not to bother, opt for a single-phase stator for a windmill. However, it has one unpleasant feature that neutralizes the ease of assembly - vibration when loaded, due to the variability of current output. After all, the amplitude of such a stator is abrupt, reaching a maximum when neodymium magnets are located above the coils, and then dropping to a minimum.
But when the generator is made using a three-phase system, there are no vibrations, and the power indicator of the windmill has a constant value. The reason for this difference is that the current, falling in one phase, at the same time increases in the other. As a result, a wind generator operating in a three-phase system can be up to 50% more efficient than the exact same one using a single-phase system. And most importantly, a loaded three-phase generator does not produce vibration, therefore, the mast does not give rise to complaints about the wind generator to the supervisory authorities from ill-wishers among neighbors, since it does not create an annoying hum.
Tags: amplitude, battery, beat, sconce, wind generator, windmill, view, harm, choice, generator, house, , protective, sign, like, computer, design, , magnet, magnetic, matrix, power, load, voltage, nominal , oscilloscope, polarity, constant, rule, principle, wire, start, , work, size, edge, row, garden, network, connection, term, ten, current, transformer, three-phase, , installation, shield, effect
Application
Traditionally, they are used in electronic devices and devices where it is necessary to create a constant magnetic field. The properties of the material make it possible to successfully use them when searching for and lifting metal objects from the bottom of reservoirs. Such structures, in addition to the eye for fastening the cable, are equipped with an eye bolt, which is simply necessary, since when screwed in, it allows you to separate two strongly adhered surfaces.
Magnets are available in sizes from 1 to 120 mm in diameter and in different thicknesses and shapes. The thinnest of them are widely used in the leather goods and furniture industries. They can be found in funny toys and devices for hanging various utensils. Powerful magnets are indispensable for filtering bulk and liquid materials. They are used to catch metal impurities and foreign objects in the conveyor flow.
The high adhesive force encourages people to use them to achieve “savings” when using water and gas. By purchasing neodymium magnets for counters, they thus try to stop or slow down the rotation of their mechanism. This possibility theoretically exists in devices where steel elements are used internally. A powerful magnet placed in a specific location on the housing can slow down the rotation of the impeller.