All distribution boards must perform 3 main tasks:
- cable protection against overloads and short circuits
For this purpose, automatic switches are installed in switchboards. They are primarily designed to protect the cable, and not the equipment connected to it, as many still think.
In case of overloads or overheating, the thermal release is activated and protects the wiring insulation from melting. In the event of an obvious short circuit, it is no longer the thermal, but the electromagnetic release that is triggered.
- protecting people from electric shock
This is ensured by installing RCDs or differential circuit breakers.
- protection of equipment from voltage surges
Unfortunately, power surges often occur in our networks. The machines do not react to this, since they are simply not designed for such protection.
The RCD is also not designed to be triggered by overvoltage. To do this, you will need modular voltage relays or UZM - multifunctional protection devices.
They set certain upper and lower voltage limits. As soon as there is a jump, or, conversely, a sharp decrease in the parameters of the electrical network, this relay (UZM) is triggered and turns off the power.
Video tutorials on installation
If, after reading the information provided, you still do not fully understand how to correctly assemble a three-phase panel, we recommend watching videos that clearly demonstrate the assembly procedure:
That’s all I wanted to tell you about how to assemble a 380V electricity metering panel with your own hands. As you can see, the connection can only be made if you have certain skills, because... When assembling, you need to take into account many nuances, such as uniform load distribution and the correct choice of machine rating.
We also recommend reading:
380 I spend to connect a 9 kW water heater for heating a private house! I draw only one 220V line from the meter because... It is not possible to change all the wiring in the house in order to evenly distribute the load on all 3 lines! Will there be a large “load unevenness” when turning on the refrigerator and kettle and how will this affect the voltage in the house?
Obtaining permission to connect to the local power grid
First, you need to undergo acceptance tests (technical inspection of the facility where the electrical installation was carried out). If the result is positive, you will be given a “Connection Certificate”, on the basis of which the owner of the electrical network must connect your residential property.
The rules for connecting to the network are described in RF PP 861 dated December 27, 2004 and its numerous editions (updated until 2015).
The energy supply company is obliged to connect to the power grid for facilities with a power of up to 15 kW, regardless of whether it has such a possibility. A connection with allocated power up to 15 kW, and a line length of no more than 500 meters, costs 550 rubles. For this money you will receive specifications for connection. After assembling the input distribution board, you need to contact the distribution network and call an inspector to seal it, then the electricians must connect your “box” to the electricity - the overhead power line support.
This issue is clearly discussed in the video:
So we looked at how electrical wiring in a house should be done with our own hands. We hope that the step-by-step instructions provided were clear and useful, and the video lessons helped to better understand the entire electrical installation process!
Also read:
- How to make grounding in a private house
- How to assemble an electrical panel with your own hands
- How to independently connect a site to electricity
05.11.2019
The difference between the shields
In stores you will see a wide range of prices for models of electrical panels that are similar in appearance. You will have a desire to save money and buy a cheaper electrical panel. Thanks to the large number of Chinese manufacturers, the quality of the shield can be very low. To reduce the cost, they use cheaper materials that are unsafe in composition and have fire protection.
When used in an apartment or private house, as a rule, the electrical panel is not exposed to precipitation and temperature changes. When installing an electrical panel in unheated rooms or outdoors, the electrical panel can quickly lose its presentation. If low-quality metal is used, the body will be covered with rust outside and inside. The case will lose its seal, the DIN rail will rust from condensation. Circuit breakers and RCDs cannot be operated in such conditions.
Low-quality plastic can crack due to temperature changes and exposure to the sun, and the seal of the electrical panel is lost. If a low-quality rubber or silicone seal is installed in a sealed IP68 electrical panel, it will lose its elasticity over time. As a result, it will not protect against moisture getting inside.
Option 4
In this version, you can already get a little confused with connecting the neutral working conductors, since there are several RCDs here. And we know that each RCD must have its own individual zero bus, otherwise nothing will work.
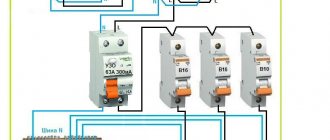
In the current three-phase circuit, there is already a 300 mA fire selective RCD at the input. It will protect the cables from fire when a phase is shorted to ground. For a person, a current of 300 mA is already dangerous and therefore, to protect it, you need to install an additional RCD of 10-30 mA.
The figure below shows one RCD with a leakage current of 30 mA only in the first phase, to which two circuit breakers are connected. This RCD will have its own zero bus and therefore zero working conductors from other groups cannot be connected to its bus. And the grounding bus will always be one common for all consumers.
In the current version, you can consider a circuit with the installation of three 2-pole RCDs, one for each phase. So all groups will have protection against current leakage. Then here it will be possible to abandon the general input RCD at 300 mA, since you will already have protection with a setting of 30 mA.
Features of the electrical panel
An electrical panel with automatic devices is a box made of plastic or metal in which electrical appliances are placed. The following must be established:
- main switch;
- electricity consumption meter.
The input machine, as well as the meter, must be sealed. In addition to the listed devices, the distribution board is equipped with circuit breakers - they protect the home network.
Depending on the mounting method, distribution boards are divided into:
- Invoices. The advantage is ease of installation.
- Built-in. Requires the creation of a niche in the wall. The positive side is saving space in the room.
Distribution board with single-phase load
The simplest wiring diagram for a house or cottage will be with a single-phase load. It is enough to analyze the installed load and distribute it equally among the phases. In this case, there will be no phase imbalance in the network.
The permitted power for a private house at a voltage of 380 V is 15 kW, in this case a 15 kW distribution board diagram is proposed in the design documentation.
However, these are only recommendations, and the owner distributes the connection to consumers at his own discretion. A five-core cable is laid from the input box to the distribution board.
In addition to the phase wires, a neutral and ground wire are installed. The panel is installed using colored wires with a cross-section of at least 4 mm. According to the PEU, the neutral wire must be blue or cyan, and the ground wire must be yellow-green.
Phase wires can have any other colors. A 380 V switchboard in a private house when connecting a single-phase load turns out to be quite simple, and the switchboard is small in size. In which single-phase circuit breakers and RCD protection devices are mounted.
A distributed load is connected to the machines. It is not recommended to connect only lighting to one machine or only sockets. The load must be distributed evenly to avoid phase imbalance. A Din-rail is mounted in the panel body, on which the machines are mounted. The neutral and ground bus are mounted below. Such electrical distribution boards are installed for a small country house if three-phase voltage is supplied to the country house.
In this case, the load is connected to the automatic circuit breakers according to the following diagram:
- The boiler and pumps are connected via a machine to the first phase;
- Sockets and lights in the kitchen to the second;
- Lights and sockets in the hall to the third.
In this case, the load will be distributed relatively evenly across the phases. Such assemblies are very convenient in terms of triggering the machine. When an emergency shutdown occurs, it is immediately clear where the malfunction occurred.
RCD at the input and single-pole circuit breakers
Advantages:
- cheapest option
- small shield (up to 32 modules)
Flaws:
- there is practically no grouping of lines
- there is no possibility of changing the load by phase
- there are zero buses
- possible false triggering of RCD
Here, only one RCD is used at the input (except for consumers that cannot be disconnected) and then the load is distributed through single-pole circuits. According to clause 7.1.83 of the PUE, you may be limited in the choice of the number of connected lines.
If you ignore this rule, then false alarms of the RCD are quite likely. At the same time, you will rack your brains for a long time wondering whether it worked as a protection or falsely.
Therefore, it is better to look for intermediate options for completing a three-phase panel.
Assembly order
After receiving permission to connect to three phases and technical conditions, we will begin to independently assemble the shield. The input will be mounted in a sealed box, which must be assembled on the outer wall of a private house or pole. It contains a three-phase meter and a circuit breaker, as shown in the photo below:
Near the input we organize a grounding device, according to the rules. The input electricity metering panel will be sealed and there will be no free access to it. Therefore, the first thing you need to do is assemble a three-phase distribution panel yourself, distributing consumers as you wish.
A 5-core cable L1 is connected from the input box to the electrical distribution panel; L2; L3; N; PE, or 4-wire L1; L2; L3; N provided that the TN-CS grounding scheme is used or another grounding device is organized near the panel.
To connect three-phase home equipment, you will need to assemble a shield according to the following diagram:
The assembly of a 380-volt metering board is carried out with a stranded wire, with a cross-section of at least 4 mm and colored insulation. Recommended colors - L1 red, L2 white, L3 black, N blue, PE yellow-green. To correctly assemble a three-phase panel, you need to carefully look at the protective devices on which phase marks are marked for connecting the wires. This diagram shows four-pole RCD protective devices with an additional N terminal; in conventional machines this terminal may not be present. One by one, we begin to connect the devices installed in the panel on the DIN rail, measure the wire from terminal L1 to terminal L1 of the next device, with a margin of 30%, for ease of installation and operation.
We carry out this operation with all terminals, but keep in mind that it is not recommended to cut the sections in advance, because during the assembly process you will notice that the length of section L1 is much shorter than the mounting section L3. It’s even better to assemble the shield using a three-phase mounting bus, which will save space and minimize the chances of getting something mixed up. We separately install the zero bus and the PE bus, which we must connect to the housing of the electricity metering panel.
If you don’t have powerful equipment in your apartment or house, you need to assemble a 380V panel in such a way that each phase is evenly loaded with single-phase consumers. You can see an example of such an assembly of a three-phase electrical panel in a private house below:
In this electrical panel diagram, the phases are distributed to a separate load, through single-pole circuit breakers and differential switches. L1, L2 and L3 are evenly loaded by consumers, according to the previously calculated expected load.
It is not recommended to do this - one phase for sockets, another for lighting, a third for any other needs, because
it is important to distribute the load between L1, L2, L3. If one of the phases is overloaded, the voltage drops on it, while at the same time the voltage rises on the free ones
This phenomenon can often be observed in the winter, in the residential sector. If your neighbor in the phase turned on a powerful consumer, the lighting lamps in your house began to glow dimly, and the refrigerator began to hum strainedly. Know this is a drawdown in your phase. And at the same time, other neighbors’ lamps, powered from other phases, begin to glow brightly and explode, equipment burns out, and a fire may even break out.
As for the three-phase load, such a distortion will be fatal for it. To prevent this from happening, when you decide to assemble a shield, additionally install a phase and voltage control relay for a three-phase network. For a single-phase network, connect a voltage relay. You can check the load distribution using a multimeter with a current clamp, which is shown in the photo below.
Well, the last option for assembling a 380-volt electricity metering panel is mixed, when the home electrical network contains both three-phase and single-phase electricity consumers. In this case, you need to assemble the electrical panel as follows:
Option 1
Here is the simplest three-phase switchboard diagram. There must be an input circuit breaker at the input. It will limit the current consumption of each consumer - home or apartment. Next comes a 3-phase electricity meter.
In fact, the placement of counters may be different. They can be installed outdoors in a metering panel for private houses, in floor panels in apartment buildings or directly in home panels. Where to install meters is indicated in the technical specifications for connection by local network companies or this is strictly determined by the design documentation of the buildings.
Most household consumers are connected to a single-phase network. The exceptions here are powerful hobs, instantaneous water heaters, electric boilers, etc. Such consumers have the ability to connect to a 3-phase network.
After the electricity meter, it is necessary to distribute the entire single-phase load evenly across phases. To do this, you need to count the power of the devices, the number of single-pole circuit breakers and try to divide them into three equal parts.
In the proposed version of the three-phase shield circuit, for a clear understanding, two are connected to each phase. The working zero from the meter is connected to the common zero bus, and the neutral protective conductors are connected to the common ground bus. The phases are connected through group circuit breakers. Thus, it turns out that when the consumer is disconnected, only one phase conductor will be broken. This should be taken into account and ensure that when connecting the shield to the network, the phase and zero are not mixed up at the input. I have encountered such errors a couple of times. It turned out that the zero was switched by automatic machines, and the phase sat on the zero bus. When the machine was turned off, dangerous voltage still remained in the sockets, which could lead to disastrous consequences. Be careful and careful.
Electrical 380V electricity metering panel for a private house with a 220V socket
In this electrical panel diagram, there is additionally a modular 220V socket (number 7) with an individual protection device - difavtomat (number 8), which combines a circuit breaker and a residual current device. The rating of the RCD must be higher than that of the circuit breaker, for example 40A, leakage current 100 or 300 mA.
Electrical metering panel 380V, with modular socket and automatic circuit breaker, TT grounding
Following this example, where the outlet is protected by a residual current circuit breaker, you can install any other modular equipment, contactors, transformers, etc. to the electricity metering panel, if necessary.
Let me note again that under each diagram there are links, by clicking on which you can read the details, find out the equipment used, and ask questions.
Otherwise, here are the main options that are used when connecting private houses and garden houses to the power grid. And most importantly, such electrical panels are successfully accepted by regulatory authorities and put into operation.
Notes
- The color identification of conductors in this ASU is made in accordance with the requirements of GOST R 50462–92, which was in force from January 1, 1994 to December 31, 2010. Currently, the requirements of GOST 33542–2015 should be followed.
- Type A UDT operates with sinusoidal and pulsating direct currents.
- This ASU takes into account “Changes 1”, which were adopted in March 2017 by the International Electrotechnical Commission to the IEC 60364-4-41:2005 standard (on the basis of which the currently valid national standard GOST R 50571.3-2009 was created). Let me remind you that these “Changes 1” require mandatory additional protection by means of UDTs with a rated differential current not exceeding 30 mA for all final electrical lighting circuits, the lamps of which are located in domestic premises. This requirement is logical, since in residential premises lamps are often installed within the reach of a hand. Moreover, the lamps are used by ordinary people.
A private house
A private house can have either a single-phase or three-phase electrical network. In the first case, the electrical installation diagram will be similar to the project for power supply of a one-room apartment. The simplest option for connecting a panel for a residential building will look like this:
In this diagram of a 220 V private house distribution board, there is a two-pole switch at the input, then an electric meter is connected, after it there is an RCD and a group of single-pole circuit breakers. Everything is quite simple and at the same time according to GOST. If a three-phase network is connected to your site, then the circuit diagram for assembling the panel will look different. Consumers from outbuildings - a garage, utility room or even a bathhouse - can already be added to it. The shield, of course, will be large and with many branches, so for the example we found a fairly suitable option.
Distribution board diagram of a private house for 380 V, using an RCD:
I would like to add a small description to this electrical circuit:
- A separate line is allocated for the garage power supply, protected by a residual current device. The remaining two machines are installed on a group of sockets and garage lighting.
- If there are three-phase electricity consumers in the house, it is better to connect them through a three-phase machine and a four-pole RCD, as shown in the example above. If there are no three-phase electrical appliances, you can use the project provided below.
The last 2 380 Volt distribution board schemes can be used not only to power an individual residential building, but also to power a spacious country cottage! We also recommend checking out the article on how to install electrical wiring in your home.
Hello. I want to install an electrician in a country house. On the pole there is a switchboard with a sealed 25 A machine, then a brush and again a 25 A machine. I want to install light in the house and assemble the panel. But now I don’t know what machines and RCDs to install at the entrance in the panel in the house. You have a 40 A automatic machine and a 40 A and 30 ma RCD. How will this fit with my 25A machines. And which wire to use, VVG 3x4 or 3x6?
Hello! It makes no sense to install machines in a house with a rating of more than 25 amperes; the VVG 3*4 cable has a good supply, so install it.
On one of your diagrams, after the meter there is an ouzo-d. At 20 amps. If I understand correctly, D is an ouzo category. This category is used for factories, workshops, etc. It is not recommended for apartments. since this category. Designed for high current loads at peak moment, that is. When starting engines. Until they work normally. Since when starting the engine consumes several times more current than during its normal operation
Option 5
The fifth option presents a diagram of a three-phase shield without an incoming RCD, but using single-phase automatic circuit breakers for some consumers. RCBOs are placed one per group and therefore their number can be equal to the number of groups. This way all consumer groups will be independent of each other. That is, if a current leak occurs in one device, only the circuit breaker to which it is connected will turn off. When using an RCD with 3-5 circuit breakers, when the RCD is triggered, 3-5 groups will be switched off, respectively. And this is no longer very convenient for the exploitation of consumers.
The above diagrams have a visual appearance in order to convey the very essence of connecting different protective devices into one general electrical panel diagram. Also, these examples are very basic and therefore your circuits will be much larger and more complex.
Source: www.elec.ru
Selection of electrical installation equipment
Before starting installation, you need to buy the electrical panel itself and all the electrical installations and devices that will make up its contents. It should be taken into account that each item occupies a certain number of mounting spaces on a DIN rail - a metal strip 3.5 cm wide. One or several DIN rails can be located in one box.
One “mounting point” includes a section on the profile 1.75 cm long - a module. The passport of the electrical panel must indicate how many modules it is designed for.
Three devices are fixed on one DIN rail: the first two occupy 3 modules each, the third – one module. It is not recommended to leave spaces between adjacent devices to save space.
Before choosing a shield, you should add up the number of all modules, and then add to the resulting sum several places that may be useful in the future. As an example, let’s calculate which box is needed for a 1-room apartment.
Using the diagram, we determine how many modules each device occupies: 4-pole input circuit breaker - 4 spaces, counter - 6, RCBO - 2 x 2, circuit breakers - 4. The result is 18 modules
For 18-20 seats, an electrical panel with 24 modules is suitable. But if the apartment is large, and in the future you plan to purchase new equipment, install a heated floor, or make repairs with replacement wiring, then it is better to purchase a box with 36 seats.
If you want to simplify further work, maximize network protection, and make the arrangement of modules convenient, try to choose a panel with a complete set, and this is:
- removable frame with DIN rails;
- entry holes and holders for fastening cables;
- two tires, working and protective zero - with stands and installation sites;
- set of fastenings for installation;
- organizers for wires.
Shields can be metal or plastic, built-in or mounted.
Let's look at how they differ fundamentally.
Experienced electricians recommend working with one shop. The advantages of purchasing from a large supplier are a large assortment of goods and a guarantee of receiving original products and not counterfeits. Therefore, it is better to purchase both the shield and the rest of the electrical installation products in one place.
In addition to the metering device and protective devices, you will need:
- combs for several poles with end caps - to connect modules to each other, simplify installation and save space;
- 2-3 meters of PV1 wire with a cross-section similar to the input cable and color-coded insulation;
- zero busbars or cross-modules for group RCDs;
- clamps and ties for organizing conductors;
- limiters for DIN rails;
- plugs for masking empty spaces.
If financial capabilities allow, then it is better to select equipment from one trusted manufacturer - Hager, ABB, Legrand, Schneider Electric. Devices of the same brand are easier to install, and the shield will look much more aesthetically pleasing.
Features of the electrical panel
Often home renovations need to be combined with electrical wiring repairs. If you do it with a large margin of safety, then this may ultimately cause a fire.
If, on the contrary, you make it unbearable to loads, then the plugs on the electrical panel in a private house will have to be constantly changed. Therefore, both the shield and the wiring must be carefully calculated for the current and voltage.
What is current strength
Any electrical appliance has an indicator indicating current and power consumption. If there are no current values on it, but only power consumption and voltage, then you need to divide the power by the voltage value.
When calculating the electrical panel in a private house, it is necessary to take into account the current strength. The maximum current value in an apartment is determined as the sum of the power consumption of all switched on devices, divided by a voltage of 220 Volts. If the wiring is designed for low current, then with a small load they can burn out.
It is necessary to calculate not the nominal, but the peak load, because in any apartment sometimes a vacuum cleaner or iron is turned on. So, for example, if a computer of 400 W, a lamp of 100 W, a table lamp of 75 W, a TV of 150 W, as well as a “stray load” of a heater of 2 kW, a vacuum cleaner of 1.8 kW, are constantly turned on in a room, then the peak consumption of the room will be 5.5 kW or 25 amperes.
What is the shield for?
Many home owners do not know what an electrical panel is for. Its main purpose is to protect against network overloads that can cause a fire.
If the wiring has a low cross-section, then under heavy loads it may not withstand and catch fire. If there are oversized circuit breakers on the electrical panel, then if high-power appliances are turned on in the house for a long time, the sockets may burn out.
If you increase the cross-section of the wiring, then the apartment, in fact, will also be left without protection: the machines may not respond to high load parameters. In a word, the shield must have optimally selected plugs, which must match both the power consumption and the cross-section of the wiring.
What types of wires are there?
Standard wires are connected to the panel. Copper wiring has four standard types of cross-section - from 1.5 mm 2 to 6 mm 2. The permissible current strength of the thinnest wire is 15 amperes, the thickest is 34 amperes. The aluminum wire must have a much larger cross-section. It is not recommended to use soft cables, as there may be problems with the safety of the wiring.
Be careful: shields in a private house and sockets are not suitable for wires smaller than one and a half square meters. mm. There is also no need to take machines smaller than 10 amperes.
What needs to be installed in the panel
The panel must provide for the division of wiring into several lines. If there is one line in the house, then in the event of an accident the entire house will be de-energized. By dividing the wiring into several parts, it will be easier to determine the location of the accident.
Several circuit breakers need to be installed in an electrical panel in a private home. For example, for each room you need to install a separate machine. Ideally, there would also be an automatic for lighting. The machines receive power through one large machine. This is necessary so that you can quickly turn off the power to the entire room. The machine is numbered in position from left to right.
Installation and replacement of the shield
You can install the electrical panel yourself. The simplest procedure in this case is to replace the machines.
The meter can be seen on the panel, as well as a batch switch and automatic machines. The batch switch looks like a device with four contacts and a rotary handle. From the main electrical wires, phase and zero come to the panel.
Before replacing machines, you need to check their nominal value and buy the same one. In no case should you install a machine with a larger rating, as this leads to accidents if many powerful devices are turned on simultaneously on one machine.
Replacing the machines is done with the package switch completely turned off. However, you need to be careful, otherwise if you move incorrectly you can be left without light. Remember that you cannot repair or install a packet switch yourself. To do this, you need to call a qualified electrician.
If a short circuit occurs when installing machines, you need to check the condition of the wire insulation and, if necessary, replace it with electrical tape.
Plastic enclosures for the electrical panel can be purchased at the store. As a rule, they have a ready-made DIN rail. The product package also includes grounding pads and a zero. You should not buy cases with plastic slats, as they break and do not provide the necessary safety.
(No votes yet)
No comments yet!
Which circuit breakers to choose for the electrical panel
The main question that affects many users is: how to decide on slot machines? The rated current of the circuit breaker is calculated based on such parameters as the consumer’s load or its power.
For example. The rated power of simultaneously switched on electrical appliances and the lighting network will be 15 kW. There is a formula: P=U×I, where P is power, U is voltage, I is current. If P = 15000 W, then the current strength will be (rounded) 68 A. This means the sum of the rated values of the machines should not exceed 68 A. But it should be remembered that a three-phase network is connected to the switchboard, so the rated amperes must be divided by 3, which will give approximately 23 A. This means that the input circuit breaker should be set to 25 A.
For lighting networks, it uses 6.3 or 10 A automatic machines. These are generally accepted standards, which are convenient to resort to to save time. If you still have free time, then you can calculate the amperage of the machine for light using the above formula, only P will be equal to the sum of the powers of all lamps used in a separate or common lighting line.
The amperage of automatic circuit breakers for power circuits should not be less than 16 A. It is this nominal value that will allow you to use electrical appliances uninterruptedly for a long time. If you install a circuit breaker with a lower rated threshold, then turning on the household appliance will be perceived by the device as a short circuit on the line and the circuit breaker will turn off the voltage.
There may also be more powerful electrical appliances in the house: hobs, ovens, refrigerators. And if several sockets can be combined into one group, then such devices will require the installation of a separate circuit breaker with a value of at least 25 A. The power of a modern electrical panel can reach 7 kW and higher.
Assembly diagram of a distribution panel in an apartment and a private house
16.06.2015 7
In order for the electrical wiring to be safe, easy to maintain, and also able to withstand the load from all electrical appliances in the home, it is necessary to correctly approach the design of the distribution board wiring diagram. This project should indicate the entire hierarchy of circuit breakers and RCDs, right down to the socket group. In addition, all protective automatic devices must indicate the rating, as well as the protection class. Next, we will provide readers of the Sam Electric website with visual diagrams of the switchboard in a private house, apartment and cottage.
So, if the apartment is of old construction and, moreover, one-room (for example, Khrushchev), then the electrical wiring project will look like this:
As you can see, in this wiring diagram for the distribution panel there is no PE bus, because In old Khrushchev buildings there is no grounding. As for the elements of the electrical circuit, it consists of a two-pole circuit breaker, an electricity meter (Mercury 201), an RCD and group “packets”. One machine serves the lighting group, the second - sockets, and the third - the washing machine. If you have a ground loop, then the electrical diagram for assembling the distribution board in the apartment will look like this:
The dotted line (1) indicates the housing of the distribution board, (2) and (3) this is the neutral and grounding bus. The fourth element of the project is the comb that connects the circuit breakers. (5) - a single-phase RCD of 40 Amperes and a leakage current of 30 mA, and (6) - group circuit breakers (3 of 16 Amperes and 1 of 25, for connecting a hob). A single-pole circuit breaker with a rating of 40 Amps is installed at the input. The lowest row of the electrical circuit consists of residential consumers - a group of lighting, sockets and powerful electrical appliances (in our case, stoves).
Well, there are also spacious apartments with electric heating and a group of powerful electricity consumers. In this case, the electrical circuit of the input distribution panel will be more serious and the number of circuit breakers will be no less than that of a private house. So, for your attention, the distribution board diagram for an apartment with an improved layout:
With such a number of electricity consumers, there must be a three-phase network (380V) and at the input, accordingly, a three-pole 63 Ampere circuit breaker. Otherwise, there is a 40 Ampere RCD, a group of 16 and 25 Ampere circuit breakers (depending on the purpose), and a separate residual current device for electrical wiring in the bathroom. with a leakage current of 10 mA.
Based on the provided apartment panel connection diagrams, design your own version and proceed to electrical installation work! How to assemble a switchboard with your own hands. we already told you!
Option 3
This version of the three-phase electrical panel circuit already better meets modern electrical safety standards. After the meter there is a general RCD in it. The current example shows a residual current device with a leakage current of 30mA. This shield circuit completely protects a person from electric shock. But there are some disadvantages to using only one 30mA RCD at the input:
- When it is triggered, all consumers in the house will be switched off simultaneously. If this happens in the dark and finding the leak location takes a lot of time, then it will not be very convenient.
- There is a possibility of false triggering of an RCD due to natural leakage currents that are present in household appliances. In this scheme, one common zero bus is also installed after the RCD and one common ground bus. Here, connecting cables from outlets is difficult to get confused.
Switchboard layout
I have already discussed in detail the basic principles of layout when designing and assembling distribution boards. In the electrical panel under consideration, the layout (i.e., the arrangement of devices inside the electrical panel itself) is adopted in a row in groups.
Enter
A load switch and a voltage control relay are installed on the first DIN rail at the input of the distribution board.
The load switch allows, if necessary, to completely de-energize the entire electrical panel for repair or maintenance work on both the switchboard and the entire apartment electrical wiring as a whole.
The ZUBR voltage control relay provides protection of the home electrical network from surges and surges in voltage in the supply network, as well as protection from zero loss.
Later, depending on financial capabilities and the purchase of equipment for a low-current network, the customer will add here both a circuit breaker for a low-current switchboard and other devices that are still being considered.
Kitchen
A group kitchen RCD is installed on the second DIN rail, and after it there are automatic switches for kitchen consumers:
— electric oven;
- kitchen sockets;
- kitchen air conditioner.
Room sockets
A group RCD of socket groups is mounted on the third DIN rail, followed by automatic switches in the rooms:
- room sockets;
— two air conditioners;
- apartment lighting.
Nuances of commissioning work
After the panel device is installed, it is necessary to turn off all devices with which it is equipped. Next steps:
- load all sockets;
- Apply voltage, check its presence at the input, correct phase and zero;
- check the RCD and automatic circuit breakers one by one;
- estimate the voltage at the input and output of the machines;
- check the behavior of the shield when connecting high power equipment;
- check sockets and switches.
The electrical panel requires periodic inspections. Once a month it should be opened, the contacts tightened, and the quality of the RCD work assessed. If the shield is installed correctly, it will last quite a long time.