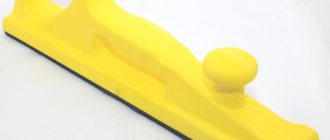
Some time ago I already used the first circuit for a soldering iron with a ceramic heater and a pistol grip. In the picture it is the top one in its already converted form.
I liked the work of the stabilizer. That soldering iron has been my main one for probably a year now. But the handle is a bit thick. It's heavier than new. Yes, and interesting.
Next, we focus on the modified diagram (Refinement of the soldering iron tip stabilizer).
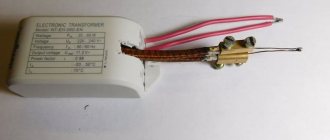
Measuring the resistance of the heater with Ali (bottom in the picture) gave a result of about 450 Ohms in a cold state and about 1.5 kiloohms in a well-heated state. Those. the resistance changes three times. I decided to adapt the scheme for him too. In fact, it turned out according to the second modified scheme. R1 – 820 Ohm, R2 – trimmer 200-500 Ohm. R3 is brought out and its resistance is 470-500 Ohms. With these ratings, my soldering iron regulates the temperature somewhere from 220 to 350 degrees.
As a housing I used a regular double splitter from the store. Photo of the board and case below.
The double is disassembled using a grinder, knife, pliers, side cutters, and excess is removed from the top cover. The picture shows approximately what condition it is in.
Pay attention to the translucent film. The board began to delaminate and I removed the top layer. And it is perfect as a safety spacer between the double buses (which I connect to the board with wires by soldering) and the board. It's all inserted inside like this:
Top cover, assembly. The device is assembled.
Principle of operation
Parameters are adjusted using a special mechanism. A soldering iron with a thermostat consists of a tip, a housing, a board and a set of resistors in the structure. The design allows for heat adjustment when working with various parts. More expensive samples have variable voltage limits. At each setting, you need to select the appropriate tip to control the outlet temperature. It is important for a novice radio amateur to determine with what parameters a soldering iron is required. Professionals in their field choose reliable models with temperature control. The equipment has good soldering performance, the action is carried out by meeting the necessary criteria. A different load is applied to each product; thermal stabilization allows you to select the boundaries necessary for high-quality soldering of various products.
Network soldering iron with temperature control
The temperature is selected in accordance with the description of the material and method of operation of the equipment used.
How to modify Chinese soldering irons
Chinese goods have long conquered the Russian market and are gradually displacing well-known electrical products from other manufacturers. However, due to the difference in standards and other features of Chinese production, the Russian user constantly has to make adjustments to the design of the purchased products.
Particularly pressing in recent years are the problems associated with the modification of Chinese soldering irons, taking into account all the shortcomings found in them (including the small temperature control range).
Design
When choosing a tool, it is important to select the required setting sizes. It is important to pay attention to the adjustment element; a high-quality soldering iron has a switch with indicated minimum and maximum temperatures. The toggle switch is responsible for switching the voltage; a simple design may not meet the requirements when soldering material. Thermal stabilization allows you to avoid overheating of the tip when the tool is idle for a long time. A soldering iron with temperature control allows you to set the amount of heat generated by the tip during small jobs. Operating modes:
- Operating capacity can vary from 60 to 140 W, the average output voltage is 80 W.
- Power comes from a 220 V power supply.
- The heat range starts from 185 °C, for low-melting solders and soft materials, and reaches 450 °C for more refractory products.
Soldering iron circuit with thermostat
The adjustment is made using a special toggle switch; the format setting error is 10 °C.
The simplest maximum/minimum heating switch
The easiest way to make an adjustable soldering iron is to include a diode rated for a current of 1 A in its supply circuit. This way you can make a simple switch for maximum and minimum heating. The 1N4007 diode is well suited for this purpose. You will also need a small switch. The circuit is turned on so that in one position of the switch the device receives voltage directly, and in the second through a diode, which will limit the power of the thermoelement.
Thanks to this simple approach, the soldering iron can be switched to a gentle mode during short pauses in operation - it will neither cool down nor overheat. The design can be supplemented with an LED indicator, which is connected to the diode output through a limiting resistor.
Equipment
The radio materials tool contains some accessories, the direction and characteristics of which may vary. It is necessary to familiarize yourself with the complete set in order to avoid downtime and poor-quality connections. The average soldering iron with a temperature controller has:
- A set of soldering tips usually consists of 5 items to perform various actions.
- Thermal sensor for own adjustment of the tool.
- Heating indicator, a regular LED that signals when the set temperature has been reached.
When purchasing, you should pay attention to the length of the wire; the length should be at least 1.5 meters; in this case, you probably do not need to use extension cords. The heating component can be of two types:
- ceramic;
- made of nichrome wire.
Temperature-controlled soldering iron included
The heating device must have a change of tips to perform different processes. Cheap products do not provide such a modification, so you need to choose a tip according to the type of action.
Current sources for powering pulsed soldering irons
Before you start making your own soldering iron, you should, based on the available materials, decide on the type of source to choose.
Traditionally, a pulse soldering iron used a powerful step-down transformer as a power source and was called that only because of its short-term operating mode.
This device is simple in design, but has a large weight and dimensions.
Power supply
Switching power supplies that became available not so long ago are much more complex. They first rectify the low-frequency mains voltage coming to their input, then convert it into high-frequency (20-40 kilohertz) and then apply it to the primary winding of the transformer. High-frequency transformers are several times smaller in weight and size than low-frequency transformers, so the entire switching power supply, despite its complex design, takes up space several times less than one low-frequency transformer.
To summarize, we can say that transformer sources are simple and reliable, but heavy and bulky.
Pulse ones are much more complex in design, but they save weight and dimensions.
Types of regulators
Devices for connecting various types of radio components have several types of characteristics. Soldering stations with heat and load adjustments are produced by the manufacturer with different parameter settings. Main varieties:
- Changing the voltage and power of the node is possible using a triac. This modification is most common when using heating components in radio engineering.
- Thyristor type adjusting element.
- Modification to increase the performance of the device allows you to change the output force to the required values.
- The indication makes it possible to recognize in which mode the heating is being carried out.
- Low-voltage controllers are used in designs designed to operate with a voltage of no more than 36 Volts.
You can probably make components that have adjustable temperature volumes with your own hands. A simple structure without interference is used, which makes it possible to extend the service life of the heating element. The galvanic component is considered reliable; its versatility allows the design to be used with various modifications and models.
Option No. 1 – Use a resistor
Who said resistance is useless? In our case, it is with the help of it that we will create a device that will operate with voltage from 6 to 24 V. To make it we will need:
- Resistor with parameters: R=20 Ohm, P= 7 W;
- A plate made of textolite (with its help we create a holder);
- 2 pieces of copper wire, with different sections. A thin rod will be useful if you need to use a smaller tip; a thicker one, in turn, should correspond to the internal diameter of the resistor.
- 1 separate spring ring (as a fastening element), screw and washer.
Photos of a do-it-yourself soldering iron, as well as all individual elements, are presented below.
The procedure is as follows:
According to the example (in the photo), we put the parts together into a common mechanism. We insert the tip, complete the fasteners, attach the washer and screw.
We form a handle from textolite fabric, on which we leave a mini-compartment for a wire and a resistive element. To the place where there is access to the heater, we connect the cord to plug into the outlet.
Additionally, we tighten the nodes and check the device for functionality. If everything was done correctly and the soldering iron works successfully, it can be used for soldering standard radioelements, as well as simple microcircuits. The miniature product will be simple and easy to use.
Low frequency devices
A design feature of the device is the repair of thin connections that can be burned through in the usual way. Stabilizers for 12 and 36 V are used, depending on the output power. There are options with a microcontroller, which is installed in products when operating with sensitive parts.
It is important to understand that the operation of such devices will be less productive.
The performance is not enough to quickly heat up the tip; the maximum degree of heating does not reach larger mechanisms.
Copper fixtures
The structure is made of copper wire twisted in a spiral pattern. Copper is capable of carrying the low current produced by small transformers. The adjustable heating components are equipped with a temperature sensor, which is responsible for controlling the tip. The thermocouple is installed on the working tip, which allows you to adjust the temperature level to the required state. The copper spiral does not pass electric current through itself, the performance of the unit stops, or the load indicator changes. Types of copper heaters:
- with wire wound around the body, preventing voltage from reaching the tip;
- The insulated structure avoids heat loss when using the device.
Homemade thermostat
The quality of copper depends on performance; adding additives in order to save money by the manufacturer can significantly reduce the service life and damage the parts being repaired.
Origin story
A soldering iron is a tool designed to transfer heat to a material upon contact with it. Its direct purpose is to create a permanent connection by melting solder.
Until the beginning of the 20th century, there were two types of soldering devices: gas and copper. In 1921, German inventor Ernst Sachs invented and registered a patent for a soldering iron, which was heated by electric current. In 1941, Karl Weller patented a transformer-type instrument shaped like a pistol. By passing current through its tip, it quickly heated up.
https://youtube.com/watch?v=35aOf4a1uQk
Twenty years later, the same inventor proposed using a thermocouple in a soldering iron to control the heating temperature. The design included two metal plates pressed together with different thermal expansion. Since the mid-60s, due to the development of semiconductor technologies, soldering tools began to be produced in pulse and induction types.
Ceramic heaters
Unlike products equipped with nichrome wire, the ceramic component can last longer than its competitor. The ceramic element allows operation at the maximum permissible thresholds, the resistance is minimal. Electrical voltage spreads along the tip, resulting in heating. Ceramic heaters require attention; under mechanical stress they are destroyed and become unusable.
Soldering iron with ceramic heater
The price of a soldering iron with a ceramic tip is higher, so it is important to choose high-quality material. Durable and reliable operation is achieved through careful use of the component.
Modification of the soldering iron itself is not difficult at all
Its essence is simple - remove the triac and connect the soldering iron wire to the heater directly. Personally, I replaced the wire (the wire with the plug will come in handy), and hung the triac by one leg on the soldering iron board. The original regulator is no longer used. I use the twister as a plug and retainer for the board.
I haven't had much practice with this soldering iron yet, but I see no reason for a negative result. The first one I converted works great and is my main one. What should you do if you decide to redo yours? Measure the resistance of the heater when cold and after warming up. Naturally in a state disconnected from the network.
- If they approximately coincide with mine, you can safely repeat them with my denominations.
- If not, then you will have to select the values for R1, R2, R3.
I haven’t experimented with soldering irons with nichrome heaters, so I can’t give any recommendations.
Advantages and disadvantages
When choosing a device for soldering radio components, you should pay attention to the technical documentation. You should not ignore the advice of a professional, because... Years of experience can help beginners choose the right device. The choice between a ceramic and a conventional device can lead to a dead end; an inexperienced craftsman should familiarize himself with the negative and positive sides of each product. Advantages of copper tips used with soldering iron temperature control equipment:
- the affordable price makes it possible for a novice master to purchase it;
- resistance to mechanical stress allows you to avoid breakdowns of the mechanism when the process has not yet been fully mastered.
Negative sides:
- Copper wire is not known for its durability due to exposure to high heat levels over a long period of time. It is possible to avoid overheating by pausing during the process; the method under consideration keeps even cheap models intact.
- Slow heating of the electrical connection.
Ceramic soldering irons, including a thermostat, have the following advantages:
- the integral system makes it possible to avoid device failure;
- the configured temperature readings are available immediately after connecting to the network, some models heat up in less than a minute;
- reliable unit subject to operating rules.
When using any device you are faced with a number of negative aspects, ceramic products are no exception. A destroyed tip is replaced only with the original one, due to the design features of each model. If dropped, the heating component cracks and loses its working properties.
Soldering irons with Hakko tips
These soldering irons are usually produced with a simple thyristor temperature controller.
Compared to the previous soldering iron, this one has a much wider selection of tips.
Such tips are called the Hakko 936 type. And Alixepress sells soldering irons with such tips, although most often the products presented have nothing in common with the Hakko company.
These are eternal stings. Such tips can last a long time, unlike copper ones, but they require special care. They cannot be cleaned with sandpaper or a blade, and it is not advisable to solder them with acid.
Compared to the classic copper tip, the Hakko 936 is hollow. You don't need to spend a lot of time and energy to warm up. And the temperature is regulated better and faster.
But even here there were problems. The soldering iron presented above has the simplest thyristor regulator. It cannot efficiently and quickly regulate the temperature of the soldering iron. And then. Such soldering irons have a wide range of temperatures. For example, you set 300 ℃, but in fact the tip is 360 ℃. It is unacceptable.
Therefore, let’s look at another representative of this type of soldering iron.
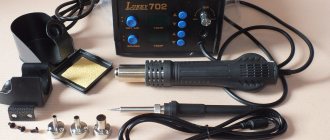
This is a soldering iron from Lukey 702 station.
Its temperature is regulated by the station microcontroller in the control unit.
Overall, the temperature control is better compared to the previous soldering iron, but now the main problem is in the design.
Both this soldering iron and this one have temperature unevenly distributed over the tip. It may be real in the center of the sting, but not over the entire area. This is a huge problem and design flaw. And this drawback interferes with all soldering. The contacts begin to stick together and the wires are poorly tinned.
The whole problem is the air gap between the tip and the heater. It does not transfer temperature well from the heater to the tip. And some radio amateurs fill this space with sand so that the temperature is better distributed over the sting.
And this is also not a solution to the problem. How then to change the tips? Should I pour sand into the sting every time? This is not an option.
Copper stings are back in service
There is a way out of this situation. These are copper tips. Yes, they burn out, they are not durable, but the temperature is distributed on their surface much better than with eternal stings. Another way to maintain temperature while soldering with these soldering irons is to use top heating.
Using a soldering gun, you can heat the surface to 100 ℃, thereby stabilizing the temperature of the soldering and the board surface.
These soldering irons can be used to solder parts and boards, but this is not the best choice for beginners. With such a tool you will have to study for a long time, understand the soldering processes and spend a lot of time on training.
Why increase power?
It is not advisable to purchase several options for performing soldering work of various types. Increased intensity is used for short-term exposure to elements; fragile parts may not withstand high temperatures and become unusable. Burnt tracks located near the controllers can affect the operation of the part being repaired.
Soldering station with thermostat
Less power output contributes to slow heating and low temperatures. With the presented indicators, during the soldering process it is necessary to act on the material longer before melting begins. Long-term heating can also have a detrimental effect on the board. To avoid serious consequences, you should correctly select the level of return through regulation. For example, to adhere massive objects, it is necessary to increase the intensity until the time of exposure to the elements is less than the melting point and provided that the appropriate solder is used.
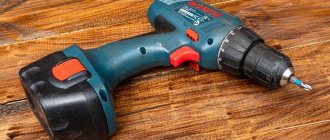
What can a soldering iron be useful for?
There are many areas of application for this high-tech device. Here is a partial list of tasks, in which you will probably find your own recurring problems.
- Soldering wires and repairing electrical extension cords;
- Soldering and replacement of radio components in household appliances;
- Repair of lamps and LED lamps;
- Repair of thin-walled metal pipe connections;
- Repair of leaky metal tanks and containers;
- Quickly burns holes in plastic;
- Cutting off excess parts in plastic parts and housings;
- And so on.
As can be seen from this list, there is always a use for a soldering iron, as long as your hands are fairly straight. And in some cases, the simplest and most inexpensive soldering iron will do, as long as the power is sufficient, for example, 60 W. It is perfect for soldering wires. But for “electronic” tasks it is better not to overdo it with power, because The tracks on the boards do not like too high temperatures and easily peel off, and the radio components themselves fail. Below we will tell you which soldering iron to choose for soldering radio components. When choosing a soldering iron, you should decide for what purpose you need this electric tool.
Switches and Dimmers
A simple type switch allows you to select a position in two directions. The unit is operated at minimum and maximum output values, allowing only to save energy. At the minimum level, the tip is maintained by the required degree of heating on the stand; pressing the switch warms it up. With a product equipped with the specified type of switch, it is difficult to perform high-quality fusion of metals, because There is no full parameter setting. Dimmable varieties of adjustable devices allow you to select important parameters.
Homemade dimmer for soldering iron
The device includes a dimmer, which is present in the grid between the power cable and the heating element. The adjustment is made by monitoring the voltage; these mechanisms are popular among beginning radio amateurs due to their low price.
Elimination of tip overheating
Refinement of the power regulator
A homemade contact sensor is made from an old Soviet capacitor and balls from a bearing. The device is placed on the factory board without modifications to the case. When the soldering iron is placed on the stand with the tip up, the sensor opens the circuit and the heating temperature decreases. When we start soldering, the contacts inside close and the tip warms up to the set temperature in accordance with the position of the regulator.
Let's look at a few more examples of such modifications in relation to various models of soldering devices.
Control units
More advanced systems have a control unit consisting of a set of regulators and microcircuits. The compactness allows you to place the drawing in the handle of the soldering iron, which is very convenient in the process. The control sensor is located outside the housing, which makes it possible to select an indicator without interrupting the soldering process.
There are soldering irons that have an external power supply. This device makes it possible to work with a stable voltage on a rectified current.
The unit adjusts the parameters of the potential differences in the electrical network, regardless of the modes; with some actions this condition must be observed. The varieties of control units can be confusing; if mobility is important, it is better to pay attention to the internal arrangement. External blocks allow for better contact; a type of soldering station that includes a hair dryer is provided.
Printed circuit board
Here is the signet file.
Now the main thing. Why is all this needed, what does it give? A simple current regulator does not provide stabilization in any way. If there is very little natural cooling so that the soldering iron does not overheat, then when soldering there will clearly not be enough power.
If it’s normal when soldering, then when idle there will be overheating. Inevitably.
This has a very strong impact. For example, my Chinese tips that came with the soldering iron (copper, by the way) simply melted before our eyes. It’s especially unfortunate for the flat one. With a hatchet.
In addition, if it overheats and is left idle for a long time, the tip burns and sometimes it becomes extremely difficult to tin the tip. The solder naturally oxidizes and turns into a gray-black mess. And before soldering you will have to clean the tip every time. In short, the life of the tip and the comfort of soldering are greatly reduced.
A soldering iron modified in this way acquires the features of soldering irons of a completely different price category and quality. This is actually a soldering station.
Another aspect that I checked for myself. Sometimes I solder parts with two soldering irons. Since I now have two such soldering irons, it made sense to check whether there was a potential difference between them that would be detrimental to the part being removed.
Measurements with a voltmeter showed zeros in the range of 20 volts constant and 200 volts alternating. I turned over one of the network plugs. Perhaps it’s just high-quality ceramics in the heaters. True, it’s worth keeping in mind that in the first converted soldering iron, instead of a power supply with zener diodes, there was a Chinese small 12-volt UPS (I didn’t find powerful zener diodes then). Perhaps this is another reason.
Well, why exactly such soldering irons are especially interesting for this alteration.
In normal mode it quickly overheats. This indicates that the heater temperature is too high. And excess power. It has a ceramic heater with a fairly high resistance and a strong change in resistance when heated, which allows you to more accurately monitor the temperature.
Consequently, after the modification it will heat up very quickly, since the voltage is supplied not after the dimmer, in a reduced form, but the full mains voltage.
For the same reason, it will quickly restore the temperature after intensive heat extraction when soldering massive parts.
DIY temperature regulator
Making a soldering iron with do-it-yourself adjustment requires knowledge of electrical engineering. If you have experience, it is proposed to make the mechanism from a conventional heating element with a power of 60 watts. High-quality connections can only be made when using a heating value balancer. Assembly is carried out by implementing some modifications and involves the use of available materials. The simplest system includes:
- thyristor model KU101G;
- resistor SP – 1;
- diode operating at a current of at least 1A.
Thermostat circuit for a low-voltage soldering iron
Installation of the model is possible without the use of a board, in a power supply housing of any size. The connection is placed on the resistor body, to which the connector for adjusting the degree of heating is adjacent. The result is an adjustable device with an output power of up to 60 watts. Schematic drawings for more powerful devices include slightly different components. Assembly is carried out on a circuit board; variable resistor R2 is responsible for adjustment, which operates in the range from 50 to 100%. The maximum permissible load is 300 watts, sufficient for a household device. Circuit options depending on the power limiter The power of the device can be adjusted in several ways; the differences lie in the use of a semiconductor controller that performs the necessary tasks. Schemes can be built using several components, depending on the purpose:
- The thyristor works like an electronic switch; the current starts in one direction. The structure is made with three outputs, a cathode, an anode, and a control electrode. Applying a pulse to the electrode causes the thyristor to open; closing occurs after stopping the supply or changing the direction of the current.
- Semiconductors that conduct current in both directions are called triacs. The housing has a control gate and power electrodes; the operation is essentially similar to two connected thyristors.
- The design of control sensors uses parts known to radio amateurs, such as a resistor, diode, capacitor, and microcontroller.
In most cases, a thyristor or triac is used, the precise debugging is regulated using a microcontroller added to the circuit.
Five ways to adjust the temperature of a soldering iron
To perform various electrical work and assemble electronic circuits, a tool such as an electric soldering iron is often used. Its simplest type, which can be purchased at any hardware store, usually has a basic design.
It includes a heating element, a tip, a handle, usually wooden, and a power cable or cord. In some versions, the soldering iron can be equipped with several replaceable tips.
The power of such a soldering iron is fixed, most often 40 or 60 watts. But it is more convenient to use a tool with the ability to adjust power. Such models are also produced, although they are more expensive.
Recommendations for testing and adjustment
When the adjustment knob is rotated, the voltage changes; the test is performed under load, i.e. with the soldering iron turned on. Accurate readings can be obtained using a multimeter. Also, the load level is determined by the connected incandescent light bulb; when the parameters are changed, the light intensity changes. A do-it-yourself voltage regulator helps with soldering work, regardless of the type of material. Varieties of circuits allow you to select exactly the modification that allows you to make a high-quality connection.
Soldering iron rewind
When repairing a purchased tool or creating it yourself, you have to wind the wire
Before actually performing the work, it is quite important to correctly carry out the appropriate calculations, since the most suitable wire is selected depending on the resistance, power and voltage of the power source. You can calculate the required indicators using various special tables
After calculating the required parameters, the most suitable wire for them is selected. For this purpose, a special table can also be used, which defines the ratio of the main parameters. The nichrome composition is a combination of chromium and nickel, due to which the manufactured element is able to withstand temperatures up to 1000 degrees Celsius.
The winding process involves tightly packing the turns. It is worth considering that when heated to high temperatures, the material in question becomes coated with oxide.
Asbestos, fiberglass or mica can be used as insulation material. Among the performance qualities of asbestos, it can be noted that it can be soaked with water, taking a plastic form; it is quite easy to spread over the surface. When using it, it is worth considering that wet asbestos is capable of conducting electricity. Therefore, the soldering iron should be turned on only after the insulating material has completely dried.
In conclusion, we note that the fairly simple design of the soldering iron allows you to make it yourself.