The blade of a carpentry tool is designed for processing wood. It experiences greater loads for a long time than the blade of a regular knife.
Therefore, it is given an original shape that requires sharpening using special methods. A high-quality cutting edge accessible to the beginner is created by a simple sharpening trolley.
The article, based on personal experience, contains practical advice for a home craftsman on how to make a simple device for sharpening a plane knife or other tool with an explanation of the operating technology with diagrams, pictures and a video.
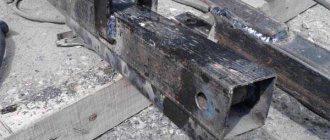
The entire process of creating the cart took literally half an hour and took place in the kitchen. This technology is called: assembly on a knee or stool. It does not require complex equipment and allows you to make a device from the most accessible parts. At the same time, nothing prevents you from assembling such a tool for professional work not from wood, but from metal, using professional equipment.
Planer knives: which ones can be sharpened
The main element of the mechanism in question are knives. Their cutting part can wear out quickly under certain conditions. When operating planes, attention should be paid to the fact that there are two types of devices:
- Manual ones are extremely common today. In the manufacture of the main part, plastic, metal or wood can be used. The blade is made using special steel, which is characterized by increased wear resistance.
- Electric planers are used when processing large quantities of material. Thanks to the built-in motor, you can significantly increase the speed and efficiency of the process.
It is necessary to take into account the fact that an electric tool can have several incisors at once. Due to this, the efficiency of the process is significantly increased. The main part is made of tool steel or tungsten. It is worth considering that the tungsten cutting part cannot be sharpened; after severe wear, it must be replaced. In this case, the surface may differ in shape and some other parameters.
Peculiarities
Today there are several devices for processing blades. They are classified according to different criteria. The most common are the following.
- Devices are classified by type of use. There are manual and mechanized machines. The first option is easy to use and also low cost. The advantage of the second is the high processing speed of steel material, which is why such tools are more popular.
- The second classification involves dividing devices according to the grain size of the abrasive material. Large grains lead to rapid removal of steel from the blade, and reducing abrasive stones helps to reduce the thickness of the metal layer.
- The third classification option is homemade or purchased devices. If required, you can assemble the machine yourself, and this option will be even cheaper.
Today, many companies are engaged in the production of sharpening devices. However, you should not give up manual sharpening. This device has a number of advantages:
- it is suitable for processing the cutting edge and can be used for sharpening other knives;
- the mechanism removes a small amount of metal; several abrasive elements of different grain sizes can be used in the process.
How can you tell if your plane knives need sharpening?
It is important to determine in a timely manner when the surface needs to be sharpened. A device for sharpening plane knives can be purchased or assembled yourself. Among the features we note the following:
- The condition of the cutter can be determined by visually examining the chamfer edge. If upon inspection it turns out that there is a thin shiny tape, then you need to start sharpening.
- Some products are equipped with double-sided knives. If the blade is severely worn, it is rotated, due to this the required performance can be ensured.
A device for sharpening plane knives can be used in accordance with certain recommendations. Do not forget that if you make a mistake, there is a possibility that a serious defect will appear, due to which it will not be possible to remove the material.
Geometry of a plane blade, chisel, chisel
The optimal profile of the cutting edge of a carpentry tool was formed experimentally. It is slightly different from the usual cross-section of a regular knife, described in the article on the rules for sharpening a blade.
Although the blade blade also has a rectangular shape.
A one-sided profile is created in the cross section of the carpentry tool blade.
We can say that the plane of the bevels is aligned with the approach, and the cutting edge is finally finished due to the formation of micro-approaches during polishing on the grinding belt.
The sharpening angle can vary from 25 to 45 degrees. It depends on the density of the wood being processed.
How to sharpen planer knives correctly?
A wood planer should be used in accordance with basic recommendations. It is worth considering that you can sharpen a plane only by using the following tools:
- A bar with a fine-grained surface.
- Emery cloth with the required type of grinding wheel.
- A leather belt with a special polishing paste, as well as a grinding stone.
Sharpening a plane at home allows you to quickly restore the condition of the cutting edge. If the knives are severely damaged, a large circle is required, which is designed to remove a large amount of material from the surface. Such a tool eliminates the possibility of the knife bending.
The best type of sandpaper for this task is sandpaper with two different wheels: one with coarse grain, the other with fine grain. This combination provides the most favorable working conditions.
Do not forget that improperly sharpened knives do not provide the proper quality of processing. That is why you need to take the task at hand responsibly.
One of the most important parameters is the sharpening angle. In most cases, this indicator varies from 25 to 45°. The most suitable parameter is selected depending on the hardness of the surface being processed. The angle is maintained when using a special template.
There are quite a large number of recommendations regarding the use of devices for sharpening plane knives. The main ones are the following:
- At the time of work, it is not recommended to apply strong pressure, since in this case a large layer of metal will be removed. Such an error often becomes the reason why the tool simply fails.
- When it comes into contact with the abrasive wheel, the steel heats up, due to which the ductility index significantly increases. That is why a specialist is recommended to periodically cool the metal in water.
- After using a large grinding wheel, finishing is carried out with a fine-grained stone. The final stage consists of applying leather and a special paste, which allows you to obtain a perfectly smooth surface.
The above information indicates that the procedure is very complex to perform. Despite this, it is recommended to carry it out almost immediately after the first signs of loss of sharpening appear. If you postpone such a procedure, then over time the knives may become unusable.
Not all private workshops have special machines for sharpening knives. That is why it is often necessary to use a combination of a block and an abrasive.
It is best to have the knives of electric tools sharpened by specialists, since even minor defects can cause them to become completely unusable. At the same time, the cost of the product is very high.
How to sharpen chisels correctly. On water stones, grinder and regular sandpaper
The most popular sharpening method is the use of artificial water stones. This method provides the most delicate and precise guidance of the cutting edge. To bring the stones into working condition, they are pre-soaked for 3-10 minutes. During the sharpening process, the abrasive is actively moistened from a spray bottle or used directly in a bath of water.
The tool is sequentially processed on stones of different grain sizes. The simplest and most effective scheme is the use of three types of abrasives:
- 800 grit - a rough stone for initial leveling of the edge after processing on a sharpener; If you did not use a grinder and did not subject the chisel to serious sharpening, you can skip this water stone.
- 1,200 grit - abrasive for intermediate dressing.
- 6,000 grit is a finishing stone.
If you want to polish the edges of your chisel to a mirror finish, use an additional 8,000 grit for a fine polish.
With this method of sharpening, it is very important to follow the sequence. By skipping the intermediate abrasive, you will have to remove the surface longer, wear out the stone more actively, waste energy and overheat the blade.
Briefly about the types of abrasive
Artificial sharpening stones consist of microscopic sharpening grains bonded into bars with a ceramic bond. Silicon carbide is most often used as an abrasive base. Due to the fragility and sharpness of the microparticles, such a stone provides high sharpening performance. Silicon carbide abrasives do not overheat the blade, quickly provide a suspension, do not require long soaking and produce a pleasant sound when sharpening. In terms of their characteristics, they are superior to stones made from electrocorundum powders or clay, and they are recommended to be purchased as the first sharpening kit.
Preparing sharpening stones for work
Water stones, just like chisels, require maintenance. Before each sharpening, it is advisable for them to restore the geometry of the working plane. To do this, you can use special diamond bars or resort to a simpler method - aiming on sandpaper.
Mark the surface of the stone with a pencil and place it in a bath of clean water for 3-10 minutes. When the stone stops releasing small air bubbles, it will mean that it is ready.
Take a sheet of 240 grit waterproof sandpaper, wet it and place it on the wet glass. The water will prevent the sandpaper from moving during operation.
Move the sharpening stone back and forth, making circular movements from time to time. When the pencil lines disappear, this means that the working surface is completely flat. After alignment, chamfer the edges of the block so that they do not crumble during further use. The stone is ready.
Let's move on to sharpening
Your task is to achieve a perfect plane of the chamfer and the back of the blade - then at their intersection a perfectly smooth cutting edge is formed. At first, do not chase speed, but concentrate on consistency of movements and uniform pressure. Be sure to use a rubber mat. This detail turns out to be very important. The backing prevents the whetstone from slipping and play on uneven surfaces, so you can fully concentrate on the sharpening process and better feel every stroke on the stone.
Aligning the back of the blade
Sharpening of chisels traditionally begins with processing the back of the blade. 800 grit abrasive is used as a starting stone.
With one hand, the blade is pressed against the stone, and with the other, it is held strictly perpendicular to the long side of the block. With light and even pressure, the tool is moved along the entire length of the working surface. After processing on an 800 grit stone, all large marks on the back of the blade should disappear, and the surface should acquire a uniform dullness as shown in the photo. Before moving on to another abrasive, a chisel bevel is processed on the same stone.
Chamfer sharpening
Here everything is more complicated, because you have to level an order of magnitude smaller area and hold the tool at a strictly specified angle. Chamfer processing is greatly simplified by a special sharpening carriage made in the form of a trolley. This device allows you to fix the chisel at strictly specified angles and has a number of additional options, which we will discuss below.
You can also align the chamfer manually. In this case, it is important to ensure that your fingertips firmly press the entire plane of the chamfer to the surface of the stone. While maintaining uniform pressure, strokes are made back and forth along the entire length of the stone. It is better to start training with wide chisels. It's easier with them. Thanks to the large chamfer area, it is more convenient to hold them at the desired angle, while you better feel how tightly the blade fits the surface of the stone.
Save on the purchase of a sharpening carriage by making it yourself. How exactly? Read our article :
- Homemade carriage for sharpening chisels and plane knives
After every four to five passes through the abrasive, the chamfer is carefully examined for uneven grinding and errors are corrected in a timely manner. The important thing here is to concentrate on maintaining a constant angle of inclination, firm and even pressure, and consistency of movements. And remember, speed has no effect on the quality of sharpening.
When the bevel and back of the blade are processed on an 800 grit stone, you can move on to the next abrasive, after first rinsing the chisel blade and wiping it thoroughly with a clean cloth. This is necessary in order not to clog the new stone with the remaining grains of the previous abrasive.
During the sharpening process, a thin burr will form on the cutting edge of the chisel, which can be felt with a light touch of your finger. By the end of sharpening it should disappear.
Sharpening semicircular and corner chisels is carried out according to the same principle, but special shaped stones are used for this, which have a concave and convex profile of the working surface.
Water stones are very effective, but at the same time they are a very demanding abrasive. They require discipline in care and use, otherwise they quickly become unusable. How to care for water stones - read our short but very useful article.
Checking Blade Adjustment
After carrying out the procedure in question, the position of the knives should be adjusted. After installing them, you need to inspect the plane and evaluate how far the blade extends. The main recommendations are the following:
- The optimal value is 0.5 mm. If you need to carry out rough processing and at the same time significantly increase productivity, the blade is moved out by 1 mm.
- It is worth considering that too much clearance causes large chips to be produced. Therefore, conditions for obtaining a high-quality surface are not provided. If the gap is minimal, then the chip size will be insignificant, and this will lead to a significant increase in the processing time.
Do not forget that in comparison with other tools, this one is used for finer processing. Taking this into account, the location of the blades is adjusted, and the corresponding blade sharpening angle is selected.
Sharpening profiles
The profile of a knife blade is linked to the properties of the material and the structure of the blade, as well as to the properties of the materials for which the tool is intended to process. Sharpening with a simple blunt wedge (item 1 in the figure) gives a stable but rough blade: the cutting resistance is high, and the knife tears quite viscous materials. A sharp wedge (item 2) quickly dulls or chips; on viscous and/or fibrous materials, the cutting resistance may be greater than with a blunt wedge due to the friction of what is being cut against the blade.
Knife blade sharpening profiles
Ideal in all respects is the ogival (smoothly sloping) profile, pos. 3. Experts are still arguing which generator is better - an involute, a hyperbola or an exponential. But one thing is certain - making an ogival blade in production conditions is difficult and expensive, and it is impossible to direct it yourself. Therefore, ogival sharpened knives are used only in special equipment, e.g. microtomes - biological devices for obtaining the thinnest tissue sections.
For disposable blades, e.g. safety razor blades, faceted sharpening is used, pos. 4, i.e. The ogive generatrix, as mathematicians say, is approximated by straight segments. The number of sharpening edges is indicated in the certificate or on the manufacturer’s website. For thick, coarse bristles, 3-4-sided bristles are better; for delicate hair not on the face - 8-sided. The 6-sided one is considered universal.
Angle α
The sharpening angle is always given in half the value α, because Many tools and, for example, bayonet knives are sharpened on one side. For knives for various purposes, the angle α is maintained as follows. within:
- 10-15 degrees – medical scalpels, straight razors, knives for artistic carving.
- 15-20 degrees – pastry knives (for cakes) and vegetable knives.
- 20-25 degrees – bread and fillet knives.
- 25-30 degrees – hunting, hiking, survival knives.
- 30-35 degrees – general purpose household knives.
- 35-40 degrees – carpentry tools, shoe knives, axes.
One and a half
Sharpening knives, except for special ones, is done almost exclusively with a one-and-a-half profile, on the left in Fig. One-and-a-half sharpening is so named because the flat edge of the blade (descent) is formed during the manufacturing process of the blade and cannot be sharpened. In fact, sharpening a knife with one and a half sharpening is no more difficult than sharpening it with a simple wedge. One-and-a-half sharpening is optimal for a knife that works with a variety of materials, and making a knife sharpener with one-and-a-half sharpening is much easier than using a faceted sharpening.
Sharpening the blade of a household or camping knife
In the center and on the right in Fig. The stages of blade sharpening and the numbers of abrasives used on them are shown. The abrasive number corresponds to the number of its grains per 1 square meter. mm surface. The finishing stage has some features:
- Hunting and camping knives are not supplied. This makes it easier for them to cut hard things (for example, bones) with broaching (with filing). In addition, if you accidentally cut yourself, the slightly lacerated wound stops bleeding faster, heals more easily, and there is less danger of infection getting into it.
- After abrading, the blades of straight razors, shoemaker's knives and for artistic carving are brought to mirror smoothness on a leather whetstone with GOI paste.
- Guiding and finishing the blades of kitchen knives can be reduced to one operation with abrasive No. 800-1100.
How to evaluate the quality of sharpening?
Having maintained a certain sharpening angle of the plane knife and carried out the final grinding, you should check the quality of the work done. It is worth considering that quality is determined by the type of chips obtained.
The check involves running a plane over the surface of the workpiece. If the surface turns out smooth, then the procedure performed was correct.
Step-by-step instruction
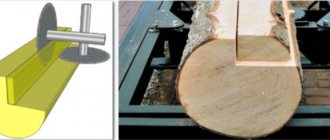
So, the design details and the necessary tools have been selected, you can begin assembling and subsequent installation of the homemade carriage.
Step 1: Attaching the aluminum profiles
Since the carriage will “run along the saw table,” the first thing to do is guide grooves. To do this, take two U-shaped profiles, approximately equal to the length of the table. You can adjust the dimensions using a grinder.
At the same distance from the location of the cutting disc, circular saws draw two lines parallel to it. Then, using a hand router, U-profile holes are cut out along them, chips are blown out of them, and the corrugated pipes are secured in them using glue. After the glue dries, the grooves are ready.
Step 2: Making the carriage base
Next, the mobile base of the cross-cutting carriage is constructed. To do this, take two strips, which in thickness fit freely into the U-shaped groove. But there is one point here - the carriage will have to “slide” freely on the table, and for this it is raised above the table by 2-3 mm. To do this, nuts of equal thickness are placed into the profile grooves at equal distances, after which guide rails are laid on them.
Then glue is applied to them, which fixes the plywood base strip. To press it tighter, you can attach clamps on the sides.
When the resin has dried, the nuts are removed from the profile grooves and the master checks whether the carriage moves freely on them. After this, for ease of further use, the carriage is cut off on the sides along the table profile.
Step 3: Installation of walls
So, the base is ready and then the thrust walls are installed on it. To do this, take two wooden blocks: one of them is rigidly fixed, using self-tapping screws, along the edge closest to the master so that it is strictly perpendicular to the cutting edge of the saw blade; the second is secured along the top edge, but only on one side. This is necessary so that the master can align this wall strictly parallel to the bottom. The operation is performed using a square.
Types of equipment for sharpening knives
The device used for sharpening planer knives can be classified according to a fairly large number of different characteristics. Among the features of the classification, we note the following points:
- There are manual and mechanized devices. The first option is easier to use and much cheaper, while the second allows you to significantly increase processing speed. Electric tools have become quite common these days.
- When considering the device for sharpening planer knives, you should pay attention to the grain size of the abrasive. Too large grains cause rapid material removal; reducing their size allows you to reduce the thickness of the removed layer in one pass.
- There are homemade and purchased devices. A homemade sharpener copes with the task.
A large number of different companies are engaged in the production of sharpening devices. In many ways, the popularity of the brand determines the cost of the mechanism.
Advantages of a homemade sharpener
There are devices on sale designed for sharpening chisels and plane knives. They differ in type and material of manufacture. These can be synthetic or diamond shards, natural minerals and other mechanical objects. Carpentry workshops often purchase special electric machines of vertical or horizontal design. However, all these advertised devices are in no way inferior to sandpaper. It does an excellent job of grinding down metal, giving it thin and clear edges, and its cost is extremely low.
Materials and assembly rules
An excellent result is guaranteed by black sandpaper, the abrasive side of which consists of silicon carbide. It is suitable for wet and dry grinding, and due to the hardness of the material, which is superior in similar parameters to garnet or aluminum oxide, it copes with the task better and wears out longer.
Sharpening a chisel at home requires sheets of paper with different grain sizes (from 100 to 600 units). The final grinding of the cutting edges is carried out with a fine abrasive powder, which can be replaced with a kitchen cleaner containing feldspar, soda or oxalic acid.
To ensure comfortable work on sharpening tools for wood carving, the master needs to create a flat base of thick plywood or MDF on which sheets of emery will be laid. To enhance the adhesion between the paper and the smooth base, you can spray the plywood with water.
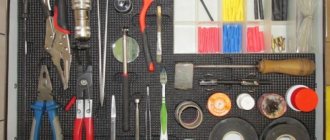
No matter how sharp the vision of a craftsman may be, it is difficult to complete the job without the help of a magnifying glass. Therefore, it is better to play it safe and purchase a simple lens with eight times magnifying power. Such an optical device does not obscure the light and makes it possible to see most of the flaws in the cutting tool.
When working with sandpaper, it is necessary to maintain the sharpening angle, which is not easy to do manually without a special device. This problem is solved by a wooden device that provides control over the process at all its stages. With its help, the blade will be fixed at a given angle, deviations will be excluded. In this case, the chamfer of the product will acquire an optimal plane. In this way, it is possible to ensure uniform abrasion of the sandpaper when performing movements in opposite directions.
Assembling a sharpening machine
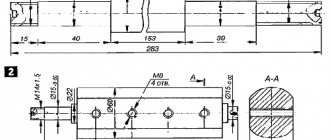
Below in the picture you can see a device used to sharpen carpentry chisels and plane blades with a length of 75 mm at an angle of 25°. Such drawings are also suitable for assembling a similar machine for straightening blades at different angles. Sharpening semicircular chisels is performed using other equipment.
The beginning of assembly involves sawing out the base from hardwood with a margin of length. We recommend focusing on workpiece dimensions of approximately 13x76x255 mm. At a distance of 19 mm from the back of the workpiece, it is necessary to cut out a tongue and groove (5x45 mm - DxW), for which a groove-forming cutter is installed in the sawing unit. Then, using a longitudinal cutting disc, a bevel is sawed at an angle of 25°, and the workpiece itself is fixed with double-sided tape to the load-bearing surface. Now a vertical cut sets the final length of the product to 190 mm.
To make a trolley holder, you will need a workpiece measuring 19x45x255 mm, on which a bevel is sawed off at an angle of 25° and vertically cut to a length of 190 mm. Then, on its lower side, at a distance of 32 mm from each edge, two holes are drilled with a recess for the nut. After this, a groove 102x1.5 mm (WxD) is made with a groove disk, in which a chisel or chisel will be fixed at a right angle.
At the next stage, the clamp is cut out and holes are made for screws in the middle of the workpiece at a distance of 32 mm from each edge. The handle of the device is glued to the clamp, and after the adhesive has dried, final assembly is carried out. So that the sharpening machine can function normally and the holder slides without unnecessary effort, a special wax composition is applied to the tongue of the base.
We recommend watching a video that shows another option for making a home sharpener.
Why is hand sharpening necessary?
Hand plane sharpening is used exclusively for its intended purpose. Among the features of use, we note the following:
- The device is suitable for sharpening the cutting edge of a plane, as well as many other products.
- A similar mechanism can remove metal from the surface. The abrasive can have different grain sizes, which determines the amount of material removed in one pass.
In most cases, a manual device is used when it is necessary to process a complex surface. Unlike electrical equipment, the mechanism is quite simple and costs a small amount. Also, when using such a tool, a knife can be sharpened, which also has a cutting edge.
The process of sharpening a chisel with your own hands
Sharpening the cutting edge of a chisel with your own hands requires a strong grip, attentiveness and patience, as well as a minimum set of sharpening and grinding materials. If you need to significantly change the sharpening angle, it is better to first use a sharpening machine. If there is no such need, then you can sharpen your chisel in the following order:
- Grind the chamfer using an abrasive stone until there are no visible holes or damage. It is necessary to strictly maintain its inclination not only in the longitudinal, but also in the transverse direction. This can be done either by hand or using a homemade jig made from several pieces of wood.
- Check the line of the cutting edge, which should be strictly perpendicular to the chisel blade. If not, straighten it with a sharpening stone and then re-sharpen it to a sharp point.
- Wrap a block of wood in fine-grained sandpaper, secure it with nails or staples, moisten it with water, and then, carefully pressing the chamfer against the abrasive surface, sand it until the edge is shiny and extremely sharp. If desired, the blade can then be polished on a felt wheel using polishing paste.
- If you need to sharpen a chisel with a bevel on the edge, then grinding is best done with a stop, lifting the blade up by about 5º.
- After finishing work, carefully wipe the chisel dry.
To properly sharpen a chisel, you need to remember one important technical rule for performing grinding and sharpening work: all movements should be performed only in one direction.
In Russian-language articles, authors almost never focus on sharpening the bevel of the cutting edge. In practice, many people actually do without this option and use straight edge chisels. What do you think about this? What's the best way to sharpen a chisel? Please share your thoughts and experiences in the comments to this article.
Sharpening plane knives on a machine and adjusting them
It is worth considering the point that sharpening a plane involves its setting and adjustment. A similar process also involves adjusting the degree of blade extension. The sharpening procedure itself is characterized by the following features:
- The procedure involves removing metal from the cutting edge.
- It is important to maintain the proper angle, since an incorrect angle causes a decrease in the effectiveness of the tool. The correct angle is maintained using a special device.
Sharpening when using the machine is simplified, since it is possible to secure the workpiece securely and set the proper angle. At the same time, it is possible to replace nozzles with varying degrees of abrasiveness. Coarse grains are used initially to remove large amounts of material, while fine grains ensure high quality surfaces.
The process of sharpening on a homemade machine
To sharpen a dull tool, you need to place the device on coarse sandpaper. The cutting part of the chisel is installed in the holder under the clamping mechanism with the chamfer down, after which the nuts are tightened to secure the tool tightly. The blade should be perpendicular to the working plane.
When you start sharpening the cutter, pay attention: characteristic marks will be visible on the sandpaper, so you need to move the structure so as to continue the process on the untouched part of the material. The work is carried out until the cutting segment acquires a uniform matte surface. Before changing the sandpaper to a finer abrasive, run the back of the blade over coarse paper a couple of times, removing any possible burrs. Each time you change the abrasive, repeat the process until the sharpened tool becomes optimally sharp.
Edit
Sharpening the chisel is completed by straightening it using a leather belt rubbed with GOI paste. The cutting edge is polished to a mirror finish. The paste can be replaced with a kitchen cleaner, which does the job just as well as the paste. The powder is poured onto a flat wooden surface. A hand-held machine will come in handy here; you need to sharpen it according to the principle discussed earlier.
How to make a sharpening device?
If necessary, you can make the required device for sharpening plane knives yourself. This version is characterized by the following features:
- Low cost.
- Possibility of application in a wide variety of cases.
- Versatility.
- Long service life.
The only drawback is that you cannot change the sharpening angle. That is why the functionality of the device is significantly reduced.
Types and their structure
Knives are the main element of the plane, so it is worth taking a closer look at their design, structure and features. The cutting part of the blades is subject to wear during operation, so the material must be sharpened periodically. Today there are two types of planes that use special blades.
Mechanized
They are electric tools. Designed for processing large quantities of wood, the blades are thick and made of stronger steel. Due to the motor provided in the design of the carriage, the speed of work increases, and the wear of the cutting elements also increases.
Manual
A fairly common type of tool that can be made at home if desired. To make the body of the plane trolley, use:
- metal;
- tree;
- plastic.
The blade is thin and is created using special steel. A distinctive characteristic of the knife is its resistance to wear. The difference between the two tools is not only the presence or absence of a motor.
Electric planers are distinguished by the presence of several cutters and the ability to use double-sided blades. All this increases work efficiency, which is why power tools are popular.
During operation, it is not immediately possible to determine that the plane knives require sharpening. However, there are several sure signs that will help you understand the need for sharpening.
- Appearance of the chamfer. If, during inspection, a shiny tape of small thickness is found on its surface, then sharpening is necessary.
- Appearance of a double-sided knife. In this case, it is easy to determine the need for sharpening - just look at the metal after turning the element twice in the plane.
Preparatory stage
The work begins with the preparatory stage. It looks like this:
- First, download the drawings with step-by-step instructions.
- The next step is to select the required materials.
- Certain tools are also required to process the material.
There are quite a large number of different sharpeners that you can make yourself. Hand tools have become widespread because they are quite easy to use.
Required Tools
In order to design a carriage for a circular saw with your own hands and then use it comfortably in a home workshop, first of all, you should prepare a set of materials and tools for its manufacture:
- Stationary circular saw on a sawing table;
- A screwdriver or drill, as well as a hand router;
- Assembly adhesive – epoxy resin is suitable;
- Hacksaw or grinder - you may need to saw off protruding parts of the structure;
- Self-tapping screws to secure parts of the product;
- Metal nuts are smaller in diameter than the thickness of the profile hole - they will be buried in it for a short time;
- 2 U-shaped corrugated channel pipes made of metal (for example: aluminum);
- Two slats made of plywood or wood - they will serve as guides. In terms of thickness, they should fit freely into the U-hole of the profile;
- Square thin plywood strip for the base;
- Two wooden walls - for the manufacture of thrust walls of the carriage.
Reference. Additionally, it is recommended to keep a vacuum cleaner “ready” to blow the structure away from shavings and wood “dust” after cutting or drilling.
Carriage drawings:
Drawing 1
Drawing 2
Manufacturing process
You can make the device yourself. The instructions are as follows:
- To begin with, an abrasive of the required grain size is selected.
- The next step is to create a template at the required angle. A wooden block is ideal for this, from which the material is removed at the required angle.
It is quite difficult to create a full-fledged machine driven by an electric motor. This is due to the fact that accurate calculations need to be made.
In conclusion, we note that a plane with timely sharpening of knives can last for a very long period. In the manufacture of the blade, tool steel is used, which is characterized by increased resistance to mechanical stress.
Using a wheel and sandpaper
When forming a chisel chamfer, various sharpening stones are used: both round ones on an electric sharpener, and flat ones in the form of sharpening and grinding stones, as well as sheet sanding material on a fabric and paper basis.
To sharpen the bevel of a chisel on a sharpening machine, you need to make sure that its speed and the sharpening wheel installed on it will not cause the metal of the chisel to overheat and loosen. The rotation speed of the spindle of the electric sharpener should not be higher than 1800÷2000 rpm, and the sharpening stone should be viscous, medium soft and with a grinding filler (for example, aluminum oxide). In order to sharpen and polish a chisel blade efficiently, it is necessary to use abrasive products that combine both grinding and polishing qualities. Sharpening water stones are best suited for this role. Before starting work, they must be soaked in water, which rises to the surface during sharpening, mixes with abrasive dust and creates a viscous grinding suspension. Fine-grained sheet abrasive material is also well suited for such work. During the sharpening process, it must be wetted, so it is advisable to use waterproof sandpaper. You can sharpen the chamfer and edge of a chisel using this material by securing it to a flat surface or wrapping it around a wooden block.
Nuances when working
In conclusion, here are a few subtleties that are useful to know if you want to make a homemade carriage for a circular saw:
- It is recommended to install a thick block on the supporting wall in the place where the disk passes through it, which will prevent the saw from jumping over the edge of the wall, which can lead to injury.
- In order to give the structure greater slip, it is recommended to clean the runners with sandpaper, and periodically lubricate the grooves with a candle stub (paraffin or stearin). Sometimes wax is used, but it is not recommended to use it, since it melts during use and sticks to the runners.
- Before applying glue to parts, blow the structure away from particles of wood dust and shavings to avoid unevenness after gluing.
- After cutting through the walls, make sure that the saw passes through them freely. To do this, you can make a sawn hole slightly larger than the thickness of the disk.
Important . The master, no matter how experienced he is, should not forget that a circular saw is a unit with an increased risk of injury, therefore, when making a carriage and working on a saw with its help, you should always be careful and careful and remember about safety precautions.
Having made an end carriage in such a simple way in a home workshop, the craftsman will have at hand an easy-to-use, universal tool that can be used in most types of carpentry work.