Turning of a conical surface, the generatrix of which has a length exceeding 15 mm, is often accompanied by the appearance of vibrations. This leads to the appearance of waviness on the treated surface. Vibrations increase with increasing length and decreasing diameter of the part.
The surface of the workpiece may become wavy if the cutter overhang is large or if its fixation is unsatisfactory. True, vibration does not occur in all cases (for example, a rigid part with a generatrix of short length and a large slope angle is being processed). In such situations, there is a high probability of tool displacement due to the cutting forces acting on it in the absence of proper support or an excessively large overhang. In both cases, the angle of inclination will be different from the required one.
Due to the short length of the cutting edge, the cutter is quite difficult to install on the machine. Lack of straightness of the tool blade leads to deviations of the hole from the desired shape. It should be noted that the cutter must be installed at the level of the centers of the machine.
Machining holes in the form of cones with an installed tool is feasible if:
- the length of the cone generatrix is a maximum of 15 mm;
- the workpiece is highly rigid;
- the cone to be ground is located close to the fixed part of the product;
- the cone has a large angle of inclination;
- the workpiece is not subject to increased requirements regarding accuracy, straightness and quality of machining of the hole.
To check the slope of a cone made with a cutter, you can use a special template.
How to choose?
It is necessary to choose a drill with a conical shank only after you know its basic parameters. You can learn a lot about an instrument by paying attention to its shade.
- A gray tint indicates that the tool has not been heat treated and is therefore of low quality.
- The dark shade indicates that the drill was processed with hot steam and is quite durable.
- The golden color indicates that there are no internal stresses in the drill material. This ensures improved performance.
- The bright gold color means that the tool is very wear-resistant. This is due to titanium nitride, which is contained in steel. The rather high price of such drills is explained by the long operational period.
To make a drill with a conical shank, different types of metal are used. The material is indicated in the labeling. If a drill is marked with HSS, it means it is capable of processing a part at high speed without deforming. Also, its strength does not decrease with strong heating.
Specifics of cone deployment
Conical holes that differ in normalized dimensions must be processed with reamers. A set of these tools is presented in Figure 1. It includes three items of a specific type and geometric parameters corresponding to the hole being processed.
Figure 1. Conical reamer: a – for roughing work; b – for grinding the removed chips; c – for finishing work
Each reamer shown in Figure 1 has a conical cutting part, the dimensions of which are selected according to the hole, and a cylinder-shaped shank. The design of the conical part provides for the presence of special grooves that form teeth.
The roughing reamer (Figure 1, a) has a small number of teeth. All of them are arranged in steps along a helical line. The tool presented in Figure 1, b has much more teeth, which, just like in the first option, are arranged in steps. A characteristic feature of the finishing reamer (Figure 1, c) are straight teeth.
Before using reamers, care must be taken to drill the hole. To do this, select a drill whose diameter is about half a millimeter smaller than the diameter of the roughing reamer. After drilling the hole, you can begin to unroll it, as a result of which the treated surface becomes not only conical, but also stepped. Processing with the second tool from the set helps to reduce steps and increase their number. When using the third sweep, the existing steps are smoothed out.
A kit used to machine slightly tapered holes may consist of just a couple of tools. Sloping cones can be processed with a finishing reamer.
The easiest way to check the parameters of the resulting holes is with a plug gauge, shown in Figure 2.
Figure 2. Test plug gauge: a - appearance; b - diagram of the use of the tool; A and B - marks indicating the maximum tolerances of the cone angle
Using the gauge presented above, you can make special marks on its side surface using chalk/pencil. When inserting this device into the hole, you need to turn it several times. Completely erased marks will indicate that the hole taper angle is correct. In the case where the marks are erased only at the smaller diameter of the plug gauge, the cone angle is made larger than necessary. Accordingly, a too small cone angle can be judged by the lines erased only at the large diameter of the control tool.
Figure 2, b shows a check of a correctly processed cone, since mark B is covered by the part, but mark A is not. If the end of the product did not overlap the mark B, then the hole can be processed again. If the end of the product overlaps mark A, then the part is considered defective. Instead of marks, special ledges may be provided on the tool, corresponding to the pass/no pass size.
How to extend the life of a drill
To ensure less wear on the drill, you must follow some operating rules.
- Do not overheat the drill. To do this, work at intervals and use coolant.
- Set the correct rotation speed. It is set taking into account the type and diameter of the drill, as well as the material.
- Remove the chips. Periodically remove the drill from the hole and remove the chips so that it does not get stuck in the workpiece.
- Drill holes in several approaches. If you need to make a hole with a diameter of more than 6 mm, use drills of different sizes (from larger to smaller), this will guarantee higher accuracy.
Differences between a smooth conical and a stepped drill
Before we find out the scope and advantages of cone devices, let’s look at their varieties. Smoothing elements in the form of a cone drill thin sheet steel, gradually increasing the size of the hole. To drill a hole of the required diameter with such a drill, you need to periodically stop and take measurements. Some manufacturers of smooth-bore cone drills eliminate this drawback by applying digital markings.
Stepped elements allow you to drill a hole with greater accuracy due to the presence of degrees. When drilling, there is a smooth transition through the steps, and as a result, the operator can easily track what diameter the hole has. It should be noted that cone drills are quite expensive. Their price ranges from 2 thousand rubles or more. It all depends on the material of manufacture, as well as the size of the holes being drilled. Many people may think that cone devices are completely useless equipment from China until they test the cutting tool in action. Craftsmen openly declare that if frequent drilling of thin-sheet materials is necessary, it is recommended to use conical cutting attachments.
Electroerosive processing method
In technology, electrical erosion refers to the destruction of the surface of a product or workpiece, which occurs under the influence of electrical discharges.
This processing method is most often used to change, within certain limits, the size and shape of holes previously made in metal products and workpieces. Developers of mechanical engineering products that they design are often faced with the need to manufacture holes that may be different from cylindrical. These can be square, oblong, rectangular, curved and other holes.
It is especially difficult to process them when the material itself has characteristics such as increased hardness or high viscosity. It is in these cases that electrical discharge machining is usually used.
What are the advantages of cone drills?
Like all types of cutting tools, cone drills have their own characteristic advantages. The advantages of using the devices in question include:
- Possibility of drilling holes of different diameters using just one nozzle
- Wear resistance - unlike cylindrical elements, conical elements have a long service life. The cutting edges of the nozzles have high strength values, so the device wears out very slowly
- Speed - the nozzle allows you to quickly drill holes, which has a positive effect on its service life. The cutting edges do not have time to heat up, so their quality does not decrease
- There is no need to pre-punch the material, since the tip of the cone drill easily cuts into any metal, even with a dense structure
- At the same time, it plays the role not only of a tool for drilling holes, but also as a grinding material
- Improves the quality and efficiency of drilling thin sheet material
- Eliminates the possibility of deformation of the drilled sheet, which is associated with a smooth transition with increasing diameter
- Possibility of using the attachment not only on stationary drilling equipment, but also on drills
- The presence of abrasive coating increases the strength and efficiency of the equipment. Cone drills can be coated with titanium or diamond
- Does not require frequent sharpening
Cone drills make it possible to drill large-diameter holes, thereby eliminating the need to use metal crowns. This type of cutting attachment is suitable not only for drilling holes in sheet materials, but also corners, pipes, profiles, etc. The main condition is that the thickness of the steel should not be more than 7 mm, and ideally no more than 4 mm.
Are oval holes allowed for bolted connections of elements of the metal frame of the workshop?
| Page 1 of 5 | 1 | 2 | 3 | > | 5 » |
| Alyaksandr |
| View profile |
| Find more posts by Alyaksandr |
| It depends on which direction these oval orchestras are performed. |
There are no rules.
You don't use oval flanges. If, for example, the joints of beams or truss chords are on bolted plates, then you don’t put them there either, the same way. And in touch, for example - so why not? (that's where they are needed most, just when installing connections and the holes don't match). If, according to science, the connection accepts a shear load only due to friction between the parts in the package (and high-strength bolts are not at all necessary), and the bolts are not designed for shear, then it doesn’t matter what holes there are (just about the connections, again ). If the holes are for temporary bolts, God himself ordered them. And the use of oval holes is hampered by the greater complexity of manufacturing
If you don’t fill in oval holes, they will “ovalize” them with a cutter, hanging from some perch, at elevation. +36,500. In the winter in the wind. You have to put it in.
Thanks to everyone who responded!
According to SNiP: “12.12. The use of combined connections, in which part of the force is perceived by welds, and part by bolts, is not allowed." Damn. And you definitely need bolts! I inserted a picture of what happens when you make ovals.
I read it in SNiP 3.03.01 4.12. In the assembled package, bolts of the diameter specified in the design must pass through 100% of the holes. It is allowed to clean 20% of the holes with a drill whose diameter is equal to the hole diameter indicated in the drawings. At the same time, in connections with bolts working for shear and connected elements for crushing, blackness (mismatch of holes in adjacent parts of the assembled package) is allowed up to 1 mm - in 50% of the holes, up to 1.5 mm - in 10% of the holes. . AND I GET HOLES: A CIRCLE and a counter-OVAL! WHAT TO DO
lexabelic
“If, for example, the joints of beams or truss chords are on bolted plates, then you don’t put them there either, just like that. » DID THE HOLES ALWAYS COME IN DURING INSTALLATION AND NO ONE THINKED ABOUT THE INSTALLERS.
| Alyaksandr |
| View profile |
| Find more posts by Alyaksandr |
A case from practice: the plant made oval holes in the gussets for fastening the purlins along the dome (in the project they were round), the installers assembled the dome, removed the scaffolding and THEN scalded the purlins. Later, we discovered that all the “legs” of the dome moved apart differently (due to the movement of the bolts in the ovals)
and therefore it is impossible to glaze the dome. This cuttlefish has been standing in the open air for about 6 years now.
So make ovals only in those cases if provided for by the KM project.
For example, node 5 of 1.460.3-23.98 Issue 1-BOLTED!
Therefore, I decide to make round holes everywhere except for diagonal connections! I hope in the future someone will reveal to me how the installers before me got bolts into the holes in the connection and how is this provided for in the standards?
once again to everyone who replied
| Alyaksandr |
| View profile |
| Find more posts by Alyaksandr |
A case from practice: the plant made oval holes in the gussets for fastening the purlins along the dome (in the project they were round), the installers assembled the dome, removed the scaffolding and THEN scalded the purlins. Later, they discovered that all the “legs” of the dome had moved differently (due to the movement of the bolts in the ovals) and therefore it was impossible to glaze the dome. This cuttlefish has been standing in the open air for about 6 years now.
So make ovals only in those cases if provided for by the KM project.
So, my dears, it’s not the factory’s fault, during installation you need to control the dimensions/diagonals, etc. (are they in the project, if such precise glazing?). And it’s not at all a fact that with round holes everything would coincide. Those who worked at ZMK will understand me. And these “installers”, then, aligned the structure according to the holes in the purlins?)))) Did they control the dimensions using them?))) When they assemble the casing of a blast furnace, for example, they first do a control assembly. All the “cockroaches” are killed there. Of course, no one makes building frames with a control assembly. And it is right. But a combination of deviations in size usually results in holes in connections, purlins, etc. should be oval. Otherwise you will have to fail during installation.
Regarding node 5 from series 1.460.3-23.98 - what specific elements do you mean? Here are the diagonal connections. M20 holes, holes, that means 23 mm (But there’s no need to comment on “holes” here) Do you guarantee that the difference in diagonals at the centers of the holes will be 6 mm or less? Otherwise, you will have to hammer the bolts, fillet the holes, etc.
Since you are taking it so seriously, you can take the force in the connection and calculate this bolted connection based only on the friction between the parts in the package.
What you need to know to choose a cone drill
In shape and design, conical drills differ significantly from cylindrical ones. Like cylindrical devices, conical devices are similarly fragile and require careful handling. To select cone devices for the appropriate work, you must consider the following recommendations:
- Attachment color - if you are choosing a core drill, then you are probably presented with models that differ in color.
If the seller says that there is no difference between the devices, then he does not understand this. The black part indicates that the nozzle has undergone additional heat treatment. Such devices have a long service life. The golden color means that the nozzle is coated with titanium nitride, which increases its strength properties. Steel-colored products do not have any coating, and they are not subjected to heat treatment, therefore, compared to previous options, they last the least - Marking - indicated directly on the outside of the equipment (on the shank).
By the marking you can understand what the nozzle is made of, as well as its diameter and accuracy class. Often the marking begins with a letter designation, and begins with the letter “P”. This letter indicates that high-speed, high-strength alloy steel is used to produce the cone drill. After the first letter, the second letter with a numerical value is indicated. The number indicates the percentage of the alloy, for example, M - molybdenum, F - vanadium, K - cobalt, A - nitrogen. The marking also contains the designation of the minimum and maximum diameter, as well as the accuracy class. Equipment with a diameter of up to 2 mm is not marked. The drill may be marked HSS type, which means high-speed steel
The marking after the HSS designation may also indicate additional information:
- HSS-E is a high-speed steel, which is an analogue of the domestic material P6M5. Designed to work with low carbon steels and cast iron, as well as hard alloy and stainless steel devices
- HSS-Co - 5% cobalt is added to the alloy
- HSS-G TiN - sustainable materials for processing titanium products
To work with conical drills, stationary drilling machines or two-handed drills are used. How to properly drill holes with cone drills is described in detail in the material.
Checking the sharpness of the drill
After a visual inspection shows that the cutting edges are smooth and sharp, check whether the correct sharpening angle of the metal drill is maintained and whether the length of the working edges meets the standards. To evaluate, you will need a special template, a protractor or protractor, and a caliper.
Checking the length of the cutting edges with a caliper
What parameters need to be checked?
- Is the angle of the cutting edge tilted forward? The presence of such an error makes the cutting edge not the highest point of the tooth and forms a hill on the back surface. This causes the drill bit to rub against the back surface of the material and not drill. The error is corrected by sharpening the drill again.
- Are the lengths of the cutting edges consistent from the center point on the web to the side apexes of the cutting edges? This distance must be the same on both sides, otherwise the diameter of the final hole will be larger than the nominal value.
- Check that the apex angle is 120°. You can determine the sharpening angle of a metal drill using a purchased or homemade template. It is important to ensure that the apex angles match for both teeth, otherwise only one side will work.
Correct and incorrect sharpening of a drill
After checking the basic parameters, drill into any metal workpiece. If the sharpening is done correctly, the drill will smoothly enter the metal, and the chips will evenly exit the grooves on both sides. And the finished hole will exceed the nominal diameter by no more than 0.05–0.1 cm.
After drilling the workpiece, sharpen the jumper to reduce the force applied during operation and reduce tool wear.
How to make a template for checking drill sharpness?
A template for checking the sharpening of a metal drill can be made independently from sheet steel or tin. You can take a template from the store as a guide. The simplest template can be made from two or three nuts. Nuts are ideal for these purposes, as they are regular hexagons with internal angles of 120°. If the nuts are connected, the angle between their faces will also be 120°. The nuts can be welded or glued to each other using hot glue.
Drilling metal
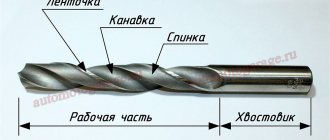
A special feature of the drills is the presence of a sharp edge, which allows for mechanical processing of the material. They have an equal diameter along the entire length, and the blade is sharpened at an angle of 118°. The sharpening angle varies depending on the hardness of the material, for example, for alloy steel, it is 135°. This type of drill is made of HSS steel with 5% cobalt. During operation, they require cooling with special drilling oil .
In order to drill a nozzle in metal evenly and accurately, it is necessary to use a guide device - a jig.
When drilling, it is best to use as little force as possible. When drilling a through hole, when the moment of exit of the cutting tool approaches, it is necessary to reduce the feed so that the part does not tear out, the drill does not break, or burrs do not form.
A conical drill is used to produce a conical hole in metal. It is used as an independent tool. They can drill a cylindrical hole, turning it into a conical one. A conical hole in the metal is made on a lathe in order to drill and bore the resulting nozzle with a cutter.
Cutting modes
The most common mistake is using too high a drilling speed . The more difficult the material to process, the lower the drilling speed should be used. For example, in the case of drilling an 8 mm hole in brass, the drilling speed should be 2500 rpm, for harder alloy steel - 800 rpm. The best sign that the drilling speed is correct is nice, long chips.
Depending on which tool to choose, cutting parameters are important. It is necessary to select the correct rotation speed and feed. Bench-top drilling machines provide the best parameters, but they cannot be used everywhere. It is necessary to follow the principle: the lower the speed and the lower the feed, the longer the tool will last.
For example, take stainless steel, 8mm hole, 4mm thickness, cooling lotion or oil, HSS drill bit, drill or drilling machine: The revolutions should not exceed 400 rpm, and the feed should not be more than 0.10 mm/ turnover In other words, you can drill at a speed no higher than 400 rpm. But this speed is not optimal. Therefore, it would be optimal, for example: 170 rpm, and the feed for every 30 revolutions is 1 mm (three times less than recommended).
Cooling the drill during the drilling process is very important. Use emulsions, oils, drilling sprays. Water should be avoided, as it does not have the properties of lubricating fluids, but only cools.
Large diameter holes
To the question of how to drill a large diameter hole in metal, there is only one answer: in the technological process of drilling necks . For example, you need to increase the neck and get a size of thirty millimeters in diameter. First, it is drilled with a tool of a smaller diameter, for example, four millimeters, then to a size of 8 millimeters, then 12 millimeters, and so each size is expanded to the result.
A large diameter neck in a product can be made on a lathe. The operation is as follows: drilling a hole, boring the neck of the desired size. As pre-drilling is required, the process can be divided into stages: small-diameter drilling, reaming with a gradual increase in drill diameter.
Drilling thin sheet metal
The peculiarity of obtaining an armhole in a thin sheet of metal is its reliable fastening . After the drill comes out to the other side, there is a danger that the sheet may suddenly jam and tear out if it was held in your hands. The best way to securely fasten a sheet is a clamp. In this case, the risk that the tin will be torn out is much less. The number of burrs formed is reduced, which will greatly facilitate the finishing of the element.
Read also: Correct installation of the disc on an angle grinder
If the metal is 0.1 millimeter thick, you can make a hole without a drill by using a metal punching tool. Its design is very simple, like pliers. A punch is attached to one lever, and a matrix to the other. The principle is the same as cold stitching using a stamp.
To cut a through groove in sheet steel, you need to drill a successive row of holes according to size, connecting them into a single slot using a chisel and hammer. To do this, it is necessary to cut off the bridges between the holes and smooth out the unevenness with a file.
Metal pipes
When drilling a metal pipe, make sure that the workpiece is securely secured in the vise. It is advisable to mount the drill on a vertical stand. Insert a piece of wood of the same shape and size inside the pipe, which will protect the pipe from deformation. In this case, use low feed.
Getting narrow nozzles
Drilling deep holes of small diameter can only be done on a special machine or lathe using a device. The part is clamped into a 3-jaw chuck and checked for runout with an indicator. The device is mounted on a tool holder. A drill chuck with a drill is installed in the fixture. First, the hole is centered, then the nozzle is drilled to a given depth. Using a tailstock is problematic, since it needs to be constantly removed to remove chips and lubricant.
To obtain vertical holes, a right angle drilling device is used. For an electric drill, this is a vertical stand at an angle of 90 degrees to the base. The easiest way is to use a vertical drilling machine.
The working area of a cone drill (also known as a “step drill”) is a spiral-shaped recess with several annular transitions of different radii. This device, due to such design features, makes it possible to determine at any stage of processing what size the hole is.
At first it seems that the use of conical step drills, which are characterized by an increased price, is inappropriate, since it is always possible to take a drilling tool of a specific radius and use it to make the desired hole. However, they have some advantages that make their use worthwhile in a variety of situations.
What is a cone drill and what are they for?
A cone drill is an attachment for a power tool, consisting of two parts - a cone-shaped tip and a cylindrical or hexagonal shank. Devices are classified into two types - smooth and stepped. A smooth conical drill has a wall shape corresponding to the design, and a stepped drill has the shape of steps.
Cone-shaped elements are used for drilling round holes in different materials - metal, wood, plastic. For such purposes, cylindrical drills are used, you say. So why are cone devices needed? They are used for drilling holes in sheet steel, as well as similar structures made of non-ferrous metals - aluminum, copper and brass. The presence of one conical drill replaces a whole set of cylindrical cutting devices - this is the main difference.
Design and types
The device consists of:
- the actual working part, which has a conical shape;
- a shank with which the tool is attached to the drill;
- sharp tip capable of cutting through the densest metal.
The cutting edge of a step drill can be straight or spiral type. Each of them has its advantages. A straight edge is easier and quicker to sharpen, while a helical edge allows for a smoother, smoother drilling experience for a smoother operation. When using a spiral edge, the processing efficiency of thin sheet metal is especially increased. There are varieties of tools designed for different materials - wood or plastic. But all step drills are designed the same.
Shanks can be round or hexagonal, which are considered more reliable in use. The tool is made of high-quality stainless steel, and a durable coating of titanium nitrogen or diamond chips increases its service life and reduces the need for frequent sharpening. It must be remembered that compliance with the operating rules and the permissible load is required.
There are two types of step drill shanks - hexagonal and round
Advantages of the stepped form
A type of cone drill is a step drill. Its design is different in that the expansion of the cone diameter occurs in the form of a step. Each of them is marked with a diameter, which makes work easier and frees you from constant measurements. The limit on the thickness of the processed material is indicated on the edge. If the metal is thick, it can be processed on both sides. The step drill has a lot of attractive characteristics:
- it allows you to accurately cut a hole of a certain diameter;
- the cut hole does not require additional grinding;
- using one device, you can cut a significant range of diameters - from 4 to 40 mm, which saves money and time;
- a step drill does an excellent job with metal sheets less than 1 mm thick;
- it is used to polish the edges of a hole made with a conventional tool;
- the same element can be used to chamfer the product;
- The stepped device can be used both when working on a machine and with a hand tool, having previously provided for strong fastening.
Sometimes the disadvantage is the need to use a drill with a low rotation speed or excessive sensitivity to distortions during operation. There will be no distortions if you pay close attention to working with the conical device and follow the instructions.
Required Tools
Professional metal drills (for example, Bosch, Makita, Metabo or Hawera) are made exclusively from high-speed steel HSS. Some are coated with a protective layer, which increases their wear resistance when drilling.
Hand tools - drills and drill bits should be selected carefully. If you have no experience in this area, you should seek advice from a store employee. Purchasing an expensive, high-end drill does not always guarantee its long service life.
Compliance with the technology for making holes in metal and a correctly selected drill significantly increases its service life and protects against premature wear. Basic rules for operating cutting tools:
- Selecting the appropriate type of gimlet for drilling metal of a certain hardness. Many manufacturers have developed entire programs using which you can select the appropriate tool.
- Selecting cutting modes, setting the correct rotation speed.
- Correctly selected feed, application of appropriate pressure on the cutting tool.
- Application of cooling. An oil-based emulsion is recommended.
- Proper fastening of the material (for example, in a vice).
- Attaching the drill to the stand is precise and perpendicular.
- Use of an expanded set of gaskets when drilling through holes.
Technological process
Drilling is the process of removing small parts of the material being processed, chips, using a drill. During drilling, the temperature of the workpiece increases. The cutting force leads to damage, the friction force causes a change in the geometry of the cutting edge, plus high temperature, as a result the tool gradually becomes dull.
Most drills are made from high-speed steel with varying cobalt content. It is very important that it is sharpened correctly: the cutting edges are of equal length, the jumper between them is located along the axis of the cutting tool.
This ensures that both edges will perform identical work during the drilling process. The drill will not have runout, the hole diameter will correspond to the size, and heating of the part and the tool will be minimized.
A drill-drill with chamfer correction has a smaller jumper, due to this the cutting edges are lengthened. With such drills you can drill a hole without preliminary marking with a core.
The choice of drills depends on the type of work being performed . NWKa HSS Baildon drills are optimal for drilling:
- structural steel;
- cast iron;
- brass;
- bronze;
- aluminum;
- plastics;
- tree.
How to sharpen it yourself
Cone drills provide the ability to drill holes with a radius from 0.2 to 1.6 cm. They are manufactured in 2 versions. One of them can be sharpened, the other cannot. The increased price of tools that belong to the second type is due to their high strength.
The cutting edge of such drills (if you follow all operating rules) does not deform for a long time. It is worth noting that an attempt to sharpen such drills for metal will most likely lead to them becoming unsuitable for subsequent use. First, you should study the technology of sharpening a conventional drill, and then take on a similar tool.
To properly sharpen a drilling tool, you need to watch a special video and listen to the advice of professionals. To sharpen a step drill, you do not need a drawing. You can simply restore the original geometry of the drill.
It is possible to sharpen a step drill using a special machine device that is equipped with an abrasive wheel. The working area of the circle should be covered with ordinary sandpaper. In addition, you can use diamond stones of small thickness, which are often used for sharpening knives, scissors, and other objects.
Restoring the geometry of conical tools, the guide recesses of which are located rectilinearly, can be done manually. If they are arranged spirally, it is necessary to use a sharpening machine device. Remember that the better the quality of the drilling tool, the easier it is to sharpen it.
Where are cone drills used?
Cone drills are used for drilling holes of different diameters in thin sheet materials. Moreover, the resulting holes are distinguished by such advantages as evenness and accuracy without scoring, chips or burrs. You can drill through thin-sheet material with a regular cylindrical drill, but the quality of the work will suffer and the task will also become more complicated. For example, the slightest deviation of the drill from the surface will result in a triangular or oval hole rather than a round one. In addition, burrs, scuffs and chips are formed, which ultimately negatively affects the quality of the work performed.
The use of conical drills can significantly simplify the work, eliminating all the disadvantages of cylindrical devices. Due to its advantages, the equipment has found its application in various fields:
- Automotive and repair
- Landscape design
- Construction
- Installation of plumbing equipment
- Installation of electrical installations
The device is not effective in situations where you have to drill holes in materials whose thickness is more than 10 mm.
This is interesting! When drilling sheet metal, it turns out that on one side the drilled hole has an ideal shape, and on the other it has burrs. It is very easy to correct the situation; to do this, you need to use the nozzle on the reverse side.
How to properly drill holes with a cone drill instructions
To learn how to drill correctly with cone drills, you must first prepare the necessary tools and materials. For work you will need the following materials and tools:
- Blank for drilling. These are sheet steel, plastic, glass, wood, etc. The workpiece must be securely secured in the jaws of a vice or a clamp.
- Drill - any power tool that can develop a rotation speed of 3-5 thousand revolutions per minute is suitable. In this case, it is recommended to attach an additional handle to the drill, which will avoid distortion. Drilling is performed in non-impact mode
- Cone drill of suitable diameter. Depends on the hole that needs to be drilled in the workpiece
After this, we proceed to the actual work. The drilling instructions are as follows:
- The nozzle is fixed in the tool chuck
- Select the location where you want to drill a hole
- The tool is applied to the surface being processed strictly in a perpendicular direction
- The tool motor starts. The first seconds of drilling into metal help center and cut a small hole. As soon as the drill begins to go deeper into the hole, the diameter increases with each subsequent revolution. At the same time, the speed of work execution increases
- The end result is a neat hole without chips, burrs or other defects.
It is enough to try the attachment in action once and then stop using cylindrical drills when processing sheet materials. How a conical drill shows itself in action when drilling plastic, plexiglass, metal and other materials is shown in the video clip.
Publications on the topic: Which jigsaw files are different, markings and purposes? Drilling reinforced concrete or how to drill reinforcement in concrete Concrete bits for a hammer drill, how to choose the right one How to make a machine and sharpen a circular saw blade, instructions with a detailed description
Foam concrete
For durable foam concrete grades above M800, the same methods and tools are used as for concrete or brick. For lightweight foam concrete used to insulate walls below M600, it is sufficient to use methods and tools as for wood, only preference is given to cutting tools with a titanium-based protective coating.
In the process of construction and repair, drills are one of the main consumables. Depending on the type of work being carried out and the surfaces being processed, craftsmen select the appropriate types of drills.
There are quite a lot of classification criteria by which drills are divided. Manufacturers today offer a wide range of products, differing in shape, material, and specific use.