Creating an interior design project
When considering the idea of converting a garage into a workshop with your own hands, you need to think through everything down to the smallest detail.
This is especially true for the interior of the room. Basic principles: maximum convenience, accessibility, practicality and functionality Therefore, it is extremely important to plan the space correctly
An excellent solution would be to draw up a detailed project, according to which the garage will be converted into a multifunctional workshop.
It is advisable to carry out the work according to the following plan:
First of all, you should draw a small sketch. It schematically indicates the technical characteristics of the garage space: width, length and height. Next, you need to think about what kind of equipment should be placed in the workshop, how many shelves are needed, and whether there is a need for work cabinets. At this stage, it is necessary to take into account the dimensions of all interior items
It is very important to think through everything so as not to encounter problems and discomfort in the future when servicing the vehicle. When the structure has small dimensions, and at the same time it is supposed to accommodate two machines at the same time, it is advisable to use wall-mounted shelf systems in the available space. They are very convenient to use and do not take up much work space. We pay special attention to designing free space in close proximity to the car
At this stage, it is necessary to calculate the dimensions of the length and width of the passages near the vehicle and understand whether they will be enough for comfortable work with the car. It is also very important to think about the finishing and insulation of the garage box. Some even manage to turn the workshop into an entire design studio. In a room where everything is beautiful and cozy, it is a pleasure to work and just be in it. Gates are another issue that requires special attention. It is better to give preference to models that meet the following requirements: durability, safety and attractive design. Well, as for the last characteristic - this is at the discretion of the owner. It is advisable to think in advance and plan places for storing all tools and work equipment. In addition, such a structure will only benefit if it is provided with an inspection hole.
All that remains is to draw up an estimate and start purchasing everything necessary to implement your idea.
And if you approach the construction and organizational process correctly and responsibly, you will end up with a high-quality, comfortable workshop where the motorist can spend time with great pleasure in the company of his four-wheeled “friend.”
How to forge a graver
Beginner engravers make do with purchased gravers or repurposed files. Mature craftsmen often feel the need for a reliable forged chisel.
Making a forged graver yourself requires intermediate level blacksmithing skills. Instructions on how to make a gravel using the hot forging method are given below.
Forging is divided into the following main stages:
- forging workpieces;
- hardening;
- final processing and finishing.
During forging, it is necessary to constantly monitor the temperature of the part. It is determined by a pyrometer or the traditional method - by the color of the glow. At the beginning of the process, the part should be light yellow, in the last operations it should be light red.
A well-heated workpiece must be grabbed from the forge with pliers and placed on the anvil. Light, frequent blows knock off the scale. To obtain a rectangle, the cross-broaching technique is used. To form a triangular shape of a part, it is pulled longitudinally on the edge of the anvil, turning it at the required angle. A similar technique is used for broaching for a trapezoidal section shape.
In a more complex way, the blacksmith achieves a diamond-shaped section. First, the tip is pulled in one direction, then the product is turned over and pulled in the opposite direction. In this case, part of the part will have to be cut off.
The next operation is broaching the tail part of the cutter. it must be additionally calcined and stretched until a pyramidal tail is formed.
You can move on to the next stage - hardening. Hardening of carbon alloys is carried out in the following sequence:
- heat the product to 805 ±15 °C;
- quickly immerse in cold water;
- check the degree of hardening with a file: if it slides over the metal without forming chips, then the required hardness has been achieved;
- When chips form, quenching should be repeated.
And the final stage is machining. The grinder is given its final shape on the abrasive wheel. Here the blade is sharpened to the required sharpness. The final finishing is done on a fine-grained wheel.
DIY carpentry workshop
Once you have decided on the room and layout, proceed to arranging the workshop. If you do not have a garage or a separate room for a carpentry workshop, you can build a room on your summer cottage with your own hands. The most important thing is to comply with safety standards, provide ventilation, heating, light and enough space for machines and tools.
Necessary equipment and materials
Any carpentry workshop is equipped with a workbench, a woodworking machine and a vice. In addition to large machines, you will need to purchase hand tools, such as a plane, hammer, tape measure, knife, drill, hacksaw, pliers, sandpaper. Hand tools can be placed on workbenches and in drawers. Large machines will require free space.
Technological process of creating a design
If you don’t have a garage or other space for carpentry, you can build a small room yourself. Select a site for construction so that it is located at a sufficient distance from a residential building.
First of all, you need to create a foundation. It is necessary to mark the perimeter of the future building on a free area and dig the soil to a depth of 0.7 meters. Wooden formwork is installed at the edges, gravel and sand are poured onto the bottom, and a reinforcing mesh is laid. The base must be poured with concrete and left for four weeks to harden.
The walls of the structure can be made of wood, brick or concrete blocks. A roof is installed on top of the frame. Floors are made in two layers: the bottom layer is sand covered with roofing felt; the top one is wooden flooring or concrete.
Installation and arrangement
First of all, you need to install all the necessary utilities and ventilation in the room. Then racks, shelves and machines are placed in the room. Equipment should be arranged in such a way that there is free space for work. Each machine requires access from several sides. The equipment must be securely fastened.
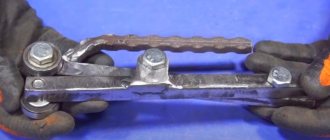
Making a gravel with your own hands
We select the most suitable fragments and cut them into one size with a Dremel
65-70mm (depending on the hand, I have 68mm). We clamp the tube into a drill and cut it with the edge of a file to a size of 15mm.
Cover the bottom of the tubes with transparent tape,
Fill half the height of the tube with epoxy mixed with wood dust. We insert the “stubs” of the needle file all the way.
As soon as the glue sets, trying not to block the geometry of the file, carefully remove the notch with a Dremel.
Further fine-tuning is carried out by hand on a block, again trying to preserve the overall geometry as much as possible.
Almost finished tool
How to equip a workshop in a garage?
If you want to convert a garage into a workshop, first of all you should think about the equipment that will be used during repairs and other work.
Having a good set of tools and equipment, the garage will become a real modern car service center, which will make it possible to carry out repair work of any complexity, of course, with the appropriate qualifications and skills.
A workbench is an indispensable attribute for a motorist
All necessary tools should be stored in one place so that situations do not arise when you need to find, for example, a wrench, but you do not know where it is. A workbench is ideal for such purposes. It is possible to assemble it yourself using a metal frame and wooden shelves.
In this case, the working area is covered with a sheet of metal, preventing damage to the wooden crossbars. If you want to fit a lot of tools in a workbench, it can be made multi-level. There are many sketches and drawings that can be used as a basis for creating a homemade workbench.
If you don’t want to make a workbench yourself, then you can purchase it at a specialized store, choosing the right size and configuration.
Water-oil separation equipment
This equipment is used directly in the process of painting cars and other vehicles. Thanks to the water-oil separator, a uniform distribution of the painted layer over all metal surfaces is ensured.
Welding machine
Car repairs are often incomplete without a welding machine. It will be required for standard body repairs, as well as for deeper and more extensive work. As a rule, for such purposes, a conventional welding machine operating on tungsten electrodes is quite sufficient.
In addition, you can get a carbon dioxide apparatus, thanks to which you can weld metal with wire.
Car washing equipment
It is not necessary to have it professionally washed in a workshop. But at the same time, installing a plumbing system in the garage will be very important. This way you can always keep your car clean without much effort.
To install such an idea, you will need to make a sewer drain and, accordingly, install a water supply system. A rubberized hose will also come in handy.
Advice! If the workshop is equipped with a plumbing system, then it is extremely important to take care of strengthening safety measures, ensuring that the lighting system is protected from moisture. This will prevent a short circuit in the electrical system
Pneumostihel Sergei Valtman
and so, I played with these tubes and motors, gradually began to understand for myself what weight of pistons for what work, which compressor is better to take, the engine.
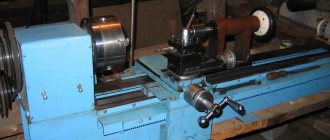
Well, there was an ambush with the turners, but my hands were itching terribly, I bought a lathe and started making my own version from a stainless tube. Based on my considerations, I chose the size of the tool holder and the intermediate impact element, to match the rubber bands that are available in the auto store, sat down and drew on graph paper, and this is the first option I got
The drawings were drawn by Rumen Radkov
Oleg has already posted the details on the forum. The pistons are only now different with fluoroplastic jackets
Of course, I ruined a couple of blanks, but then I got what I needed, well, of course, I sanded the .. raw .. stainless steel and carbonitrated the cylinder tube and lock nut, in the composition that I wrote about at the beginning, after two hours, the result was a beautiful black part like a weapon , with surface hardness, the file slides. Then I used felt and polishing paste to just add gloss and that’s it!
The pistons and tool holders were heated, but this was not worth doing, because after experience, I realized that all the parts can be carbonitrated and that’s it, volumetric hardening is not needed, there are no such impacts that something would rivet.
It is enough to select steel grades with the desired properties, as a result you can obtain a thick layer and high hardness, which also does not require grinding after technical maintenance.
But I’ll say right away that it turns out just great from ordinary food-grade stainless steel 12x18n10t. Here is the first sample, still with an all-steel piston, now they have started to make composite pistons, the jacket is sharpened from fluoroplastic, and it has a steel insert with a flange, to increase the area over which the impact is distributed, otherwise the core will simply pierce the fluoroplastic
Now the pistons have become weighing 1.5, 2.7 and 4.2 grams, respectively, for different jobs, like this
Why several different ones? In order not to make three handles as in GRS, but only three pistons, since the remaining intermediate forces of the piston impact are regulated by decreasing or increasing the piston stroke, due to the thread on the cylinder. The spring is selected to be somewhat longer, and as it is adjusted, it is shortened to the point where at maximum speed, with the spring fully screwed in, the piston strikes are barely audible. The spring was selected experimentally and the most suitable one is made of wire diameter 0.5-0.6mm
Here's a video on how to adjust the handle.
This makes it possible to have the widest range of power, from micro-engraving of names to upsetting thick prongs.
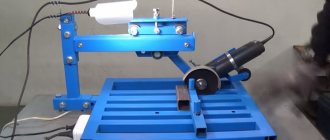
Here you can see the range of capabilities of this very simple machine.
from the side, the engraving of the stamp looks like this (the camera automatically amplifies the sound, in fact it is several times quieter)
This pneumatic clamp doesn’t even need a filter, what’s more, it’s absolutely insensitive to gaps, but it doesn’t pump air, it’s simply consumption-free, closed-loop)))
Adjusting the impact force is also possible in another way, for example, by increasing the parasitic volume, as in a pneumatic hammer, or by partially depressurizing the pneumatic system, for example, a forum member installed a depressurizing valve on the cylinder of the compressor block for adjustment.
Compressor installation location
If there is no extra space and the compressor is allocated the “only free corner”, then there is nowhere to go - we put it there. But if you have the desire and ability to install the compressor correctly, install it in a separate room.
This room must be dry and heated (most compressors are designed for operation in the temperature range from +5 to +40°C). For obvious reasons, the compressor should not be exposed to precipitation. The room must be well ventilated, the sucked air must not contain vapors of toxic substances, explosive gases and solvents. For this reason, the compressor should not be installed directly in the vehicle preparation and painting area.
It is extremely important to ensure low dust levels in the room. Try, if possible, to minimize the number of different “dust-collecting” surfaces - all this dust will ultimately go into the compressor and not all of it will be retained by the filter
If it is impossible to ensure low dust levels in the compressor room, you will have to pay attention to the condition of the air filter more often. A clogged filter not only reduces compressor output, but also causes valve failure.
The place to install the compressor must be horizontal and level. For ease of maintenance, it is advisable to install the compressor at a certain distance from the walls (0.8 - 1 m).
The compressor is the heart of the pneumatic system. At the same time, without an air line (it can be compared to arteries), it will remain only a part of the general “organism”.
Device for making ropes from plastic
When the plastic used to make water bottles is heated, it shrinks. Therefore, bottles can be used to make excellent strong rope. But this will require a special device. See exactly how to make it.
- You will need a board, an electric drill, a utility blade and nuts and washers.
- Place two washers in the center of the board.
- Drill holes in the centers.
- Drill holes on the back side.
- Screw in the bolts.
Using the device is not difficult. The bolts have protruding areas onto which washers are placed. The number of washers will determine the thickness of the rope being made. The knife is placed on washers, and the structure is strengthened by tightening the nuts. Then the entire structure must be secured to a work surface, for example, on a workbench.
Then all that remains is to take a plastic bottle and cut off the bottom. The workpiece is placed under the knife. Pull the ribbon with one hand and hold the bottle with the other. Approximately 25 linear meters of excellent rope is obtained from one 2-liter bottle.
Now you know what garage accessories to make with your own hands and how to arrange the space inside.
Making a gravel for engraving on metal
Making a serger of the simplest design is possible for a home craftsman with metalworking skills. To do this, take as a basis:
- file or needle file;
- spring leaf;
- part of the bearing race.
The main thing is that the steel is high-strength and elastic. Strength is necessary for the graver to successfully cut the metal of the workpiece, not become dull for a long time and maintain the specified sharpening shape. Elasticity will allow the tool not to break under load.
A higher-quality cutter can be obtained by forging, but for this you must have good blacksmithing skills and have a forge. A file made from a needle file will be noticeably inferior to a forged one in both strength and flexibility.
Before you start sawing and forging metal, you should build a drawing of the tool. You will need not only a large-scale image of the cutter itself, but also a drawing of the handle.
How to make air in the garage from a compressor
To connect the end equipment you will need the following components:
The most tensile strength are reinforced oil and petrol resistant rubber hoses. These are difficult to damage even with a car wheel, but they also have the highest price. Hybrid-polymer models with good performance characteristics are more accessible.
First of all, you should decide on the cross-section of the hose, which is selected in accordance with the recommendations of the tool manufacturer. In general, it is recommended to choose hoses with a diameter of 10 and 12 mm to avoid bottlenecks later. Two models with the same cross-section may have different strength and operating pressure characteristics, so it is worth checking these parameters for each position separately.
When operating a pneumatic line in a car service center, it is useful to use the most flexible hoses, because the “oak” line will cling to everything, break easier and be difficult to move around the room. The bendability parameter in the product characteristics is responsible for this.
As for the form, there are three options:
Regardless of the shape and material of manufacture, it is not recommended to use hoses longer than 15 m, as this leads to loss of power.
Hoses directly affect the reliability of the line and the correct functioning of the tool
In order for the same impact wrenches to work in accordance with the passport specifications, it is important to fulfill the following conditions:. 1
Select a hose with suitable operating pressure and internal diameter. High-performance tools may place more stringent demands on hose strength and capacity
1. Select a hose with suitable operating pressure and internal diameter. A high-performance tool may have more stringent requirements for hose strength and capacity.
2. When installing the pneumatic line, a balance was maintained between the length of the hoses and the number of splitters. The more branches are planned, the more carefully it is necessary to select the cross-section of the distribution hoses and take into account the compressor performance.
3. Distributors and quick-release connectors (QDCs) of suitable cross-section were used.
Pneumatic splitters are often called air tees or air hose tee fittings. Branchers allow you to connect additional lines to the main output of the compressor for simultaneous operation of several pneumatic tools.
Air tees are divided into two types:
- Herringbone splitters. Allows the outlet lines to be connected to the main hose rather than to the compressor. Made in the form of a cross with four outlets. Dimensions are selected in accordance with the diameter of the air hose. The most popular splitters are 8, 10 and 12 mm.
- Threaded tee fittings. Equipped with an inlet and three outlets with threads of a certain size. Designed for use in conjunction with threaded adapters and connectors.
To connect terminal equipment, it is customary to use quick-disconnect connections (QDC). With their help, you can quickly and reliably connect a wrench, spray gun and other equipment. The BRS also allows you to disconnect the pneumatic tool from the line without stopping the air supply. A herringbone or threaded connection is used as a fitting.
There are two types: BRS father and BRS mother. Most often, “male” fittings are installed on pneumatic tools, and the “female” connector is screwed onto the hose to the compressor.
When using powerful impact wrenches and other productive equipment, it is important to select a coupling with high throughput. Unlike the standard version, it is designed for high pressure and flow of compressed air
Connecting a tool directly to the compressor outlet is fraught with premature corrosion and increased wear of the working mechanisms of impact wrenches and tire changers.
To avoid early repairs and replacements, additional equipment for air preparation must be included in the pneumatic line:
Source
Purpose of the graver
For engraving, the master needs a set of metal stamps of different shapes to engrave various elements of the image. The most common are:
- Spitz is a wedge-shaped cutter with a slope of 30 to 40°, used to design the outline of an image and clear elements of great depth;
- Messer - resembles a knife, the wedge slope is from 15 to 30°, it is used to make fine details;
- flah - similar to a chisel blade 0.15-6 mm wide, used to select depressions in the design;
- bol - a rounded point with a radius of 0.2-0.6 mm; with its help, semicircular depressions are selected, from which text elements of the design are formed;
- hornbeam - diamond-shaped section, large elements on concave elements are chosen with it;
- facet - a trapezoidal section with a blade sharpening angle from 50 to 115°, used for forming images of high complexity;
- Shatir - the blade has a serrated shape with a distance between the teeth from 0.1 to 0.5 mm, it is used to obtain several parallel strokes.
Stichels for carving metal of other shapes are rarely used for restoration work and when making particularly complex images.
Installation rules: slopes, closed loop, gooseneck
When bringing all the elements of the pneumatic network together, try to adhere to the following recommendations.
1. The highway must be given a slight slope - 1-2%. This is necessary so that condensate accumulating in the main line does not reach consumers, but flows to the lowest point of the pneumatic line, equipped with a drain valve.
2. For the same purpose, branches from the main line to consumers should be given a ring-shaped shape in the form of arches (the so-called “gooseneck”). That is, the outlet should not just go down, but first go up, and then down. Thanks to this, the condensate, again, will flow down the slope without reaching the consumption posts.
3. The lowest points of the main line and all dead ends of pipelines (lower parts of vertical sections) must be equipped with condensate traps. It is advisable to combine them with a common drainage line connected to a condensate separator (such devices are sold).
4. If possible, the pneumatic line should form a common closed loop so that the pressure at all its points is the same. Otherwise, the pressure at the farthest point of the line will be minimal. And the longer the line, the less pressure at its farthest point.
5. It is advisable to distribute branches to consumers according to their operating pressure: the higher the pressure, the closer to the compressor. Each consumption station should be equipped with a gearbox with a pressure gauge (gearboxes combined with a filter-moisture separator and lubricator are available for sale), as well as a shut-off valve.
6. There should also be shut-off valves in certain sections of the main line - in order to be able to cut off any section from the network for local repairs without disconnecting all consumers.
7. The pneumatic network is laid out, as a rule, along the walls or ceiling. The main thing here is to maintain ease of control, maintenance and drainage of condensate. Before installation, it is a good idea to mark the places on the wall where the highway will pass.
8. To seal threaded connections, you cannot use tow, which is familiar to plumbers. Instead, use special sealants containing Teflon or Teflon tape. When assembling, make sure that particles of sealing material do not get inside the pipelines.
9. Try to keep the line free from obstructions to air flow. You should not embed various plumbing elements (for example, water taps) into it - their hydraulic resistance is enormous.
10. Pipeline routes should be as simple as possible, with a minimum number of bends, intersections, cuts or connections.
Finally, a video to consolidate your knowledge.
So, all the requirements for the pneumatic network have been met: the material and diameter of the pipelines have been correctly selected, hoses and quick-release connections have been selected. It seems like they didn’t forget anything... But they forgot: to clear the air of dust, oil and moisture. This is the only way we can extend the service life of pneumatic tools and avoid painting defects such as bubbles, oil craters and debris. About equipment for air preparation - next time.
Source