Vernier calipers are used to determine outer and inner diameters, linear dimensions, depths of grooves and holes, and distances between shoulders. Some modifications allow markings to be applied to the surfaces of workpieces. The tool is used to measure workpieces in mechanical and metalworking production areas, to control the production of wear surfaces when repairing equipment, and due to its ease of use, it is used in home workshops.
Vernier caliper design
Shown in Fig. 1 caliper type ШЦ-1 consists of:
- Barbells.
- Framework.
- Measuring scale.
- Upper lips.
- Lower lips.
- Depth gauge.
- Vernier scales.
- Clamping screw.
The choice of caliper for a specific task is determined by the dimensions, design features of the part and requirements for dimensional accuracy. The tools differ in the following parameters:
- Measuring range . The length of the scale on the rod ranges from 125 to 4000 mm.
- Accuracy . Common modifications have an error of 0.1, 0.05, 0.02 and 0.01 mm.
- Functionality . There are calipers with and without a depth gauge.
- The number and shape of measuring surfaces. The jaws of single-ended and double-ended instruments are available in flat, pointed or rounded shapes.
- The design of the reading device . It can be vernier, mechanical, clock type or electronic.
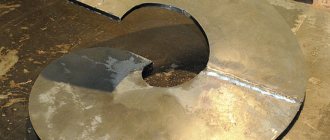
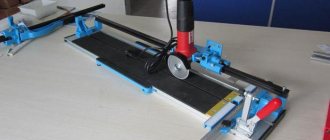
Vernier calipers are made of wear-resistant tool steels, and their measuring surfaces can be reinforced with carbide tips. To mark parts, cutters are installed on non-sharpened jaws (Fig. 2), complete with holders and clamping screws.
Tool structure
How to learn to use a caliper? To begin with, get acquainted with its device. The double-sided manual caliper with a linear measuring system, which is most in demand in production, consists of the following structural elements:
- A measuring rod with a scale with divisions whose accuracy corresponds to the class of the instrument.
- A measuring frame sliding in the rod guides. How to use a vernier caliper? On the lower control surface of the frame there are vernier divisions, by which the mantissa of the measured quantity is determined: the value of the size after the decimal point. For example, when measuring a length of 13.9 mm with class II accuracy, the reading “13” will be taken from the main scale, and the reading “0.9” from the vernier scale. For ease of use, the frame is equipped with a grooved protrusion in its lower right part.
- Lower measuring jaws of the rod body. They are designed to determine the external dimensions of a part or workpiece. The measuring planes of the jaws are internal, and their reach is determined by the measurement limits for which this tool model is designed. According to the state standard, the reach of the lower jaws can be from 35...42 mm to 63...125 mm, depending on the measurement limits for which this model is designed.
- The upper measuring jaws of the rod body, with the help of which the dimensions of the external surfaces of the products are determined. The control planes of the upper jaws are also calibrated, and their overhang, as in the previous case, is determined by the capabilities and type of product. It ranges from 16 to 30 mm.
- A clamping screw with a knurled head, with which the current position of the frame is fixed.
- A depth gauge, which is a flat ground pin that slides in guides located on the opposite side of the rod body. At the working end of the pin there is a conical bevel in order to reduce the size of the end surface of the depth gauge. This makes it possible to estimate the depth of holes with small diameters.
Tool structure
All contact edges of the rod, guides, frame and vernier are carefully ground to size, with an accuracy an order of magnitude higher than that with which a caliper operates.
If there are special design requirements, other elements may be provided. Auxiliary measuring surfaces (and, consequently, units) are necessary if marking operations are performed, determining the size of ledges, stepped parts of structures, etc. Sometimes a micrometric frame feed is built into the tool.
Measurement order
The tool and part need to be prepared for work: remove dirt, bring the jaws together and make sure that the readings correspond to “0”. To measure the outer diameter or linear dimension you must:
- spread the sponges by moving the frame;
- move until it fits snugly against the countersurfaces;
- fix the position of the frame with a locking screw;
- bring out a caliper to evaluate the results obtained.
To measure the internal size, the jaws are brought to “0” and then moved apart until they come into contact with the countersurfaces. If the design features of the part allow you to see the scale, then the readings are read without fixing or removing them.
To measure hole depth:
- by moving the frame, the depth gauge is extended;
- lower it into the hole to the bottom and press it against the wall;
- move the bar until it stops at the end;
- fix with a locking screw and remove.
The accuracy of the results depends on the correct positioning of the jaws relative to the part. For example, when determining the diameter of a cylinder, the rod must intersect or cross with its longitudinal axis at a right angle, and when measuring the length, it must be positioned parallel. In calipers of the ShTs-2 and ShTs-3 types there is an additional frame, which is movably connected to the main micrometric adjusting screw (Fig. 3). This design simplifies tool positioning. When taking measurements, the additional frame is fixed on the rod, and the position of the main frame is adjusted by rotating the micrometer screw.
How to measure a large diameter pipe
The caliper jaws, with a measuring range from 0 to 125 mm, are 40 mm long and therefore allow you to measure pipes with an outer diameter of up to 80 mm. If you need to measure a pipe of a larger diameter or if you don’t have a caliper at hand, you can use the traditional method. Wrap the pipe around the circumference with one turn of non-stretch thread or wire, measure the length of this turn using a simple ruler, and then divide the result by the number Π = 3.14.
| Online calculator for calculating the diameter of a pipe along its circumference | |
| Total winding length, mm: | |
| Number of turns: | |
Despite its simplicity, this method of measuring pipe diameter allows for an accuracy of 0.5 mm, which is quite enough for a home craftsman. For a more accurate measurement, you need to wind more turns.
Reading results
Vernier scale
The number of whole millimeters is counted from the zero division on the staff to the zero division of the vernier. If they do not match, then the size contains fractions of a millimeter corresponding to the accuracy of the tool. To determine them, you need to count on the vernier from zero to the line that coincides with the mark on the bar, and then multiply their number by the division value.
Figure 4 shows the dimensions: a – 0.4 mm, b – 6.9 mm, c – 34.3 mm. Vernier division value 0.1 mm
By hourly indicator
The number of whole millimeters is counted on the bar from zero to the last mark not hidden under the frame. Shares are determined by an indicator: the number of the division on which the arrow stops is multiplied by its price.
Figure 5 shows the size 30.25 mm. The indicator division value is 0.01 mm.
By digital display
There is no need to count here, the size is shown on the display.
To determine the internal size taken with a tool with radius measuring surfaces (lower jaws in Fig. 3), their thickness, which is indicated on the fixed jaw, is added to the readings on the scale. To calculate the outer size taken with a caliper with cutters (Fig. 2), their thickness is subtracted from the readings on the scale.
How does a digital caliper work?
There are three modifications of calipers, they are divided according to the method of taking dimensions.
- The simplest vernier models can be used for home needs. Integer values are taken from the bar, the fractions are determined by the vernier - these are the basic rules for how to use a vernier caliper.
- The mechanical measuring principle is used in dial models. Through a gear transmission, fractions of a millimeter are transferred from the rod scale to the dial, and whole values are taken from the rod.
- The most convenient and accurate is the digital option, where all results are obtained from the display screen. The electronic part itself can be customized, making it even more convenient to use.
To understand how to use it, you need to understand how a digital caliper works. The work is based on a digital capacitive vernier: inside the device there is a capacitive matrix, several plates, the main ones being the stator and the slider. When making calculations, they are displayed on the display, the stator is located on a mechanical ruler, and the rotor is located under the display itself.
https://youtube.com/watch?v=7CsvxNz6K50%250D
Marking
A regular caliper with pointed measuring surfaces copes with basic marking operations. By pressing one jaw against the side of the part, you can use the tip of the second to draw a line on the surface perpendicular to it. The line turns out to be equidistant from the end and copies its shape. To draw a hole, you need to mark its center: the recess serves to fix one of the jaws. Any technique of descriptive geometry can be used in a similar way.
Carbide tips and cutters leave noticeable scratches on parts made of steels with a hardness above 60 HRC. There are also narrow-profile calipers designed exclusively for marking.
How to measure an angle
To obtain a given angle when marking, you can use a protractor, which everyone became familiar with in geometry lessons at school. It is quite sufficient for accurate measurements in everyday life.
The photo shows a plastic ruler in the form of a triangle with angles of 45º and 90º, with a built-in protractor. Using it, you can mark and check the accuracy of the resulting angle.
When marking metal parts, a metalworker's square is used, which provides higher measurement accuracy.
Why do measurement errors occur?
The most common errors that reduce the accuracy of measurement results with a working instrument:
- Excessive pressure on the frame causes misalignment relative to the rod. The same effect is obtained if, when measuring with the lower jaws, the caliper is brought together by the upper jaws.
- Installation of jaws on fillets, chamfers and roundings.
- Distortions during positioning.
- Instrument calibration violation.
The first three mistakes most often arise from lack of experience, and go away with practice. The latter must be prevented at the stage of preparation for measurements. The easiest way is to set “0” on an electronic caliper: there is a button for this (in Fig. 6 the “ZERO” button). The hour indicator is reset by rotating the screw located at its bottom. To calibrate the vernier, loosen the screws securing it to the frame, move it to the desired position and fix it again.
Deformation of the caliper elements and wear of the measuring surfaces make the tool unsuitable for use. To reduce the number of defects in production, calipers undergo periodic verification by metrological services. To check the accuracy of a tool and acquire skills at home, you can measure parts whose dimensions are known in advance: for example, drill shanks or bearing rings.
How to work with a caliper
The measurement process begins with preparing the instrument. It is cleaned of dust and grease, and sponges for external measurements are combined. The scale on the rod and the first mark on the vernier must coincide with the zero mark. 10 mark on the vernier scale – with a mark of 19 mm on the rod scale.
The digital caliper is ready for use when the arrow points to “0”. The zero indicator should be on the display of the electronic device. How to use a caliper? The video will help beginners use the device correctly, measure the wall thickness of parts, the diameter of products, and the depth of holes.
How to take measurements with a caliper
To determine the parameters of external surfaces, work with large sponges.
- Spread the jaws to the required width by moving the frame.
- Fix the part between them so that the blades fit tightly to its surface: use the adjusting screw.
- Check the accuracy of installation of the device: distortions of the jaws are unacceptable.
- Set aside the detail and decipher the information.
How to correctly measure the inner surface of a part with a caliper?
- Set the scale to “0”.
- Small jaws are placed inside the part.
- Spread the lips: they should touch the inner surface.
- Fix the position of the caliper using the screw.
- Check the precise fit of the jaw blades.
- Explore the parameters.
When measuring the depth of a hole with a caliper, use a depth gauge. It is pulled out of the bar by moving the frame. The parameters are read after the bar reaches the bottom of the hole.
How to determine readings on a caliper
When reading information on the dimensions of the outer and inner surface of a part, its depth, the indicators on the main and additional scales are taken into account
- The main size of the part is determined by the markings on the instrument rod where the zero mark of the vernier is located.
- Fractions of a millimeter are calculated from the marks on the vernier scale or on the dial of the pointer mechanism.
- The main indicator and the dimensions on the additional scale are added up.
If the zero mark of the vernier on the rod is between the numbers 22 mm and 23 mm, then the part size is 22 mm. To determine the vernier indicator, it is necessary to establish which mark of the additional scale coincides with the markings on the rod. The exact relative position is given by a fraction of a millimeter.
If the vernier mark is between two lines of the main scale, then the smallest number is taken into account. The vernier mark is between indicators 4 and 5 of the rod ruler, fractions of millimeters will be “4”
The overall size of the part is 22.4 mm.
Information is read from a dial device in a similar way. The electronic device shows the overall result on the display: measurement speed is 60 seconds. The device is connected to a computer and outputs data to a hard drive for further analysis of the information.
After completing work with the caliper, the adjusting screw on the device is loosened, and the jaws are moved apart by 2 mm. All components are wiped with a rag to remove dust and oil, and the device is placed in a case.
A caliper is not a complex measuring instrument. It's easy to use. The accuracy of the indicators will satisfy the most demanding craftsmen. The device measures not only the parameters of parts. It is used to measure the diameter of drills, holes, and stones in the jewelry industry.
https://youtube.com/watch?v=Nobw6s9k4dQ
What can experts advise?
Sergey Voronenkov, master installer: As a rule, pipes made of steel intended for installation of water supply systems are characterized by their inner diameter. You can often hear from professionals about half-inch or inch pipes. This means that their internal diameter is 12.7 mm or 25.4 mm. But the outer diameter is the province of the plumber and plumber. Simply because most plumbing systems today are installed using a threaded connection. In turn, the thread is cut on the outside of the pipe.
Viktor Ivanovich Petrov, plumber: The use of a metal measuring tape during measurements is less preferable. Metal cannot ensure a tight fit of the tape measure to the pipe, which is why the error will be too large. The result will be much more accurate if you use the so-called flexible tailor's meter.
Less accurate, but very fast method
However, if there is no need for overly complex and precise calculations, then you can determine the diameter simply by applying an ordinary school ruler to the diameter of the pipe. You will only need to hold the ruler so that its scale coincides with the imaginary line of the pipe diameter. Small deviations in one direction or another are quite acceptable. After all, in stores, pipes, as a rule, are offered in standard sizes. If necessary, the sales consultant can adjust the diameter of the required pipe.
An ordinary ruler can help if there is no professional tool for measuring the diameter of the pipe, but do not forget about the error.
Vernier calipers - classification and marking
The measuring instrument, a caliper, can be of 3 types and about 8 standard sizes, at least according to domestic regulatory documents
Moreover, when purchasing any precision instrument, it is important to focus on the standards by which it is manufactured and calibrated. It is divided into types depending on the indicator of the measured value from which we take the required numbers
These can be vernier (ShTs), dial (ShTsK) and digital (ShTsTs) calipers. In the first case, we will have to run our eyes over both scales, count the divisions and report the result. In the second case, we will see numbers on a mechanical scale with a moving arrow, but in the third case, we will be shown the finished result on the display.
Within these types, further subspecies can be divided depending on the design and length of the main line. For example, you can divide tools by the type of material from which they are made. An example of a hard alloy tool is ShTsT-I. There are differences in the design of the jaws or additional accessories. Thus, ShTs-I and ShTs-III differ in the location of the jaws; in the first case it is bilateral, and in the second it is unilateral. But the ShTs-II has a micrometric feed frame, which will make marking easier if you need to transfer your measurements to another plane. There is no point in discussing the differences in standard sizes for a long time; one has only to say that the larger the ruler, the greater the error in the obtained values.
Photo of the ShTs-2 caliper, antok.by
Photo of caliper, antok.by
Photo of digital caliper, tehnoalat.rs
Photo of dial caliper, tehnoalat.rs
Photo of digital composite caliper, tehnoalat.rs
How to measure using a ruler or tape measure
Before you measure the diameter of the pipe with a tape measure or a flexible ruler, you should know that this option is simple, and this task will be feasible even for inexperienced craftsmen. Here you only need to take one measurement.
It is necessary to measure the circumference of the pipeline. The resulting value is divided by the value of Pi. To measure and get more accurate numbers, you should use not 3.14, but 3.1416. But, for the task of finding the outer diameter of a pipe with a large volume, a ruler will not be enough. You will need to take a tape measure to work.
To determine the volume of a pipe, they also use the method of measuring the dimension of the wall at the cut. This can be measured with the same instruments. It is also possible to use a caliper. The wall thickness indicator is subtracted from the dimensional indicator of the volume outside.
When installing highways, it is important to know that to determine the internal volume of the assortment imported to us, it is necessary to determine that it is supplied with accompanying documentation.
Watch the video
How to measure the diameter of a pipe?
It indicates the internal volume in inches. To convert internal or external dimensions to centimeters, they need to be multiplied by 2.54. For a similar conversion of the internal and external diameters back, you should multiply the indicator by 0.398.
Below is another interesting way.
How to measure with a caliper
If you ask a professional plumber how to measure with a caliper, the answer to this question will be as follows: “a caliper for such actions is the most convenient device, and you can use it to measure the required dimension very easily without making additional calculations. But only pipes with dimensions up to fifteen centimeters can be measured in this way.”
You need to press the jaws of the device firmly against the wall of the assortment, but it is not recommended to apply much force. Then you can measure and determine the dimensions in centimeters, and, if necessary, in millimeters.
Also, using a caliper, you can measure and determine the size of the end part. If this part of the highway is located in a hard-to-reach place, and the connection here is permanent, then this device will even come in handy.
But, the length of its legs should not be more than half the volume of the pipeline. To determine the measurement, the measuring device is applied to the pipe at its widest point.
Watch the video
Measurement with caliper ShTs-1
Before determining the diameter of a steel pipe using this method, you should remember that experienced craftsmen recommend using only a high-quality device for work. Only he can guarantee accurate sizing.
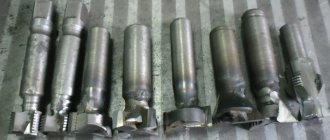
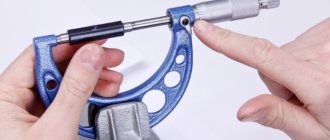
How to measure with a micrometer
If the diameter of a metal or any other pipe is determined, then each measurement can be made with high accuracy (up to 0.01 mm) using a micrometer.
In appearance, the device resembles a bracket. On one side there is a heel - a support, and on the other there is a stem and a high-precision thread equipped with a microscrew. The microscrew contains a metric scale. To find out how to find the volume indicator of the assortment using a micrometer on a metal or other pipe, you need to place the part between the heel and the end, then start rotating the screw.
Continue until 3 clicks are heard. Next, you need to find the readings on the stem, where there is a scale in millimeters, and the data from the second scale of the device (these are hundredths of a millimeter) are added to the obtained figures. The sum of these two indicators determines the required value. And, as you can see, finding it is not at all difficult.
Micrometers equipped with an electronic digital readout function allow you to most correctly measure the diameter of a pipe. They are the most convenient to work with and allow you to determine the result with an accuracy of 0.001mm. If the battery in such a device runs out, you can measure it with it, just like with a regular micrometer.
The only disadvantage in this case is the high cost of the devices, which is not always acceptable for a home craftsman. Therefore, in order to correctly measure at home, such devices are used extremely rarely.
Laser sensors
The diameter of a metal or any other round pipe can be measured using scanning laser sensors. How is the pipe diameter determined by these devices? Everything is simple here.
Such devices consist of a receiver and a receiver. These devices use a plane of light produced by a laser, which is deflected by a rotating prism and directed through a lens.
In the receiver, the laser is focused on the diode. It takes time for the laser to pass through a metal or other system.
Ways to measure external and internal volume
Before you start working and find out how the diameter is measured, you will have to establish exactly what volume is needed for a specific task. All pipes for any pipelines are measured and classified according to their internal diameter. It is called “conditional passage” because it is responsible for the network’s throughput capabilities.
If the internal diameter is measured, it is designated Dу, and the external diameter is designated Dн. The wall thickness is indicated as h. With these designations it is convenient to measure and perform calculations, and draw up projects of various highways for residential and industrial buildings.
As for the methods for measuring the volume size of pipe products, the first thing that is important to note is the difference in their features depending on the conditions. They must be taken into account, otherwise many mistakes can be made.
Determining the choice of one or another option depends on how accessible the object being measured is located. Now about some of the methods in more detail.
Measurement by copying - photography
This method can be useful when there is no access to the pipe at all. It is suitable for both small and large diameter pipes. To scale, you will need to attach a ruler or any other large-scale object to the pipe, the dimensions of which are initially known. Then the pipe with the attached objects is photographed - and the resulting image will allow an analysis of the diameter of the pipe, based on a comparison of the sizes of a large-scale object for comparison.
Measuring labor using the copying method will allow you to determine the diameter of pipes located in hard-to-reach places.
In particular, this technique is used if it is necessary to calculate the dimensions of pipes in a car without the need to unload it. It will be possible to take just one photo and send the train on its way. Otherwise, it would be necessary to measure each pipe separately.
What tool do you need for each method?
Before choosing the diameter of a heating pipe, or any other system, you need to know what is used in such situations.
well-known caliper is used more often for measurement than other tools. But, it may not be among the set of home tools. Therefore, we have to solve the question of how to measure the diameter of a pipe without a caliper.
It is also not possible to find out the exact dimensions of a product with a large diameter for heating or water supply using this device. In such situations, it is possible to measure the required length of the volume of the tubular product using simpler devices:
- flexible ruler;
- tape measure;
- knowledge of the value of Pi, which is 3.14.
If access to the network is not difficult, a better option for calculating the value would be a tape measure or a metal ruler. But, with a hard ruler it is easy to calculate the size of only the end parts of the line that is being measured.
Watch the video
How to measure the diameter of the riser
Another option for measuring the circumference of a pipe inside or outside is the copying method. In such a situation, for example, a ruler is brought to the pipe. This section of the highway is then photographed. Further measurements in order to obtain the entire set of necessary information should be taken from the photograph. Figures that correspond to reality are obtained after scaling the photographs taken.
In addition, you can find the diameter using the following formula:
D = L:3.14.
In it, D indicates the diameter, and L is the circumference of the tubular product. In a simple example it looks like this. The circumference of the pipe is 62.8 cm. This number is divided by 3.14. The result is 200 mm.
It's not just home plumbers who work with this formula. It is also used in production conditions, only in this case there is a slight amendment. The formula for the work remains in the same form, only the double thickness of the tape measure and the value of 0.2 are subtracted from the final result. This number includes a correction for the adherence of the tape measure to the surface of the highway.