How to wind line on a trimmer reel: key points
A gasoline or electric trimmer is an indispensable assistant in the arsenal of a modern summer resident or owner of his own home.
Thanks to these garden devices, you can easily mow even a large garden plot. After purchasing this tool and doing several mowings, many people think about how to properly wind the fishing line onto the trimmer reel. For an inexperienced user, the first operation to replace it will seem problematic and time-consuming, since developers often do not fully reflect the instructions for replacing fishing line in the instruction manual.
Common mistakes
Although winding line is a very simple task, many beginners may wind the line incorrectly. Below are the most common mistakes.
- Many people, when measuring thread, think that 4 m is a lot. Because of this, people often measure out less and therefore end up running out of line. Don't be afraid to measure out too much, because you can always cut off the excess.
- In a hurry, some people do not follow the threading grooves inside the spool and wind the thread at random. This leads to the line flying out of the reel and can even cause injury.
- For winding, you should use only the appropriate fishing line. This error is the most common. You need to monitor not only the thickness and volume of the fishing line, but also its type. You should not use the first line you come across for winding, which will not meet your goals. For example, you do not need to use a thread on young grass if you need to mow dead wood.
- Do not turn on the device until it is completely wound and assembled. Although this is obvious, some people do this to check if everything is done correctly.
- In no case should you confuse the direction of refueling, as this will overload the engine, and it will soon fail.
It is common for beginners to make mistakes, so you must follow the tips given in this article.
For information on how to replace the line on a Patriot , see below.
The fishing line flies out
If the string flies out when mowing, this is another indication that the spring in the bobbin has weakened or was completely lost due to careless disassembly of the head. As a result, the cord does not hold and jumps out when rotated.
Preparing to wind the fishing line
Before the winding process, you must first remove the reel with fishing line from the housing. Depending on the manufacturer, power and type (electric or gasoline), there are three design types of trimmers:
- Compact trimmers with electric drive.
Straight trimmer
This model provides the ability to install a knife. Removing the coil in such models is done using two keys recessed into the coil body. To install the trimmer knife, you need to align the hole of the reel and the rod, and then insert a device in the form of a steel pin (screwdriver, iron rod). After fixing the coil, the housing can be easily unscrewed clockwise by hand.
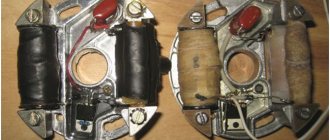
Basic malfunctions of the trimmer starter
It is not difficult to determine the cause of the breakdown of the trigger device. There are several main options:
- broken cord (rope);
- when the spring breaks or becomes disengaged.
These parts are shown in the photo below.
It may happen that the starter mechanism is accidentally broken. The consequences will be disastrous if a broken rope is wound around the flywheel of a running internal combustion engine: then the spring will burst and the pulley will break. But such cases when a complete replacement of the starter assembly is required are extremely rare. In most cases, to repair the mechanism, it is enough to install a new spring or replace the cord.
Winding fishing line onto the trimmer
Measured and careful removal of the spool from the braid reel makes it possible to proceed directly to winding the fishing line. The design features of the head, the number and location of the fixing holes dictate the sequence of actions when performing this operation, and also determine the methods used. Today there are several types of reels, depending on the number of tendrils of the fishing line and the methods for threading it:
- Trimmer head with one working tendril;
- A reel with two tendrils of fishing line;
- Reel with automatic winding.
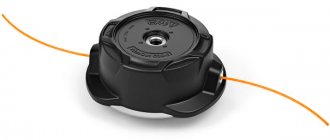
Trimmer reel with one tendril
Brush cutter reel with one tendril
Many owners and specialists note the ease of operation and threading of the reel with one mustache. Depending on the manufacturer, the length of the threaded fishing line can range from 2 to 5 meters. The end of the fishing line is inserted into the head into a special technological groove or hole, and winding is carried out in the direction opposite to the working rotation of the reel. Most reels have arrow marks on the outside of the housing that indicate the direction in which the trimmer spool moves.
After winding, you need to leave a free end of 15-30 cm to enhance the centrifugal force, which is decisive when removing trimmer line in automatic and semi-automatic reels. We pass the remaining end through the working hole of the coil and assemble the head.
Trimmer head with two antennae
Double flute head
After removing the spool from the reel body, we determine the number of streams for winding the fishing line (1 or 2). There is no fundamental difference between reels with one and two grooves, but if carelessly threaded into a double groove, problems with operation may occur. Due to the possibility of intertwining of adjacent tool lines, a situation may arise when, after wear of the working antennae, it is impossible to remove new ones.
Regardless of the number of streams, a fishing line with a length of 1.5 to 3 meters is taken for refueling. Winding must be done in the direction opposite to the rotation of the head, since winding in the direction of movement will lead to the fact that the fishing line will not be removed from the reel. After the fishing line is tucked into the trimmer reel, we thread the free ends (15-30 cm) into special holes. Next, we assemble the head in the reverse order of disassembly and check its functionality. Don’t worry if the ends of the two antennae are very different in size, because when you start the trimmer, the knife installed on the guard will cut off the excess.
Trimmer head with automatic line threading
Types of trimmer heads
Some models on the market have a reel with an automatic winding mechanism. The owner only needs to correctly thread and fix the ends in the head, and the winding operation will be performed by the tool itself when switched on in operating mode. It is almost impossible to wind the fishing line incorrectly into a trimmer with such a head, since the reel independently determines the position of the tendrils. The advantages of an automatic trimmer head include ease of threading of fishing line, but the disadvantages include frequent breakdowns of the mechanism due to the complexity of the design and high cost.
Types of trimmer heads for reels
The main element of the trigger is the mowing head, which is a cylindrical body with a reel (reel) inserted inside. The fishing line (cord) is tucked into it. The heads differ from each other in the method of feeding and threading the cord. There are three types of heads:
- Auto. Then the line is supplied when the user reduces the motor speed. Automatic cord feeding is very convenient when there is a lot of work to do. The lack of such a head. high thread consumption.
- Semi-automatic The implementation of such a head does not require the user to perform any complex manipulations. The principle of its operation is designed in such a way that the line automatically begins to lengthen while the trimmer operates at full speed. You just need to tap the head of the machine a little on the ground (this will release the blockage of the line), and the cord will come out of the bobbin due to centrifugal force. Then the fishing line is cut to the required length with a knife, which is located on the protective cover.
- Control. To extend the cord, the machine must be stopped. After which the line will need to be removed manually.
Replacing fishing line in a trimmer: 2 simple ways
A trimmer is a necessary and useful tool for a summer cottage and a private home. Many people own and actively use it, but not everyone knows how to replace the line in a trimmer, especially at first.
In this instruction we will walk you through the entire replacement process step by step. Looking ahead, there are two ways to thread a trimmer spool with line. There is no fundamental difference - the difference is that in the first case there will be one line folded in half, and in the second there will be two sections of such lines.
Content:
What types of fishing lines are there?
A common type of fishing line that is suitable for virtually all types of reels is round cord. This is an ordinary fishing line, suitable for mowing succulent grass, but it will be much more difficult to mow dead wood, and even more so it will not cope with bushes.
Typically, the diameter with which young grass can be mowed does not exceed 1.6 mm. The thicker the thread, the more coarse grass it can overcome.
There are fishing lines with sharpened edges in the form of an asterisk or a square; this option is more adapted to mowing dry grass due to the existing sharp edges, but its disadvantage is greater wear and is inferior in strength to round cord.
There are fishing lines with improved aerodynamics with corresponding dents, scales and notches; a similar product makes less noise, but it is used only on lawn mowers, since it is difficult for such thread to come out of the spool; it is used in most cases with disks into which segments are inserted. The disadvantage of this product is its fragility.
Replacing fishing line on a brush cutter
How to wind the cutting cord on the reel of a brush cutter (trimmer) yourself
Replacing line in Patriot trimmer
Preparing for replacement
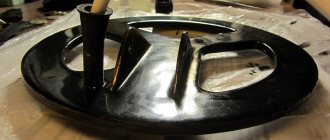
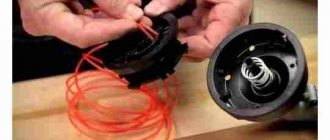
Disassembling the trimmer spool
For clarity, the mowing head (spool) was removed from the brush cutter. There is no need to remove the fishing line to replace it; everything is done locally. It doesn't take much time.
We disassemble the trimmer spool - it is held on by latches. Remove the cover by pressing the latches. If there is not enough effort to do this with your hands, then use a screwdriver.
The spool consists of the following:
- Housing with spring
- Cover with locking latches
- Reel with button
How much fishing line to reel
How much line do you need to put on the reel spool? Experienced fishermen always wind the fishing line not of the length that will be needed for casting, but with a huge supply. This is necessary to protect against possible breaks. Also, if you use a braided cord, at the end of the season you can swap the sides of the cord by rewinding it to the other side. This will result in savings on expensive consumables.
Typically, each reel indicates the amount of fishing line of a certain thickness that the spool can hold. Usually even several values are prescribed. For example, “0.25/200 0.30/150 0.40/100.”
If you need to reel in a certain number of meters, you need to calculate how long the line is for 1 revolution of the spool. After which you can approximately calculate how many turns of the handle need to be made to wind a certain amount of fishing line or cord. But it is necessary to take into account that the number of revolutions of the reel handle never corresponds to the number of turns of line on the spool. For example, in most inertia-free reels, the line will make 5 turns with one turn of the handle.
How to choose a trimmer line
A trimmer bought in a store is already ready for use - it is loaded with a standard nylon fishing line. It cuts the grass, but does a poor job - it quickly breaks down and only mows down young, thin plants. It does not take old grass and weeds with woody stems at all or cuts them with difficulty, quickly wearing out. It only lasts for a short time, after which you need to replace the line in the trimmer.
It is not recommended to use fishing line; it is better to take a special thread with a fiberglass core. It is sold in construction stores. Opt for an option with a square or triangle cross-section - their sharp edges will work like knives.
The consumption of trimmer line when using faceted and reinforced consumables will be reduced by 2-3 times, and productivity will increase by the same amount compared to round line and line not reinforced with fiberglass.
Purchase material with a diameter no less than that recommended by the manufacturer. If the diameter is unknown, you need to look at the size of the holes on the outer housing of the mowing head: the diameter of the working thread should be slightly smaller than the hole in order to pass through it freely.
Buy a sufficient supply of cutting thread (for 2-3 replacements), try buying different options to compare which one will work best.
Having found out how much material is needed for one winding, be guided by the length of the line during your next purchases so that there are no pieces left too short for winding.
To replace the line on a mechanical scythe with your own hands, you need to disassemble the mowing head and remove the reel on which the working thread is wound.
Tools
Trimmers are designed to remove excess vegetation on the site. Their main difference from a lawn mower is their compact size, which allows you to remove grass even in the most difficult areas. The devices are available with two engine modifications - electric and gasoline.
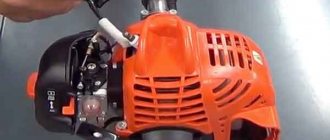
Operating instructions for petrol trimmer Patriot PT 2540
Precautions and getting started with the trimmer:
- At the beginning of work, it is necessary to check all the elements of the device, the correctness and reliability of their fastenings.
- The switched on equipment must not be left unattended. During work, children must be kept at a safe distance.
- It is necessary to remove from the territory all solid elements that pose a threat to the cutting element of the equipment.
- When cutting grass with a trimmer, protect your eyes, hands and feet with glasses or a mask, gloves and closed shoes.
- The trimmer must be carefully protected from moisture to prevent corrosion.
- The trimmer is started on a flat and dry surface. For operation, do not use fishing line more than 2 mm in diameter to avoid damage to the device. The fishing line cannot be replaced with reinforced fishing line, iron cables and wires.
- The fuel mixture is prepared from gasoline with an octane rating of at least AI-95 and original oils and lubricants from the Patriot company.
- If a fuel mixture leaks during operation, you must move at least 3 meters away from this point and only then start the device. It is strictly forbidden to pour fuel mixture into the trimmer with the engine running or hot.
- It is necessary to regularly diagnose the health of the device. If the slightest malfunction is detected, stop operation and take the equipment to a service center.
- It is strictly forbidden to use the trimmer in enclosed spaces. It is intended for outdoor use only.
Sources:
https://stroy-podskazka.ru/trimmery/namotat-lesku-patriot/ https://strport.ru/instrumenty/trimmer-benzinovyi-patriot-pt-2540-osobennosti-kharakteristiki-instruktsiya-otzyvy
How to remove fishing line
To change the line in the trimmer, remove the head cover. To do this, press the latches of the latches located on both sides of the cover with your fingers and pull the cover up. Access to the coil will open. After that, pull it out by pulling it up along the axis on which the coil sits. If the ends of the fishing line stick out from the holes in the head, then lift the reel along the axis and pull the remaining fishing line inward from the holes in the head. Now the part does not hold anything and it is easy to remove it and remove the remaining working thread.
The coil is divided into two parts by a central partition with a cutout. Different models of braids have different parts in size, so you need to check how much fishing line you can wind on the reel. Its length varies between 1 and 4 m.
Instructions
In order to change the fishing line, you need to remove the old one (if there was one).
The reel is part of the trimmer structure, which is located inside the head of the brush cutter, drum or reel. Depending on the manufacturer, the heads may vary. But this article only covers Patriot, although their mechanism is used by many other companies.
Now you need to understand how to properly remove the head from the trimmer and how to remove the drum from it.
Replacing line in Patriot trimmer
Instructions on how to unscrew the manual head on a trimmer are described below.
- First of all, you need to clean the head of dirt and adhering grass if it is dirty. To do this, you need to lift the lawn mower head up and, holding the casing, remove the special protective cover placed on the drum.
- The next step is to remove the coil from the drum. The reel can be easily removed even with one hand, because it is not secured inside the drum in any way.
- The drum itself is secured in the trimmer with a bolt. This bolt must be unscrewed, after which the drum can be easily pulled out. To do this carefully, you should support the drum with the spool while unscrewing the screw counterclockwise.
- Now you can pull the coil out. As mentioned above, it is not secured by anything except a hook with a metal shaft, so it does not need to be pulled out with force. Carefully, in a circular motion, pull the spool out of the drum.
- Now all that remains is to remove the old fishing line and follow the following instructions.
Installing the coil and drum in their original place is performed using the reverse algorithm.
Before threading the fishing line, you should make sure that you have purchased a thread suitable for the trimmer . If the thread does not fit, fuel or energy consumption increases, as well as the load on the lawn mower engine.
In order to replace the thread itself, you need to prepare a piece of thread of the required size. Most often this requires about 4 m of fishing line. The specific figure will depend on the parameters of the thread, for example, its thickness, as well as on the parameters of the spool itself. If you can’t accurately determine the length, you can do the following: insert and wind the thread until the reel is fully charged (the line level is comparable to the protrusions on the sides of the reel). It is necessary to ensure that the fishing line sits evenly in the reel.
Do not forget that a thick thread will be shorter than a thin one.
Instructions for threading fishing line into the reel are described below.
- You need to take the prepared thread and fold it in half. You should ensure that one edge is 0.1-0.15 m longer than the other.
- Now you need to take the ends in different hands. The smaller one needs to be pulled up to the larger one so that it becomes 2 times shorter. When bending, maintain a distance of 0.15 m.
- Locate the slot inside the coil baffle. Carefully thread the loop you made earlier into this slot.
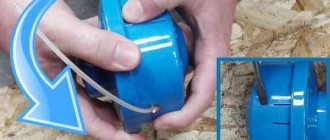
- To continue working, you need to determine the direction of winding the thread in the spool. To do this, just inspect the coil - there should be an arrow on it.
- If the indicator arrow could not be found, then it is quite possible that there is a written designation. An example is shown in the photo below. The coil head needs to be inspected. There is a direction indicator on it. However, this is the direction of movement of the coil. To get the winding direction, you need to wind in the opposite direction.
- Now you need to fill the reel with fishing line. It is worth noting that there are special guide grooves inside the coil. When winding the thread, you must follow these grooves, otherwise you may damage the trimmer. At this stage, you need to charge the coil very carefully.
- When the user has wound almost the entire thread, he should take the short end (do not forget about the 0.15 m protrusion) and pull it into the hole located in the wall of the spool. Now you need to repeat this action in the same way with the other end (on the other side).
- Place the reel itself in the reel head, first threading the fishing line through the holes inside the reel.
- Now is the time to return the drum to its place. After this, you need to take the ends of the fishing line with both hands and pull them to the sides. Then you need to put the lid back in place (here you can safely apply force until a characteristic click is heard).
- All that remains is to do some “cosmetic work”. You need to see if the thread is too long. You can start the trimmer and check in practice whether everything is comfortable. If the thread is a little long, you can trim it with scissors.
READ How to Properly Wind Line on a Trimmer Spool
How to thread line into a trimmer reel
To replace the line in the trimmer, cut a piece of material to the desired size by folding it in half. One of the halves should be 5-10 cm longer than the second.
To properly wind the fishing line onto the reel, the middle of the thread, folded into a loop, must be placed in the groove of the central partition. One half of the line is tightly wound around the upper part of the part, the second - on the lower part. The longer part is wound onto the lower one. Winding is done in the direction opposite to the direction of rotation of the head. An arrow should be drawn on the cover or side of the head - it shows the direction of rotation. It is necessary to wind the line in the opposite direction of the arrow. Do the work carefully, pressing the coil tightly against the coil.
Insert the remaining ends, 10-15 cm long, into the slots on the top side of the coil, this will fix them. With the ends secured, the reel will not unwind.
If you do not have a fishing line of the required length, you can wind the line not in one piece, but in two. In this case, bend the end of the line with a hook and insert it into the slot in the central partition of the bobbin. Do the same with the second piece. Now wind first one piece, and then the other, on your halves of the coil against its direction of rotation.
To thread the line into the trimmer, insert the ends of the line into the holes in the mowing head and pull them out. Place the spool on the axle and push it down until it sits in place, and again pull the ends of the cutting thread to extend them to their full length.
The ends brought out should almost reach the protective casing. Cut off the excess. To do this, you can use a steel plate installed on the casing, which plays the role of a knife and automatically cuts the fishing line of excessive length when the head is untwisted.
The reel is closed with a protective cover. Put it in place and press down until the latches make a click when they click into the grooves. Always check that the cover is seated on the trimmer and that the latches are latched, otherwise it may come off during operation. In this case, the coil will be thrown out by the force of rotation.
Do not try to wind as much material as possible - in this case, the spool may not fit into place and there will be problems with installing and fixing the cover. It is better if the reel is filled with line so that it does not extend beyond the dimensions of the part.
Removing and disassembling the coil
The cutting head of the trimmer consists of a cover, a spring (not available in all models), a bobbin with a cord, and a cover. Before you start disassembling the electric unit coil, be sure to disconnect the trimmer from the mains. The method of disassembly depends on the mounting of the mowing head. First option:
- To remove the cover that covers the inside of the head, press down on the latches (latches) located on both sides of the head.
- Remove the cover, under which you will see the coil, take it out of the case. Some trimmer reels have a spring under the bobbin, which also needs to be carefully pulled out.
- After removing the bobbin, you will see a screw in the center of the case. Unscrew it with a screwdriver.
- Having removed the fasteners, we take the body of the part and, rocking it in different directions, remove the gearbox from the shaft.
In the second option, the trimmer head is screwed onto the gearbox shaft. To remove it, you need to secure the shaft. To do this, such devices have a hole into which a thin screwdriver or metal rod is inserted. Brief instructions:
- Insert a screwdriver into the special hole, then secure the shaft.
- Grab your torso by your head and begin to twist it. This must be done clockwise, since the threads on the shaft remain.
Winding fishing line onto a reel
First way
the line is bent in half
We bend the prepared segment (in this case it is four meters) approximately in half, one segment should be 15-20 cm longer, and insert it into a special slot located on the partition.
fishing line is inserted into the slot
The line is wound in the previously indicated direction. This is done with tension, the line is carefully distributed. In this case, you need to wind a section that is longer on the section that is closer to the button.
There are designs that do not provide for dividing the coil into two sections. This does not change anything, the fishing line is wound in the same way. You just need to make sure that the segments do not overlap each other.
The segment that is located at the bottom of the coil should end first, i.e. Closest to the mounting holes.
This tip fits into the corresponding hole in diameter. the line is securely fastened.
the line is securely fastened
The long piece is wound another half turn. It is fixed there in exactly the same way. In this case, the segment intersects another section of the coil.
The long piece is wound another half turn
The fixed ends of the spiral fishing line are inserted into the holes in the trimmer reel housing.
The fixed ends of the spiral fishing line are inserted into the holes in the trimmer reel housing.
The coil is attached to the body. The ends of the fishing line are pulled upward with force so that the fishing line, previously secured in the holes of the reel, jumps out. It is easy to recognize by its characteristic sound (click).
The ends of the fishing line are pulled up with force
The button spool snaps into the trimmer spool housing.
The button spool snaps into the trimmer spool housing.
the line was successfully changed. In this case, you need to put it back on the trimmer and you can start cutting the grass.
It should be repeated; there is no need to remove the reel from the trimmer; this was done to clarify the process of replacing the fishing line. You can take the spool apart, wind it onto the spool, and put it back.
Replacement of mowing line completed successfully
The tips can and should be cut so that they do not touch the trimmer cover.
How to thread the line into the trimmer?
To ensure that the area near the house always looks well-groomed and neat, it must be mowed regularly. Fortunately, modern technology allows you to solve this problem without excessive physical effort. Electric trimmers are so easy to operate and maintain that even a teenager can mow the grass with them. The main thing is to figure out first how to thread the fishing line into the trimmer.
Battery trimmer options
Cordless scythes are easy to use; they actively help clear the area near the house of weed. Such devices contain batteries with a charge indicator. You can simply adjust the bar and handle.
Advantages of battery trimmers:
- without noise, also without wires, you can care for lawns;
- the best option for amateur use;
- It is light in weight and has excellent balance.
The equipment comes in a series, and the following comes into it.
- Barbell with height adjustment. It can be adjusted at any time. Perfectly suitable for those conditions when the unit is used by several people, and everyone can adapt it to suit themselves.
- The handle is shaped like a circle and is easy to adjust. It has 6 positions.
- The mowing unit is adjustable. This can be done in four positions.
- The edge can be cut vertically. With all this, the angle can be changed up to 90 degrees.
Sources:
https://stroy-podskazka.ru/trimmery/namotat-lesku-patriot/ https://moreremonta.info/strojka/kak-snjat-katushku-s-trimmera-shtil/
Review of Patriot pt 555
Since I have something to compare with, I’ll say it directly. the difference in engines is 1.3 horsepower and 3 horsepower. It has a significant effect only when there is something to cut off.
There is no point in buying a powerful unit if you have a branded lawn planted on your property. One awkward move, and the fishing line will shave such grass down to a bald spot on the ground. But if you come to abandoned virgin lands. Or you just need to mow a hectare or two, then the Patriot gas trimmer shows what confident mowing is like along with small growth.
Was there a bush in the way? No problem, we install the saw blade and in a few minutes we cut just above ground level. Fir trees, birches, willows - there is enough power to fell even small trees. Just don't get carried away. Remember, this is not a chainsaw Friendship