Countersink. Purpose and types of tools
A countersink is a tool designed for semi-finishing metal. Externally, it is a metal shaft with cutting surfaces, reminiscent of a drill. It is created specifically for the metalworking industry. Produced in accordance with GOST 12489-71, GOST 3231-71 or TU 2-035-923-83 in accordance with the type of device.
Download GOST 12489-71
Download GOST 3231-71
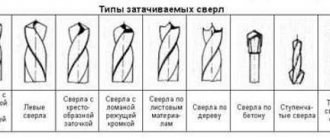
Countersinks are divided into:
By type of fastening in the machine chuck:
- tail;
- mounted
By design features:
- solid;
- prefabricated;
- welded;
- with and without carbide inserts.
By geometric shape:
- cylindrical;
- conical;
- reverse.
In the direction of the ribbons and grooves:
- right rotation;
- left rotation.
Solid shank countersinks are most similar to drills, but differ in the presence of more cutting edges. In their cross section there are from 3 to 6 such sharp teeth. For production, high-speed tool steels R9, R18 are used, as well as alloy plates with increased hardness and wear resistance VK4, VK6, VK8, T15K6. The permissible cutting speed for models with carbide inserts is higher, which increases their efficiency.
Mounted countersinks do not have a tail and are attached using a mandrel, for which a groove is provided in the body of the tool.
There are strictly 4 teeth in diameter. The nozzle itself is sometimes equipped with removable working blades made of hard alloys. The cutters are fixed with wedges and can be replaced as needed.
A conical countersink is similar to a drill; the working part of the tool tapers towards its end. Used for processing inclined circular surfaces. Manufactured from alloy steel and metal-ceramics.
The ribbons of the countersink drill can be twisted in different directions; accordingly, the profiles of right and left rotation are distinguished. Left-hand rotation countersinks are used in semi-automatic lathes that feed material from the right side.
The choice of type of countersink is directly determined by the size of the hole in the workpiece and its material. With a diameter of up to 12 mm, they work with solid countersinks, starting from 20 mm - with countersink attachments and tools with inserted alloy blades. When it is necessary to make smoother and larger holes, combined models are installed in the machine, where there can be up to eight sharp teeth, and these countersinks are optionally combined with drills, reamers and other drilling and cutting tools.
Hole machining: methods and their applications
It is unlikely that the manufacture and assembly of any mechanism is possible without drilling and subsequent processing of holes in it, because drilling and plumbing have become simply inseparable concepts. In the same way, it is impossible to do without drilling in most other areas of activity. And after you make a hole in anything (no matter using drilling or others), you need to process it to adjust the dimensions and reduce the roughness of the walls.
Holes are processed using several methods, depending on the requirements for the workpiece. In particular, there are 3 main methods (drilling, countersinking and reaming), as well as varieties of these methods (drilling, countersinking, countersinking). Let's consider all these processes in more detail.
The difference between countersinking and related operations
Countersinking is similar to reaming holes; the cutting edges of the tool remove excess material from the stenoctium, reduce roughness and increase the diameter. This is a semi-finish operation, which means it is followed by another processing step. Deployment is the final procedure. During countersinking, defects in drilling, stamping and casting are eliminated. In the process, you can slightly adjust the binding to achieve better alignment for the future connection. Accuracy can be increased to 5, and sometimes even to 4th class.
When setting the cutting mode, you need to remember that the thickness of the metal removed during countersinking is equal to half the allowance for a given hole diameter. Compared to drilling, the feed can be made 1.5-2 times larger, but the speed can remain the same. Specific cutting parameters are calculated using formulas given in the regulatory literature.
Since a countersink has greater rigidity compared to a drill, due to the increased number of sharp protrusions, the accuracy of the direction of movement increases, as well as the quality of processing, smoothness and cleanliness of the surface. For comparison, drilling gives a roughness of 20 microns and grades 11–12, countersinking gives a roughness of 2.5 microns, grades 9–11, and reaming gives a roughness of 0.25-1.25 microns and grades 6–9. Quality is the precision of manufacturing a part; as its value increases, tolerances increase and accuracy decreases. If the technological process for processing a product requires both countersinking and reaming, then they are performed in one installation and alignment of the workpiece on the machine.
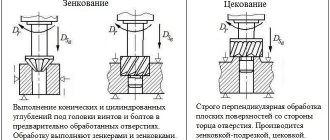
Countersinking and countersinking are often confused due to the similarity of names. In fact, countersinking has a completely different purpose, and it uses a great tool called a countersink.
This type of machining creates recesses to accommodate fasteners flush with the surface of the part. In addition to chamfering, a countersink is used to cut conical-shaped recesses. Another purpose will be to clean and process recesses before installing fasteners; this is done using flat or end countersinks, also called counterbores, which is more correct.
The most widely used on the market are conical countersinks with working angles of 90 and 120º, which create recesses to hide the heads of bolts and screws. In the metalworking industry, countersinks with a flat tip are also used, used for cleaning recesses for fasteners. Countersinks are installed in the same machines as other tools for processing holes for fasteners.
Deployment
The reaming procedure involves holes that were previously drilled into the part. An element processed using such a technological operation can have accuracy up to the sixth grade, as well as low roughness - up to Ra 0.63. Reamers are divided into rough and finishing, and they can also be manual or machine.
Cylindrical manual reamers 24Н8 0150
The recommendations that should be followed when performing this type of processing are as follows.
- Allowances in the diameter of the hole being machined are selected according to special tables.
- When using a hand tool that is rotated only clockwise, first perform rough reaming and then finish reaming.
- Steel parts are processed with the obligatory use of coolant, while cast iron parts are processed dry.
- Machine reaming is carried out immediately after drilling on the machine - with one installation of the part.
- To control the quality of the result, special calibers are used.
How to countersink metal correctly
If an amateur craftsman can take a drill and a drill for countersinking, then in an industrial environment the following machines can be used for this:
- drilling;
- turning;
- boring;
- milling;
- aggregate.
The countersinking process takes place in strict accordance with the technology, the general points of which can be described in the form of the following recommendations:
- In cast parts with an uneven margin for subsequent metalworking, it is necessary to bore the hole to a depth of 5–10 mm for the correct direction of movement of the cutting tool.
- For the countersinking operation, an allowance of 1–3 mm is left, depending on the final diameter.
- Countersinking of steel products is not complete without cooling with special oil solutions. When working with cast iron, as well as non-ferrous metal, it is not mandatory.
- The optimal version of the countersink and the operating mode are selected taking into account the required hole diameter, processing accuracy, its depth, the metal of the part and the options of the production machine.
- The cutting tool mount must fit into the slot that is on the workstation.
- In the case where finishing processing by reaming is expected, then during countersinking a part of the allowance, from 0.15 to 0.3 mm, is left for further work.
- To process products made of hardened and alloyed steels, countersinks with carbide inserts with a diameter of 14-50 mm and 3-4 teeth are used.
- When processing non-ferrous metals and iron alloys with a high carbon content, feather countersinks are used.
- High-speed steel tools are used to process products made from ordinary structural steel. For holes larger than 40 mm, the equipment is supplemented with nozzles with a diameter of 32–80 mm.
The discrepancy between the process and the established technology is often the cause of defects. If the tool wears out a lot, the resulting hole will be smaller than the design. When the master has overestimated the feed, or waste has stuck to the teeth of the countersink, the cleanliness of the processing may not satisfy the quality. Other defects: part of the surface is not processed, the resulting diameter is larger than required, are the result of an incorrect choice of countersink or its incorrect installation.
Drilling
As you might guess, before machining a hole you need to do something to make it. So, the most common and common method of making holes is drilling.
Drilling is a type of machining for the purpose of forming holes, performed with a drill. This process can be “manual” (as you might guess, it is done with hand tools), as well as “machine” (performed on special machines).
Typically, to make a hole less than twelve millimeters in not particularly hard materials (such as structural steel, non-ferrous metals and alloys made from it, as well as polymer alloys), hand-held drilling devices are used.
And in order to make holes larger than 12 millimeters or to improve productivity in the case of mass production, the drilling process takes place on stationary or desktop drilling equipment (machines). The first ones are vertical or radial drilling.
Reaming
Hole drilling is a subtype of conventional drilling. At its core, it is an expansion of the size of the hole made earlier. Drilling holes is also done with drills.
Advice: It is highly not recommended to try to drill holes formed not by drilling, but by other methods, such as stamping. The reason is that such holes differ in the different hardness of the material of the internal walls.
During casting, scale is formed. During forging and stamping, non-uniform internal stress occurs in different places of a metal workpiece. This results in the drill being subjected to constantly changing loads during machining. And this can cause a displacement of the drill axis or even breakage.
If you process holes using a similar method (drilling and reaming), you can achieve X quality (accuracy measurement). The roughness after drilling at the hole walls is possible within the limits of no more than Rz 80.


