When repairing or adjusting a car's suspension, it becomes necessary to fix the spring in a certain position.
Various tool concepts:
- Passive: Represents two brackets connected to each other either rigidly or using a threaded rod.
Simply secures the spring, compressed using the weight of the vehicle. After lifting the body with a jack, the elastic element remains in a compressed state. - Active: The compression mechanism can operate under load when the shock absorber is under operating tension. The position of the body relative to the ground does not matter.
Let's consider the second option in more detail.
How does a spring remover work, and what types are they?
What is a puller used for? It overcomes the straightening force of the springs. The applied force on the puller brackets is commensurate with the weight of the car, but this does not mean that its design is too expensive and high-tech.
There are many options, but they are divided into only two types: mechanical and hydraulic drive.
Mechanical spring remover
Most often it has a threaded drive mechanism.
With a sufficient diameter of the pin (providing a good gear ratio on the thread), and a long handle of the key, you can compress the springs manually without excessive effort.
The technology is as follows: two pullers are symmetrically put on the rack. By turning the threaded rod, you bring the claws to the middle of the spring directly on the shock absorber, compressing it to the required size.
Pullers placed on both sides ensure uniform compression. When working with the suspension of trucks or heavy SUVs, experienced craftsmen install 3 or even 4 pullers.
Semi-permanent racks
Service stations often use semi-permanent struts to remove springs from shock absorber struts. The tool is quite universal and fits most pendants. Thanks to the drive mechanism gearbox, working with it is convenient and safe.
The only drawback is that it is not always possible to compress the spring directly on the car. After all, this is a bench device: the puller works with the suspension removed from the car.
Lever type
Lever type pullers have a similar “problem”. The mechanism is reliable and safe, but its dimensions do not allow it to fit into the space under the wing of the car.
Hydraulic puller
Of course, there are pullers with compressors, electric drives, and other devices that make life easier when servicing a car. This is all good until you see the price tag.
Sometimes it is more profitable to visit a car service center several times than to purchase an industrial puller for personal use. Which exit? Make your own instrument.
Manufacturing a shock absorber spring remover
Many car enthusiasts use a regular chain: they wind a few turns around the coils of the spring and tighten the chain. After lifting the car with a jack, the shock absorber strut is stretched, but the spring remains compressed. This is a dangerous method: if the chain slips, the spring may spring back and cause serious injury.
How to make a simple puller similar to an industrial one
A mechanical semi-stationary “machine” can be created from a “Volgovsky” jack.
- old jack from Volga-24, Moskvich 412 or other Soviet passenger car = 0 rub.
- old connecting rod from any engine = 0 rub.
- steel corner from a landfill 1 meter = 0 rub.
- a pair of rods from broken shock absorbers = 0 rub.
- a handful of bolts and nuts M12 - M14 = conditionally free.
Making spring ties from an old jack
Today I removed the strut, it needs to be repaired, but we are not talking about repairing the strut, but about tightening the spring. I’ve seen a lot of different options, everyone makes a VAZ jack from the original one, in my opinion, but I don’t have one, but I have a jack from the Volga GAZ 21, now I’ll try to make a puller out of it. I also needed a couple of corner pieces, a connecting rod from the same Volga, and welding and a grinder.
In principle, what is there to try, I will do it now, for this you need a jack, a connecting rod from a Volga car.
I will continue to do and show what and how...
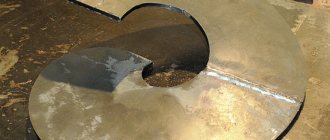
This is what happened: the connecting rod was welded down,
and on top of this ring I had cut off from a gas cylinder,
this is the ring. Here she is, these are the rings
I have one, I make various products from a gas cylinder and I used it to make a puller.
These are the two segments (I’m not going to the exhibition))) don’t pay too much attention to the appearance.
This is how the puller turned out, now I’ll cultivate it, clean it and spray it a little from a spray can to make it better and show how it works.
Now it will dry out a little because I spray painted it and will try to remove the springs.
This is how the puller for springs from the struts turned out to be so easy to make; it took about 30 minutes to make, which means it was quick to make.
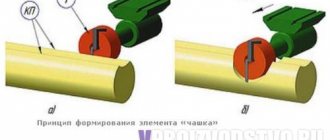
I had to redo the design a little, because the ring that I had prepared at the top was good to disassemble, but assembling it and getting into the shock absorber cushion is difficult, so I had to do it like this.
I didn’t come up with this myself, I spied it and changed it. This is how we compress the spring itself without a cup and structure that stands on top of the shock absorber.
It turned out to be an excellent design, which was tested and proved to be excellent))) Bye everyone.
Author; Alexey Avramenko Cherkassy, Ukraine
Branded spring tensioners
Of course, there is special equipment used when repairing cars of a certain brand. To compress springs, however, universal ties are more often used. The appearance of these devices is shown in the figure:
Branded spring ties
It is clear that a set of universal zip ties can be bought in a store. However, the cost of such equipment is higher than the price of all the components in total.
Cost of ties in stores
You don’t have to bother at all and buy the finished product in the store. Abundance can be confusing. There are hydraulic and mechanical shock absorber spring tensioners. The price for them differs significantly. The cheapest options will cost about 1,500 rubles, and the most expensive - about 30,000 thousand. Of course, for single jobs it is not at all necessary to purchase an expensive product. A mechanical coupler for a couple of thousand rubles will be enough for you.
You can purchase hydraulic couplers. It’s more convenient to work with them, but the price tag is twice as high. There are universal zip ties with various attachments, but this is also a fairly significant purchase. Pay attention to high-quality mechanical shock absorber spring tensioners. The price for a normal product will be in the range of 2-3 thousand rubles.
We cook the screeds ourselves
In general, it makes sense to make shock absorber spring ties yourself. How to do this is discussed further.
Four nuts and two threaded rods
The metal products listed below are easy to find in almost any supermarket. For example, you can buy two M16 threaded rods. You will also need four extended nuts, as well as a steel plumbing pipe. Its internal diameter is 16-16.5 mm.
The end result is what is shown in the pictures. You will also need a steel rod, which is used to make reinforcement. Let's look at how screeds are made:
- Two identical cylinders are cut from the pipe, the length of which is 80-120 mm;
- Threaded rods can be shortened if necessary;
- 8 rods approximately 30 cm long are made from reinforcement;
- Using any bending equipment, the rods are bent to obtain hooks;
- Four rods are welded to two nuts, another four - to pipe sections;
- The set of components is completely ready for use at this stage.
It is easier to weld by placing the workpieces on a plane. The essence of these words is illustrated by the picture:
How to weld hook rods
Actually, what follows is a film where the technology is shown “inside and out”. The author even solved the problem with the lack of a bending machine: to bend one rod, you need two similar rods welded to a steel profile.
If the reader thinks that using welding is difficult, then it is better not to take risks. Welded joints can withstand significant loads, but only if they are performed according to all the rules. Spring ties can be made without welding. A suitable drawing is given below.
Two ties in 10 minutes (video)
Main stages of work
At the next stage, a metal corner will need to be welded to the base of the elongated rack. And then we bolt it to the flywheel.
Next, we will need three blanks of round steel rod: two of them bent at an angle of 90 degrees, one of them is flat.
From these blanks we will make forks for hooking the shock absorber spring.
We weld one corner piece to a straight piece, and weld the second to the folding support of the jack. As a result, we got two forks.
The homemade product is ready. We install the strut and begin to remove the spring. Then you can install it back without any problems.
You can watch the video below for details on how to make a shock absorber spring remover from a VAZ car jack. Source - YouTube channel bricolage du cardan.
Source
How should the spring be tightened?
Let's list the steps involved in tightening the shock absorber springs yourself. Everything looks simple:
- When the body is supported by a jack, two ties are brought to the spring from opposite sides;
- By rotating the nuts with your hands, you achieve confident engagement of the hooks and springs;
- Using a wrench, the nuts on different rods are rotated in turn;
- It is better to play it safe and secure the compressed spring with straps or wire.
Video of spring tensioners on shock absorber
No explanation required here. The result is shown in the photo.
Spring compressed by ties
When using homemade and even purchased equipment, follow these simple tips:
- Before using ties, threaded connections are lubricated with cyatim or grease;
- The ties cannot be removed from the compressed spring, even if it is additionally fixed;
- When carrying out work, exercise maximum caution. It is better to sacrifice body parts than your own health.
Features of the suspension of Lifan cars are discussed in these articles:
Diamond jack clamp
Fixing the processed materials in a stationary position is one of the most important factors in the quality of work in the workshop. To perform this task, there are many different devices made of metal, plastic and even cable. Below, we have provided detailed instructions for making a convenient and powerful 150 mm clamp from a regular diamond jack. To work, you only need welding and a grinder with a cutting and grinding wheel.
First of all, the jack must be completely disassembled. In the lower and upper corners of the rhombus we grind off the caps of the pins on one side and knock them out with a hammer. Now the halves of the diamond can be separated by unscrewing the screw from the socket (opposite the handle).
The side corner joints have locking tabs that need to be carefully ground off. They are knocked out identically to the previous ones, with a hammer, but from the side of the handle, you first need to unscrew the pin that is held by the crimping plate. To remove the plate, just carefully cut off the clamping area with the edge of the cutting disc.
Having disassembled the jack into its components, you can begin to fit the parts. We take 2 ribs from one of the sides and mark the places for future cuts, as shown in the photo (after which we weld). We make a through hole for further connection with bolts.
The second part of the clamp is made from the ribs of the opposite side, cut in the indicated places and welded into a single unit. Don't forget to drill the holes.
Studs cut from the lower and upper corners can be used as clamping elements by welding to the edges of the jack clamps.
The main parts are ready and you can begin assembling the device. We install the side elements previously removed from the sides into place and limit their displacement to welding drops. We connect the 2 stops through the previously drilled holes using a bolt and nut.
We pass the screw through the hole in the handle mount, screw it onto the latch and then onto the opposite mount in the small lever. We bring the fixing plate close to the first fastening and weld it. For convenience and aesthetics, the protruding part of the screw can be cut off.
As a handle, you can use a standard one or make your own from a steel rod with limiters installed at the edges.
We hope that the presented instructions conveyed the essence of the process of making a homemade clamp from a jack. For a more complete understanding, we recommend watching the entire procedure in video format, with good editing and comprehensive comments from the author.
Drawings of universal threaded ties
Let's return to the question of how to make a device for tightening shock absorber springs yourself. Below is the appearance of the finished devices:
Factory-made threaded ties
On one side of the rod there is a left-hand thread, on the other - a right-hand thread. The standard thread pitch is M18. But buying threaded rods is not enough here. And to cut the thread yourself, you will need special equipment.
Drawings of the components that make up the entire structure are shown here:
Threaded tie (3 parts)
To make parts, you need a lathe, drilling and, probably, milling machine. It may be easier to contact a workshop. Print the drawing by downloading it from the website.
Most likely, there are no other drawings of universal ties on the Internet. And what is shown above is taken from a book on repairing domestic cars. You can use it.
Let's say the ties were made according to the drawings and all the parts fit together. But even then the advice about using lubricant remains valid. You need to take solid oil or cyatim and apply this material to the threads of the nuts.
Packaging cyatim-201, 20 gr.
Cyatim-201 lubricant is a rather expensive material. You can reduce consumption by mixing it with machine oil in a 50/50 ratio. Good luck.
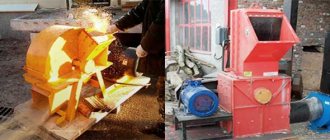
Wood splitter from a hydraulic jack
The spaciousness and accessibility of stove heating of premises makes it relevant even in the current era of high technology. Dry wood creates a reliable source of heat, but preparing this material for use requires considerable effort. To facilitate the process of splitting logs, stumps, bars and boards, you can make a homemade wood splitter from a jack, the assembly of which is clearly demonstrated below.
The presented list of materials does not claim to be an absolutely ideal combination. This is a sample from which you can build on when making a wood splitter from a jack with your own hands. If necessary, the dimensions can be changed, and components can be replaced with ones of similar shape and strength.
By instruments:
- Welding machine
- Bulgarian
- Drill or drilling machine
The first step in making a wood splitter is to weld the box into which the materials to be split will be placed. The design consists of 3 elements cut from an I-beam. Protruding stops are welded to the ends of the central (long) crossbar, against which the jack and logs will rest.
To strengthen the connection of the side elements with the central crossbar, pieces of metal plates can be welded to the bottom of the former, which will go under the central part. These elements can also be used to attach the log splitter to the floor or wall if holes are drilled in them.
The cleaver is made from pieces of metal plate located at an angle of 60-70° to each other. In order for the joining of the plates to be tight, their edges should be sharpened with a grinder or grinder. To strengthen the structure, a triangular piece of thick metal can be placed in the upper part.
We’ll start installing the jack by making a backing for the body to position the tool evenly in relation to the central crossbar. An improvised stand can be welded from ordinary pieces of metal of the required thickness.
Tightening shock absorber springs with your own hands is simple and realistic
Shock absorber spring tensioner
Quite often it happens that the shock absorbers on a car wear out or fail. This is not surprising, and there can be many reasons for such consequences. In this case, every car owner is faced with a number of troubles and the only solution may be to replace the shock absorbers.
This is interesting: Video of adjusting the rear axle gearbox of a VAZ 2107
You can do this at a service center or in your garage, but this will require spring tensioners (some call them shock absorber coils), which require a special puller, as well as some knowledge and skills.
Simple and affordable
We take two rods of equal length. The thread can be any, but it is most convenient to use standard M16 or M18. The rod must have two threads: on one side - left, on the second - right, or vice versa. It is advisable to firmly fix the elongated nut in the center as a limiter. There are such commercial rods, so if there is no special machine for cutting threads, we go to the car market.
All that remains is to weld a few hooks onto the nuts - and you can use them. To make the device work more smoothly, it is advisable to lubricate the thread and nut. You can use regular machine oil or grease. Here it is necessary to achieve smooth operation; almost any lubricant will do. You can also use the drawings and take them to a turner, who will do everything. A shock absorber spring tie is made in a few hours.
How does a shock absorber work?
A mandatory component of every shock absorber is a spring. There are now all sorts of progressive types of this mechanism, such as oil or pneumatic, but the design of each of them includes the same spiral element, which helps to maintain a given level of the car above the ground, and also facilitates work when there is a load on the shock-absorbing device itself.
Quite often it happens that the shock absorber is in perfect order, while the spring element has worn out, lost the necessary rigidity, or has completely burst. In this case, it needs urgent replacement, which can be done with your own hands only if you have a puller.
There is a flip side to the coin, when everything is fine with the spring, but you need to carry out repair work on the shock absorber itself, in which case a puller will be indispensable.
A few more points
So we have figured out that making a screed with your own hands is not so difficult. For this, apart from desire, a small amount of tools and time, you don’t need anything. If there is no tie, but the spring needs to be removed, then it is better not to risk your own health and not to experiment, but to contact a service station.
It will not be possible to tighten the shock absorber spring without zip ties; this has already been said. This does not apply to cases where the product has lost its elasticity and has cracks. Such a spring can no longer be called working. You can find a huge number of options for making homemade zip ties, the most popular of which we have just reviewed.
A homemade shock absorber spring tie is quick and easy to make. The main thing is that the structure is durable and fulfills its main task. Don't forget that if the tie comes off the spring, you can get seriously injured from the impact, so always try to keep the spring away from your face and securely fasten it if possible.
What is a puller
A puller is a special device that allows compression of shock absorber springs so that repair work can be continued in the future. There are many variations of this device, but the most common puller for springs is two metal slats with threads cut along their entire length and hooks attached to both sides, which move towards each other when turned. Those. when you need to compress the springs, you just need to turn the rack, and the fixed hooks will tighten the spring.
There is an even more simplified puller method - a belt puller. In this case, two “frogs” are used with durable fabric belts tucked into them. The belts are thrown onto the upper and lower coils of the springs, then the car owner begins to work with “frogs”, pressing each one in turn. Subsequently, these actions tighten the belts, and the “spiral” begins to tighten, after which repair work can be carried out.
Spring tightening process
Let's start with the fact that the pullers described above are not the only ones of their kind; there are several other configurations of this device; you can also make it yourself or simply buy it. However, without it, the screed will be a complete nightmare and an almost impossible task.
When starting to perform this operation, it is necessary, first of all, to remove the strut with the shock absorber, having first placed the car on a jack and securely fixed it.
Next, the puller is attached to the upper and lower coils of the springs, and manual work begins. Depending on the operating principle of your puller, you will either rotate some element of it, or, as in the case of the “frog,” alternately work with two pedals.
At this point, the tie can be considered complete; the main thing to remember is that you should not compress the spring completely, increasing the risk of breakage of both the spring itself and the compression device. It is enough to simply release the element you need from the pressure and repair or replace the shock-absorbing mechanism.
As for the use of a puller, it is designed to facilitate the entire repair process, because without it you would not only have to fix the stand with a vice, but also make enormous efforts to compress the springs; someone would need to hold them while you work on the entire mechanism etc.
In addition, by using this device, you make the repair process safe for yourself, practically eliminating the chance of spring failure.
Some practical tips
When working with a factory product or a homemade device, you must:
- Threaded connections must be lubricated with grease or cyatim. Ciatim-201 lubricant is not cheap. Therefore, in order to save money, it is mixed with machine oil. The proportion is 50/50.
- When compressing the working structure, it is prohibited to remove the screed, even if additional fixation measures have been taken.
- While working, you must be constantly alert and careful. It is better to sacrifice body parts than your own health or even life.
At home, working with your hands, you can use various devices to compress springs. For example, clamping the work material in a vice. All methods to achieve the final result are good. The main thing is to follow safety precautions and not join the ranks of injured “home spill” specialists!
Conclusion
The process of tightening shock absorber springs is a measure that every driver faces who wants to repair shock absorbers with his own hands, rather than take his “iron horse” to a car service center. However, without a puller, it is not that it is completely impossible to carry out this operation, but it will be accompanied by a lot of difficulties and a fairly high risk for a person. If you use such a simple and inexpensive device for screeding, the risk is immediately minimized, and the work process itself becomes easy and fast.
What you need to know when dismantling
Tightening car springs is a rather dangerous process. If you make a low-quality puller, it may come off. The high pressure puts you at risk of injury. That is why it is necessary to be extremely careful when performing such work.
To prevent anything from happening, you can make a stationary screed. Its design does not differ from that described above. The only change is the rigid attachment to the tabletop. This will ensure that the shock absorber spring tie is securely fixed, which will significantly reduce the risk of injury. Now let's look at another popular and extremely effective design.
Replacing the front spring without a puller or zip ties.
Published on August 28, 2016
Replacing the front spring without a puller or zip ties.
where are the tuning levers from the package?
Replacing the front spring without a puller or zip ties.
Hello Roman, in your case, when replacing the lever, you could not bother yourself with this work, unscrew the wheel, put a beam under the lever and lower the car with all your weight. Then take a thick wire and tie the springs on both sides. And then take everything apart. A lot I did this once, but then I had to get the ties anyway. I think this method is suitable for anyone who is replacing the springs with new ones)) good luck to everyone in the repairs.
Tough.