What is a weather vane man?
A weathervane person is an individual without his own opinion, without principles, without his own position. A weathervane man changes his mind depending on the circumstances.
Interesting materials:
Who was the first secretary after Brezhnev? Who was the headmaster after Snape? Who came before Patriarch Kirill? Who came before Rakhimov? Who was the head of the Gestapo? Who was the prince in the Vladimir principality? Who was Inna Makarova's husband? Who was Houston's husband? Who was Marina Golub's husband? Who was the governor of the Kingdom of Poland on the eve of the uprising of 1830?
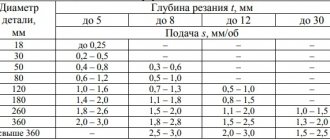
Instruments for measuring wind speed and direction
At meteorological stations, a weather vane . It is installed at a height of 10-12 m above the earth's surface. A hand-held anemometer is used to determine wind speed in the field . electric anemometers and anemorumbometers are also widely used , as well as recording instruments for continuous recording of wind direction and speed - anemorumbographs .
Wild weather vane (station) (Fig. 2.11 at the end) is a device used to measure wind speed and direction.
Tretyakov's wind meter (Fig. 2.12 at the end) is used to measure wind direction and speed in field conditions. The need for such measurements is due to the fact that the direction and especially the wind speed in the fields can differ significantly from the weather site data. Tretyakov's wind meter resembles a weather vane in its action.
Currently, remote instruments are used to measure wind direction and speed - anemorummeters , based on converting the values of wind elements into electrical quantities.
Anemorumbometer M-63 (Fig. 2.13 at the end) is used to measure wind direction, instantaneous speed, average speed over a ten-minute interval and maximum wind speed between measurements.
Hand-held cup anemometer MS-13 (Figure 2.14 at the end) is used to measure average wind speed in the range from 1 to 20 m/s.
Figure 2.1 — Scheme of the vertical structure of the atmospheric front with a system of clouds (altostratus (As); nimbostratus (Ns); cirrostratus (Cs), cirrus (Ci)) (according to SP. Khromov).
Figure 2.2 - Scheme of the structure of a cyclone (Bjerknes and Solberg):
a) - vertical section of fronts north of the cyclone with a system of clouds (altostratus (As); nimbostratus (Ns); cirrostratus (Cs), cirrus (Ci)) and precipitation;
b) - plan of a “young” cyclone with cold and warm fronts, with a zone of clouds and precipitation (shaded part);
c) - a vertical section of a cyclone through its warm sector with cold and warm fronts, with a cloud zone and a system of air currents.
Figure 2.5 - Isobars at sea level, hPa
H - center of low pressure; B - center of high pressure; Г—horizontal pressure gradient.
Figure 2.6 - Distribution of atmospheric pressure and winds near the earth's surface: on the right - meridional section of the wind direction (according to A.P. Shubaev): 1 - wind direction; 2 - direction of the horizontal pressure gradient.
Figure 2.7 - Breeze diagram.
Figure 2.8 - Scheme of hair dryer formation.
Design principle
The historical origin of the weather vane as a weather instrument dictates that it should be made only of metal. However, examples of wooden or polymer products are also currently known. The preference for metal is explained by the fact that metal weather vanes, unlike those made of other materials, have higher accuracy. In this regard, the buyer himself needs to reason in this way: does he need a weather vane as an indicator of the direction of the wind, or will it be more just a stylish accessory. And, based on these considerations, choose the material of the product. Of course, if the weather vane is only a decoration, then it can be made from a variety of, sometimes even what is called “improvised” materials.
The design of the weather vane, if we talk about the basic configuration, is simple and includes the following parts:
- checkbox,
- Axis,
- Frame,
- Pointer.
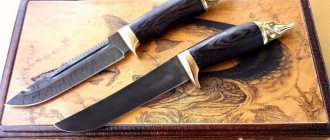
The flag is the most important part of the weather vane in terms of decoration. It is the flags that are made in the form of a variety of figures and shapes. In the old days, each figure had its own, very important, meaning. For example, scales symbolized the desire for justice, angels - an exalted spiritual life, a lion - power, and so on. Weathervanes were often equipped with the coats of arms or standards of their owners. Simpler people, craftsmen or traders, tried to attach a figurine of a donut, a horseshoe, and similar accessories responsible for advertising their craft or product.
Modern homeowners most often choose flags that symbolize animals or birds, or famous emblems/logos. True, you can always find unusual, completely exclusive images.
Axis
– is needed, in fact, in order to hold the checkbox. In fact, the role of the axis is most often a piece of reinforcement or rod, about fifty centimeters long. Usually, to center the structure, there is a cap in the middle of the axis - with the teeth or edge down.
Signposts
– an indispensable attribute that directly indicates the direction of air flow. The indicators can be called a separate element of the weather vane - this design, as a rule, is a kind of “wind rose” - indicators in the four cardinal directions. Usually, the first letters of the directions are indicated at the tips of the signs. This element is also metal, most often it is welded directly to the base of the weather vane.
Frame
- represents the base of the weather vane, as it is located at the very bottom of the structure - under the cap and indicators. It is most practical to make the body from a pipe of wide diameter, but its length varies within fifteen centimeters. Inside the housing, at the bottom, a nine-millimeter closed-type bearing is installed. It is not recommended to use open bearings, as moisture may enter the housing or condensation may form, which will lead to bearing failure.
It is important to understand that the axis of the weather vane, passing through the entire structure, with its lower part enters the bearing in the lower part of the body, which allows the device to move freely.
How the wind appears
First, you need to figure out where the wind in nature comes from. During the day, certain areas on the Earth's surface heat up to different temperatures. Hot air rises from the surface, and is replaced by colder air, which also gradually becomes warm.
Due to this unevenness, a difference in pressure appears between the air layers.
This is what causes the wind to appear. It begins to blow from an area with increased pressure in the direction where this parameter is less. Interesting fact : wind speed directly depends on the pressure difference in the areas. The higher it is, the faster the air flow will move.
What types of weather vanes are there?
Despite the fact that the weather vane is a rather ancient attribute, nowadays there are many varieties of this device. The most primitive version of the device: a horizontal axis is attached to a vertical axis, one side of which ends in a plane, and the other ends in a counterweight. Such a simple device will certainly help determine the direction of the wind, but, in fact, a weather vane is not only useful, but, perhaps, first and foremost, a beautiful and stylish accessory! Therefore, most often, you will not find ordinary metal plates on the roof of someone’s house. This will be an individual, bright and effective weather vane.
As a rule, they like to use figures of animals and birds to indicate the direction of the wind - this is the design that is often found in our country.
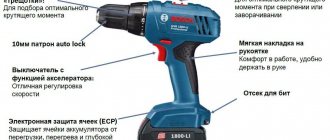
For those who care deeply about changes in weather, they offer weather vanes with a special scale of eight points - it will allow you to most accurately determine the direction of the wind. If the values need to be as accurate as possible, plus you also need to know the strength of the wind, modern stores offer weather vanes with sensors. Such devices may have a special display where information is displayed, or they may be connected to a personal computer or smartphone.
In addition to their main function, weather vanes can also improve the heat exchange processes in a room. When installed directly on the chimney, the weather vane increases draft in it and also prevents leaves, any debris and precipitation from getting inside it. In this situation, the device will not only indicate the direction of the wind, but is also able to prevent smoke from entering the room and keep the chimney clean.
As for the appearance of weather vanes, the flight of imagination is inexhaustible. This accessory is so individual that sometimes you can find completely unique models, real works of art.
How to install a weather vane?
As you already understand, today even in ordinary residential buildings you can find a variety of weather vane models. They can be made from a wide variety of materials - from wood to plastic. Of course, metal models traditionally predominate.
Of course, there are craftsmen who independently make weather vane models. As a rule, they are made of wood, and sometimes even from scrap materials, such as plastic bottles. But it is quite possible to attach a ready-made weather vane yourself.
However, the fastening of weather vanes does not depend on other factors. Unless this is a special model for a chimney, then attach the accessory to a vertical or horizontal rack installed on the roof. It doesn’t matter what the roof deck is made of - the weather vane is installed equally well on both tiled and slate and metal roofs; soft or bitumen roofing is also suitable.
When choosing a weather vane for a residential or office building, you should prefer medium-sized models. Usually it is from 40 x 70 cm to 80 x 80 cm. If you need a weather vane for a gazebo, garage or small building, then it would be better to choose a smaller size.
Before fastening, it is recommended to check how correctly the flag-figure and its counterweight are balanced in the finished product. If there is no balancing and there is a significant imbalance in weight, the weather vane will not work correctly and its service life will be significantly reduced.
The technology for installing a weather vane is not complicated, you just need to be careful when assembling:
1. The figurine is attached to a sleeve, which, in turn, must be freely put on and rotate on the axis of the structure. There is a little secret here - to avoid friction and nasty squeaking when the flag moves, you can put a metal ball, for example, from a bearing, between the sleeve and the body of the figure. It is also important, when assembling a figurine with an axle, to put a special umbrella cap on the lower part of the sleeve, which will protect the rotation mechanism from moisture or the formation of ice during frosts.
2. The flag is attached to the axle with a screw so that the clamp allows the flag to rotate freely; it is recommended to install a rubber washer-spacer between the body of the axle and the screw.
3. Now you need to put indicators on the axle - usually they go on the coupling, which allows them to move. The coupling is equipped with pins - they are oriented according to the cardinal directions; it is these pins, paired with a counterweight, that indicate the direction of the wind.
4. Now that the weather vane is assembled, place a metal penny towards the base of the axle. The size of this nickel should be sufficient to hold the structure on the roof and convenient for attaching the weather vane to the roof. In this regard, in principle, such a solution is not the only one. You can attach the weather vane axis to the roof using clamps or threads - if such a solution is optimal.