When working with plexiglass, it is often necessary to drill it; we will tell you how and with what to drill plexiglass in this article. After reading a little about this process, you will understand that when drilling, the drill will be pulled into the material. What should you do to carefully drill through plexiglass and what exactly should you use to drill into this material?
Drilling of this material is carried out using a stationary drilling machine and a mobile drill; the drills used are those designed to work with light metals, high-speed steel, and also drills for hardened steel or carbide. It is possible to use drills of a canonical shape and a standard shape, and the sharpening angle should be in the range from 60° to 90°.
In order to get the best result when drilling plexiglass, it is necessary that the drill used meets certain technical requirements, namely:
- The elevation angle of the groove should be 17°;
- Drill point angle 70°;
- The rake angle should be sharpened to 3°...8°;
- The rear sharpening angle ranges from 0° to 4°.
The thinner the plexiglass, the smaller the sharpening angle at the apex should be. If the drill meets the parameters described above, then it will work properly, it will not drill the material, but scrape, this will prevent chipping.
To prevent overheating of the plexiglass, as well as to prevent the drill from becoming clogged with chips, it is necessary to periodically lift it and clean it. If as a result of your work you want to get a smooth surface of the hole, then you will need to do a little practice beforehand to find the optimal combination between the cutting speed and the speed at which you will feed the tool.
Cooling is of great importance, especially if work is carried out with material whose thickness is more than 5 mm. It is also necessary during the drilling process to lubricate with an emulsion intended for drilling, just pay attention to whether they are compatible with plexiglass.
Drilling tools
You can drill plexiglass using two tools to choose from:
- stationary drilling machine;
- household or professional drill.
When using a drill, it is important not to use the “impact” mode, which is only necessary for working with stone or concrete. As for the rotation speed of the drill, the optimal mode is from 500 to 1000 revolutions. The same settings can be used when working on drilling machines. Experts recommend using drills with a power of at least 750 W, optimally from 1200 W.
For high-quality drilling of plexiglass, you should use a drill with more than 750W power
Drill selection
For drilling thin sheets (up to 3 mm in diameter), ordinary steel metal drills can be used. They are not suitable for wood and concrete, since the former have an obtuse sharpening angle, while the latter have a pobedite tip. Feather ones are also not used - they leave large burrs.
Conventional metal drills can be used if the diameter of the final hole is up to 5 mm. In other situations, it is better to use special drills for plexiglass, which are made from high-speed steel. Their peculiarity is the sharpening angle. It should be selected according to the following scheme:
- for thin sheets (from 1 to 3 mm) – from 55 to 70°;
- for medium sheets (from 3 to 7 mm) – from 70 to 80°;
- for thick sheets (more than 7 mm) – up to 97°.
Exact adherence to the angle is not necessary, but it is better to avoid significant deviations in order to prevent damage to the material being processed.
Unconventional glass drilling methods
A thin steel drill, heated white, is hardened in mercury or a piece of sealing wax and sharpened. Then prepare a saturated solution of camphor in turpentine, moisten it with a drill placed on the brace, and quickly drill the glass , which is then wetted at the point of convergence with the said solution. This method can drill through 1cm thick glass
To drill a hole in glass, we recommend taking a triangular file, dipping it in turpentine and carefully drilling the hole.
You can also drill glass on a lathe with a copper rod, lubricating it with oil and sprinkling with emery. Particular attention should be paid to the hole when the drilling process comes to an end and only the last thin layer remains, since the glass can easily crack
Operating instructions
Using the correct tool does not guarantee that the hole will be straight and smooth. It is also necessary to follow basic drilling rules so as not to melt the edges or get deep burrs, which subsequently cause cracks to appear.
Drilling techniques
Conventionally, two drilling techniques can be divided:
- for holes with a diameter of less than 5 mm;
- for holes with a diameter of more than 5 mm.
Small holes are drilled at minimum speed, gradually increasing them up to 1000. The best option is to adjust the rotation speed from 500 to 1000 using reverse (accordingly, it is better to use drills that support this function). In this case, you should not drill for more than 10–15 seconds in one approach, taking a subsequent break for at least 10–20 seconds. This will prevent the edges of the hole from melting due to overheating. It is worth considering that increasing the temperature above 120–150 °C will also lead to darkening of the sheet material.
You should gradually increase the radius of the hole in the plexiglass, otherwise it may crack
To drill holes with a diameter of more than 5 mm, it is recommended to start with small-diameter drills, gradually increasing them in increments of 2-3 mm. This will prevent overheating and will also allow you to drill without putting pressure on the plexiglass itself. In addition, you can use water cooling, that is, supply water to the drilling head through a dropper or syringe (many machines have such a cooling system initially).
It is also important to perform drilling on a completely flat and smooth surface. Wood is ideal for this - it is inferior in hardness to plexiglass, so it will not be able to scratch it. It is better to take plywood or several layers of fiberboard or chipboard.
Step-by-step instruction
In most cases, the drilling process is performed according to the following scheme:
- Prepare the surface on which the plexiglass sheet will be located. It is optimal to use plywood, a wooden panel, or a pallet for this.
- Place a sheet of plexiglass. It is recommended that the place where drilling is not performed be covered with geotextile or any other fabric, which will protect the material from polymer and metal filings, which could theoretically scratch it.
Before drilling plexiglass, it is important to prepare the work area well to avoid damage to the material. - Install a compatible drill bit into the drill, select low speed, drilling mode (no impact).
- Start drilling at low speed. After a minimum recess appears, raise the speed to medium and in this mode drill up to ⅔ of the thickness of the material. Next, raise the speed to maximum, periodically reducing it to minimum to avoid overheating.
If the edges of the hole have melted, it is recommended to use a drill of a slightly larger diameter, but this will prevent overheating of the plexiglass. If burrs appear, you can get rid of them using a mineral stone drill (used primarily in drills for drilling). Naturally, the speed is maintained at a minimum.
Under no circumstances should you put pressure on the material itself - with heating and static pressure there is a possibility of its point deformation. Plexiglas will not suffer from this, will not become fragile, but will lose its original appearance.
So, in most cases, you can drill through plexiglass using a regular household drill. Drill screwdrivers are not suitable due to the low number of revolutions (if they are used, burrs are formed, and considerable pressure must be applied).
The main thing is to choose the right drill, taking into account the thickness of the material and the diameter of the required hole, and also to prevent it from overheating during the process of drilling plexiglass. To produce large holes (over 10 mm with a thickness of more than 7 mm), it is recommended to use stationary machines with a drill water cooling system.
Cut a large hole with a glass cutter
A large diameter circle can be cut out of glass using a glass cutter. To do this, use the circular design of this tool. It consists of a suction cup located in the center of the diameter, an adjustable tripod and the glass cutter itself. The movement of the glass cutter should be smooth and uniform, and excessive pressure should not be applied to the handle.
Drilling a large diameter hole in glass
Hole of any shape and size in glass in 1 minute
The cut is made once, after which the separation line is tapped from the inside with the handle of a glass cutter. If all manipulations are performed correctly, the cut fragment is easily separated and dumped into a substitute bucket.
Holes in plexiglass. How and what to do?
Plexiglas is a durable material, but at the same time malleable to all types of mechanical processing. It can be cut, drilled, polished and milled - with the right approach, damage to the plexiglass is excluded. But the most difficult procedure is drilling plexiglass - and many would like to know how to drill plexiglass without cracks and do it at home. There are many nuances in this procedure: from selecting the optimal drill to choosing the optimal speed when drilling.
Making holes in glass
There is an ancient, but now somewhat forgotten method of making holes in glass. The space on the glass where there should be a hole is properly cleaned of dirt and grease with gasoline, acetone or alcohol. Next, wet fine sand is poured onto the washed area and a funnel is made in the sand up to the glass with a sharpened stick of the required diameter. Molten solder (lead or tin is acceptable) is poured into the mold prepared in this way in sand. After 1-2 minutes, you should discard the sand and remove the solder cone. An even through hole appears in the glass.
What you need to drill plexiglass
Drilling holes in plexiglass can be done with two types of tools:
- On a stationary drilling machine. This option is not always suitable for the home, since such machines are used quite rarely in everyday life.
- Using a drill. Drilling can be done with either an inexpensive household drill or a professional or semi-professional drill.
When using the tool, the following recommendations must be observed:
- Do not drill organic glass with the “impact” mode turned on - damage to the panel will be inevitable;
- The rotation mode of the drill should be in the range of 500–1000 rpm - a high speed will lead to melting of the plexiglass;
- The power of the tool must be at least 750 W - otherwise the drill may “get stuck” in the thickness of the sheet.
When choosing a drill for plexiglass, it is important to take into account one nuance - you should use either special drills for acrylic made of high-speed steel, or drills for metal. The equipment for drilling concrete and wood is definitely not suitable - the material simply will not be drilled with such drills.
As an alternative solution to the problem of which drill to drill plexiglass with, it is possible to use pen equipment for drilling. But it is worth considering that the edges of the resulting hole will have a large number of burrs, which will require additional processing.
An important feature is the sharpening angle of the drill used. It should be as follows:
- when drilling thin sheets (1-3 mm) - about 55-70 degrees;
- for sheets of medium thickness (3–7 mm) - 70–80 degrees;
- for thick sheet acrylic (from 7 mm) - up to 97 degrees.
All sorts of different ways to make a hole
You can make a through channel in a glass surface in other ways. For example, you can use ordinary copper wire. First you need to dilute one part of camphor powder in two parts of turpentine, add fine-grained emery and stir the resulting mixture thoroughly. Then apply the composition to the work site, insert the copper wire into the drill chuck and begin the drilling process.
The work can also be done using a duralumin, aluminum or copper tube. At the working end of the improvised tool, cutting teeth are cut out with a needle file. A wooden plug is driven into the other end, into which a screw with a cut head is screwed in to secure it in the drill chuck.
In the right place, cardboard washers are glued to the material being processed on both sides. The working end of the tube with cutting teeth, moistened with turpentine, is inserted into the washer and glass is produced to one third of the thickness of the material. Then the sheet of glass is turned over and work continues on the other side until a through hole is obtained.
A soldering iron will help you make a hole in the glass.
Some craftsmen use a soldering iron to make through holes in a glass sheet. A marking mark in the form of a ring is first applied to the surface of the material. Then the soldering iron tip warms up thoroughly, and careful melting of glass along segments of the circle begins. To be honest, using this method rarely produces fairly straight edges on the hole.
Methods for drilling plexiglass
Regardless of the type of tool and equipment chosen, as well as the thickness of the acrylic sheet, you can drill plexiglass in only one way: by systematically immersing the working part of the drill into the sheet. But depending on the thickness of the plexiglass and the diameter of the required hole, the work can be done either in one pass or in several.
Let's take a closer look at how to make holes in plexiglass:
- Initially, you need to mark a point on the sheet at the location of the future hole.
- If the acrylic sheet is of small thickness, then drilling is performed in one pass while creating uniform, small axial pressure on the drill.
- If the sheet thickness is large, the operation is performed in several stages - after each 3–4 mm deepening, it is necessary to pull out the drill, remove all dust and chips, and at the same time wait for the material to cool in the drilling area. This will completely eliminate the risk of the plexiglass melting.
In order for holes in plexiglass to have perfectly smooth edges, it is necessary to achieve an ideal combination of the rotation speed of the drill and the depth of its penetration into the sheet. Insufficient speed leads to acrylic melting in the drilling zone, and too high speed leads to the appearance of torn sharp edges. To correctly make a hole in plexiglass, it is important to follow a certain sequence:
- At the beginning of work, the drill must be brought to the material at low speeds.
- When the cutting edges of the equipment are fully inserted into the hole, it is necessary to increase the rotation speed.
- Towards the end of drilling, the speed should again be reduced to a minimum.
This will allow you to make a hole in plexiglass at home, while avoiding the appearance of chips and cracks in the material processing area.
Preparatory activities
Before drilling glass at home, the material should be prepared:
- Using alcohol or turpentine, you need to degrease the surface and then wipe it with a soft and dry cloth.
- When drilling, do not allow the glass sheet to slip.
- The sheet must be completely placed on the base.
- It is recommended to mark the area in which the hole will be made with tape or a felt-tip pen.
- If you have never drilled holes before, it is better to practice on small pieces first so as not to damage the main sheet.
- Making holes in glass is a slow process. When working, do not accelerate or press hard on the material.
- The glass drill must be held strictly perpendicular to the surface being processed. In addition, you should not create the entire hole at once. Sometimes you need to stop to let the glass cool down.
- If you are almost finished with the work, then you need to turn the sheet of glass over and make a hole on the back side. This will prevent chips and cracks from occurring.
- To prevent significant unevenness on the glass, use fine-grit sandpaper.
So, for this purpose you will need the following devices:
- drills for metal or ceramics;
- screwdriver or drill with low speed;
- plasticine;
- pure alcohol;
- turpentine.
Before making a hole in the glass, it must be placed on a flat surface. There are some nuances here: the ends of the sheet should not hang down and/or stagger.
The power tool should be set to the minimum rotation speed. The drill must be clamped into the chuck. Then you can start drilling the hole.
The surface should be degreased using pure alcohol, and then a plasticine recess should be sculpted in the area of the future hole. You need to add a little turpentine there. To prevent cracks from appearing in the material, you should not press too hard on the tools.
How and with what to drill a hole in glass, LIFE HACK
READ How to cut gypsum tiles to resemble bricks
Helpful tips for drilling
It is important to understand that organic glass belongs to the category of thermoplastic materials. And when heated to a temperature of 150–160 degrees, it begins to melt and deform.
To drill a hole in plexiglass efficiently and the first time, use a number of tips that can often be heard from professionals on specialized forums:
- Do not neglect the cooling of the material. Therefore, when drilling thick sheets, the area in the processing zone is often covered with an emulsion or oil, which prevents overheating of the equipment;
- It is important to promptly remove chips and dust from the work area. If this is not done, dust will enter the hole being drilled and begin to melt, creating additional friction. This can lead to binding and breakage of the drill, melting and deformation of the sheet in the processing area;
- the material must be firmly fixed on the table. Since plexiglass is lightweight, when drilling small parts, they may rotate together with the drill, which reduces the accuracy of the work and can lead to scratches on the surface;
- it is necessary to use a substrate. Plywood, wooden panels, and rubber are widely used as the latter. If there is no substrate, then the drill may “break off” at the exit from the thickness of the sheet - this will lead to the appearance of cracks and chips on the underside of the plexiglass;
- To get rid of the characteristic matte tint of the hole caused by partial melting of the acrylic, just warm up its edges. To do this, you need to iron them using a red-hot stainless steel rod;
- Any operations with plexiglass must be carried out smoothly, avoiding sudden movements - the slightest mistake can lead to damage to the surface, which will be quite difficult to repair.
We also suggest watching an introductory video that tells you how to drill plexiglass using conventional metal equipment.
As you can see, acrylic lends itself well to all types of processing, and if certain nuances are observed, you can do literally anything with the material.
Holes from bullets, stones and metal balls
On the glass of houses, regardless of the floor, there are holes of unknown nature and characteristic shape. Very often, if there are several glasses, only one is broken. In this case, the inner Honor glass is usually more damaged than the outer one. These holes are often associated with the poltergeist phenomenon, and the phenomenon itself is called the "ghost glazier" or "ghost sniper".
In fact, such holes are formed as a result of the impact of balls from bearings, pneumatic bullets, and simply small stones on the glass.
A very good explanation of this phenomenon was given by S.D. Varlamov (Department of Physics, MIOO) back in 2008:
A common shape for holes, which begins with a small round hole and continues with a kind of “cone”, is captured in numerous photographs. One of them is given below. Next to the photograph is a schematic typical cross-section of a hole across the glass.
The prose of life is that this is the trace of a small pebble hitting the glass or (which happens much more often) a small steel ball fired from a slingshot or an air pistol. A stone or steel ball (in the future we will talk about a stone) remains on the other side of the glass from which the impact occurred, and the broken glass flies away in the opposite direction.
In the photographs and in the schematic “profile” of the glass chip, it is noticeable that “in profile” the hole is not a cone at all, but a figure formed by three axisymmetric surfaces. Let us qualitatively describe the sequence of appearance of these surfaces.
The first is the side surface of a small hole, which has the shape of a cylinder with a relatively large diameter and a very small “height”. Here the glass was thoroughly destroyed as a result of non-isotropic compression deformation during the time of contact with the stone. The cracked glass from this area turned into small crumbs after the stone bounced off.
READ How to cut corrugated sheeting for a pipe
It is followed by a second surface with a small radius of curvature. It limits the area of glass, which immediately after the “push” breaks away from the glass array adjacent to the point of impact. The separation is associated with a large relative shear deformation of the glass at the point of impact. Glass has a “tensile” strength that is lower than a “compressive” one, so the surface of the “first” tear extends into the glass over distances greater than the area of glass failure as a result of strong non-isotropic compression (which took place in the area of a small round hole). The glass material from this area gained momentum at the time the stone touched the glass. Then the stone bounced off the glass, and waves appeared in the glass material, spreading from the point of impact. Since with increasing distance from the point of impact the amplitude of the displacement of particles from the equilibrium position decreases, at some distance from the point of impact the material shift becomes insufficient for a “separation” to occur, and as a result, the first separation surface with a small radius of curvature “stops” inside the glass array and does not goes the glass .
And finally, the third curved surface has a large “average” radius of curvature and is not smooth. It is formed after the compression and shear wave in the glass reaches the surface of the glass opposite to the one on which the stone hit, is reflected from it, and, now turning into a stretching wave, reaches the points of the first boundary of the “separation” that are furthest from the point of impact of the stone. In these areas, if there are small cracks within the glass volume, very little tensile stress is required for the glass to break. Cracks grow rapidly within the area that is currently under tensile stress. Since this region has a finite thickness (it is determined by the time of interaction of glass with stone and the speed of propagation of waves in the glass), and even its boundaries move, the shape of the separation surface is not smooth. The “waviness” of this separation surface is determined by the presence of internal microstresses in the glass, which arose in the glass during its cooling and subsequently only intensified with the gradual crystallization of the glass. Growing cracks emerge on the surface at different distances from the “epicenter” of the impact, so the chip boundary on the glass surface opposite the impact site does not at all represent a regular circle.
Drilling plexiglass
Drilling plexiglass
#1 Post by Vladimir Lomov » Thu Apr 26, 2012 17:12
Re: Drilling plexiglass
#2 Post by Hedgehog » Thu Apr 26, 2012 17:24
Good luck to everyone. Dmitriy.
Experts are like dirt. There are not enough modelers. Don't tell me what I'm doing wrong. Show me how you do it. Full-time school of classical ship modeling: Here, on the forum, Facebook
Re: Drilling plexiglass
#3 Post by baboo » Thu Apr 26, 2012 17:40
Re: Drilling plexiglass
#4 Post by Klostr » Thu Apr 26, 2012 18:38
Re: Drilling plexiglass
#5 Post by Petr » Thu Apr 26, 2012 18:54
The owner PetOs Modelbau is a Milania dealer in Germany, as well as resin and etching from Flyhawk, KomplektZIP, Big Blue Boy, Five Star and many other manufacturers.
Brigantine Phoenix from Milania - in progress Pint from Artesania 1/65 - in progress Diorama Arkhangelsk 1600 in 1/60 - in plans
Re: Drilling plexiglass
#6 Post by Mars » Thu Apr 26, 2012 18:55
Surplus is a necessary thing.
Re: Drilling plexiglass
#7 Post by Bender Rodriguez » Thu Apr 26, 2012 19:37
Re: Drilling plexiglass
#8 Post by Hedgehog » Thu Apr 26, 2012 19:42
Good luck to everyone. Dmitriy.
Experts are like dirt. There are not enough modelers. Don't tell me what I'm doing wrong. Show me how you do it. Full-time school of classical ship modeling: Here, on the forum, Facebook
Re: Drilling plexiglass
#9 Post by mirzulya » Thu Apr 26, 2012 20:13
Re: Drilling plexiglass
#10 Post by Hedgehog » Thu Apr 26, 2012 20:18
Good luck to everyone. Dmitriy.
Experts are like dirt. There are not enough modelers. Don't tell me what I'm doing wrong. Show me how you do it. Full-time school of classical ship modeling: Here, on the forum, Facebook
Re: Drilling plexiglass
#11 Post by mirzulya » Thu Apr 26, 2012 20:42
Re: Drilling plexiglass
#12 Post by Hedgehog » Thu Apr 26, 2012 20:49
Good luck to everyone. Dmitriy.
Experts are like dirt. There are not enough modelers. Don't tell me what I'm doing wrong. Show me how you do it. Full-time school of classical ship modeling: Here, on the forum, Facebook
Re: Drilling plexiglass
#13 Post by mirzulya » Thu Apr 26, 2012 22:19
How to process plexiglass?
- Types of processing
- Operating rules
- Useful tips
Questions about how to process plexiglass and how to drill it at home are asked very often. Working with plexiglass on CNC machines also has its own subtleties. A separate topic is how to further process such a hole. All this will allow even novice craftsmen to avoid many mistakes.
Types of processing
Before talking about how exactly organic glass can be processed at home, you need to learn about the main types of such processes. If we talk about, in general, all possible options, the list will be as follows:
- cutting;
- milling;
- grinding;
- processing of plexiglass using pumice;
- stamping;
- getting the fold;
- turning work.
Such material, regardless of the specific type (this also applies to acrylic glass, of course, and made from polyvinyl chloride), is recognized as a type of thermoplastic plastic. When temperatures rise, even just to 150 degrees, there is inevitably an increased risk of deformation. Therefore, drilling organic glass is considered a much more complex operation than polishing, milling or cutting to size. To properly drill a hole, either CNC or manually, you need to carefully select the correct drill bit size.
Attention should also be paid to the brand of the drilling device.
In any case, it must be taken into account that organic glass compared to ordinary glass:
- twice as light;
- stronger;
- endures blows more steadfastly;
- optimally protects against heat spread;
- much more transparent.
Unconventional glass drilling methods
A thin steel drill, heated white, is hardened in mercury or a piece of sealing wax and sharpened. Then prepare a saturated solution of camphor in turpentine, moisten it with a drill placed on the brace, and quickly drill the glass , which is then wetted at the point of convergence with the said solution. This method can drill through 1cm thick glass
To drill a hole in glass, we recommend taking a triangular file, dipping it in turpentine and carefully drilling the hole.
You can also drill glass on a lathe with a copper rod, lubricating it with oil and sprinkling with emery. Particular attention should be paid to the hole when the drilling process comes to an end and only the last thin layer remains, since the glass can easily crack
Operating rules
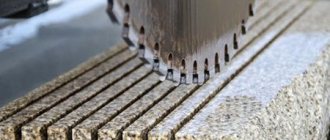
Cutting plexiglass can be done even with basic improvised means. A common saw for metal will also work. In industrial settings, even special lasers are sometimes used. But in most cases, they still try to find some kind of compromise between the perfection of the instrument and its cost. Therefore, in practice it is usually necessary to use circular saws, band saws and cutters. It is advisable to work with a band saw where a clear straight cut is not needed (that is, when receiving preliminary blanks for molding).
The rotation speed of the belt mechanism is 700-800 m per minute. Where it is necessary to obtain a clear, smooth contour, it is advisable to use cutters. Using circular saws, precise, straight cuts are obtained. The cut line will be very clear.
It is recommended to cut cast acrylic with carbide-hardened teeth; the optimal rotation speed is from 800 to 1200 m per minute.
In industrial conditions, it would be better to process plexiglass using high-speed equipment. Accelerated cutting and low feed rate allow you to form an excellent edge . The cross section of the discs is 25 cm. The discs themselves are made from high-speed alloys. You can also use ordinary ferrous metal, but with hardening with carbide components.
Laser cutting is much more precise than using mechanical tools. There will be less waste from such work. But in this case, the tension inside the product increases. Gluing such surfaces is very dangerous.
You can drill plexiglass using a stationary or movable drilling machine. The drill must be made of high-speed alloy. It is designed for maximum performance. The deeper you drill, the more often you need to raise the drill. This will allow you to remove chips and at the same time reduce heating of the material. Cooling cutting devices with special liquids or compressed air helps reduce dangerous internal stresses.
For engraving, in most cases, rippers are used, which are placed on pantographs. The rippers themselves are equipped with small-sized cutters of various profiles.
In difficult cases, laser cutting machines are used. To ensure better engraving quality, the depth of the beam is limited.
You can grind rough or deformed plexiglass using wet sandpaper coated with fine grains of corundum. When rough grinding is completed, the surface is treated with polishing mixtures like VIAM, crocus. The work is carried out either manually or using polishing equipment. Cut edges and matte surfaces can be polished mechanically using diamond cutters without any problems. On curved cuts and in other difficult cases, polishing is performed with high-temperature fire. You will have to work as carefully as possible, thoroughly cleaning the treated layer; stress is prevented by annealing, which makes gluing or painting easier.
Plexiglas must be molded in three stages:
- warming up;
- actual molding;
- heat removal and cooling.
Useful tips
You can glue extruded organic glass using:
- film glue;
- polymerizable glue;
- epoxy, polyester adhesives.
A curved cut is made using a nichrome thread or a hot spring. When it comes to turning, the most practical option is the same mode as for high-speed machining of hardwood. The chips are of decisive importance for drawing conclusions about the quality of work.
When drilling, the angle of the drill bit should be a maximum of 60 degrees for thin sheets, and 70-90 degrees for thick workpieces.
It is better to bend plexiglass after thorough heating in the required place; This is achieved with the help of a soldering iron, a hair dryer, and in their absence - with the help of a red-hot metal tube.
Ideal drills:
- have a groove with a lifting angle of 17 degrees;
- sharpened at the front angle by 3-8 degrees;
- sharpened at the rear angle by 0-4 degrees.
A conical drill will produce a conical-shaped hole. A stepped tool will help in drilling cylindrical channels. A router bit is used to make an elongated hole.
Important: Regardless of the type, the tip must be in perfect condition. You need to start drilling at minimum speed, then, when a notch appears, go to medium speed.
Only in the last third of the material does it make sense to drill as quickly as possible . But even then we must not forget to periodically reduce the speed to a minimum. Having found burrs, drill them out with a mineral stone drill at the lowest speeds.
Important: you can drill plexiglass with a drill, but you cannot drill with a drill-driver. Holes longer than 10 mm and wider than 7 mm are recommended to be processed on stationary machines with water heat removal.
How to cut plexiglass, watch the video.
Drilling a large hole in glass
The drill is made from a piece of aluminum, duralumin or copper tube 40-60 mm long. From the first end, a wood plug is hammered into it to a depth of 20-25 millimeters, and at the other end the teeth are cut out with a triangular file. A small screw 4-5 mm thick is screwed into the cork so that its smooth part protrudes 10-15 mm. The head is sawed off. A paper washer with a hole equal to the drilled diameter is glued to the glass on both sides. The glass is placed on a piece of rubber. A little abrasive powder is poured onto the drilling space. Then insert the end of the screw protruding from the cork into a hand drill, lubricate the teeth with turpentine and then start drilling. When the tube goes deep into the glass by at least 1/3 of its thickness, the glass is turned over and drilling is completed on the second side.
How to cut, drill, process and glue plexiglass?
Plexiglas (acrylic glass, acrylic, plex) is a transparent plastic that looks very similar to glass, but compared to glass it has more advantages:
- Twice lighter in weight;
- Stronger and more impact resistant;
- Has the best thermal insulation properties;
- More transparent.
Acrylic has two major drawbacks: it is more expensive and, when exposed to direct fire, it begins to melt and burn. Also, when working with it, it is necessary to avoid heating, since acrylic does not react well to high temperatures and this can lead to significant stress in the material, which, in turn, can lead to the formation of cracks.
How to cut?
Plexiglas is usually protected with film on both sides. It is recommended to leave the acrylic in a protective film throughout the processing process to protect the finish.
There are several ways to cut plexiglass, but regardless of the method you use, you must always ensure that the cutting tool does not cause heat to the material. One method of cutting is to use a cut-off machine, preferably with a 10-tooth-per-inch carbide blade. Plex can also be cut using a CNR milling machine, carbon dioxide (CO2) laser technology or a thin supersonic water jet. Please note that the edge finish will vary depending on the cutting method.
Choose a machine blade that is specifically designed for cutting acrylic. The teeth of the blade should be smooth, thin and evenly distributed at the same height. Make sure that the blade contacts the material at a constant speed, as changes in speed can cause the edge of the material to melt.
Thin pieces of acrylic (1/8 inch ≈ 3mm thick or less) can be cut like glass using an engraving knife, metal scriber, awl or mounting knife and finally broken apart carefully. Please note that if you need to make a long cut, this method will not work, as it leaves edges that are not flat enough, which are then difficult to glue.
Unconventional glass drilling methods
A thin steel drill, heated white, is hardened in mercury or a piece of sealing wax and sharpened. Then prepare a saturated solution of camphor in turpentine, moisten it with a drill placed on the brace, and quickly drill the glass , which is then wetted at the point of convergence with the said solution. This method can drill through 1cm thick glass
To drill a hole in glass, we recommend taking a triangular file, dipping it in turpentine and carefully drilling the hole.
You can also drill glass on a lathe with a copper rod, lubricating it with oil and sprinkling with emery. Particular attention should be paid to the hole when the drilling process comes to an end and only the last thin layer remains, since the glass can easily crack
Sources:
https://gazsnabstroy.ru/prochee/kak-vyrezat-krugloe-otverstie-v-stekle https://www.umeltsi.ru/prisposoblenia/111-otverstija-v-stekle.html
How to drill?
Acrylic lends itself well to drilling, but it is necessary to avoid heating and rough handling of the material during drilling. The heat generated by the drill can lead to melting or cracking, and any careless movement of the material near the drill can lead to breaks.
Use specially ground and polished drill bits designed for acrylic, or reshape a regular twist drill bit on a sander so it can be used for drilling in resin. The shape of a twist drill can be changed by grinding the edges of the drill on both sides so that a scraping action is created when drilling. If the drill is properly sharpened and operated at the correct speed, long, curly stripes will be achieved during the machining process.
How to glue?
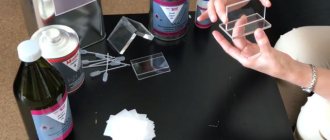
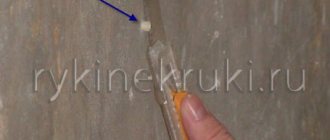
To achieve strong adhesion and transparent seams, it is recommended to use solvent-based adhesive. When working with this glue, make sure that the room is well ventilated and away from sources of heat and fire. Also, follow the manufacturer's instructions and be sure to wear safety glasses and protective clothing.
The capillary method of gluing acrylic is the most popular. To achieve perfect bonding, check that the surfaces of the elements are well connected and are flat, straight and clean. Connect the parts using adhesive tape or a clamp, and keep the connection horizontal so that the glue does not leak out.
Carefully apply glue along the edges. When gluing edges that form a square corner, apply glue to the inside edge. When gluing flat edges, apply glue to both sides if possible.
For best results, use a bottle with a needle applicator. It will take at least 30 minutes for the parts to stick together, but to achieve maximum strength - from 24 to 48 hours.