After the first stage of installing a chain-link fence has been completed: the posts are installed and securely fastened, you can begin the direct installation of the mesh itself.
Despite the fact that stretching a chain-link mesh is a relatively simple process, it is better to familiarize yourself with the theoretical part and choose the appropriate method. The choice of method for how to stretch the chain-link mesh onto the fence depends directly on the mounting location. It would be correct to break the entire fence into its component elements and carry out the work sequentially.
How to properly tension a chain-link mesh with your own hands
The process can be divided into several stages in the form of instructions.
Recommendations
All of the above design methods can be divided into seasonal and more durable. When choosing, you should take this into account. Owners of plots planning to change the fence later can plant an annual bindweed plant as a hedge, attach artificial pine needles or reeds
If you do not want to remove the mesh, then it is better to pay attention to more durable and stable materials - polycarbonate, corrugated sheets, bamboo mats
Some design methods can be combined with each other. For example, attach a shading mesh, and on top of it make a woven pattern from threads or braid. Such a fence will be denser and at the same time original. If flowers are planted along the fence on your property or beds are laid out, do not use completely opaque materials. Plants need sunlight and cannot stay in the shade all the time.
How to decorate a chain-link mesh, watch the video.
Video description
The video shows how to secure a chain-link mesh to metal posts using tie wire:
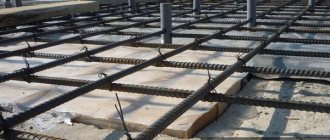
Frame fence made of chain-link mesh
What is a frame fence? These are support posts to which angle steel frames are attached. It is on the frames that the chain-link mesh is attached. That is, first the frames are made, the mesh is installed and attached to them, and only then these structures are attached in different ways to the pillars. Fastening methods: welding, wire, bolts.
In this process, the most important thing is to correctly attach the mesh itself. There are two options here:
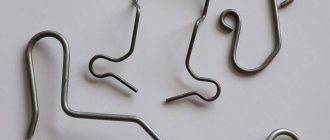
- hooks made of wire rod or reinforcement with a diameter of 6 mm are welded to the inside of the corners, and the mesh is put on them;
- a steel rod is passed through the edges of the mesh material, which is welded to the outside of the corner, then exactly the same rod is passed from the opposite side, the mesh is tensioned, and the second free rod is also welded to the corner opposite on the frame.
This might be interesting! In the article at the following link, read about how to calculate a fence made of corrugated sheets.
Types of chain link
The cost of chain-link fencing is much lower than that of fences made of other materials. This is the main advantage of the grid.
Tension with welding
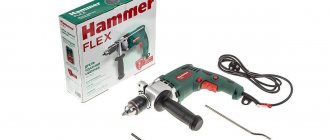
Any owner of a summer house or private house can easily buy it at any hardware store. However, in order to tension the chain-link mesh with your own hands, you will additionally need posts for its fastening, fittings and a cable with a diameter of 5–7 mm.
Today there are 3 types of chain-link, different in fabric material:
- Plasticized. This is a chain-link made of iron wire, which is coated with a protective layer of polymer against the occurrence of corrosive processes. The mesh is not afraid of high humidity and frequent precipitation.
- Galvanized mesh is not subject to corrosion processes. But it is more expensive, unlike black wire chain-link, and therefore less popular.
- Non-galvanized, made of ferrous metal. This material does not last long, no more than 4–6 years. Moreover, corrosion appears on it very quickly. For a temporary fence or enclosure, you can buy such a chain-link, but take into account the fact that another fence will soon be installed instead. Otherwise, the mesh must be painted, this is done once every 3 years.
Fastening with self-tapping screws to wood
In addition to the material, the mesh is different in cross-section and cell shape. Cells can be in the form of a rhombus, square or other
But their cross section is very important. The size is in the region of 20–65 mm
The smaller the cross-section, the less natural light reaches the site through the fence, the greater the strength and solidity, but at the same time the higher the price. For a fence at the dacha, so that small animals (cats, dogs) cannot enter the territory, purchase a chain-link with a cross-section of 45–55 mm.
Tension on reinforcement
Common mistakes
During the process of installing fencing, novice builders may make small mistakes. This can reduce the life of the fence and quickly ruin its appearance.
Let's look at the most common errors:
- Metal supports are not cleaned of rust. When using used supports, you need to thoroughly remove rust and paint, you can apply a protective layer to the surface.
- When installing supports, the method of driving the support into the ground is often used. This may lead to deformation of the support. Therefore, it is better to use a drill or install it in pre-prepared holes.
- To avoid sagging of the mesh, you need to install carabiners in advance, which will allow for timely tightening. To protect the fence from thieves, it is better to weld the wire broach to the posts, which will strengthen the structure.
Easy installation, resistance to damage and deformation, strength, a wide range of sizes, durability and affordability - these are the few qualities that chain-link mesh is endowed with.
The invention of Karl Rabitz has become very popular these days and is widely used in the national economy and in everyday life.
We will send the material by email
The topic of the article is how to stretch a chain-link mesh, and what methods exist to properly secure it to the posts. The topic will be of interest to those who have purchased a plot of land and want to fence it inexpensively without investing a lot of money.
Overview of species
Posts for chain-link mesh differ in the most common types of material for the supporting structure: concrete (including reinforced), wood, pure metal structures and asbestos cement.
The consumer is primarily interested in how reliable the fence will be and how many years it will last. The initial data is the strength of the entire fence, the topography and the perimeter of the delimited territory. When, for example, it is necessary to fence an area of several tens of acres, the construction of a permanent fence (with pillars poured into concrete) may not coincide with the owner’s fast-moving plans.
Wooden
Supports made of timber or logs have been used since ancient times. Wood is easy to process and is cheap (compared to metal structures). Wooden poles are the most budget option. But a simple board is of little use as a load-bearing support - even if you take the thickest one available, it would rather replace the chain-link than serve as its guide and fixing support. Ideal strength - by the standards of a wooden supporting structure as such - is achieved using a square or round support. The timber must be strictly square in cross-section, the log must be calibrated to a perfectly round shape.
It is easy to drive nails into the wood or screw in self-tapping screws - the mesh is hung on them.
Without periodic maintenance of wooden posts - impregnation once a year or several years, renewal of waterproof coating - the tree is susceptible to rotting and being corroded by insects that feed on its fibers, for example, wood borers. If there are ants in a log or piece of timber, the owner will have to treat the supports with chemicals. Climbing into cracks, insects nest and reproduce inside. Mold, fungi, mildew and microbes love dampness - in two to three years the piece of wood will begin to turn into dust. When replacing poles, the chain-link in these places will be remounted.
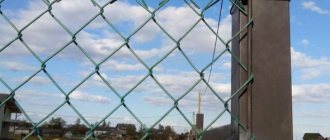
Metal
Metal poles are much more durable than wooden poles. The most famous option is a square corrugated pipe.
Rectangular corrugated pipe is used for horizontal crossbars, which improve the fixation of the chain-link at additional fastening points. Without maintenance (periodic painting with primer once every year or two), the pillars will last a maximum of ten years. An economical option is to check them for rusty spots and renew the primer coating in the places where they appear; the primer should be the same color and shade.
An equivalent alternative to a professional pipe is a simple thick-walled one. The downside is the relative high cost of construction steel. Metal cannot be dug in - it will rust and collapse in a few years. Ideal insulation from salts and moisture of the soil where such a pillar is inserted will be ensured by concrete pouring of the structure.
Concrete
You can also make a concrete pillar with your own hands. First, a frame of about 10x10 cm, 3-3.5 m high, welded from ribbed reinforcement, for example, 16 mm cross-sectional diameter, is installed. Formwork is installed under it - so that the structure is strictly square in cross-section, for example, 15x15 cm. Concrete is poured inside in parts - approximately the same way as a “frame monolith” is cast for a multi-story building or structure.
The disadvantage of the design is the capital costs, the complexity of installing the chain-link: even before pouring concrete, it is necessary to provide loops, for example, from thick nails, welded on both sides into the frame. The advantage is the lack of maintenance of the resulting reinforced concrete product. It will easily last 30 years, if not more. Does not require casting additional concrete as a base.
Asbestos-cement
Asbestos cement is inferior in durability only to high-quality reinforced concrete, for the production of reinforced concrete products for which concrete prepared according to the M400 recipe or even stronger was used. But the costs of asbestos-cement pipes are much lower. The disadvantage is that it is even more difficult to install the mesh: if the fastening points are not drilled correctly, the asbestos pipe may crack. The strength and durability of this support will be in question.
Plastic
Plastic - low-density polyethylene, polypropylene, polystyrene, polyurethane - cracks and fades from ultraviolet radiation, especially in the summer heat, when the temperature is often above +40°. Composite materials - in particular, solid polycarbonate - are somewhat better, but they will not save the fence from swaying and vibration during a hurricane. Plastic is not afraid of water, but annual temperature changes from, say, -25° to +45° will “kill” it in a few years.
Fastening sections
The method of attaching the chain-link to the poles depends on the chosen material. For wooden or concrete supports, different fastenings are used.
Metal pipes must be equipped with special brackets, hooks or plates to which a chain-link can be easily attached. They can be welded. You can attach it to metal pipes using small steel plates with holes. Large threaded pins are threaded into the finished holes on the plates and secured with nuts through special holes in the pipes.
The mesh is attached to the concrete posts with thick wire or clamps. The wire should be selected from stainless steel. The concrete posts do not have holes, hooks or plates, so the net is attached to large clamps or tied tightly. To do this, use strong steel wire.
The mesh is put on hooks, which are then bent with a hammer. The chain-link is attached to wooden posts with staples or nails, or can be screwed with steel wire. It is better to secure it in several places.
What posts are suitable for a chain-link fence?
Despite the light weight of the mesh, there may be several options for installed supports. Their choice is influenced by the purpose of the structure, the type of soil, and whether the fence will be temporary or permanent.
Brick
Stands made of this material are durable and do not require additional finishing or decoration, but the laying process is labor-intensive and the cost of bricks is high. A foundation will have to be poured under such pillars, so in practice it is unprofitable to install a chain-link fence.
If you still choose brick, we recommend that you familiarize yourself with the material: “How to make brick pillars for a fence.”
Wooden
Wood is most often used when owners want to build a temporary fence. For this, a beam or log is used. The cheapest species is pine. Expensive, but durable - elm, oak.
A significant drawback of raw materials is instability to external influences. It is for this reason that the tree needs to be pre-treated with antiseptics.
Photo: using timber as a fence frame
You can learn how to install wooden fence posts from this article: “Installing wooden fence posts.”
Metal
Ideal posts for chain-link fences. They can be made from square or round pipes or corners. The metal is not subject to climatic influences. The supports are simply treated with an anti-corrosion solution and painted to make them look neat.
It is convenient to attach mesh, wire, and hooks to such supports. Fixation method: welding.
When using a tension fence, the posts should be placed every 2 m so that the material does not sag. For other installation methods, the step between supports can be increased to 2.5–3 m.
Read more about installing metal poles.
Concrete
Pillars made of this material are used extremely rarely for several reasons:
- attaching a mesh fabric to them is quite difficult;
- you will have to hire help for installation;
- To transport them to the construction site, you will need to rent special equipment.
The price is affordable. So, 1 pillar measuring 80*80*2000 mm costs from 350 rubles. for 1 piece Many craftsmen pour concrete supports themselves. But for a chain-link fence, this is an unreasonably labor-intensive option.
Asbestos cement pipes
It is possible to build a fence from such pillars, but for reasons, as in the case of concrete ones, it is not practical.
If you happen to have pipes, the mesh will be attached to them with special clamps or twisted wire, which is not particularly convenient.
Photo: fastening the mesh to an asbestos-cement pipe
They are inexpensive. The average price of a pipe measuring 100*3000 mm is 300 rubles.
How to level fence posts
A uniform level for the fence is created by levelly installed support structures. There are several measuring instruments for leveling support posts:
- laser level;
- hydraulic level;
- plumb line;
- spirit level (building level).
Leveling pillars
How to use a laser level
A laser level is a modern device that projects horizontal and vertical beams. Based on the projected lines between the pillars, a flat horizon is determined. When used, the meter is mounted on a special manipulator tripod. The device allows you to determine the uniform spacing between posts even on sloping ground.
What is the hydraulic level used for and how does it work?
The water level is made of a flexible and transparent hose 10–15 m long, filled with liquid. At its ends there are graduated vessels. Used to determine a level horizon between posts. This is an ideal option if you do not have enough money to purchase a laser level.
We align the pillars using a regular level
READ ALSO: How to Paint Flowers on a Fence Using Enamel
The operating principle of the hydraulic level is based on interconnected vessels. To determine the level horizon between the posts, the instrument bulbs are applied to the supports. To bring them to the same level, the liquid in the vessels is kept at the same level. Given the large distance between the posts, independent measurement with this device is not feasible. You will need the help of a partner or a neighbor in the area.
The video below explains how to use a hydraulic level.
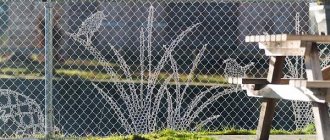
Why cover the chain-link mesh?
Why close the fence on your summer cottage from neighbors? The answer is quite simple. Since it actually performs the main functions, in other words, it blocks the backyard territory.
Opaque fences
The fence should be masked when a number of conditions are necessary:
- you need to hide from view from the street or from a neighboring area. Few people want to be visible all the time;
- sun rays that penetrate the territory;
- the dacha is located in an open space and must be protected from the wind;
- you need to protect the area from dust and debris coming from the street;
- I don't like the appearance of the fence.
The photo below shows a fence between neighbors in the country.
Facade mesh
Manufacturing of tension fence
This is the simplest design of mesh fencing. It will require minimal financial and labor costs. Next, each stage of construction is discussed in detail.
Site marking
Preliminarily mark the location of the supports on the site:
- in the area where the fence is installed, large plants and debris are removed, depressions and mounds are leveled;
- markers (stakes) are driven into the ground at the corners of the site boundaries;
- a cord is pulled between them;
- along the towline from the entrance to the site, mark with pegs the position of the wicket and gate posts;
- measure the distance between the corner markers, and from the corners to the installation site of the goal posts.
Then, for each side, the span length is selected from the range of 2-2.5 m, so that a whole number of them fit in the space between the markers, and they themselves are approximately equal along the entire perimeter of the fence. It remains to place markers along the string in increments equal to the accepted span length, thus indicating the location of the supports.
Preparing holes for pillars
It is more convenient to make holes for posts using a garden drill. Depth - 10-15 cm more than the buried part of the column. At the bottom of the excavation, a sand or sand-crushed stone cushion 10-15 cm thick is arranged. The material is compacted in layers of 5 cm, after watering it with water. This is a drainage cushion: it does not retain moisture, so the base of the column remains dry.
Installation of load-bearing pillars
The supports are installed in the following sequence:
- a “heel” (a square plate for support) and hooks are welded to the posts, then they are primed and painted, and the buried part is also covered with bitumen or polymer-bitumen mastic;
- randomly choose one of the sides of the future fence and install the outer supports. Each column is brought into a strictly vertical position using a plumb line and temporarily fixed with wooden wedges or fragments of brick;
- Using a water level, determine which rack has the lower top. Sand is added under it until both posts are the same in height;
- Having removed the wedges, concrete is poured into the holes with installed racks or a mixture of soil and sand is filled with a layer-by-layer tamper. The rack cavity is filled with the same material;
- The cord is pulled strictly horizontally between the supports, for which equal distances are removed from the tops. A thick wire is laid between the cord and each stand. Without this, when installing other racks, they would have to touch the cord, which could lead to its unnoticeable bending.
Then the intermediate posts are installed one after another, observing the following conditions:
- strictly vertical position (controlled by a plumb line);
- the distance from the top to the cord is the same as that of the outer supports;
- the gap between the post and the twine is equal to the thickness of the wire laid under it on the corner posts.
Methods for installing fence posts
All vertical parts are welded on top with plugs. They also practice driving a post into the ground. They drill a small hole, install a support, put a glass on top to protect the head from flattening, and hammer it in with a sledgehammer. This option is suitable for dense soil.
Fastening the mesh
The easiest way is to unfold the mesh and hook it onto the hooks of the supports, having first tensioned it properly. You can do without hooks - just tie the fabric with wire or clamps. But such a fence will soon sag.
It is more correct to use guy wires with a diameter of 4-6 mm; there are two installation methods:
- the panel is “stitched” with wire, passing it through each cell, then the fabric is mounted, tensioning the stretch with tensioners or ties. This is an ideal option, but it is labor-intensive, especially since at least two strings are required, and preferably three;
- First, tension wires are stretched between the posts, and then a web is screwed to them with wire every 20-30 cm. This is a simpler installation method.
Stretch marks put a significant load on the corner posts, which is why it is recommended to make them from a larger diameter pipe.
But the installation step of the supports can be increased to 3 m. The strongest fences are on logs - crossbars made of profiled pipes welded to the supports. It is allowed to use steel bars or reinforcing bars with a diameter of 10 mm.
Do this:
- roll out and secure the mesh on the posts using hooks or clamps;
- thread a rod through the cells;
- weld the rod to the vertical structural elements.
To evenly stretch the mesh, a rod is threaded through the cells and the panel is stretched by two people from above and below.
What is a chain-link mesh
Chain-link mesh is a fabric made of intertwined metal rods. The design received such a strange name because of its possible creator, Karl Rabitz.
Thanks to its universal elastic design, chain-link fences have gained popularity. This material is easy to create and therefore costs less than other market competitors. To quickly mount the canvas, simply stretch the mesh onto the prepared columns. When building a fence in this way, you can even install it yourself.
The basis for a chain-link fence differs in the diameter of the diamond-shaped cells. They vary from 0.2 to 1 centimeter. The cell diameter primarily affects the strength of the structure. Of course, the amount of weave also affects the appearance of the fence.
Also, the chain-link varies in roll height within 1-2 meters. It is worth noting that the larger the fence, the worse the rigidity of the frame. This should be taken into account when installing the fence.
In addition, the material used to make the fence varies:
- Low carbon steel. This material makes the fence flexible, but the mesh is subject to greater deformation under physical stress.
- Stainless steel. The structure will be more solid. Stainless steel will also help prevent premature corrosion of the metal.
It is worth considering the outer coating of the metal wire:
- Not galvanized black chain-link. An uncoated fence will quickly rust. This will lead to rapid chafing in the weave areas, which will negatively affect the integrity of the fabric. Under such conditions, the fence will live for 3-4 years. To prevent premature corrosion, the metal is periodically coated with a layer of paint. As a result, such procedures are more expensive than buying a chain-link with a protective coating.
- Galvanized metal mesh. The zinc coating easily tolerates water and snow, which gives a longer service life. This type of fence does not require annual painting, although it costs a little more. By overpaying for a roll once, you will save on caring for galvanized chain-link throughout its entire service life.
- Plasticized chain-link. A special-purpose polymer coating reliably protects the metal. Such a fence is not afraid of external influences. The protective layer is painted in the color of your choice. This will give your chain link fence a personal touch. The design of a plastic-coated fence is rigid due to the thickness of the wire 2.5 - 2.8 mm and the small diameter of the diamond 25-50 mm.
Advantages and disadvantages
Let's look at the pros and cons of the chain-link mesh point by point:
Price. Chain-link mesh is low cost. A roll of such material is cheaper than other similar designs. Cost-effectiveness will increase if you install the fence yourself. Plastic. Even a garden fence can be given a different shape and the fence can be made round. Durability. The chain-link wall is strong and difficult to break. The design will serve you for decades. Metal coatings will further increase the service life of the building. Lightweight material. A roll of chain link weighs no more than 40 kilograms. To build a fence you will not need special equipment or additional tools. Light transmission. Thanks to the cells, the rays will easily pass through the fence
This is especially important for the garden and country house. Quick installation. The fence can be erected without any problems by one person in a short time. Care
Chain-link fence mesh does not require constant maintenance or washing.
The disadvantages of such a fence include its unsightly appearance and easy overcoming of obstacles from the outside. The mesh will not hide the property from prying eyes. These nuances can be solved if you know how to accurately install and select wire mesh.
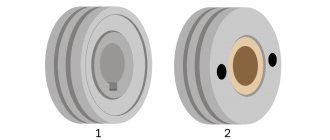
Cable clamp - strong grip!
Required tools and materials
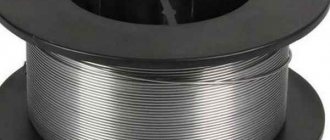
A wedge cable clamp is a special device whose purpose is to firmly connect the cables to each other. It can also be used to make a loop at the end of the same cables. But what else do you need to know about these elements?
Why is this detail in construction?
Typically, such devices are used where work is carried out under heavy loads, so only high-strength and high-quality metals are always used for the manufacture of clamps. Manufacturers produce these devices strictly in accordance with standards. The design of the clamps is very simple. They consist of two hex nuts and a steel bow. Professionals recommend installing at least three clamps on one cable; this is enough for safety and reliability of fastening. If the load is higher than the clamps you have chosen can withstand, then you should take a different type of this clamp, and not increase the quantity. Only high-quality and high-strength steel is always used for manufacturing. This is necessary to ensure a reliable connection at both ends of the elements. For greater reliability and strength, the clamps are often additionally coated with another protective layer. For these purposes, galvanic galvanization is used. The advantage is that with its help the device is provided with maximum resistance to external environmental influences. It is also excellent protection against corrosion. Although the design of this device is simple, you still need to read the instructions before use. Any tool or device has its own nuances that must be taken into account in the work. If the steel cable clamp is not installed correctly, the element may simply break. The end of the cable is inserted into the arc and secured inside using a special lock, in this case hex nuts. The nuts are twisted in different directions, and the cable will be between them. When fully twisted, the ends should be tightly pressed together.
Steel cable clamp - classification
Clamps come in different types. They are divided according to purpose, material used and design. You can also formally designate different lengths; the most popular is a cable clamp of 3 mm, 5 mm in diameter, but in special cases sizes up to 40 mm are used. Each species also has different subspecies. Clamps, which are divided according to purpose, are ordinary and reinforced, and according to the material used - steel and copper; an aluminum cable clamp is also popular; a galvanized steel version is used in particularly harsh operating conditions. Clamps, which are divided by design, are flat, arc-shaped, single and double. Regular clamps are the most common. Typically, they are made from galvanized steel of class 2. In appearance, such clamps resemble closed loops at the base, which have two strong bolts. This type of product is for household use and is not intended for heavy loads. The reinforced version speaks for itself, its design is more thoroughly worked out, the shutter mechanisms have reinforcements, so their scope of application may be more critical. Flat types of clamps are often made of high-strength carbon steel. The surface of these devices is galvanized. Their diameter can range from 2 to 40 mm. In shape, such clamps resemble a pair of plates that are connected to each other with a bolt and nut. They are typically used for splicing steel cables or other standing rigging. They are also quite suitable for creating loops at the end of the brace. Professionals recommend installing at least two clamps on one connection. Flat clamps can also be divided into single or double. The main difference is the number of bolts available. Single clamps are fastened with one bolt, and double clamps are fastened with two bolts. In terms of application, such clamps do not differ much. Arc-shaped clamps are made of a cylinder that is bent in an arc, and fastening occurs using two bolts that are located at the ends. Devices of this type are most often used for connecting metal cables, but it is quite possible to use them for making loops. This type of clamps is more industrial; they are designed for heavy loads. A typical standard arc clamp can withstand a load of about 97 kilograms.
Specialized and wedge clamps - what are their features?
Many construction jobs cannot be done without a strong clamp. Construction has always been characterized by the presence of a large number of operations. You definitely need to lift something up, pull a load, and in this case it’s building materials; you often have to fix various objects. For such work you need strong spring-loaded clamps. Not only do they allow you to connect the cables, but you can also attach a load to them. Such devices are not very different from standard clamps. In addition to the usual metal arc, they have a pair of levers that are equipped with movable brackets. This design solution helps ensure a highly durable and durable connection. With its help, you can securely fasten any object to a cable of different thickness. Lately, wedge clamps have become the most popular among specialists. This is an excellent connecting element for copper and aluminum wires, the cross-section of which can range from 35 to 100 square millimeters. Only this type of clamp is good for connecting steel-aluminum devices. Such devices consist of a body and a wedge, which is wear-resistant. For the manufacture of the body, forged cast iron steel is used, and the wedge itself can be made of bronze or from various aluminum alloys. If you need to install aluminum or steel-aluminum wires in bolt clamps, where the cross-sections are very large, then you need to use special gaskets that are made of soft aluminum tape . The use of such an addition in work will give the fastening the greatest mechanical strength. It is important to remember that after installation, such clamps must be tightened again ten days later . The lift should be done like this. The first step is to press the hinge part of the aluminum housing, then you need to insert a steel anchor, and then the aluminum housing is inserted again using a steel mechanism.
How to make cable clamps with your own hands?
Cable clamps are used in many industries. There is no industry where they would not find application. But often ordinary household work cannot be done without such a small device. Car owners especially need them. You will need a small diameter metal tube, a couple of metal plates and several bolts and nuts. The metal tube must be bent into an arc. The diameter of the pipe must be such that the cable that is planned to be used can fit into it. A cable must be inserted into the hole in the pipe until the end appears outside. Then the end must be pulled out of the pipe to a distance of 10-15 cm, then the end of the cable and the cable itself will need to be covered with plates from below and above, and the plates must be tightly connected to each other using strong bolts. This device is well suited for making loops. If you need to connect two cables to each other, then you need to choose a tube with a larger diameter. It must be taken into account that two cables need to be inserted into one hole, but only in different directions. The plates are also selected taking into account the diameter of the cables. Such a clamp will always come in handy in household chores, just keep in mind that it is not suitable for heavy loads, but it is quite possible to try to use it as a tug.
If the mesh suddenly sag, remove the metal bracket and thread it back into the mesh one or two rows closer to the other edge of the mesh. Then repeat the fastening.
Types of supports for chain-link mesh
When choosing support posts for a mesh fence, it is important to pay attention to the following aspects:
- strength and resistance of supports to the destructive effects of natural or mechanical factors;
- ease of installation;
- the amount of cash costs.
Support installation diagram
Support posts are made of various materials, such as metal, wood, concrete, asbestos cement, plastic, and can differ in length and cross-section. Their dimensions depend on the footage of the mesh, the intermediate width between the posts and the height of the fence.
Diagram of components
Metal racks
Metal posts for chain-link fences are produced in the form of round and profile pipes. Standard size of metal round and support pipes for chain-link mesh:
- transverse diameter of a round pipe – from 45 mm;
- cross section – 40x40 mm;
- wall thickness – 2.9 mm;
- height – 2.5 m.
Installation options diagram
After installing the supports, the height of the fence between sections should not be higher than 1.5 m by law.
Metal supports have a number of significant advantages:
- durable and resistant to mechanical damage, aggressive weather conditions and low temperatures;
- more visually attractive (especially stainless alloy racks);
- have a longer operational period of at least 10 years (from stainless steel - more than 50 years);
- in contrast to concrete and asbestos-cement supports, they are suitable for the implementation of fencing of any design.
Scheme of continuous mesh placement
The disadvantages include:
- the metal is susceptible to corrosion damage, which requires the application of a protective coating and painting every 2–3 years;
- fastening metal poles involves making a concrete base;
- high cost compared to wooden racks (price depends on the size of the product).
Given the heavy weight of the pillars, their installation is carried out with the involvement of additional workers.
Wooden fence posts
Wooden poles are easy to install, and they cost less than metal ones, but the durability of such poles is short due to a number of factors:
- low strength, not suitable for fastening sections (the use of such supports is most appropriate for tension type fencing);
- insufficient practicality of the material (wood is sensitive to moisture and requires additional protection from the negative influences of the external environment);
- regular maintenance (wood supports require annual painting and treatment with special protective agents).
Diagram of a device with wooden posts
However, wooden posts can be used to support a temporary fence if you are planning to move the entire fence to another location. The wooden fence support element is made from homogeneous wood material.
Fencing project with wooden supports and veins
The low weight of such supports is an advantage during the installation process, as it greatly simplifies the work. Also, the advantages of these support products include:
- availability of material;
- low price;
- no need to use professional equipment during installation.
Layout of a wooden pole in the ground
Concrete posts
Concrete posts for chain-link fences are highly durable and reliable. The influence of weather conditions is insignificant. The cross-section of the standard design is 80–100 mm, the height depends on the dimensions of the mesh material and the depth of the column’s entry into the soil.
Example of installation of concrete support structures
Concrete pillars have a number of significant advantages compared to pillars made of other materials:
- Operational durability.
- Zero susceptibility to corrosion, thermodynamic instability and mechanical damage. This quality is due to the production specifics of the pillars, which include the addition of granite crushed stone and reinforced steel rods to the solution.
- Concrete supporting structures do not require maintenance or coating with protective agents.
- Ease of installation process. The factory support structures have through holes to make it easy to attach the chain link to the vertical support rods.
Installation diagram of concrete supports made of concrete
The disadvantages of concrete support elements include:
- the heavy weight of the pole (on average, a support weighs 30 kg at a height of 2 m), complicating the installation processes (installing the pole yourself will be problematic, the help of 1-2 assistants will be required);
- high price (cost in Russia varies from 500 to 1500 per piece);
- difficulties in transportation and installation, requiring the use of special equipment, tools and the use of machinery.
Source
How to straighten a sagging fence and posts
To understand how to level a fence, first determine why it might tilt. The cause of fence skewing is often incorrect installation of support posts. Therefore, by aligning the pillars in a timely manner, the problem can be solved. With the right approach, the curvature of the fence can be eliminated and its service life can be extended.
Repair and alignment of a wooden pole
Reasons for skewed fence
The barrier may tilt due to the following factors:
- insufficient number of support posts that cannot withstand the load of the fence;
- incorrect consideration of wind load during the construction of the fence;
- making mistakes in the installation of fence supports (insufficient deepening of the post into the soil, poor strengthening);
- errors during marking, causing the initially uneven installation of the fence.
Leveling fence supports
As can be seen above, the skew of the fence is mainly associated with the support posts, which play a key role in maintaining the exposure of the fence.
First, it is worth determining the severity of the situation, including the following options:
- an old barrier structure on half-rotten wooden posts;
- pillars tilted under the influence of the soil;
- the fence is severely skewed, almost to the ground.
Scheme of fencing made of corrugated sheets on a strip foundation
If any of the above symptoms are present, alignment of the supports is useless. The fence will have to be dismantled and built from scratch.
If the causative factors are less significant, the posts can be aligned and dismantling the fence can be avoided.
Inexpensive fencing options
Knowing which fence will cost you the least can save you a considerable amount of money. If you do not take into account the aesthetic side of the issue, then thanks to a wide range of materials, it is quite possible to build an inexpensive, reliable fence. Analysis of materials taking into account their cost will allow you to choose the appropriate option for each site.
Euro picket fencing
Euro picket fence has proven itself well as a durable material used for fencing. These are vertical strips made of galvanized steel sheets coated with a layer of polymer. Advantages of structures made from this material:
- independence from weather conditions;
- ease of transportation;
- good stability during strong winds;
- neat appearance.
Polycarbonate fence
This is a durable synthetic material with good sound insulation. Polycarbonate is most often used in various combinations with other materials. It is easy to install, but installing a polymer fence will not be cheap, which is the main disadvantage.
Corrugated fencing
Corrugated sheet structures are in great demand due to their quality, durability and stylish design. Corrugated sheeting has high anti-corrosion properties and a wide variety of colors. However, it is worth understanding that a fence made of corrugated sheets requires a reliable foundation, the pouring of which will require additional costs.
Analysis of materials taking into account their cost will allow you to select the appropriate fence option for each site. The illustration for the article is used under the standard license ofazende.ru
Plastic construction
Availability and ease of installation are the main advantages of plastic structures. In addition, such a fence looks quite aesthetically pleasing and does not require special care. If we compare the stability of structures made of plastic and corrugated sheets, preference is clearly given to the first option. When purchasing polyvinyl chloride, you should carefully check the quality certificates so as not to choose a low-quality material that has toxic properties.
Wooden fence
The most environmentally friendly and budget option is a wooden fence. This material allows you to independently build any structure without spending a lot of money. The disadvantages of a wooden fence include:
- the need for constant treatment against rotting;
- fragility;
- easy flammability.
Chain-link fencing
A simple and inexpensive way to fence your territory is to install a chain-link fence. The price for such a design will be the cheapest, and its installation will take very little time. However, it should be understood that this material will not protect the area from gusts of wind and from prying eyes.
Hedge as a fence
You can try to fence your area using a fence made from planted trees. This fencing option looks interesting and also protects the area well from wind and dust. However, planted plants and trees require constant care, which leads to new costs. It is recommended to use coniferous and deciduous trees, as well as rose hips and hydrangea as hedges.
Installation and fastening process
In principle, the installation process itself is simple. To do this, you need to install support pillars, attach two horizontal parallel logs to them, to which the chain-link mesh is attached. This is ideal.
A simpler one is to not use horizontal elements at all. That is, the mesh itself is simply attached to the supports. Previously, for strength and to create a fence shape, a metal rod or wire rod was passed horizontally along the edges of the roll. Many, reducing the cost of the process, even removed this. It's even easier if you use wooden poles. The mesh is attached to them with ordinary nails. That is, before attaching the chain-link mesh, you need to choose the method of its installation. More precisely, material for support posts and additional fastening material.
On our website you can get acquainted with the most popular plots in the Moscow region for the construction of a country house. In the filters you can set the desired direction, the presence of gas, water, electricity and other communications.
For example, if these are wooden pillars. How the process is carried out:
- At a distance of 1.5-2.0 m from each other along the perimeter of the site, holes are dug for the pillars; you can use a drill for this;
- the pillars are cut to the required length, the lower part of which is waterproofed;
- The racks are installed either in the ground, then the installation depth should not be less than 1 m, or using concrete mortar with an installation depth of at least 50 cm;
- the chain-link mesh is partially unwound, that is, the length of the segment should be equal to the distance between the support tables, plus 10 cm;
- you need to start the process from the corner post;
- the mesh material is attached to it with nails;
- the mesh is stretched, the free end of which is attached to the second post;
- and thus around the entire perimeter.
Attention! It is very important that the mesh is evenly stretched. There are no distortions that will be almost impossible to correct in the future.
Don't skimp on additional materials. For example, buy a steel cable with a diameter of 6 mm. Pass it along the top and bottom edges of the mesh, stretch them and secure them to the posts. In this condition, the fence will look more beautiful and will not bend or sag over time. Another option is to nail logs to the posts, to which the chain-link mesh is also attached with nails or screwed with wire.
Types of chain link
Depending on the purpose, the mesh is made of ordinary uncoated steel or galvanized wire. In more aggressive conditions, polymer-coated wire is used.
Non-galvanized
This mesh is made from black untreated metal. It is afraid of humidity, and after the first rain or fog it becomes covered with rust. Its scope of application is reinforcement of reinforced concrete structures and plaster, fastening of thermal insulation and other work where the metal does not come into contact with a humid environment or only contacts for a short time.
Non-galvanized mesh is inexpensive, which is what attracts summer residents to it. When installing a fence, it is recommended to cover it with waterproof metal paint or a water repellent. Protection needs to be updated at least once every 1-2 years, which, of course, increases the cost of operation.
Galvanized
A galvanized wire chain-link can last 20 years or more. The best way to protect steel is hot-dip galvanizing. An important characteristic is the thickness of the zinc layer, which is determined by the mass value per square meter and averages 70-90 g/m².
The second most reliable method is the galvanic method. The thickness of zinc during electrochemical processing is less than during hot-dip galvanizing, but it also ensures a fairly long service life of the material.
Corrosion of galvanized mesh in the first months of operation is the result of the fact that there is not enough zinc on the wire - 10 g or less. It can only be called galvanized formally
When purchasing, pay attention to this important factor.
Plasticized
The chain-link mesh with a protective polymer coating is decorative and at the same time very resistant to corrosion. This material is used in humid climates, including on the sea coast. Modified PVC is used for processing. It is evenly sprayed onto the metal surface, creating a sealed, resistant film.
High-quality polymer coatings do not crack from frost or heat, and do not fade. The mesh retains its appearance and technical characteristics for a long time.
Calculation of income and expenses
Average values are given here, so in your case the numbers may differ either up or down.
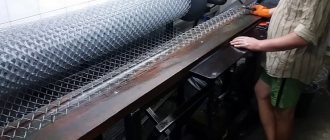
Raw materials
We calculate the costs that go into the production of one roll of chain-link mesh. One ton of wire costs about 35,000 rubles. The weight of a roll of chain-link mesh made of wire with a diameter of 1.6 mm and a cell size of 55 mm will be approximately 9.5 kg. The cost of such a roll, taking into account the amount of wire used, is 333 rubles.
Workers' wages
As a rule, the salary of employees in big cities is higher than in small towns, and it is even lower in villages. We will consider the salary of a machine operator using the example of Stary Oskol. Let it be 16,000 rubles in 22 working days. Let's take into account that it is better to pay wages depending on the number of mesh rolls produced. During one shift, 11 rolls are produced or 22 rolls per day. Then the production of one roll should cost 70 rubles.
Electricity costs
The price of 1 kW/h is approximately 4 rubles. The energy consumed by the machine for making mesh netting is 1.5 kW/h. But in addition to producing the mesh, the rolls are also packaged and loaded onto racks. This means that in 1 hour a little less than 1.5 kW/h will be spent. Then we will assume that 1 kW/h of energy is spent to produce one roll of chain-link mesh.
Renting premises
We calculate the rent for the premises as a share of one produced roll of chain-link mesh. 22 rolls will be produced in one day. For 22 working days (for 1 month) – 484 rolls. As a result, we receive an amount of 2-4 rubles.
Additional costs for taxes, transportation, etc. will be 10-20 rubles per roll.
Total cost
For one roll of mesh, a chain-link made of 1.6 mm wire and a mesh size of 55 mm, the cost will be as follows:
Wire price (333 rubles) + worker's payment (70 rubles) + electricity costs (4 rubles) + rental fee (2-4 rubles) + additional expenses (10-20 rubles) = 419-431 rubles .
Types of structures
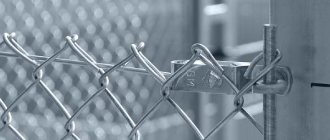
Options for attaching the mesh to the supports
There are several ways to build a chain-link fence. The choice of installation technology depends on the purpose of the fence, budget and even the topography of the site.
- Tension fence without guides. The mesh is stretched between the installed posts and fixed to them with wire. The advantages of the technology are simplicity and speed of installation, minimal consumption of materials, the ability to use supports of almost any type (except brick). Typically, a tension fence is installed as a temporary fence or for zoning your site.
- Tension fence with guides. It is mounted according to the same principle, but reinforced with one, two or three longitudinal guides, which can be wooden beams or metal profiles. This type of fencing is more reliable and looks more solid. But a design with metal pillars and horizontal elements made of profiles or reinforcement welded to them is not suitable for installation on heaving soils - rigid connections can break when moving
- Sectional fence. The most labor-intensive and expensive option, but it looks the most aesthetically pleasing. To build it, you need to make frames from a metal corner and weld a filling made of mesh fabric. The frames are attached between the supports by welding, which requires the use of metal pillars, or brick, concrete with metal embedded parts. A sectional fence is the best choice if the fencing needs to be done in an area with a strong difference in relief - it is convenient to install it in “steps”, placing the frames at a given height relative to the ground surface
How to make beautiful and unusual shelves on the wall with your own hands: for flowers, books, TV, for the kitchen or garage (100+ Photo Ideas & Video) + Reviews
Possible options for installing poles
Installation on non-heaving soil is advisable using concreting. The support is placed in a dug hole, leveled using measuring instruments horizontally and vertically, and filled with concrete.
Drilling holes for fence posts
For installation on heaving soil, holes for supports are dug below the freezing level of the soil. The column is dug in halfway, which implies a high consumption of solution. The reliability of the design is high, but not economical.
Which pillars to use
There are several options:
Wooden pillars - made of timber or logs. The cheapest, but also the most “perishable” option. Antibacterial treatment is required before installation. The best option is a special protective impregnation. To save money, you can paint the above-ground part, and it is better to impregnate the part that will be buried with mining: immerse the pillars in a container for several hours. Before installation in the hole, you can additionally wrap this part with roofing felt.
Chain-link fence on wooden posts
- Metal pillars. They can be made from a round or square pipe or a metal corner. The wall thickness is 2-3 mm, the pipe diameter is on average 50 mm, the profile section is 40-50 mm, the angle flange is 50-60 mm.
- Concrete pillars. The most inconvenient installation option: it is too difficult to attach the mesh to them, and it is difficult to install. In addition, the strength resource of reinforced concrete will not be in demand: too small loads are created by a chain-link fence.
The most convenient option of all those mentioned is a profile pipe, and preferably a rectangular one. It is easy to attach the mesh to it, and you can weld hooks or wire if necessary. If possible, install these. The optimal cross-section for a pillar is 25*40 mm or so. There is no need to take a larger cross-section - the fence is light.
The order of installation of pillars
First, the pillars are placed in the corners of the site. If you need to fence only one side, place one post at the beginning, the second at the end. Their verticality in all planes is strictly checked, and the height is adjusted. At the very top and 10 cm above ground level, two cords are pulled. The rest of the pillars are placed on them. The height is leveled along the upper cord, the lower one serves to facilitate orientation: by applying a plumb line to a point on the upper thread, you can find the place where the hole will be drilled.
Installing posts under a mesh fence
The installation step of the pillars is 2-3 meters. Less is too expensive, more is no point, the mesh will sag. When installing a grid without a guide wire, it makes sense to place posts every 2 or 2.5 meters. This makes it easier to tighten the mesh without sagging. For other models - with wire, slugs (guides) or sections - the step can be 3 m.
Example of corner post reinforcement
If the mesh is pulled between the pillars, the outer ones will bear a considerable load. To prevent them from being led away, they put up jibs. They are placed, dug in, and welded to the installed pole.
Weaving the support wire
The supporting wire, cable or reinforcement is designed to prevent the mesh from sagging under its own weight. With a fence height of up to 1,500 mm, you can only use the top broach. At higher heights (from 1500 to 2000 mm), it is advisable to use two broaches: upper and lower. If the height of the fence exceeds 2000 mm, you need to use another supporting wire - in the middle of the panel.
As a rule, the greatest problems arise with how to tension a chain-link mesh cable, so manufacturers have provided special tensioning devices for different types of broaches:
- broaching with reinforcement. In this case, reinforcement (15-20 mm in diameter) is passed through the mesh cells of the chain-link and welded to the support posts, and pieces of reinforcement are also welded together.
Pulling the chain-link with reinforcement
- wire drawing. The method involves fastening the wire (screwed onto a support post) on one side and stretching it on the other. For this the following can be used:
Pulling chain-link wire– a hook with a long thread, a lanyard of the “hook-hook” type . To do this, the wire is threaded at a distance of 30-50 mm from the edge, and then the lanyard is screwed until it stops. The remaining piece of mesh is loosely tensioned by hand and attached to the support post. Installing a mesh through a cable using a lanyard is one of the most economical and reliable methods.
Tensioning the chain-link mesh through the cable with a lanyard– wire tensioner . This is a special device that makes it easy to tension the wire for the chain-link mesh.
Device for tensioning chain-link mesh
Note. If the length of the fence exceeds 7 meters, it is recommended to install additional tension wires on intermediate posts. This is done in order to reduce the load on the outer supports and to improve the quality of the mesh tension. For fastening, special clamps (plastic or metal) are used that keep the wire from sagging.
Chain-link mesh broaching clamp
Scheme of fixing and tensioning the chain-link mesh
Supports – Wire tension in the vineyard
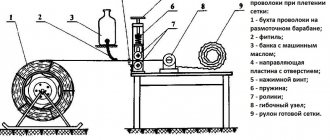
Contents of the material
Wire tension is carried out as follows. A coil of wire is placed on a reel (rotating table). One worker maintains the reel and ensures that the wire does not tangle, another extends the wire to the last post in the row, then secures the wire by wrapping it around the post and braiding the end with his hands.
On the way back, the worker secures the wire with staples on intermediate posts. The staples should not be driven in completely; the wire should move freely in the longitudinal direction. While the second
the worker secures the wire in this way, the third
Rice. 13. The staples should be driven in slightly obliquely to the direction of the wood grain.
holds it out in the next row. Therefore, three workers are required for this job. You only need to pull and braid the wire with your hands, then and in subsequent years it can be tightened without the help of pliers. Any chains or tension locks are completely unnecessary. If the wire is braided at the end using pliers, then when braided again, after a few years, it breaks very easily. The pressure of the bunches and the entire bush on the lower wires of the trellis increases every year. Therefore, between pillars standing at a distance of 7-8 m from each other, the wires sag quite a lot. Then it becomes necessary to tie these lower wires to the grape stakes. If the grape stakes do not have sufficient strength, I drive between the intermediate posts one shorter post, 1.7 m long, to which I attach both lower wires with staples.
This middle post serves solely to support the heavy load of bushes and decorates the vineyard. On rocky and clayey soils, driving in posts can be quite difficult. The pillars split at the upper end and, as a result, rot within a few years. On such soils, I use a punch, which is a steel pipe with a diameter of 80 mm welded at the lower end. A rod made of hardwood (ash, elm or oak) is driven into the pipe, protruding 20-30 cm above its upper end. I place an iron ring on the wooden rod.
For punching, an iron or wooden hammer weighing 8-10 kg is required. Using this method, you can achieve good results in the most difficult soil conditions,
Rice. 14. Braiding wire at the edge post.
On old plantings, as an experiment, I used transverse bars reinforced at the height of the cordon. The purpose of these crossbars and the wires stretched over them is to support the arches and knots. Thanks to this, I achieve an even distribution of annual vines.
In addition, they break off less and make harvesting easier. With good development of the vineyard, the installation of transverse bars is fully justified once the bushes reach eight years of age. To form straight trunks, it is necessary that they are well tied to the stake in at least three places. I most often use willow as a garter material. It does not crash into the vines and lasts for years.
The vines from which the shoulders of the cordon are formed should also be tied in two or three places. The older the bushes, the less labor the garter requires. Thanks to the use of the two lower wires of the trellis, on which the entire bush is supported, the perennial shoulders of the cordon no longer need gartering at all. They rest their annual vines on two wires, and nothing happens to them even in the strongest winds.
As long as I only used one bottom wire, I needed to tie up the perennial arms as well.
Rice. 16. Trellis with transverse slats for abundantly fruiting plantings, Fig. 15. Punch.
When they thickened, the wire grew into them, and as a result, entire parts of the bush often died or were broken off by the wind. It's best to lead
Which is better: heated floors or radiators?
Warm floorBatteries
Rice. 17. Garter using iron wire and willow twigs.
tying bushes at the same time as pruning. But if the weather is cold, it is better to postpone the garter until the pruning is complete. However, vines needed to lengthen parts of a bush, whether in height or along a row, should always be tied up immediately after pruning, since, firstly, it is later difficult to determine what a long vine is needed for, and secondly, such vines are often interfere with soil cultivation.
see also
Comments 82
Let's take note. In the summer we will also fence the garden with mesh.
I regret that I didn’t take a photo of this obscenity. Well, they just didn’t get around to it - they neighed like those horses. And I shook out the cans - it was really stupid, I thought they twisted the meat like that. They gave it to the dogs. I only consume condensed milk from Rogachevskaya. It doesn’t seem to have mutated yet, everything works and is in the right place