How to choose a low-speed drill
Among the variety of presented functionality, first of all you should pay attention to the power of the electric tool. The final capabilities of the drill depend on this parameter. For serious construction work, choose a drill with a power of at least 1500 W. If we are talking about minor repairs, you can get by with a simple drilling option with a power of 700-1000 W.
When choosing a drill for drilling timber, the main parameter is its power Source Rubankom.com
A particular advantage is the so-called mixer drill, which combines the functions of mixing construction mixtures and making holes. This is a fairly powerful tool, equipped with modern electronics, which provides:
- ease of use throughout the working day;
- durability and reliable service;
- possibility of drilling various materials over a wide range.
A set of accessories for work is supplied with the drill. Each of the spindles included in the set has a characteristic thread. Shaft manufacturing companies take into account the features of spindle fixation when producing products.
Features of timber construction
If logs are used in wooden construction, their position relative to each other is fixed by grooves. Groove - a notch selected along the entire length of the log. With this groove, the upper log seems to cover the lower one and thereby creates immobility of the logs. But timber with smooth edges must have additional clamps.
Construction from timber has a number of advantages. The wall remains flat, which is very convenient for subsequent finishing. The thickness of timber walls will be the same everywhere, unlike log walls. A house or bathhouse is built directly on the foundation, that is, there is no such additional problem as transporting and installing a log house made elsewhere. But the issue of fastening the timber to the wall must be taken extremely seriously. The strength of the structure depends on this.
Some would-be craftsmen solve this problem simply by using nails, staples and similar gadgets. It is strictly not recommended to do this! Wood is a living material. It is subject to drying out and shrinks. A nail firmly driven into 2 beams prevents this shrinkage, and 1 beam seems to hang over the other, forming a gap. A wall with cracks is not a wall, since heat escapes, but frost, on the contrary, sneaks into the house.
To prevent this from happening, it would be correct to drill holes for dowels in the timber. A dowel is a wooden rod with chamfers. It is made from hardwood such as birch.
A large dowel that replaces a nail is often called a dowel. Both names are correct and mean the same thing. The dowel can be either homemade or industrially produced. Recently, it has become convenient to use rake handles for dowels, which are sold in every hardware store. This is due to the successful correspondence of the diameter of such a handle, 25 mm, with the diameter of the wood drill. The size of 25 mm is optimal for fastening timber 150x150 mm, which is usually used in construction.
Major manufacturers of low-speed drills
The quality of the instrument depends on the reputation of the manufacturer. Experienced craftsmen identify a number of models that deserve attention.
Makita
A brand from Japan, specializing in the production of electric tools, has gained worldwide trust due to the quality of its products. Among the variety of drills from this company, the unit model 6300-4 is popular. The specimen is suitable for high-quality work by experienced craftsmen. The price is within 14.5 thousand rubles. The tool allows you to perform all popular tasks, including preparing solutions.
Appearance of the Makita 6300-4 drill Source Makita-profi.ru
Felisatti
The Italian manufacturer, whose brand produces everything needed for construction work, also produces low-speed drills. The professionals appreciated the professionalism of the Italians, choosing the DMF23/1150VSE device among popular models.
Metabo
Among countries producing power tools, Germany ranks high, distinguished by reliable and high-quality products. Metabo produces drills that any DIYer will appreciate. However, the high cost of the devices deters non-professional construction workers from purchasing them. Thus, the price of the common B32/3 drill model is 59 thousand rubles. Not everyone can afford to work with an expensive tool.
Russia
If, when choosing a manufacturer, the question is about saving money, you should pay attention to Russian brands. The efficiency of Interskol or ZUBR tools is at the level of foreign competitors. The availability of products from domestic companies forces craftsmen to make a choice in their favor.
There are several worthy models on the Russian market, for example, drill Zubr ZDM-1200R Source stroyberi.com.ua
Techniques for drilling holes in wood
At the preliminary stage, the surface should be countersinked. The essence of the procedure is to make a small recess according to the dimensions of the head of the fastener at the site of subsequent drilling. Then the main drilling is carried out using equipment of a nominal mounting diameter. If you plan to use dowels, then drilling is carried out without preliminary countersinking. If there is no need to drill through the workpiece, then use a feather drill. It is designed to organize a tenon joint and can be equipped with a built-in drilling depth limiter.
To preserve the structure of the wood when drilling large holes, annular cutters and feather drills are used. Unlike cylindrical drills, they practically do not create chips on a wooden surface.
There are several models of ring drills for small dowels on the market, but they do not have a long service life Source Brigadir52.ru
Drilling with feather drills
Place a feather drill in the intended location and use the drill at low power. The process continues until the master sees the end of the tool from the back of the block. To eliminate chips in the hole area, drilling is then used from the opposite edge. The workpiece is turned over in the desired direction, fixed and drilled, installing the drill in the hole already made.
Dowels for timber - description of the working process
All photos from the article
When erecting buildings, their correct fastening and fixation of individual elements is very important. Dowels for timber are a type of product that is not visible from the outside, but has a great influence on the reliability and durability of the structure, so you should understand which products suit you best and how to use them correctly.
In the photo: a dowel is an important element of any log house, be it timber or log
Basic requirements for this type of fastening
The elements we are considering are called dowels in another way, so if you come across this term below, keep in mind that they are one and the same thing. As for products of this kind, their use is carried out only in compliance with several important conditions:
| Material of manufacture | Many experts recommend using birch as the ideal type of wood, but it is not always possible to find this option, so the same wood from which the structure is built is often used, especially since waste is most often generated during the work, which can be used to make dowels |
| Humidity of elements | It must coincide with the humidity of the base material, this is due to the fact that if the indicators differ, drying will occur unevenly, which can lead to deformation and problems in the future. From this point of view, using waste material used is a reasonable solution, since in this case the humidity exactly matches |
| Correspondence of the hole to the dowel | This requirement means that a pin arrangement that is too loose is just as undesirable as one that is too tight. The fact is that after construction the log house shrinks, so the elements will move down, and in cases of high humidity the material will increase in volume and the structure will rise; the dowel should serve as a guide to prevent deformation, but not impede the movement of the beam |
| Correct arrangement of elements | Remember one simple rule: the dowel should be deepened by about 2 centimeters relative to the upper beam, this will prevent a situation where, with an increase in volume, the fastener lifts the elements located above |
Important! You should not listen to advisers who claim that the tighter the dowel is driven, the better the structure will hold; this option will not allow the frame to move, which will lead to an increase in joints and increased formation of cracks on the surface.
To deepen the fastener, use a spacer of the same diameter
Workflow Description
Let's consider the basic rules for carrying out work; they are quite simple, so almost anyone can cope with them, the most important thing is to do everything carefully and use high-quality materials and tools.
Making dowels
Of course, you can buy ready-made elements, but their price is quite high, and the DIY process is not very difficult.
The work is done as follows:
When making dowels, neatness and attractiveness are not important, what is important is accuracy and compliance of the elements with the holes
- First, you need to choose a manufacturing method; if you have at least a simple lathe, then you can make round versions that are no different from the ready-made ones that are sold in the retail chain. If there is no equipment, then you can get by with rectangular elements, there won’t be much difference anyway;
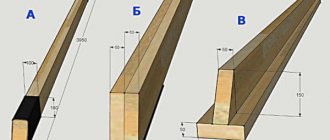
- The length of the blanks should be 2.3 times the thickness of the timber. This is due to the fact that the correct location involves an option in which each fastening element passes through three beams, and in the upper and lower crown it should be located approximately 2/3 of their thickness. As noted above, the dowel must be recessed by at least 20 mm so that deformation does not occur when the structure moves;
This diagram clearly shows all the basic rules for fixing crowns; this option has been used by professional carpenters for more than two centuries
Advice! You can simplify the manufacturing work by purchasing a block of the required size; its cost is low, but you just need to round the corners a little - and the fasteners will be ready.
- You don’t have to cut the elements right away, but do it as you work, it all depends on which option is preferable for you.
Fastening the timber
It is important to carry out the work correctly, since this determines how securely the structure will be fixed; the list of measures is as follows:
- First you need to choose a high-quality drill for dowels for timber. Too weak options are often used, so cases when a power tool burns out while drilling are not uncommon. Low-speed modifications with a three-stage gearbox with a power of 1300 watts or more are best suited; they do the job well, as they are designed for high loads;
Choose modifications with a handle on top, it will be much more convenient for you to carry out work on drilling timber
- As for the drill, select a screw version of the required length; it is better not to save money and purchase a product from a well-known brand, since cheap analogs are usually not durable and can fail almost on the first hole. The length depends on how thick your timber is, and the diameter varies depending on the width of the walls; most often, products from 20 to 30 mm are used;
Drills with a diameter of 30 mm are among the most popular
- Drilling is carried out starting from the third row, and it is very important to maintain the vertical position of the equipment when working, because the dowel will serve as a guide, and if it is located at an angle, the surface may bend over time. The work should be entrusted to a physically strong person, as the drill sometimes jams and can turn the tool, which is unsafe when working at height;
When working, you need to hold the drill very tightly
- Remember a simple rule - the hole should be 1-2 mm larger than the size of the dowel, this will ensure its sufficiently tight location, and the fastening will not interfere with the shrinkage of the structure. That is, with a drill diameter of 30 mm, the dowel should be 28-29 mm;
- The distance from the edge of the beam must be at least 300 mm, the distance between the attachment points is from one and a half to two meters. Sometimes you can increase the number of dowels by placing them in places that may become deformed;
- Driving in the dowels is done using a heavy hammer or sledgehammer weighing 2-3 kg; in order to drown the elements, stock up on a spacer in advance.
As you can see, the instructions for carrying out the work are not complicated; it is important to have a reliable tool on hand and use fasteners of the right size.
Conclusion
The use of dowels is mandatory for wooden buildings. With their help, the structure is not only strengthened, but also receives guides for proper shrinkage of the structure. This article will talk about some of the points discussed above in more detail.
Source: https://rubankom.com/materialy/brus/str-brus/1411-shkanty-dlya-brusa
Types of dowels
There are many types of fasteners, but they are conventionally divided into groups according to material and shape. Let's consider this issue in more detail.
Material of manufacture
Two types are actively used:
- Wood. Most experts strongly recommend using a wooden tenon when constructing wooden structures. The main advantages when choosing such fasteners are given:
- Even drying. The beam and dowel should be approximately the same humidity. This will allow the shrinkage process to go through with virtually no visible changes;
- Not affected by temperature changes . The tree practically does not change its linear dimensions at different temperatures, so the fastening element will always be in place;
- No rust . Metal rusts over time, which leads to rotting of wooden surfaces in contact with it;
- There is no condensation. With a sharp change in temperature, moisture forms on steel, which is completely useless inside a load-bearing wall.
- The dowel fuses with the wall. After a certain time, the house will become monolithic, the wooden surfaces will be soldered together.
- Metal. This option also applies to a budget fastening method; waste materials (pipes, fittings) are often used. Although experts prefer the previous method, The metal dowel has its advantages:
- The top layers of wood are protected from torsion;
- Durability of the structure.
Form
There are also several main forms:
- Round section. Taking into account the fact that the holes for fastening in the log are made with a drill, the round dowel will provide the maximum contact area, guaranteeing the reliability and durability of the structure;
- Square. It is easier to make such an element; it also costs less. But that's where the positives end. When entering the hole, the edges of the tenon are deformed, and the total contact area remains minimal. Building a house this way is dangerous;
- Narrow rectangle . The easiest option to manufacture. A board of a certain thickness is taken and cut into rectangles. The only advantage is the very small thickness. Suitable for narrow timber, but installation is extremely difficult.
We make the dowel with our own hands
This type of fastener is sold in stores, but you can make it at home without much difficulty. The wooden element is made as follows:
- scraps of boards are taken, from which beams measuring 25 by 25 centimeters are cut;
- stakes are made 1.5 times the thickness of the building timber, with a diameter of 2.5 centimeters;
- The corners are cut off with an ax to give a rounded shape.
But the following must be taken into account:
- the wood for fastening must be harder than timber. Nowadays birch is most often used for these purposes;
- the dowel should not differ significantly in humidity from the main structural element;
- It is strictly forbidden to use a dowel with a knot.
We carry out calculations
Depending on the chosen fastening technology, it is possible to determine with sufficient accuracy the number of dowels and calculate their correct characteristics.
Deciding on the sizes
There are many scientific works that will help determine the diameter of the dowel. But in the professional environment of carpenters and builders, certain rules have already been formed:
- for timber with a thickness of 20 centimeters or less, a dowel with a diameter of 25 millimeters is used;
- a thicker beam is fastened with a tenon measuring 3 centimeters;
- timber thicker than 0.2 meters can be fastened with a 2.5 cm dowel, but subject to the step being reduced to a meter.
The length is determined even more simply - the most common and recommended method is to fasten two logs with a dowel one and a half beams long.
Counting the quantity
Even a small sauna will require quite a large number of spikes that need to be purchased or made, which can take a long time. Therefore, it is better to know the number of fasteners in advance.
There are fastening rules:
- the first dowel is inserted at a distance of 20 to 70 centimeters to the corner;
- the step is from one and a half to 2 meters;
- It is necessary to fasten two adjacent logs in height.
Knowing these tricks, the height of the structure, the diameter of the timber, you can easily calculate the number of dowels needed for construction.
Drilling
A powerful drill is used if it is necessary to make holes directly on the construction site, or a machine if the timber is prepared in advance.
The second method is common in the West and allows you to assemble the structure of almost any house in a few days. But it requires attentiveness, accurate drawing, and professionalism.
In the first and second cases, the rule remains unshakable - the hole must be strictly vertical.
The diameter of the drill and the thickness of the dowel must match, and for the upper tiers of the timber the hole should be even two millimeters larger. This eliminates sagging of the supporting structure due to a small vertical load. The hole is made 2 centimeters longer than necessary so that the tenon can move smoothly during shrinkage.
Clogging
Typically a sledgehammer weighing several kilograms is used. The dowel is driven inward below the edge of the beam to the end of the hole; nozzles (usually made of brass) are used for this.
Correct location
The ideal option is when the dowels are arranged in a checkerboard pattern. But a strictly vertical direction along parallel lines is also allowed and does not significantly affect the strength.
A gap of at least thirty centimeters before the start of the opening is recommended. The distance of the fastener to the corner should not exceed 70 centimeters. The step can vary from a meter to 3, depending on the material from which the timber is made (hard varieties require a smaller step).
Advantages and disadvantages
Like any other fastening element, the dowel has a number of positive aspects, as well as disadvantages.
Advantages:
- The spike provides reliable grip and prevents the crown from sagging;
- Provides long-term reliability under bending loads, which nails and bolts cannot boast of;
- Promotes uniform shrinkage of the house. The fastening element moves freely along a vertical plane, preventing horizontal deformations;
- The wooden product is not subject to the formation of moisture and corrosion, excluding the process of rotting;
- Extremely cheap. Even buying ready-made dowels won’t put a big dent in your pocket, allowing you to minimize your budget.
But there are also disadvantages:
- Difficult to install. Absolute vertical position, ideal selection of diameter, implies the presence of decent construction skills;
- Serious quality requirements. The presence of knots or heterogeneity of the material can lead to disastrous consequences;
- Excessive force when driving often leads to cracks in the timber. After which it needs to be changed.
Source: https://ooo-asteko.ru/drel-dlya-sverleniya-brusa-pod-nageli/
Video description
Dowels: installation.
Circular drill
Masters call this device a ballerina, since the principle of operation of the drill resembles the movements of a dancer. The cutting element consists of a central drill and additional cutters located on a common axis. The position of the cuts can be changed, thereby adjusting the diameter of the future hole. The circular drill set includes a punch intended for marking and a hexagon required for fixing the drills.
The result of drilling using a circular ballerina drill Source Piko-train.ru
A cutting element of this type is chosen in the following situations:
- when it is necessary to drill holes of small depth, the radius of which varies from 15 mm to 65 mm;
- when working with plywood, wood, chipboard, fiberboard and similar materials. Mostly workpieces with a cross section of up to 20 mm or sheet products are processed.
Drilling with a circular element is best done with a low power drill, since there is a high probability of damage to the device.
Tips for vertical drilling
Experienced users recommend adhering to the following guidelines when working with a drill:
- When drilling timber for dowels, a stand should be used to secure the tool. A kind of tripod maintains the vertical position of the drill and makes the carpenter’s work easier.
- To maintain the vertical, the right angle is constantly controlled using a carpenter's square.
- To avoid chipping at the exit of the holes, any wooden block should be placed under the main workpiece.
- When working with a drill, if possible, it is necessary to fix the part with a vice.
- If it is necessary to control the depth of the hole, and the drill or drill bit is not equipped with a built-in limiter, then the required distance is marked directly on the drill using electrical tape. This will help stop the drill in time.
When drilling deep holes in wood, the main thing is to firmly hold the stop handle of the tool Source Multicom.by
What is the best way to drill timber?
In order to work with timber
easily and without problems, the optimal solution would be to buy a twist drill. Its design is such that it fits into the wood with the effect of a self-tapping screw, without the need to put pressure on the drill. The price of such a drill is higher than a feather drill, but the quality of the hole is worth the cost.
Interesting materials:
How to make transparent slime at home? How to do smart diagnostics on an LG washing machine? How to make a Smart TV using a flash drive? How to make a mixture for stove repair? How to make snow from salt? How to make snow on a Christmas tree from salt? How to make snow on branches? How to take a photo of your teeth? How to make Soy candles at home? How to make a saline solution for processing onions?