Glued laminated timber has found widespread use in the construction of economy-class housing and luxury houses. In addition to house construction, small batches of material are used to implement original projects for the creation of architectural miniatures, interior decoration and furniture manufacturing. For these purposes, rare wood is best suited; blanks of non-standard sizes and original profiles may be required. You can make a unique profiled beam with your own hands for the implementation of individual author’s projects in your own workshop or on rented equipment.
Before organizing your own production, you need to decide whether independent production will be justified. The motivation for making such a decision is often the desire to realize one’s own creative potential in the following areas of business activity:
- Production of exclusive furniture;
- Providing services in interior design of homes;
- Author's design of reception halls, restaurant interiors and art exhibitions;
- Business in the field of architectural miniatures.
A dream to finish the facade of a house or arrange a veranda according to your own design can motivate you to make your own laminated laminated timber.
Depending on the needs for material and available woodworking equipment, there are several ways to independently produce profiled timber. The implementation of such a project includes the main stages:
- Defining goals, quantity of products and estimating the project budget;
- Selection of material and organization of drying;
- Production of lamellas;
- Gluing;
- Profile recess.
When will independent production be justified?
Depending on the situation, each developer will have his own motivation for action:
Read also: How to make a boat trailer
- First of all, this is a financial issue. Indeed, in some cases you can save significantly, but here you still need to take into account the time factor;
- Quite often there is a need for non-standard dimensions of timber, which cannot be found from manufacturers, and then this is practically the only way out of the situation;
- When there is already a sufficient supply of edged boards and timber, but it is unprofitable to sell it, and profiled material is needed for construction;
- If there is a need for powerful load-bearing beams, and in this case, you can make laminated veneer lumber with your own hands from thick boards. This design is not subject to torsion and cracking, and can also withstand higher loads than a similar solid wood beam.
Options for custom beams
There may be other reasons for such a decision, but in any case, you need to calculate in advance how feasible and justified this is in a particular situation.
Read also: DIY paper squirrel mask
Peculiarities
Currently, profiled timber is used literally everywhere. It is used to build both inexpensive and luxury homes, outbuildings and other structures of similar types. Many people use timber to make homemade eco-friendly furniture. All this indicates the relevance of the material under consideration and its relevance. But few users know that it is quite possible to make timber with your own hands.
The timber is made using special tools. Such work cannot be called too complex or inaccessible, which is why many people resort to them.
There are several most common reasons why users decide to make high-quality timber on their own.
- At the head of the “table” is the financial issue. In fact, in many cases, users can save a lot of money by making the timber themselves rather than buying it ready-made. But at the same time, we must not forget about the time factor - you will have to spend some time making a homemade product.
- Often people need timber that has dimensions that are far from standard. Such materials can be very difficult (or impossible) to find on sale. In such a situation, the solution to the problem can only be the independent production of such an environmentally friendly material with suitable dimensional parameters.
- The reason for making timber yourself may be the presence of a large number of leftovers, for example, edged boards, which are no longer profitable to put up for sale. From such components you can make high-quality timber and put it into use.
- If you really need powerful and strong load-bearing beams, then timber made from thick boards will be a good solution. The results are very good structures that do not crack, twist, rot or mold.
It should be taken into account that walls built from homemade profiled timber can be left without auxiliary finishing. Without paint, wallpaper and other materials, such bases look no less impressive and attractive.
There are several different ways in which users can make high-quality timber with their own hands. Each home master chooses the optimal technology for himself.
Bonding and crimping
For gluing, use any available wood glue; for timber intended for indoor use, it is better to choose environmentally friendly glue. The operation is performed at room temperature, in a ventilated area. Glue consumption is up to 10 liters per cubic meter of finished timber.
The lamellas are laid in a previously determined order, the glue is applied with a brush or roller, the thickness of the adhesive layer is up to 2 mm. The assembled structure is fastened with screw carpentry clamps located at intervals of 400-450 mm. It is recommended to place gaskets made of multilayer plywood measuring 12x12 mm under the clamp stops.
Read also: How to make hair voluminous???
The time for complete curing of the glue is determined according to the passport data of the composition. After the gluing process is completed, glue deposits are removed on a planing machine, “steps” are eliminated, and the timber is given the specified dimensions. For finishing, use sandpaper or a sander.
Comment
In order not to get hung up on the word BRUS, we need to add that this technology is quite applicable in the manufacture of other parts. For example, to make a tabletop for a computer desk, I used a purchased floorboard, from which I glued the shield.
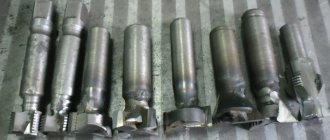
Tip: When making small workpieces (for furniture repair) or small structures (wall shelves, drawers), when making grooves or quarters is not convenient, or you do not have such an opportunity, gluing is often done using a smooth fugue. In this case, for more reliable gluing and fixation, a set of center markers will be very helpful. I advise you to buy it. You can buy markers in construction stores; they cost pennies, but they help remarkably. Large markers, in the photo on the right, homemade, turned on a lathe, are used for larger jobs.
Glue lesson
The dried lamellas are calibrated and go through the defect sampling stage. In other words, the lumber is re-inspected to identify defects that affect the strength of the wood or the appearance of the finished product, after which all damaged areas are cut out. Then the lamellas are spliced along the length on the end splice line, and then the material is planed and ground on four sides using special equipment to obtain products of a precisely specified shape. This stage ensures, in particular, the smoothness of the surfaces on which gluing will subsequently be carried out, thereby increasing the adhesion strength of the lamellas to each other.
Gluing occurs on special hydraulic presses using durable, environmentally friendly glue. The peculiarity of the technology is that the direction of the annual rings of adjacent boards should be opposite, so that warping is minimized and strength is maximized.
With the number of lamellas from two to five, the laminated veneer lumber is up to 200 mm thick; from five or more lamellas – up to 800mm.
The glue penetrates deeply into the pores of the wood, which ensures a strong connection of the lamellas to each other. Especially good for residential premises is laminated veneer lumber, produced using vapor-permeable glue, which does not create barriers to the passage of air and water vapor inside the material. A house made of such material “breathes” in the same way as a structure made of solid wood.
Advice
When heat treated, the wood changes color, acquiring a beautiful brown tint. It should be noted that the color change is end-to-end, which is clearly visible on the cut. Scratches on such a surface are practically invisible. By changing the heat treatment temperature, you can achieve the desired shade of wood and the required degree of resistance to environmental conditions.
Read also: How to Make Anti-AFK in Minecraft
According to Nikolai Nikolaev, deputy director for product and technology at Vuokatti-Rus, the main component of such glue (4,4″-methylene-diphenyl-diisocyanate) is characterized by low volatility due to its high molecular weight - 250 carbon units (for comparison: the weight of water is 18 carbon units). In addition, in the presence of water, this substance quickly polymerizes and forms a completely chemically inert solid material. The phenomenon of toxicity is the ability of a chemical substance to penetrate the body and react, causing disruption of physiological functions. During polymerization, the substance loses its ability to evaporate (much less to enter into reactions). Accordingly, due to the chemical inertness of this adhesive, the environmental risks associated with its use are very low.
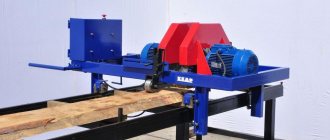
Profiling and final trimming
Profiling timber with your own hands is the most important operation. When making timber with your own hands, the profile can be given any shape. To cut the profile, it is advisable to use an economy-class milling machine or assemble a machine for profiling timber yourself. This is easy to do using a hand router, a carpenter's workbench and a simple slipway. The power of the milling cutter must be at least 2 kW. This solution is suitable for the production of small batches of profiled timber. A variety of attachments allows you to cut profiles of the most complex shapes, including cone-shaped ones.
Profile types
When choosing the type of profile for yourself, you first need to take into account your professionalism and what kind of cutters you have for profiling the timber. It's best to stick with the simplest options so that you don't need a lot of different tools and don't have to do the same amount of calculations. To determine this, you can use GOST 9330-76, with which you can make all the calculations most correctly.
Basically, home equipment for profiled timber is quite simple and craftsmen prefer such types of profiling as:
- through a block;
- through a triangle.
It should not be forgotten that GOST always indicates the depth and width of the groove in accordance with the cross-section of the timber being processed.
Gluing timber
Gluing timber is the most critical process. It is especially important to choose the right glue here. That is, depending on where (outdoors, indoors) under what conditions (humidity, temperature) the future product will be used, and also depending on the requirements for the appearance of the adhesive joint (color of the glue), it is necessary to select the appropriate adhesive. Now on the market there are practically no problems with the choice of glue.
The gluing technology depends on the chosen adhesive and is usually also indicated on the packaging. As you can see in the photo, the glue is yellow in color (the color issue was not important for me), the glue is intended for use in outdoor work, on wood, the pattern of annual rings on the timber is multidirectional. Defects and chips along the edges of the timber will be removed during finishing of the timber. After gluing, I used clamps to compress and secure the parts to be glued.
Read also: How to make an origami dinosaur out of paper
Drying of the adhesive joint must be carried out in accordance with the recommendations of the adhesive manufacturer. As a rule, the following conditions must be met:
- Direct exposure of the product to the sun and water should be avoided (for example, I dried it under a canopy)
- The parts to be joined must be pressed firmly along the plane being glued
- Drying times must be maintained in accordance with the manufacturer's recommendations.
I will mention one more non-standard (optional) operation. Taking into account the fact that laminated veneer lumber was created for the production of window blocks, and the force impacts when performing caulk work when installing window blocks are not small. I decided to further strengthen the structure of the beam by installing it on dowels. I used homemade dowels made of oak, with a diameter of 22 mm, using a hole in the lower part of the dowel for a conical wedge (the dowel fits into the spacer on the wedge - when driven in). First I drilled the holes. The dowels and conical wedge were placed on glue. I hammered the dowels in with a sledgehammer.
Final operations in the manufacture of laminated veneer lumber
After thoroughly drying the products, we finally process the laminated timber. In particular, we plan timber. When planing, you need to maintain the same dimensions for all beams; the clean dimensions of the beam (in cross-section) are 90 by 275 mm. Next, we treat the glued timber on all sides with fire protection, twice.
The finished glued timber is shown in the photo below (end view and side view).
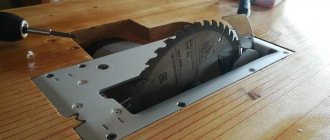
Using a Circular Saw
The second way to make a connection with your own hands is to use available tools. For example, using a hand-held circular saw. Such a tool costs 2-5 thousand rubles, depending on the manufacturer. The main thing is that it can be cut at a back angle and make a cut with a depth of at least 65 mm.
The advantages of this option:
- Ability to control the accuracy of the cutting depth.
- Easy cutting of a straight and smooth groove.
- Disadvantages of working with a circular saw:
- The cutting depth may not be sufficient.
- It is impossible to clean the groove with this tool.
- Each time you need to readjust the cutting depth.
- Low operating speed.
- Best used for cutting a triangular groove.
Doesn't it burn in fire?
I would also like to add that at the final stage, the finished building material is carefully treated with a special composition, which is both an antiseptic and a fire retardant. Thus, laminated veneer lumber, while maintaining the natural properties of wood, acquires such additional qualities as resistance to rotting, insect damage and high fire resistance (according to studies, in terms of these indicators the material is close to metal structures). By the way, the “fire hazard” of a tree today is an exclusively psychological category! Wood begins to deteriorate only at a temperature of 300°C, which is usually reached after 80 minutes after the start of combustion. During combustion, a whitish carbon-pyrolytic layer is formed on the surface, which protects the inner layers of wood, which remain undamaged by fire and maintain the original temperature, so that in fact wood is a fire-resistant material.
Steel structures, on the contrary, almost do not burn, but in a fire the steel becomes soft and quickly loses its load-bearing capacity. The same applies to steel reinforcement that strengthens concrete structures. At temperatures up to 600°C, steel structures retain up to 20% of their load-bearing capacity. When exposed to fire, steel structures become spaghetti-like and begin to fall apart. These properties of steel and concrete are well known to specialists, but builders and ordinary buyers are not very well versed in this topic.
An experiment was conducted in Japan that confirmed the claims of laminated veneer lumber manufacturers about its unique fire resistance. The wall, assembled from laminated veneer lumber with a section of 180x215(h), with an area of 3x3 meters, was exposed to open fire for 45 minutes. As a result, the sample received damage to only 30% of the beam in depth and, accordingly, the wall retained its structural and load-bearing capacity.
Technology of work execution
To perform this work at home you will need:
The grooves are made by adjusting the timber to each other.
- wood hacksaw;
- plane;
- clamps;
- brushes and brushes;
- It is advisable to have a grinding machine and a milling machine, but this is not a prerequisite;
- measuring tool;
- boards, slats;
- glue;
- solvent.
In order for the material to be of high quality, the blanks used for its manufacture must be dry. It is best for the drying to be natural.
First, the workpieces are cut, the length of which should be 5 cm longer than necessary. Take three blanks, from which one beam will be made. They plan the edge that will be glued together. It is necessary to pay attention to the location of the annual rings; in adjacent lamellas they should be multidirectional. In the middle lamella we make a groove on both sides, and in the outer lamellas we make dowels on one side.
To see what the laminated timber will look like, first assemble it without using glue. Now you need to properly prepare the surfaces that will be glued together. To do this, they are treated with sandpaper or a grinding machine, all dust is carefully removed and the surface is degreased.
All lamellas are thoroughly dried and coated with fire bioprotection twice, with intermediate drying.
A few important notes
1. Properly manufactured laminated veneer lumber is superior in its structural, mechanical and other parameters to solid timber made from the same wood and with the same dimensions.
2. Modern adhesive compositions for wood, if used correctly, make it possible to obtain an adhesive joint that is stronger than the wood itself. I once wanted to tear off the glued block to the tabletop. The end result was that the block itself split along its length, but at the place of the adhesive connection it did not lag behind one iota.
3. In many cases (including at home in a city apartment), it is possible to make laminated veneer lumber without the use of special expensive tools, if you use purchased parts (floor slats, boards) for its production.
Before moving directly to the manufacturing technology of laminated veneer lumber, let's consider some definitions.
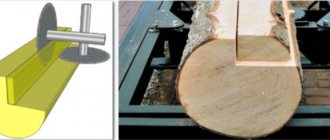
The figure below shows the main parts of laminated veneer lumber and how to connect them. In fact, there are many more connection methods, but the figure shows the easiest ones to make at home. An important condition for timber is the relative position of the annual rings; the lamellas must be glued together in such a way that their relative positions in the manufactured timber are in different directions for adjacent lamellas. In this case, the timber will be least susceptible to warping.
What kind of profiled timber can you make with your own hands?
We work around the clock throughout:
Moscow region, Vladimir, Kaluga, Tula, Tver
When more advanced types of products appear on the building materials market, suitable for the construction of a bathhouse, country house or private wooden house, you inevitably think about the relevance of using “budget” edged timber. After all, today more and more developers prefer to build houses from profiled timber, which have a number of advantages over their predecessor - for a reason?! But such building material is significantly more expensive than its non-profiled counterpart. What if you make profiled timber with your own hands - is this possible?
How to dry lumber
The best results are obtained by chamber drying of wood, but you can set up a place for drying in a garage or on a country plot; wet lumber is often stored under sheds or in outbuildings. The natural drying process can take several months. If this process is organized indoors, you can use a heater and fan. In any case, the room must be ventilated. When the stack is located under a canopy, the wood must be protected from direct sunlight.
In the drying stack, the edged boards are laid in horizontal rows; the rows are separated in height by spacers of the same size. Dry wood blocks with a section size of 40x40 mm can be used as a gasket. The bars are laid perpendicular to the main layer every 500-600 mm. To prevent deformation processes, it is recommended to lay oppression from available material on the top row of the stack.
During the drying process, the moisture content of the material is periodically checked; when the moisture content reaches 10-12%, the lumber can be used to make lamellas. Humidity control is carried out with a moisture meter; there are no special requirements for accuracy of measurements; an inexpensive device can be used for these purposes.
Raw materials
The main criteria by which glue for timber is chosen is environmental friendliness and strength. Some manufacturers use low-grade compounds, saving on costs, so the timber can turn out to be hazardous to health.
A good adhesive meets the EN 204/205 standard, and the finished product can even be used for interior decoration. Compositions based on polyurethane, melamine, and resorcinol are considered safe.
One-component wood glue Kleiberit 300.0 DIN EN 204
Advice! As for the wood itself, it is best to take the most popular raw material - pine.
Spruce and larch, cedar and fir are also good options. You can also make a combined material, the front parts of which will be made of valuable wood. The initial blanks for laminated veneer lumber are sawlogs, followed by debarking and cutting into boards of the required size, unedged or edged boards.
Thin gauge timber Saw logs
Imitation as a decorative finishing option
Quite often, to create a certain style or interior atmosphere in the interior of a house, imitation timber is used with your own hands. This approach makes it possible to achieve an almost complete visual analogy with real timber and has a number of advantages:
Exterior finish with imitation timber
- Imitation can be performed on a surface made of any material;
- Wood consumption is significantly reduced, and, accordingly, financial costs and time for implementation;
- Such finishing can be done after the construction of the house at any time, both inside and outside.
It is quite easy to make a set of decorative elements for such an imitation at home. To do this, you will need a pre-calculated volume of boards with a thickness of at least 50 mm, as well as an electric plane and a sander.
The manufacturing process will be as follows:
- Using a plane, you need to smoothly round the edges of one of the sides of the board, giving it the rounded shape that a beam has;
- Then, using a sander, you should sand everything thoroughly, removing all the blemishes and marks from the plane.
A board processed in this way can very realistically imitate not only timber, beams and ceiling beams. To achieve complete similarity, in the corners where the planes of the walls meet, the boards must be shifted relative to each other by half their width, simulating cutting the corner of a log house.
If desired, such a “timber” can be tinted to resemble valuable wood species, further enhancing the imitation effect.
Making dowels
This type of fastener consists of wooden cylindrical elements of a certain diameter, which are driven into pre-drilled holes in beams lying on top of each other, thus additionally fastening them together.
Making dowels for timber with your own hands is not difficult and anyone can do it, however, any business has its own subtleties that you need to know.
- According to the technology, dowels should be made from harder wood species;
- Their diameter should be such that they can be driven into the technological holes with a slight tension. If the fastener is loose in the hole, it is practically useless, and if it is too tight or protrudes above the surface, it can cause problems with settling of the house.
- You can split birch logs of the required length into many square pieces, and then manually trim them to a round shape of the required diameter;
- If you have a wood lathe available, then these elements can be quickly turned;
- Cuttings for shovels and other garden tools that have become unusable can be used as dowels. In this case, you just need to cut them into pieces of the required length.
Advice! You can also use metal pipe scraps of suitable diameter as dowels.