–Categories
- sew (147)
- children (22)
- miscellaneous (14)
- drawings (12)
- food (10)
- home and comfort in it (4)
- kazanshi ribbons hairpins flowers (3)
- quotes (1)
- salt dough (1)
–Search by diary
–Subscription by e-mail
– Regular readers
–Communities
-Statistics
Friday, April 03, 2015 07:20 + to the quotation book
Alpha buttons are spring-loaded. How to remove an unnecessary button on clothes
Remove the Alpha buttons, spring buttons:
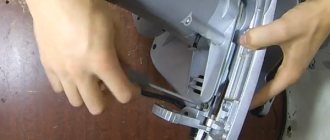
1. These buttons are easiest to remove with side cutters with flat cheeks
Lightly squeeze the button, then turn the side cutters at an angle of 90 ° and squeeze again (as if squeezing it out), and so on several times until the button collapses. If you try to remove the button in one step, you can irreversibly damage the fabric.
2. Asian buttons
Since Asian-made buttons are made of thinner metal than European ones, they can be removed simply with pliers.
We squeeze the button with pliers, turn the pliers at an angle of 90 and squeeze again, if necessary, repeat the operation several times.
Do not try to remove Turkish buttons this way.
You'll just be wasting your time.
3. Drilling. This method must be used very carefully, as you can wrap the fabric of the product around the drill and damage it irrevocably. It is worth using drilling if it is necessary to reuse the spring part of the button or if there is no other way to remove the button.
We clamp the spring part of the button with pliers:
We use a drill Ø3.5mm.
It is necessary to drill out the flared part of the front part of the button
After this, the button can be easily removed.
The spring part of the button can be used for re-installation.
4. Decorative composite buttons can be easily disassembled using a side cutter.
If you don’t have a side cutter, you can pry it out with a flat bladed screwdriver and turn it at an angle of 90°. Be careful not to damage the fabric.
5. Removing the bottom of the button:
Read also: Dimensions of wood carving cutters
Also with the help of side cutters.
Don’t try to eat a bite at once; squeeze the button part, then turn the side cutter at an angle of 90° and squeeze again, and so on several times.
You can do everything!
Attention: high-quality installation of fittings can only be done in an atelier or workshop using appropriate professional equipment.
The rivet is an excellent and durable type of fastener. But unlike bolts, nuts, studs and screws, it cannot be removed without damaging it. The bolt can be unscrewed with keys or a screwdriver, after which it can be reused. The broken rivet will have to be thrown away. The question also arises: “How to rivet rivets if there is no riveter in your arsenal?”
What to do if the button comes undone?
It is better to slightly flatten the convex part of the button using pliers (this is more sensitive), placing paper or cloth on both sides so as not to stain it. It is better to slightly flatten the convex part of the button using pliers (this is more sensitive), placing paper or cloth on both sides so as not to stain it.
Interesting materials:
Why weren't the Flamethrowers captured? Why is my PayPal account limited? Why does window glass not transmit ultraviolet light? Why did Oleg conquer Kyiv? Why is deer a symbol of Christmas? Why does OLX block my account? Why did Onegin go on a journey? Why does Onegin reject Tatiana's letter? Why does rye bread fall off in a bread machine? Why is the money tree dangerous?
Rivets in construction and mechanical engineering
There are many types of rivets. Some have the form of a single part - a bushing, which is inserted into the hole and, using a special riveter, the edges of the bushing are expanded on the other side of the parts being connected and pressed (flatten). Such rivets are the most common, cheap and reliable. They are used mainly in construction and mechanical engineering. How to rivet construction types of rivets?
How to remove a button from jeans.
How to change a button on your jeans yourself.
A typical case. A button on a pair of jeans broke on a broken leg. The property of this type of button is to jump off the shaft under increased load. Removing button remnants. Remove with a side cutter in one motion. Then the process of installing the button according to your wishes.
Remove the unnecessary denim button.
A) On a broken leg:
If you disassemble the button from the wrong side of the product, you can damage the fabric, so we bite the button from the front side.
B) On a stable stem: First we bite the stem of the button, then what is left. With this method, the fabric is not damaged at all.
B) Remove the holster buttons. You have decided to replace the corded buttons with rivets. Since caburs are made of cast metal, it is impossible to cut them with a side cutter; I had to remove them from the wrong side. The main thing is not to damage the fabric.
Sewing repair of jeans.
Frequently encountered problem: A typical situation is that there is simply a hole in the place of the button. The button was torn out with meat. It’s good if there is a clothing repair shop nearby. It is necessary to “stitch” on a sewing machine; hand darning is undesirable, because When you punch a hole, you cut the darning threads, and over time the button will fall out. View after renovation. We install the button so as to close the darning area on the jeans as much as possible.
You can read the article on installing denim buttons by clicking on the link
Source: www.liveinternet.ru
LiveInternetLiveInternet
—Quote book
Square bag. It is better to sew bags using the so-called stitch, that is, using a sewing machine with high stitching.
We are sewing a new backpack from old jeans. I have accumulated a number of leftover ones.
Super potatoes in 5 minutes! Brilliant potato recipe! Just 5-10 minutes of preparation.
We sew our own toiletry case We sew our own toiletry case
—Categories
- BAGS (751)
- Bags 3+ patterns (16)
- Cosmetic bags (13)
- Children's bags and backpacks (5)
- Backpacks (4)
- Wallets (29)
- Bags (407)
- Bags (Knitted) (33)
- Bags (Ideas) (58)
- Bags – 2 (139)
- Bags Jeans (57)
- ALL ABOUT REPAIR (142)
- Home improvement (25)
- We make furniture (41)
- Designs (56)
- Floors (1)
- Various small items (28)
- VIDEO (1)
- ALL ABOUT HANDcraft (2063)
- Applications, stencils (149)
- Metal fittings (35)
- Cords (3)
- Beads (3)
- Video master classes (105)
- Everything for the kitchen (33)
- Second life for old things (61)
- Embroidery (28)
- Ribbon embroidery (7)
- Knitting (techniques) (145)
- Knitting (patterns) (33)
- We knit things (74)
- Knitting for home (24)
- Decoupage (13)
- Making flowers (145)
- For luxurious ladies (100)
- Animals - toys (126)
- Ideas for needlewomen without master classes (22)
- History of needlework (12)
- Books, magazines on needlework (100)
- Rugs (51)
- Leather (59)
- Shreds (35)
- Modeling (56)
- Soap and everything connected with it (8)
- Weaving from everything (96)
- Pillows, rugs, blankets (149)
- Programs for needlewomen (21)
- Patchwork - blocks (108)
- Patchwork - techniques (28)
- FOR NEEDLEWORKERS. Pictures (1)
- Handicrafts (160)
- Handicraft sites (54)
- DIY tricks (23)
- Sewing techniques (75)
- Transformers - ideas, MK, etc. (32)
- We sew for the home (36)
- We sew clothes (150)
- We sew cases and organizers (29)
- We sew, knit shoes and socks (96)
- FOR US LOVED (669)
- Hair (147)
- Cosmetology (117)
- Makeup (36)
- Masks (93)
- Our body. and its attractive parts (106)
- Phyto (72)
- Note to the hostess (122)
- EARN? CAN! (105)
- business on the Internet (34)
- Blogosphere (26)
- how to make money on handicrafts (25)
- About copywriting (16)
- Your own business (14)
- COOKING (392)
- "Easy and Simple" (138)
- Baking (107)
- Preservation (2)
- Cooking secrets (133)
- Cakes, pastries (36)
- LITERARY REVIEW (356)
- Libraries and search engines (43)
- Hooked! (Interesting articles) (87)
- Music (40)
- Proverbs (32)
- Websites for watching movies online (44)
- My Sister's Poems (49)
- Poems, prose. love (75)
- DIARY DESIGN (567)
- HTML (9)
- Animations (11)
- Everything to create pages (168)
- For computer user (91)
- Picture+code and Avatars (138)
- Useful and interesting things on the Internet (104)
- Just pictures (3)
- Dividers (15)
- Frames (42)
- Cute and Comments (20)
- Diary Design Schemes (20)
- File hosting services (4)
- Backgrounds (8)
- PRO AUTO (9)
- PSYCHOLOGY (173)
- Career guidance (6)
- Psychology of relationships (86)
- Theory (27)
- Esoterics (53)
- MISCELLANEOUS (38)
- Online stores, auctions (20)
- About Dogs (3)
- PHOTO (72)
- My sister's works (3)
- Photoshop and other programs (66)
—Applications
- I am a photographer
Plugin for publishing photos in the user's diary. Minimum system requirements: Internet Explorer 6, Fire Fox 1.5, Opera 9.5, Safari 3.1.1 with JavaScript enabled. Maybe it will work - Postcards
Reborn catalog of postcards for all occasions - always no analogues at hand
^_^ Allows you to insert a panel with an arbitrary Html code into your profile. You can place banners, counters, etc. there
—Links
-Music
-Always at hand
—Search by diary
—Interests
-Friends
— Regular readers
—Communities
-Statistics
How to remove a button from jeans.
How to change a button on your jeans yourself.
A typical case. A button on a pair of jeans broke on a broken leg. The property of this type of button is to jump off the shaft under increased load. Removing button remnants. Remove with a side cutter in one motion. Then the process of installing the button according to your wishes.
Remove the unnecessary denim button.
A) On a broken leg:
If you disassemble the button from the wrong side of the product, you can damage the fabric, so we bite the button from the front side.
B) On a stable stem: First we bite the stem of the button, then what is left. With this method, the fabric is not damaged at all.
B) Remove the holster buttons. You have decided to replace the corded buttons with rivets. Since caburs are made of cast metal, it is impossible to cut them with a side cutter; I had to remove them from the wrong side. The main thing is not to damage the fabric.
Sewing repair of jeans.
Frequently encountered problem: A typical situation is that there is simply a hole in the place of the button. The button was torn out with meat. It’s good if there is a clothing repair shop nearby. It is necessary to “stitch” on a sewing machine; hand darning is undesirable, because When you punch a hole, you cut the darning threads, and over time the button will fall out. View after renovation. We install the button so as to close the darning area on the jeans as much as possible.
You can read the article on installing denim buttons by clicking on the link
Have questions. Write, we will answer: [email protected]
Source: club-snap.su
Material of manufacture
Hammer rivets can be made from various materials. For consideration are the most popular varieties.
Aluminum
This type of building parts is also often called exhaust. Their production is regulated by several domestic standards:
- with countersunk head - GOST 10300-80;
- with semicircular – GOST 10299-80;
- with flat – GOST 10303-80;
- semi-hollow - GOST 12641-80.
The size grid is quite varied: diameter - from 1 to 10 millimeters, length - from 5 to 45 millimeters. Moreover, these indicators may vary depending on the type of rivets (hammer, pull, threaded).
Steel
Stainless steel parts occupy a special place among all hammer rivets. The production of these elements is carried out not only in Russia, but also abroad.
Most often, steel rivets are produced without any additional coating, and their sizes may vary. So, for example, the diameter of the cap can be from 1.8 to 55 mm, the height of the cap can be from 0.6 to 24 mm, the height of the entire element can be from 2 to 180 mm.
Due to such diverse indicators, these parts can be used for connecting sheets made of metal, for fastening facade plates to substructures, as well as for connecting metal structures with parts made of other materials.
Copper
Construction parts made from this material are characterized by several distinctive features:
- due to their antimagnetic properties, they are widely used in the radio industry;
- due to the fact that copper does not rust, rivets made from it are in demand in almost all areas (especially in cases where the materials fastened with them often come into contact with water and air);
- Copper elements are used to assemble apparatus and tools for the chemical industry, as they are quite resistant to the action of various substances manufactured artificially.
Brass
Brass parts are quite flexible, but at the same time durable. And thanks to their appearance, they can perform not only their direct functions, but also serve as a decorative or design element. Most often, such elements are used in the industrial and instrument-making fields.
The length of brass rivets reaches 4–70 mm, and the diameter is 2–8 mm.
In order to choose the right crimp (mandrel) for brass parts with a semicircular head, you should choose crimps that have:
- long service life;
- uniform hardening;
- working ends are polished;
- Impact heads are inductively annealed.
- this is the production of permanent connections using rivets used in the manufacture of metal structures (trusses, beams, various types of containers and frame structures). A rivet is a cylindrical rod made of ductile metal, at one end of which there is a head called an embed. During the riveting operation
on the second side of the rod, installed in the holes of the workpieces being connected, a second rivet head is formed, which is called the closing head. The mortgage and closing heads are mainly semicircular and countersunk (Fig. 5.14). The need to use ductile metal for the manufacture of rivets is due to the fact that its heads are formed as a result of plastic deformation of the rivet rod. When making riveted joints, the rivets should be selected from the same material from which the parts to be joined are made. This prevents the appearance of galvanic couples, leading to corrosion at the point of contact between the rivet and the part. The riveting process consists of two stages - preparatory and riveting itself.
Preparatory riveting process
involves drilling or punching a hole for the rivet and forming a recess in it using countersinking for the rivet and closing heads, if necessary. The actual riveting includes installing the rivet into the prepared hole, tensioning the riveted workpieces, forming the closing head, and cleaning up after riveting. Depending on the nature of the rivet joint, riveting is performed in a cold (without heating) and hot (with preheating of the rivet to a temperature of 1000 ... 1,100 ° C) method. In practice, hot riveting is used in cases where steel rivets with a diameter greater than 12 mm are used.
Removing a construction rivet
It is difficult to call this action dismantling as such. This is removal. To remove the rivet, you will need the regular rivet gun that was used to install it. But since you don’t have one at hand, it’s worth figuring out how to rivet a rivet without a riveter.
You can try to remove rivets in which the head or bent part protrudes above the plane of the riveted parts with a sharp chisel and hammer:
- Place the cutting part of the chisel exactly under the head (or bent part).
- Hit the chisel with a hammer. Some large rivets may take several hits to break off.
- Once the head (or bent part) is torn off, all that remains is to remove the rivet from the hole. This can be done by pushing it out with a nail or other thin object (for example, a screwdriver).
But more often you cannot get to the caps and curved parts, since they are, as it were, in the body of the parts being fastened. At the factory, special grooves are drilled for the caps and expanding parts in the parts, and then the rivets fit into the metal like a glove. How to rivet rivets in such a “tricky” case?
Here a screwdriver (or drill) with a metal drill selected for the diameter of the rivet will come to the rescue. Proceed as follows:
- Using a core, make a notch on the head of the rivet so that the drill does not wander, although some are accustomed to doing without serifs.
- Place the screwdriver bit on the head and drill out the inside of the rivet.
- When the drill goes through, the remains of the head and widened part fall out on their own.
General principle
Buttons are a useful invention. They were first used in France in 1885 for leather goods: shoes, gloves, bags. Today, buttons are inserted into jackets, overalls, children's bodysuits, pockets and even underwear. They securely hold the edges of the fabric and at the same time can be completely invisible.
What you need to know about the buttons:
- "Mom and Dad". This is what people call the upper and lower parts of the button (which can also consist of several parts). The “male” has a protruding pin that fits into the “male” - a metal part with a recess and a beautiful “face”. They are located on opposite sides of the fabric. The “mother” is always installed on the upper part of the product, and the “father” is placed on the bottom. As planned, the pin should fit in and out of the recess.
- If the rivets are not sewn, they consist of several parts. Usually “mother” and “father” have 2 parts each. They are collected during the installation process. There is no need to do this in advance.
- Insert non-sew buttons into the holes. They should be narrow and the fabric should be dense. If there are already holes, but they are torn or frayed, they are strengthened with silicone glue, non-woven fabric or sewn with thread. If there are no holes, use a special punch or awl. As a last resort, you can punch a hole with a thin nail. You can’t cut it with scissors: sooner or later the fabric will come apart and the button will start to fall out.
- The button is assembled after installation on the fabric. The metal parts are inserted into the hole, checking for the correct location, and then pressed tightly against each other. Ideally, a press and special attachments are used to connect parts, which allow you to flare (flatten) the required parts of the button. After flattening, one piece fits tightly onto the other.
LiveInternetLiveInternet
—Quote book
Square bag. It is better to sew bags using the so-called stitch, that is, using a sewing machine with high stitching.
We are sewing a new backpack from old jeans. I have accumulated a number of leftover ones.
Super potatoes in 5 minutes! Brilliant potato recipe! Just 5-10 minutes of preparation.
We sew our own toiletry case We sew our own toiletry case
—Categories
- BAGS (751)
- Bags 3+ patterns (16)
- Cosmetic bags (13)
- Children's bags and backpacks (5)
- Backpacks (4)
- Wallets (29)
- Bags (407)
- Bags (Knitted) (33)
- Bags (Ideas) (58)
- Bags – 2 (139)
- Bags Jeans (57)
- ALL ABOUT REPAIR (142)
- Home improvement (25)
- We make furniture (41)
- Designs (56)
- Floors (1)
- Various small items (28)
- VIDEO (1)
- ALL ABOUT HANDcraft (2063)
- Applications, stencils (149)
- Metal fittings (35)
- Cords (3)
- Beads (3)
- Video master classes (105)
- Everything for the kitchen (33)
- Second life for old things (61)
- Embroidery (28)
- Ribbon embroidery (7)
- Knitting (techniques) (145)
- Knitting (patterns) (33)
- We knit things (74)
- Knitting for home (24)
- Decoupage (13)
- Making flowers (145)
- For luxurious ladies (100)
- Animals - toys (126)
- Ideas for needlewomen without master classes (22)
- History of needlework (12)
- Books, magazines on needlework (100)
- Rugs (51)
- Leather (59)
- Shreds (35)
- Modeling (56)
- Soap and everything connected with it (8)
- Weaving from everything (96)
- Pillows, rugs, blankets (149)
- Programs for needlewomen (21)
- Patchwork - blocks (108)
- Patchwork - techniques (28)
- FOR NEEDLEWORKERS. Pictures (1)
- Handicrafts (160)
- Handicraft sites (54)
- DIY tricks (23)
- Sewing techniques (75)
- Transformers - ideas, MK, etc. (32)
- We sew for the home (36)
- We sew clothes (150)
- We sew cases and organizers (29)
- We sew, knit shoes and socks (96)
- FOR US LOVED (669)
- Hair (147)
- Cosmetology (117)
- Makeup (36)
- Masks (93)
- Our body. and its attractive parts (106)
- Phyto (72)
- Note to the hostess (122)
- EARN? CAN! (105)
- business on the Internet (34)
- Blogosphere (26)
- how to make money on handicrafts (25)
- About copywriting (16)
- Your own business (14)
- COOKING (392)
- "Easy and Simple" (138)
- Baking (107)
- Preservation (2)
- Cooking secrets (133)
- Cakes, pastries (36)
- LITERARY REVIEW (356)
- Libraries and search engines (43)
- Hooked! (Interesting articles) (87)
- Music (40)
- Proverbs (32)
- Websites for watching movies online (44)
- My Sister's Poems (49)
- Poems, prose. love (75)
- DIARY DESIGN (567)
- HTML (9)
- Animations (11)
- Everything to create pages (168)
- For computer user (91)
- Picture+code and Avatars (138)
- Useful and interesting things on the Internet (104)
- Just pictures (3)
- Dividers (15)
- Frames (42)
- Cute and Comments (20)
- Diary Design Schemes (20)
- File hosting services (4)
- Backgrounds (8)
- PRO AUTO (9)
- PSYCHOLOGY (173)
- Career guidance (6)
- Psychology of relationships (86)
- Theory (27)
- Esoterics (53)
- MISCELLANEOUS (38)
- Online stores, auctions (20)
- About Dogs (3)
- PHOTO (72)
- My sister's works (3)
- Photoshop and other programs (66)
—Applications
- I am a photographer
Plugin for publishing photos in the user's diary. Minimum system requirements: Internet Explorer 6, Fire Fox 1.5, Opera 9.5, Safari 3.1.1 with JavaScript enabled. Maybe it will work - Postcards
Reborn catalog of postcards for all occasions - always no analogues at hand
^_^ Allows you to insert a panel with an arbitrary Html code into your profile. You can place banners, counters, etc. there
—Links
-Music
-Always at hand
—Search by diary
—Interests
-Friends
— Regular readers
—Communities
-Statistics
Rivets on clothes
But rivets are also used in the manufacture of various types of clothing. Their use began in the 19th century, when, while sewing pants made of rough canvas, which will later be called jeans, one of the craftsmen noticed that if the seam is riveted at the beginning, it will definitely not come apart or tear.
Here rivets are used, for which the name “buttons” is more appropriate. Unlike ordinary ones, they consist of two parts - internal and external. Everything is held together by the fact that the head of one element fits into the cavity of another. Then, under pressure from the riveter, the head of the internal element is flattened (expanded) inside the cavity of the outer element, and such a “super button” cannot be broken, no matter how hard you try. The fabric is more likely to tear. How to rivet these types of rivets correctly?