The semiautomatic welding machine is convenient for use in small workshops or at home. It is compact in size and does not require the preparation of a special workplace. Both an experienced welder and an unqualified beginner can handle the device. To obtain a properly functioning device, you need to configure the semi-automatic welding machine, which depends on the type of metal, the thickness and speed of the wire, the composition of the gas in the cylinder and other factors. The device is capable of working with different alloys.
Setting up a welding machine: general information
First of all, it is necessary to understand that the setup process regulates the welding parameters. They, in turn, significantly depend on a number of factors of the task being performed. These include the thickness and alloy of the workpiece, the position of the joint in space, the configuration of the joint, the external conditions of the work, and others. In addition, the current real voltage in the network, the composition of the gas in the cylinder (if any), changing the coil of wire, and so on, contribute. Accordingly, the setup of a semi-automatic welding machine must take them all into account when making parameter adjustments.
At the same time, the welder has only four possible adjustments at his disposal:
- Current value;
- Feed speed of filler wire of selected thickness;
- Arc voltage value;
- Shielding gas consumption.
Of course, many of these factors are interrelated. Therefore, to set the primary values, carried out using the knobs on the front panel of the inverter machine, you can use the table. But fine tuning of the device during operation will still be necessary. And this will become the most difficult task, the solution of which will allow us to obtain the optimal result of the work.
Possible adjustments during the welding process
In order for the seam to turn out smooth and beautiful, you need to feel the semi-automatic machine and be able to adjust it correctly.
It is necessary to set the necessary parameters according to the setting tables that are attached to the technical documentation for the device of a particular type. You cannot cook at a low operating current: this will affect the quality of the seam, and in some cases it will not even be possible to connect the parts together. The following principle is observed: the thicker the metal, the higher the operating current or voltage (depending on the operating principle of the semiautomatic device). More details about the adjustment in the video:
Setting up a semi-automatic welding machine: adjusting the voltage
Adjusting the welding arc voltage is the first step when setting up a semi-automatic welding machine. It is recommended to set low values for the start (test brewing process) - 15-20 V and a current of up to 100 A.
The welding process requires the welder to hold the torch in one hand, while the other remains free. This is how the parameters are adjusted in real time. For this, digital or mechanical regulators on the inverter are used. The adjustment can be performed smoothly or stepwise. In this case, several factors are monitored - the process of formation of the weld bead, the sound of the arc and its combustion, the degree of metal spattering.
In this way, it is possible to arrive at the optimal operating voltage. This is important because:
- A parameter value that is too low compared to the optimal value results in a seam that is too narrow and has poor penetration. This negatively affects the strength of the connection;
- Too high a voltage (compared to the optimal value) produces a very wide seam, leading to the risk of burning through and welding of the wire to the torch tip.
For specific semi-automatic devices, manufacturers often include a plate with recommended voltage values. It is convenient to place it on the inside of the lid of the container with additives.
How is semi-automatic welding carried out?
As in other types of welding, before starting work, you need to make sure that the parts have been pre-treated - degreased and cleaned. Before starting work, connect the ground cable to the welding table and check the extension of the welding wire. If the wire is longer, you need to cut it off with side cutters.
HELPFUL ADVICE.
It is important that the tip of the wire is sharp - then it will be easier to light the arc. During the welding process, before each new seam, the tip (or the resulting ball) of the wire will need to be bitten off - this will make the start of the new stage easier.
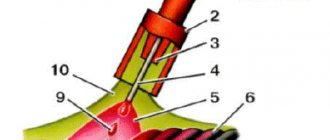
Like any type of welding, semi-automatic welding begins with ignition of the arc. To do this, the welding wire must touch the surface of the part being welded. We press the torch button - the supply of welding wire and shielding gas begins simultaneously.
The arc is ignited. The welding process is taking place. To extinguish the arc, you need to release the button and move the torches away from the work being welded.
The torch can be operated with one hand, but when using two hands the seam will be more accurate and control over the process will be more confident. You need to grab the burner with one hand, your index finger should be at the bottom of the start button. You can lean on your other hand with your leading hand - this will make it easier to control the distance to the surface to be welded and the angle of inclination, as well as make the necessary movements with the torch.
There is no universal welding torch angle that must be observed when welding. If we cook parts in the same plane and both parts are of the same thickness, then the burner can be held vertically. If the parts are different in thickness, then the tilt should be made towards the part with a smaller thickness. When welding two parts at an angle, it is more convenient to hold the torch at an angle of 5-25% degrees (from the vertical). The distance from the nozzle to the surface to be welded is from 5 to 20 mm.
The movement of the burner can be either forward or backward. When welding at an angle backwards. With this method, the depth of penetration and the height of the seam increases, its width decreases. When welding at an angle forward, the edges are better fused, the penetration depth is reduced, but the seam is wider. This method is good for welding metal of small thickness.
During the welding process, you will choose the most convenient and comfortable welding style for you - from the way you hold the torch to the parameters of the machine. Also pay attention to the sound of the arc - it will help you adjust the settings. Thus, a correctly installed arc has a smooth hissing sound. If you hear a cracking sound, then most likely there is an imbalance between feed speed and voltage, or poor contact in the welding area.
The influence of torch speed on seam quality
The quality of the weld also depends on the welding speed - the speed at which the electric arc passes along the welding site. The speed of the welding torch is controlled by the welder and affects the shape and quality of the weld. Over time, you will learn to determine the speed by looking at the thickness and width of the seam during the welding process:
- Too high a speed is accompanied by increased metal splashes. The seam is thin and intermittent.
- A speed that is too slow will produce a wide, blurry seam.
How to move the welding torch during semi-automatic welding?
There are many ways to move the torch to form a seam:
- For metals 1-2 mm thick, you can move the torch in a zigzag pattern to act with an arc on both sheets being welded - then the result is strong and airtight. In addition, with this method, the electric arc does not penetrate the metal.
- If you have some experience, use a straight seam, without any oscillatory movements. This weld can be used to weld metals of any thickness, but here it is important to feel that the arc evenly covers both workpieces.
- When you need to make a long seam, in order to prevent overheating of the metal and thermal deformation, you can weld in small segments from one or the other end of the parts being welded. This will allow the entire segment to be welded without thermal deformation of the sheet metal.
Setting the current and wire feed speed
These interrelated quantities are selected according to their optimal values after stress and a constantly determined wire diameter. The higher the feed rate of the consumable, the higher the working current needed to melt it. A number of semi-automatic models that have a synergistic SYN mode can automatically adjust the wire feed speed depending on the set voltage.
Errors in making this adjustment lead to negative effects. In particular:
- Too high a feed speed will result in a large scattering of metal splashes and an uneven seam with sagging;
- Setting the feed rate too low will cause it to melt before leaving the burner nozzle. This will lead to increased nozzle clogging and frequent stoppages of the welding process. In addition, the risk of seam rupture and subsidence also increases significantly.
Possible seam defects during semi-automatic welding and how to prevent them
VIEW Welding machine on AliExpress →
Seam defects occur if welding is carried out in violation of the technology and the selection of consumables is carried out incorrectly. In this case, cracks, undercuts, pores in the weld metal, unevenness in width and length, as well as burns, sagging and other defects cannot be avoided. Incorrectly selected following values affect the following factors:
- Wire diameter: with a smaller one, the seam width will be insufficient; with a larger one, it will increase, which will affect the penetration depth.
- Current strength. It will also affect the depth of welding: the larger the value, the deeper the seam, which leads to burns, especially if you are welding thin-walled metal.
- The arc voltage will increase the width of the weld.
- Welding speed. If the value is large, the depth of welding decreases, the seam becomes narrow; if the value is insufficient, burns will occur, the seam will be uneven, and in some cases this will lead to warping of the product.
Figure 5 - Defective seam
Figure 4 - Defective seam
Most often, defects occur when welding is done by a person who does not have the skills to conduct the welding process. Share your experience of semi-automatic welding in the comments to the article.
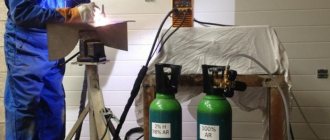
Selection of gas and adjustment of semi-automatic welding machine according to its consumption
The choice of shielding gas is a factor not chosen by the performer at will. The specific gas to be used for a particular welding task is determined by several factors. The most significant of them are the material of the elements being connected, their thickness and additional requirements for the quality of workmanship.
Based on this, we recommend adhering to the following recommendations:
- Carbon dioxide, as the cheapest option for a protective coating for the weld pool, is preferable. But it is worth remembering that despite the deep penetration, its use produces a fairly rough seam. Therefore, this option is not suitable for products with high aesthetic or aerodynamic requirements;
- The combination of argon and carbon dioxide in a 3:1 ratio is excellent for welding thin-walled structures. Spatter formation is minimal. The final seam is of high quality in all respects;
- Aluminum and aluminum alloys require the use of pure argon;
- The optimal protection option for stainless steel connections is argon (98%) with a small addition of carbon dioxide (2%).
You can even monitor the correctness of compliance with this factor visually. If, when forming a seam, it turns out to be porous, this indicates that air enters the work area and interacts with the hot metal. That is, the supply of protective gas must be increased. But only a person with extensive experience can determine excessive gas consumption. As a rule, this is done by ear when working with the same model of semi-automatic machine.
Extra options
In addition to the simplest devices, there are also more advanced models with advanced functionality on the market. Let's look at their capabilities and why additional settings are needed.
Inductance (arc setting)
The most popular function, which is actively being implemented even in budget-class welding, is inductance adjustment. The parameter allows you to control the rigidity of the arc and change the characteristics of the weld. Thus, with minimal inductance, the arc temperature and penetration depth are noticeably reduced, and the weld is more convex. This setting helps to weld thin parts, as well as metals that are sensitive to overheating. At maximum inductance, the melting temperature increases, the bath becomes more liquid, and the penetration depth is maximum. The bead of such a seam is smooth, without bulges. This mode is used for melting thick metal and working in corner joints.
Knowing how the arc reacts to changes in inductance, the welder can independently control the penetration depth and bath temperature to improve the quality of work and create more reliable critical connections.
High/low speed
The switch, which is marked as High/Low, in most models is responsible for more precise adjustment of the wire feed speed. We already know that every semi-automatic machine contains a similar regulator, but if your device can work with 0.6 and 1.4 mm wire, the boundary marks will be very different. That is why, when working with thin material, the toggle switch is set to the High position and the wire generally feeds faster, while the Low position is suitable for thick solder.
Note! Now there are hundreds of products on the market from dozens of different manufacturers, so in order to be sure what functionality a given model has, what this or that regulator and switch is responsible for, you should carefully study the operating instructions.
Setting polarity when welding with a semi-automatic inverter
The polarity factor - direct or reverse - also significantly affects the final result of welding work performed by a semi-automatic machine.
Direct polarity means connecting the burner to the negative terminal, and the connected elements to the positive terminal. This option is used when using flux-cored wire. With this option, the active release of heat is directed to the consumable material. The flux melts well, but active slag formation is observed.
Reverse polarity with the connection of the torch to the positive terminal of the device is used when using solid welding wire.
Tables of semi-automatic welding modes
As mentioned above, the experience and knowledge of experienced welders will allow them to set the correct welding modes without hesitation. But what about those who have only recently begun to master this specialty? There are special tables for setting modes for each type of welding. But you shouldn’t always use ready-made data; you need to experiment in practice and not be afraid to apply your accumulated experience and knowledge.
Table No. 1. Preferred settings for the formation of a butt weld in the lower spatial position, as well as for welding low-carbon and low-alloy steels in a shielding gas environment (carbon dioxide, a mixture of carbon dioxide with oxygen and carbon dioxide with argon) using reverse polarity current.
Table No. 2. Recommended semi-automatic welding modes for forming rotary butt joints using carbon dioxide, a mixture of carbon dioxide and argon; argon with carbon dioxide and oxygen, in relation to a current of reverse polarity.
Table No. 3. Preferred semi-automatic welding modes for forming an overlap weld using carbon dioxide or a mixture of carbon dioxide and argon with a reverse polarity current.
Table No. 4. Preferred parameters of the semi-automatic welding mode for carbon steels in a vertical spatial position with reverse polarity using carbon dioxide or a mixture of carbon dioxide and argon.
Table No. 5. Preferred semi-automatic welding modes for horizontal connections using reverse polarity with protective carbon dioxide.
Table No. 6. Recommended semi-automatic welding modes for forming ceiling seams with reverse polarity using carbon dioxide.
Table No. 7. Recommendations for setting semi-automatic welding parameters in a carbon dioxide environment when working with carbon steels.
In conclusion, I need to give one piece of advice. If you unconsciously copy the average parameters of equipment settings given in tables and reference technical literature, you may encounter some inaccuracies and even typos. It is important for a welder not only to blindly duplicate recommendations, but also to approach each specific task creatively, with the necessary scrupulousness and increased attention to detail. This will be a guarantee of high-quality work.
How to set up a semi-automatic welding machine for welding aluminum structures
Aluminum structures, due to the specifics of the material, are the most difficult to weld and require a special approach. But if you follow the recommendations, there will be no problems connecting such elements. Among these features:
- Welding work must be performed with reverse polarity. This option more effectively destroys the oxide film on the surface of structures;
- The feeding mechanism must have four rollers to feed consumables without noticeable crushing of the soft metal;
- The diameter of the wire used should be smaller in comparison with the diameter of the torch tip. Due to the impressive expansion during heating, failure to comply with this condition will lead to the wire getting stuck in the torch;
- The consumable supply channel in the burner should be Teflon to reduce friction.
By following these recommendations, you will get an optimal welding result that will require minimal modification.
Settings schedule
What are the benefits of these actions? You draw up a working diagram that is applicable specifically to your device. For clarity, it’s good to draw a graph indicating your settings.
As a sample, you can use the self-tuning schedule for a semi-automatic welding machine shown in the illustration above.
You are familiar with the capabilities of your welding machine, you are aware of the minimum and maximum allowed values of current and voltage for the desired mode.
When performing subsequent work, you will be able to easily understand the details of the welding process and create the appropriate settings.
Welding speed
In semi-automatic welding, the speed of movement of the torch is set by the welder. It is necessary to choose a speed at which high-quality formation of the weld is obtained. Thick-walled structures are usually welded at high speed, forming narrow seams. At high welding speeds, it is necessary to ensure that the end of the wire and weld metal does not oxidize through the exit from the gas protection zone. At low welding speeds, the weld width increases due to the expansion of the weld pool. The ability to form pores increases.
How to prepare a semi-automatic machine for operation
First, the inverter semi-automatic welding machine needs to be filled with welding wire by installing the coil into the machine. Using a special pulling mechanism, you need to adjust the degree of wire tension.
In the case when a coil of a slightly larger diameter than necessary is used, a special adapter should be used. The wire is removed from the mechanism by about 15 cm, after which its excess length is cut off.
Next, you need to install a gas cylinder and check whether the system is equipped with fuses. You should definitely pay attention to whether the correct semi-automatic welding mode was selected, as well as whether the gas in the cylinder is suitable for welding a particular metal.
Tabular data values for welding work
There are certain regulations developed empirically, and the table of welding currents for semi-automatic machines will help you make the correct adjustment and setup of the equipment. Below we provide a table that will help you correctly configure the unit based on the specific conditions of working with metal surfaces
| Thickness of welded parts, mm | Wire diameter, mm | Voltmeter readings, V | Ammeter indicators, A | Additive feed rate, m/h |
| 1 -1,5 | 0,8 | 20 | 70-80 | 150 |
| 2 | 1 | 20 | 150-170 | 150 – 180 |
| 3 | 1,2 | 21 | 180-230 | 180 – 240 |
| 4 – 5 | 1,2 | 25 | 200-300 | 350 – 450 |
| 8 | 1,6 | 30 | 300 | 550 – 650 |
This data is quite enough for you to decide how to set up the Resanta semi-automatic welding machine for welding. In any case, these are the recommended settings, and you can adjust more precise settings directly in the workflow.
Gas supply speed
Gas supply setting
Although this parameter is not important and significant, nevertheless, you must control the required gas flow according to the indicators of the reducer, which is installed on the gas-cylinder equipment. It is recommended to set the general gas consumption mode at 6-16 liters. A more precise flow rate will need to be set only if you use a certain thickness of metal in your work.
How many volts do you need to weld?
Now it remains to decide how to configure the Telwin Bimax semi-automatic welding machine using the voltage table data. As you can see, the thicker the metal for welding and cutting, the higher the voltage of the equipment. Using the driven data, the equipment can be configured to efficiently melt and cut metal. Thus, by correctly setting the voltage, we will effectively melt and heat the metal. The only difficulty is if we use non-standard design dimensions in our work, which differ not only in thickness, but also in the main characteristics of the metal connections.
Semi-automatic voltage selection
For highly alloyed materials and non-ferrous metals, you can find data on the Internet. Some users say in bewilderment why a large voltage range from 1 to 10 is indicated for the same material. In this case, it is necessary to be guided by the technical data of the equipment manufacturer, as well as the specifics of welding work.
Wire feed speed mode
The high-speed wire feeding mode is an auxiliary solution to the question of how to set up a semi-automatic welding machine Svarog. In this case, it is necessary to take into account the feed speed together with the strength of the current used. Both slave parameters are interconnected. The higher the current, the faster the wire feeds. At the same time, the quality of the high-speed feeding mode may drop for one reason if you see strong fusion effects or incorrect shear on the seam. In this case, it is necessary to adjust up or down depending on the further effect of the welding equipment.
Wire feed speed adjustment
Today, the industry produces automatic modes for high-speed wire feeding, but such units, as a rule, are designed for professional work by a welder. For household versions of welding equipment, you will have to solve the problem of how to set up a semi-automatic welding machine Lorch yourself, more precisely, by selecting the appropriate mode on the panel part of the semi-automatic welding device.
Additional fine tuning options
In addition, there are options for additional configuration of equipment adjustment, which involve the implementation of the following options:
- Inductance. This parameter allows you to adjust the basic rigidity of the arc and achieve an effective indicator of seam quality. This parameter is suitable for welding with thin steel sheet materials.
- High/Low. Wire feed speed switches are “fast-slow”, in contrast to the standard wire feed speed mode in the drum. Please note that this functionality is provided in many models of welding equipment, so you will have to carefully study the features of using this effect in practice.
Conclusion
The semi-automatic device has become an indispensable assistant, both in everyday life and in industrial production. To accurately set up the equipment, you need to carefully study the instructions and find the optimal solution for setting up the working equipment in accordance with the criteria for welding and cutting metal. Never be afraid to experiment, but at the same time, always remember fire and electrical safety precautions. Based on the results of experiments, it is possible to construct the necessary adjustment mode for a semi-automatic welding machine in operation.