There are several electrical tools that are constantly needed around the house. One of these can be called a sharpening machine or emery machine. The unit is useful not only for purely male needs, such as sharpening a drill, removing burrs or chamfering, but in many ways it performs everyday tasks. This includes sharpening knives and tidying up garden tools. The simplest, but not the cheapest, is to buy a ready-made machine. There is another option - to make emery with your own hands. To do this, you don’t need to buy expensive parts or have engineering skills.
The advantages of making a homemade emery with your own hands are obvious: the design will be designed to suit you, the materials here can be steel scraps that always get in the way underfoot, the engine can be taken from an old washing machine - in general, with minimal financial and physical costs you can really get an excellent thing.
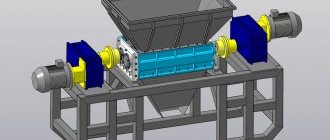
Emery from a washing machine motor
What's good about Soviet washing machines is that they were equipped with reliable electric motors. Another advantage of using such motors for a sharpener is the low power and shaft speed, and this is important for an emery grinding wheel, which at high speeds can simply crack upon contact with the tool being processed. Good weight and power supply from a 220 V network are also convenient: in the first case, the emery will be stable without the use of additional attachments, the second indicator saves the master from the need to assemble the starting unit for the emery: it can simply be taken from the washing machine.
Sandpaper from a washing machine engine is in no way inferior to factory models. And if in the case of Chinese technology one can still doubt the longevity of the product, then a homemade design, where every detail has passed through its own hands, will indeed be an indispensable assistant for many years.
What you need
To make emery with your own hands, you will need certain tools and materials. The simplest design eliminates the need for welding and turning, which allows it to be manufactured by almost anyone. Set of necessary tools:
- a jigsaw or a regular wood hacksaw (it’s better if the hacksaw is a packaging one);
- electric drill with a set of drills;
- screwdriver or shaped screwdriver;
- Angle Grinder;
- soldering iron 100 W;
- small chisel;
- a square with one of the angles at 90 degrees;
- calipers;
- drawing compass;
- drawing pencil and tape measure;
- metal scissors;
- bench vise;
- a piece of 150 grit sandpaper.
Set of necessary materials and equipment:
- model of a Soviet electric motor from a washing machine with capacitors;
- toggle switch for loads up to 1.0 kW;
- cord with socket 2 meters long;
- small sharpening stone with a mounting hole diameter of 32 mm;
- chipboard slab measuring 0.5x0.5 meters and thickness 0.02 meters;
- multilayer plywood measuring 0.15x0.15 meters and thickness 0.01 meters;
- timber measuring 60x60 mm and height 0.2 meters;
- wood screws 50 and 20 mm with a press washer;
- galvanized sheet 0.5x0.5 meters in size and 1 mm thick;
- rubber stoppers for antibiotics in the amount of 4 pcs.
You should not take an electric motor from an automatic washing machine if it is high-speed. The revolutions of the emery should not exceed 1500 per minute, otherwise it will be dangerous to work on such a machine.
Which engine to choose
As mentioned above, the parameters of the washing machine motor must meet certain criteria. Taking the first engine you come across and building an emery structure around it is not very practical if in the end it turns out that it will be impossible to work on such a machine. Therefore, craftsmen with practical experience recommend proceeding from the following points when choosing an engine for making emery with your own hands:
- the most common models among Soviet engines that are used to make emery are the motors of such washing machines as “Malyutka”, “Sibir”, “Volga” or “Vyatka”;
- the recommended engine shaft rotation limit is 1500 rpm;
- It is advisable to take the power no lower than 100 Watts and no higher than 1000 Watts, the most famous motors have a power within 400 Watts;
- if the engine has support legs with holes for fasteners, this is welcome;
- The engine of the future emery must be designed for a voltage of 220 Volts.
When removing the engine from the washing machine, it is important to remove the entire starting circuit along with it, so as not to separately select and buy capacitors for the emery. If the engine does not have support legs, this will not prevent it from being installed in the structure. It is important here that it has studs, by means of which the body of the unit is tightened: by attaching it to these studs, the motor will be installed on the emery.
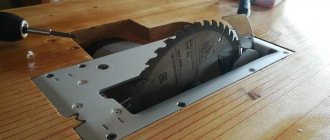
How and from what to make security elements
The protective casing in the emery is an extremely important design element. It serves as a protection against possible injuries when the grindstone breaks, and also prevents sparks from getting into the eyes and onto nearby objects. Also, if you take motors from washing machines, then in some of them the stator winding may be open and it must be protected from abrasive and other foreign particles. It is impossible to seal the engine housing, as this disrupts the cooling mode of the unit and it may fail. In this case, the protective casing also plays an important role, simultaneously protecting the emery motor.
The most convenient way to make a protective casing with your own hands is to make it from galvanized steel. It is not necessary to make it round, following the contours of the working grinding wheel; it is easier to make it in the form of a truncated cone, where the upper part is slightly larger in size than the diameter of the stone. The easiest way to attach such a casing is not to the engine, but directly to the emery support on which the motor is mounted.
According to the rules, the casing must cover the working tool on all sides, leaving open only a small window in the working area, namely part of the end and side planes of the emery circle.
Connecting (checking) the motor
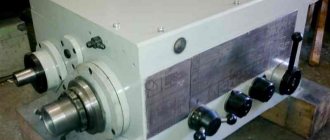
Naturally, before you start assembling something, the electric motor must first be connected and tested. In old washing machines, there are two versions of motors: an older and high-quality one, it has a closed housing with an impeller, with two supply terminals, and a newer one - four terminals, no impeller, cooling occurs through holes in the front and back, through which the windings are visible.
The old version does not require any capacitors for starting - the starting winding is cleverly connected and disconnected inside the engine using a special mechanism. Thanks to this, no connection difficulties should arise: both outputs are connected to a 220 volt network. The disadvantage of such a motor is that the direction of rotation of the shaft is preset by an internal connection and cannot be changed. Typically the direction is clockwise and therefore it will be necessary to use a left hand thread to attach the stone.
The newer version has four terminals of two windings: working and starting. You can distinguish them using a multimeter: the resistance of the working winding is about 10 Ohms, the starting winding is about 40 Ohms. Perhaps the resistances will differ from those indicated, but only slightly. The starting winding must be connected through a 4-5 µF capacitor for a voltage of at least 400 V. I have come across composite capacitors for similar motors: two connected in series, 10 µF each at 300 V. That is, in this way the maximum permissible operating voltage of the finished capacitor was raised. Using a composite capacitor of two with low voltages (at least 300 V) is possible, but not advisable. Capacitors should be non-polar!
You can check the engine without capacitors and starting winding at all: voltage 220 V. supplied directly to the working winding. With this connection, the motor will start without load in any direction. To set the direction of shaft rotation, you need to connect the starting winding and capacitor. For emery, you need to set the direction counterclockwise. The connection diagram is shown below, if the shaft rotates clockwise, you need to change the connection of the starting winding.
In many publications on the network I have seen a statement that the starting windings do not need to be connected at all, and the direction of rotation must be set manually when starting. Allegedly, if the starting circuit is used, the engine will burn out. I can only explain these speculations in one way - one wrote something stupid, and the rest were copied from the first. I can say with confidence: the starting winding can and should be connected through a 4-5 uF capacitor, the starting circuit should always be connected, without any additional buttons. And if the motor is working properly, such a connection is safe and completely harmless for it.
DIY emery assembly steps
Step-by-step assembly of electric emery with your own hands. Attaching the motor to the base of the machine:
- The base of the machine is a 50x50 cm chipboard board. The engine is placed in its middle part and the dimensions of the engine are outlined with a pencil in order to know approximately where it will be installed.
- The engine typically has four studs or long screws that hold the engine housing together. Two adjacent studs will be the points where the support brackets will be screwed.
- Emery support brackets in the shape of the letter “P” are made from two pieces of galvanized steel 5 cm wide and such a length that the distance between the legs is equal to the distance between the head and the screw nut, and the height of the legs is approximately 6 cm. Holes are drilled in the legs of each bracket for a screw, in the long part of the bracket there are two holes for self-tapping screws.
- Unscrew the two adjacent screws, put the brackets on the petals of the body covers and put the screws back in place.
- The staples are turned so that their long sides lie with each other in the same plane, and the screws are tightened.
- The engine is installed in the previously outlined location on the brackets and screwed with self-tapping screws to the emery plate.
Sharpening device from a washing machine: selecting a motor for emery
In terms of its power and configuration, the electric motor from old-style washing machines is ideal for portable homemade emery. As a rule, motors from units such as Siberia, Volga or Vyatka are used for this purpose. Approximate characteristics should be:
- mains voltage - 220 V;
- power - up to 370 W;
- rotation speed - no more than 3 thousand rpm.
Attention! If you construct an emery from a more powerful engine, a significant number of revolutions can simply break the whetstone during operation.
The parameters of the engine are necessarily indicated on its body. To make emery, a device with a power of 100-150 W and 1-1.5 thousand rpm is sufficient. It will cope well with household sharpening of repair equipment and kitchen utensils.
Old engine
A faster grinder (for example, an emery machine based on common engines with 2.8 thousand rpm) is appropriate to use for grinding or polishing parts. In this case, the emery stone should be stronger, and the main fastening element, the flange, should be of better quality and stronger.
Advice. To assemble emery from a motor with your own hands, you can use both a 1-phase and a 3-phase motor.
Electro-emery from an angle grinder
An angle grinder is not very suitable as a base engine for creating sandpaper with your own hands. This is due to the high speed of its working shaft. Such a tool will be dangerous to use and will be suitable mainly for simple sharpening operations, for example, to sharpen the blade of a kitchen knife.
It is advisable to use light stones with a small diameter as working stones for these purposes. It is better to order a flange for attaching such a stone to an angle grinder from a turner: it is very important here that it is perfectly balanced on the engine shaft.
Before working on such a machine, it should be well secured with clamps to the work table. During the sharpening operation, it is important to use thick clothing that will reliably cover all parts of the body from possible injury.
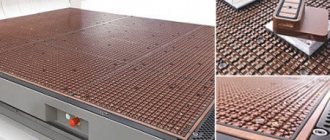
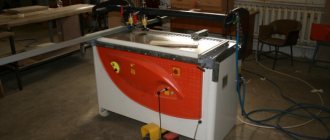
Result of work
The sharpener is ready.
The result is a sharpener like this, there are a lot of uses; if desired, you can make polishing wheels, emery wheels, etc.
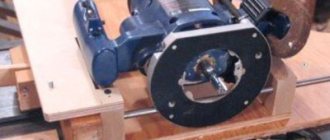
How to make a flange with your own hands?
The most difficult task of the entire project was attaching the sharpening attachment to the motor shaft of the washing machine. The shaft does not have the required threads, and its diameter does not fit the hole in the stone. To eliminate the discrepancy, it is necessary to make an attachment for the electric motor.
Homemade sandpaper from a drill
You can also make a sharpening machine from a regular electric drill. In this case, it is better to use a drill that has a speed controller for the motor shaft, then you can set the rotation to a safe speed. It is advisable to order a flange for fastening the stone from a turner and have it made with a shank so that you can attach the flange directly to the chuck of an electric drill.
It is convenient to use such a machine if you have a vice - you just need to carefully clamp the drill in it. Another option is to mount the drill on a workbench so that the chuck protrudes over the edge of the table. This homemade emery is much safer than emery from an angle grinder, and it is very easy to make with your own hands.
Dear site visitors, share in the comments what you think about creating emery with your own hands and what good designs there are for such a homemade machine.
Electric grinders, or, as people say, emery stones, are collected in a great variety from everything that falls to hand; they are often made from motors from washing machines.
I also decided to make myself a homemade machine for sharpening drills, knives, etc. I have a Chinese sharpener, but its quality is